Deliciously Low FODMAP

Inspire yourself with hundreds of delicious low FODMAP recipes, tips, and tools, and enjoy the abundance that is yours even when you have IBS.
Use the buttons and filters to find something specific or browse the complete collection for inspiration.
Discover a treasure trove of recipes with my FREE recipe club! Get new ideas delivered straight to your inbox every week.
Deliciously Low FODMAP is a trademark of IBS Game Changer, LLC
Filter to find Recipes and Tools
More Filtering Options
- All 735
- Appetizer 50
- BBQ 46
- Bowl 32
- Breakfast 58
- Cocktails 13
- Collection 1 58
- Collection 10 27
- Collection 11 30
- Collection 12 27
- Collection 13 31
- Collection 14 29
- Collection 15 31
- Collection 16 34
- Collection 17 31
- Collection 18 33
- Collection 19 36
- Collection 2 32
- Collection 20 33
- Collection 21 33
- Collection 22 40
- Collection 23 17
- Collection 24 1
- Collection 3 28
- Collection 4 29
- Collection 5 30
- Collection 6 32
- Collection 7 31
- Collection 8 31
- Collection 9 32
- Condiments 6
- Crock Pot 4
- Dessert 108
- Diabetes Game Changer Exception Protocol Contains Alcohol 11
- Diabetes Game Changer Exception Protocol Contains Flour 109
- Diabetes Game Changer Exception Protocol Contains Flour AND Sugar 77
- Diabetes Game Changer Exception Protocol Contains Sugar 49
- Diabetes Game Changer First Four Weeks 368
- Dinner 335
- Drink 8
- Easter 1
- Free Guide 17
- Gluten-free 596
- Gut Microbiome 2
- Guthealth 3
- Holidays 69
- IBS Triggers 4
- Keto Friendly 127
- Lactose-Free 175
- Low FODMAP Diet 721
Chocolate sheet cake with peanut butter ganache (low FODMAP)
15 Minutes prep • 30 Minutes cook/finish • Gluten-free • Low FODMAP • Makes 12 pieces
15 Minutes Prep • 30 Minutes cook/finish • Gluten-free • Low FODMAP • Makes 12 pieces • Ok to make ahead: Steps 1 - 5
It’s National Peanut Butter Day, so of course, I couldn’t resist bringing this favorite recipe back to you! If you love chocolate and peanut butter, you’re really going to LOVE this cake! It’s the perfect combination of moist chocolate cake with creamy peanut buttery chocolate ganache. The peanut butter cup topping brings it all together. My mother-in-law tells me this is her all-time favorite cake and that’s saying something coming from her!

Ingredients: Cake
2 cups white sugar
2 cups gluten-free flour (I used 1 ½ cups King Arthur Measure for Measure and ½ cup gfJule’s All-Purpose Flour)
½ teaspoon salt
1 stick butter
½ cup vegetable oil (I used Canola oil)
1 cup Water
¼ cup unsweetened cocoa powder
½ cup lactose-free whole milk mixed with ½ tablespoon of white vinegar (to sour)
2 Eggs
1 teaspoon baking soda
1 teaspoon Vanilla
10 - 12 Justin’s mini dark chocolate mini peanut butter cups, chopped
Ingredients: Ganache
7 ounces semi-sweet chocolate chips (I used Guittard)
7 ounces milk chocolate chips (I used Guittard)
2/3 cup heavy cream (or lactose-free half and half)
2/3 cup creamy peanut butter
Directions: Cake
(1) Prepare: Preheat over to 350 degrees F and grease and flour an 11” x 17” rimmed baking sheet. Combine milk and vinegar and set aside.
(2) Combine dry ingredients: In a mixing bowl combine sugar, flour, and salt and set aside.
(3) Blend the cocoa butter: In a saucepan, melt the butter with the water, oil, and cocoa powder and heat just until it starts to boil.
Pour hot mixture over flour mixture and stir well to combine.
(4) Add the eggs and dry ingredients: Beat the eggs together with the soured milk and then stir into the chocolate mixture until well combined. Add baking soda, and vanilla and stir to combine.
(5) Bake: Pour into the prepared pan and bake for 20 minutes. Remove from oven and let cool.
Directions: Ganache
(1) Melt the chocolate: In a microwave-safe bowl, melt together the semi-sweet and milk chocolate chips with the cream or half and half until melted and smooth.
(2) Add the peanut butter: Swirl in the peanut butter and stir until smooth, cooled, and slightly thickened. Spread the ganache over the cooled cake reaching all the edges.
(3) Finish: Sprinkle with chopped peanut butter cups.
(4) Plate and serve: Allow the cake to set at least one hour in the fridge or two hours at room temperature. Then, slice and serve.
Eat and enjoy every bite because you can!
Pro Tip: Want to save time? Use a good gluten-free chocolate cake mix (such as Bob’s Red Mill Gluten-free chocolate cake or King Arthur gluten-free chocolate cake mix). But make the chocolate peanut butter ganache from scratch. It’s the game-changer here.
This post may contain links for you to easily purchase items listed on the page. In some cases, we have provided a special discount code for IBS Game Changers so be sure to use it when you purchase an item to get the discount that has been arranged just for you! As an Amazon Associate, I earn a commission from qualifying Amazon purchases.
More Deliciously Low FODMAP™ desserts you might enjoy


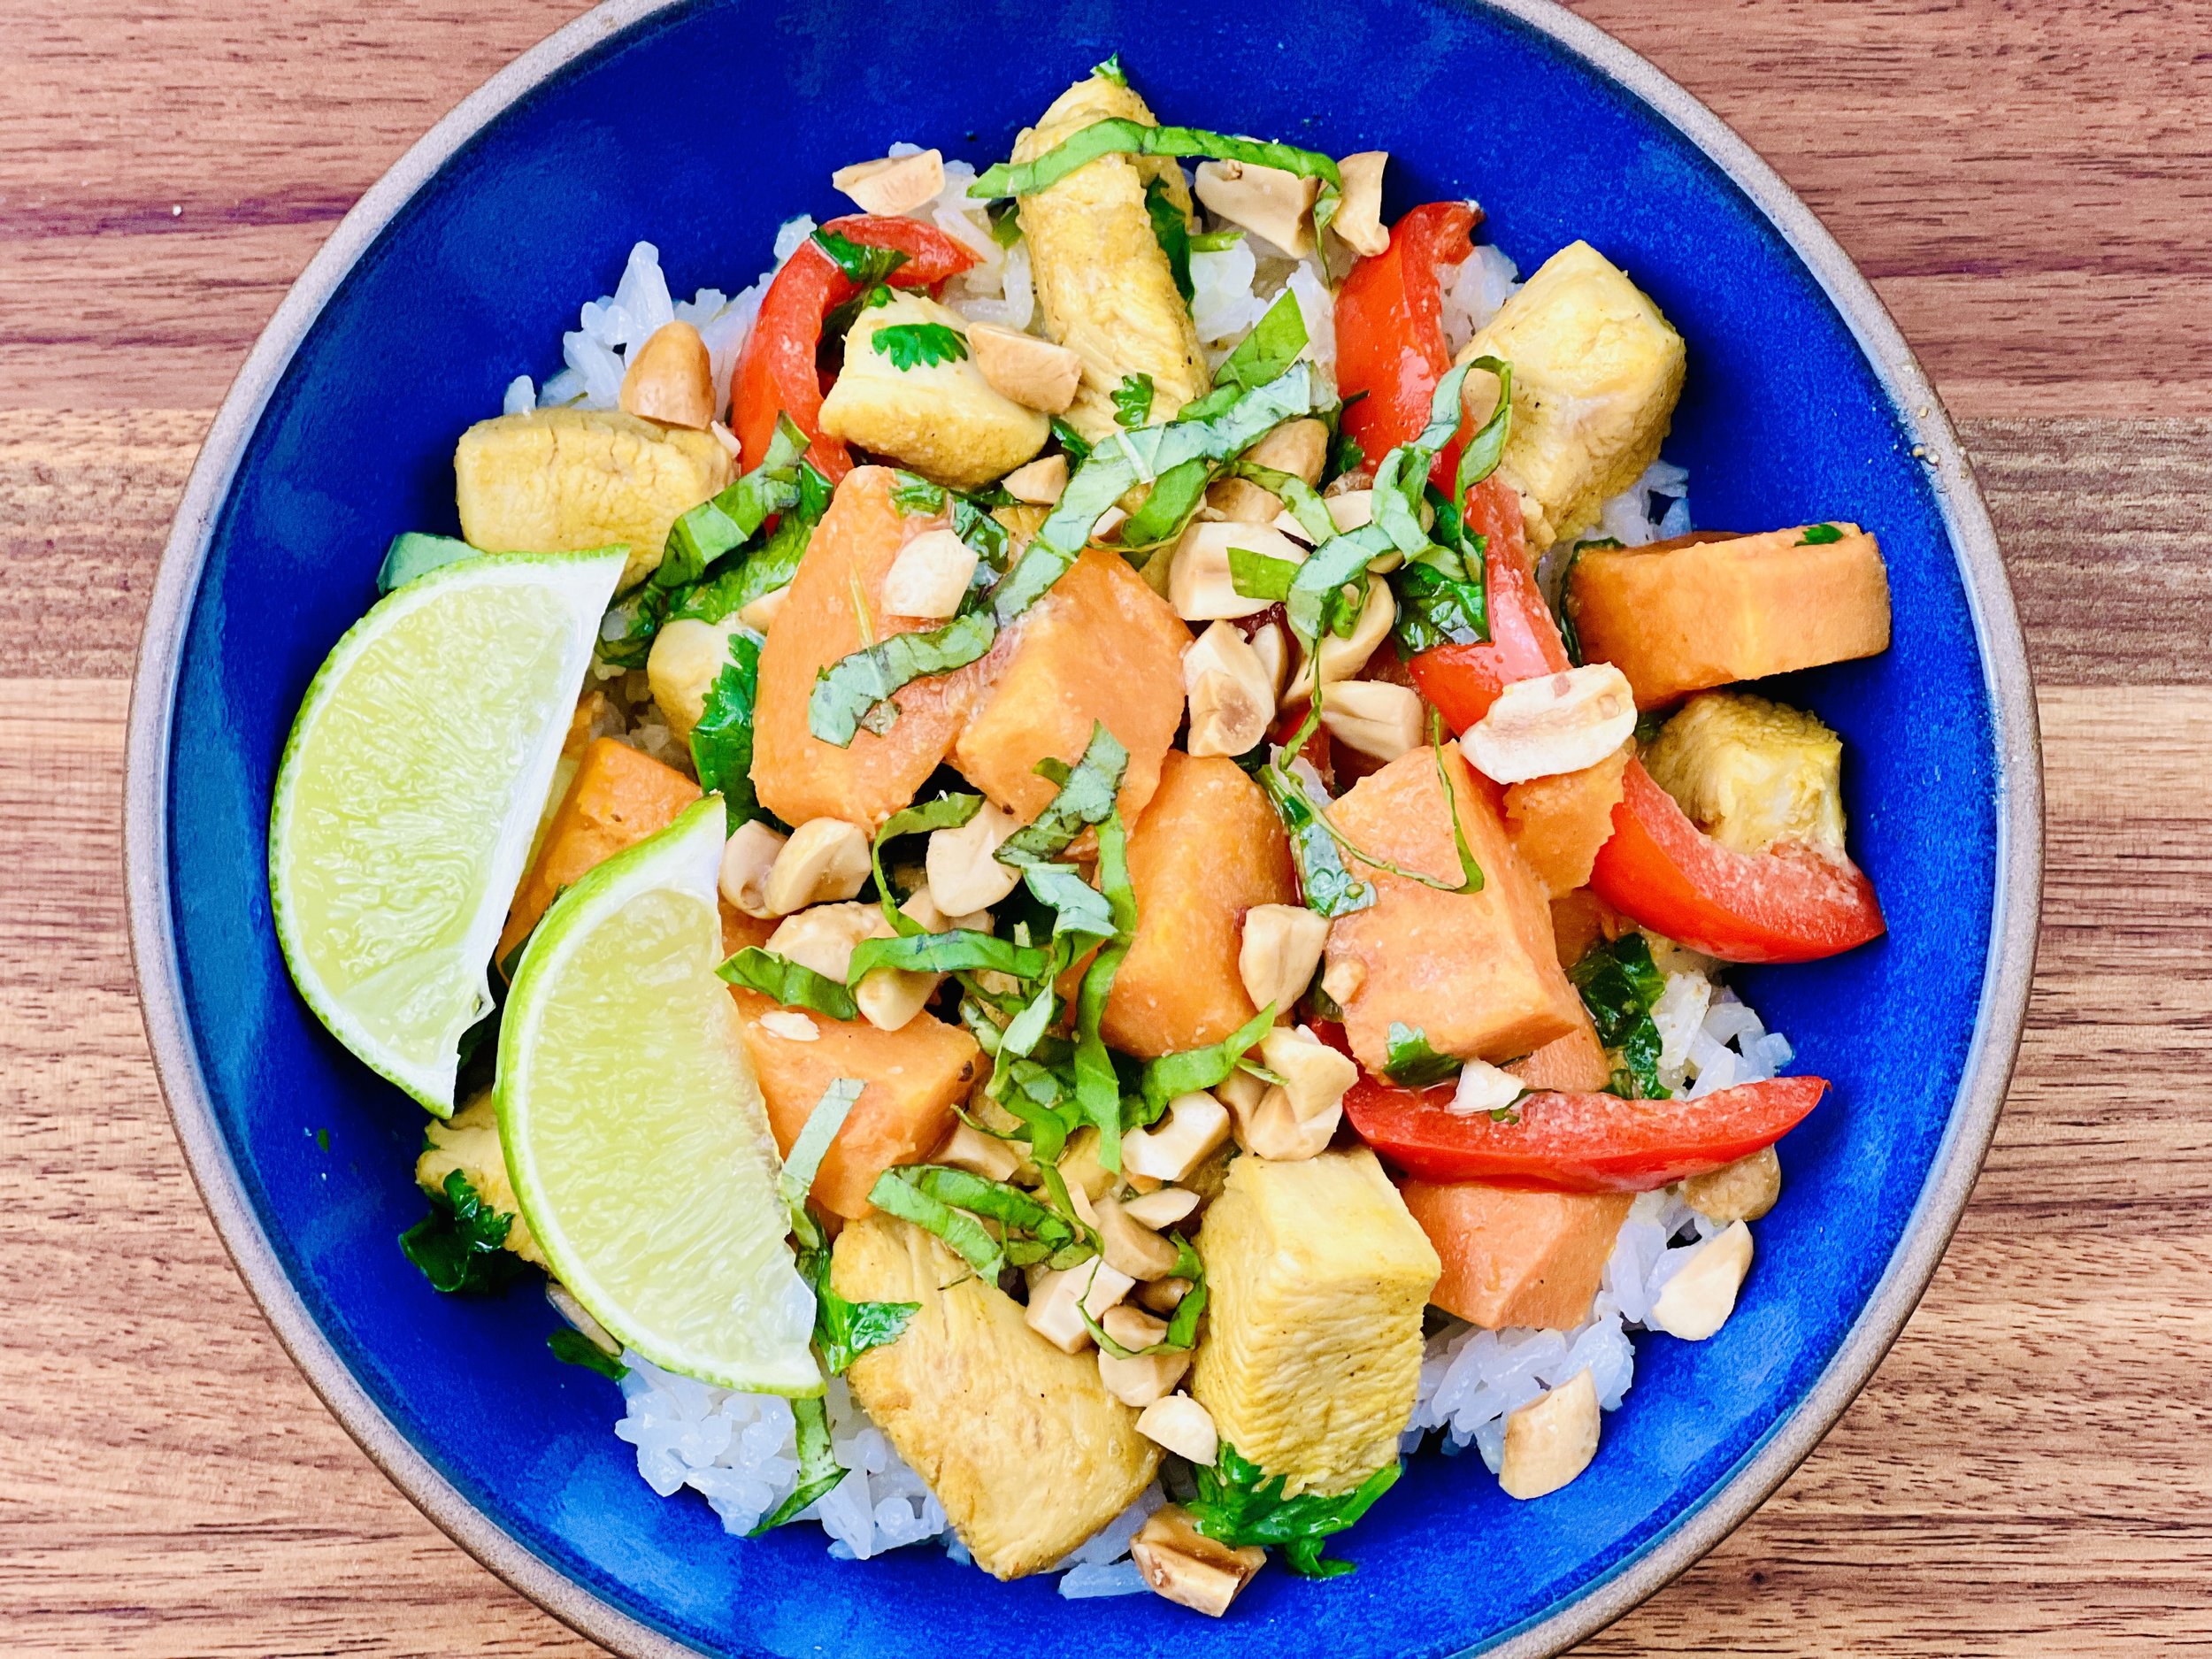
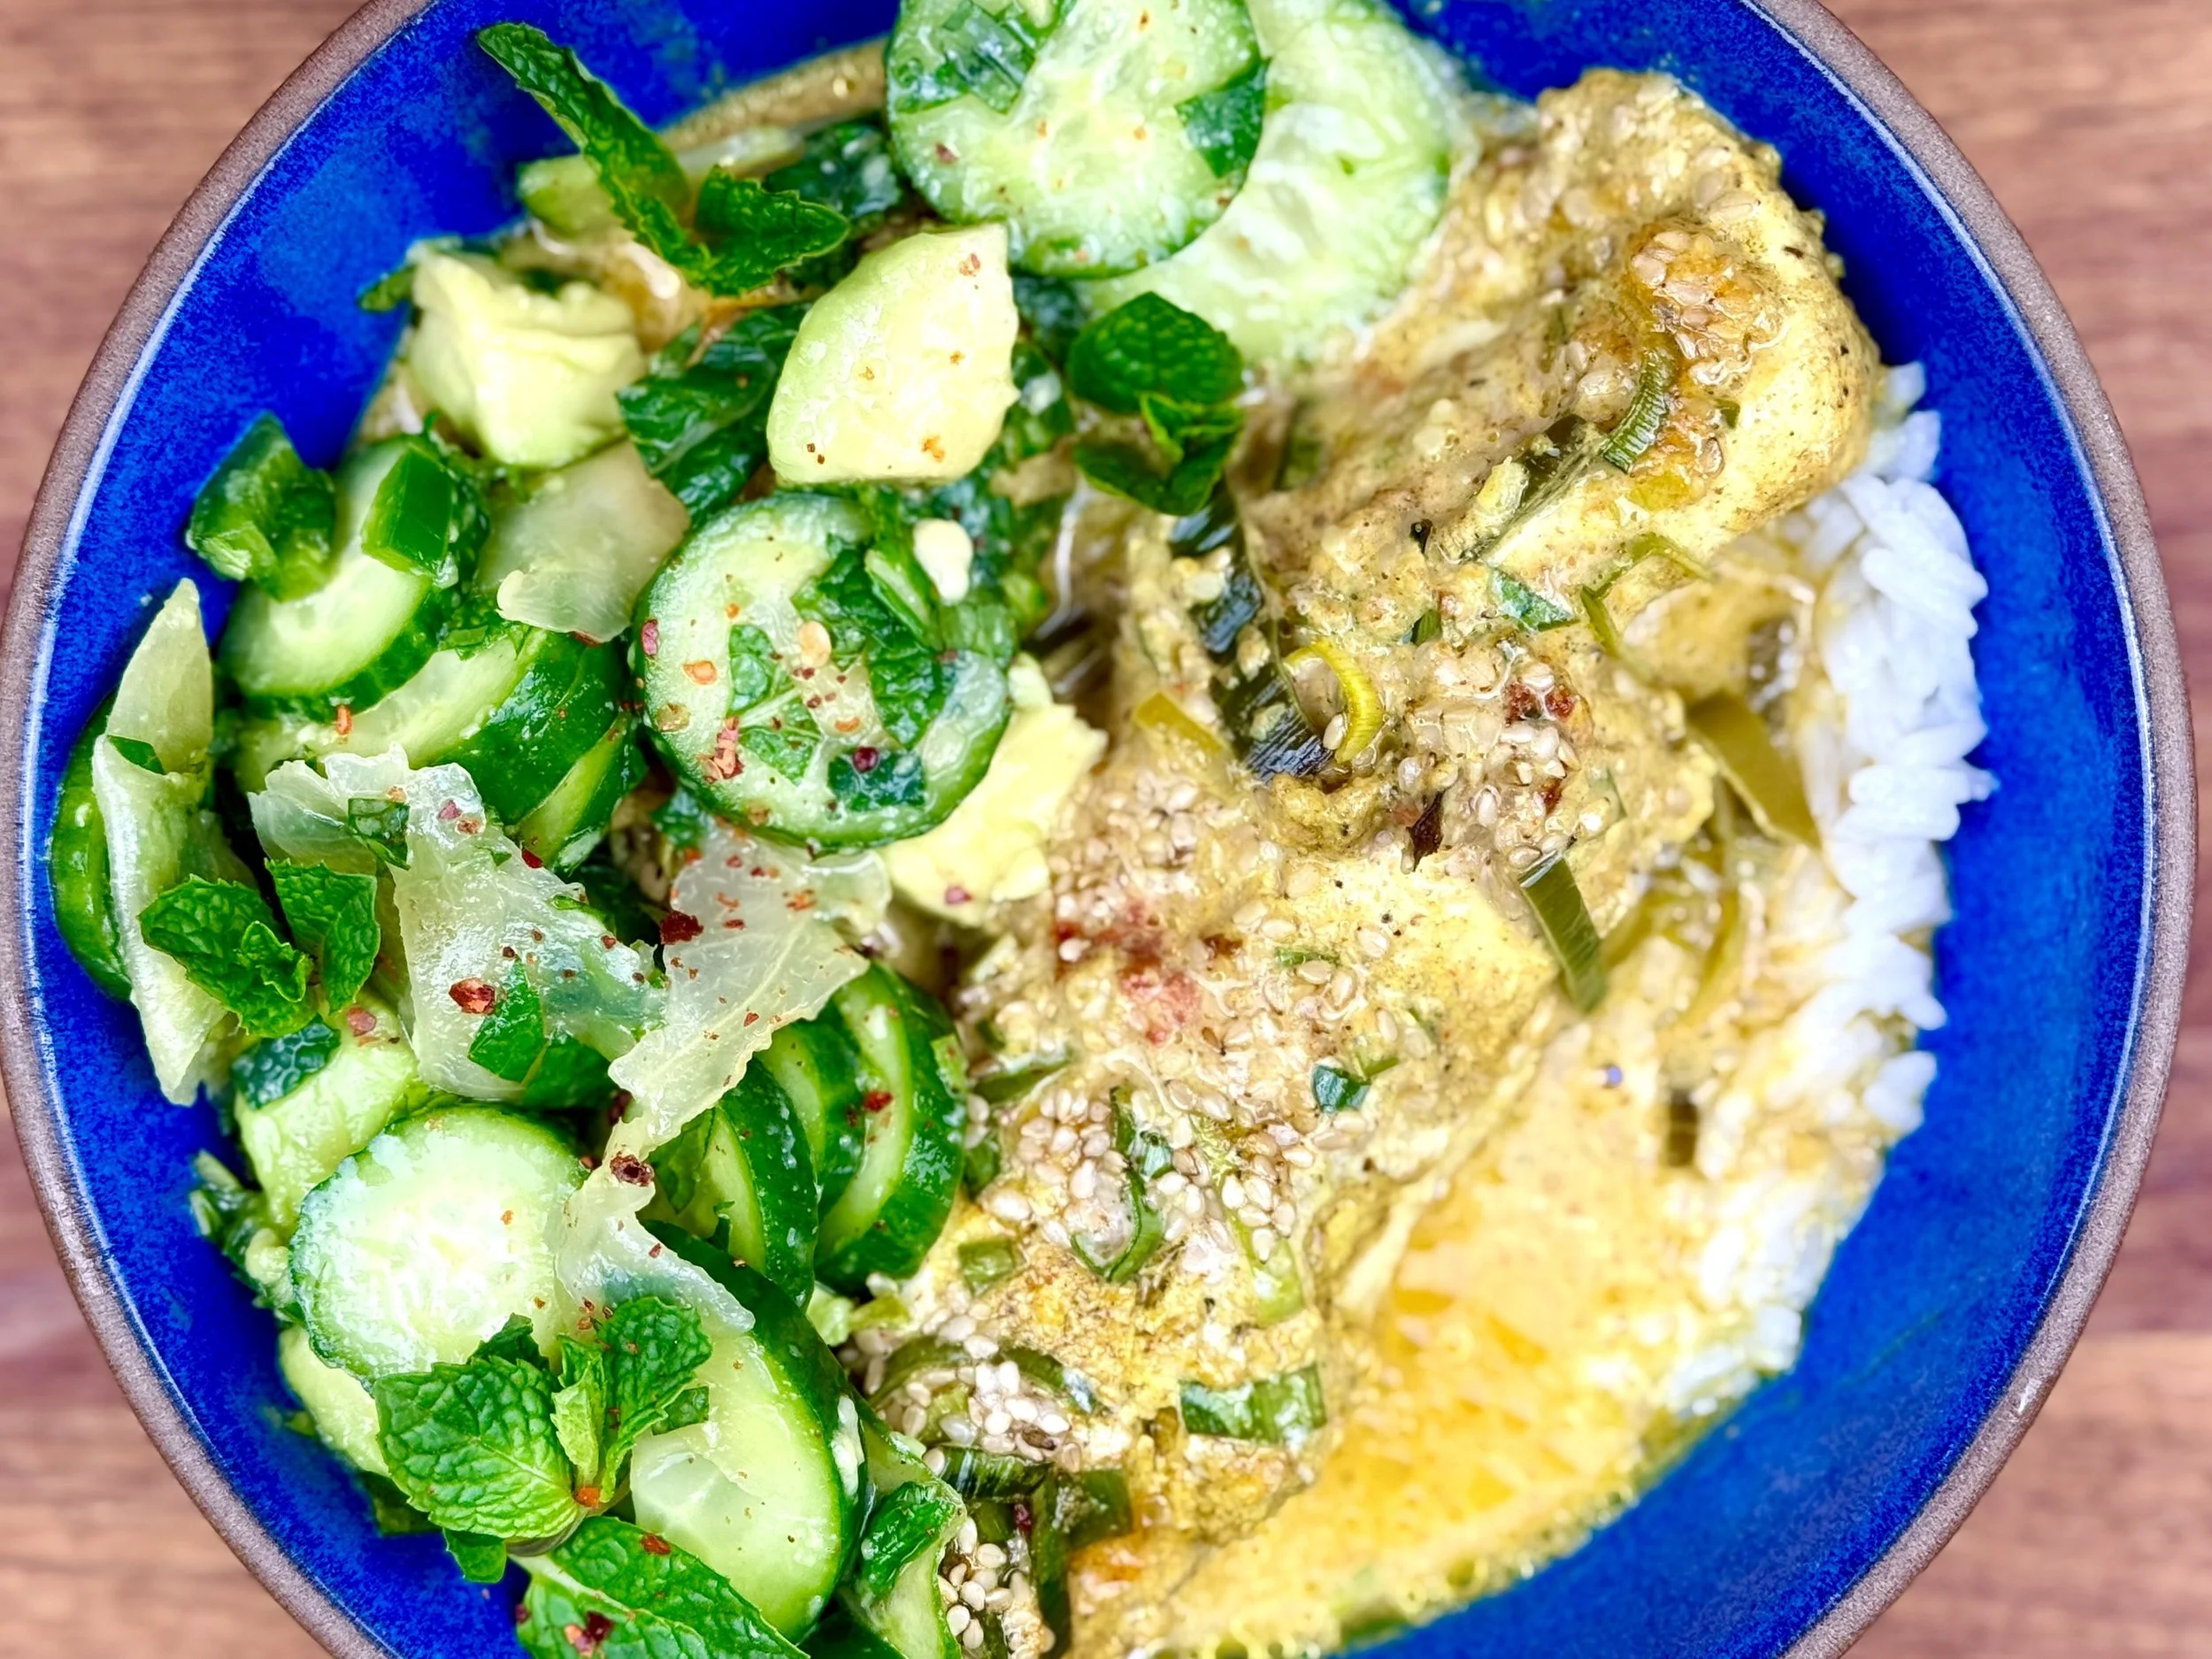
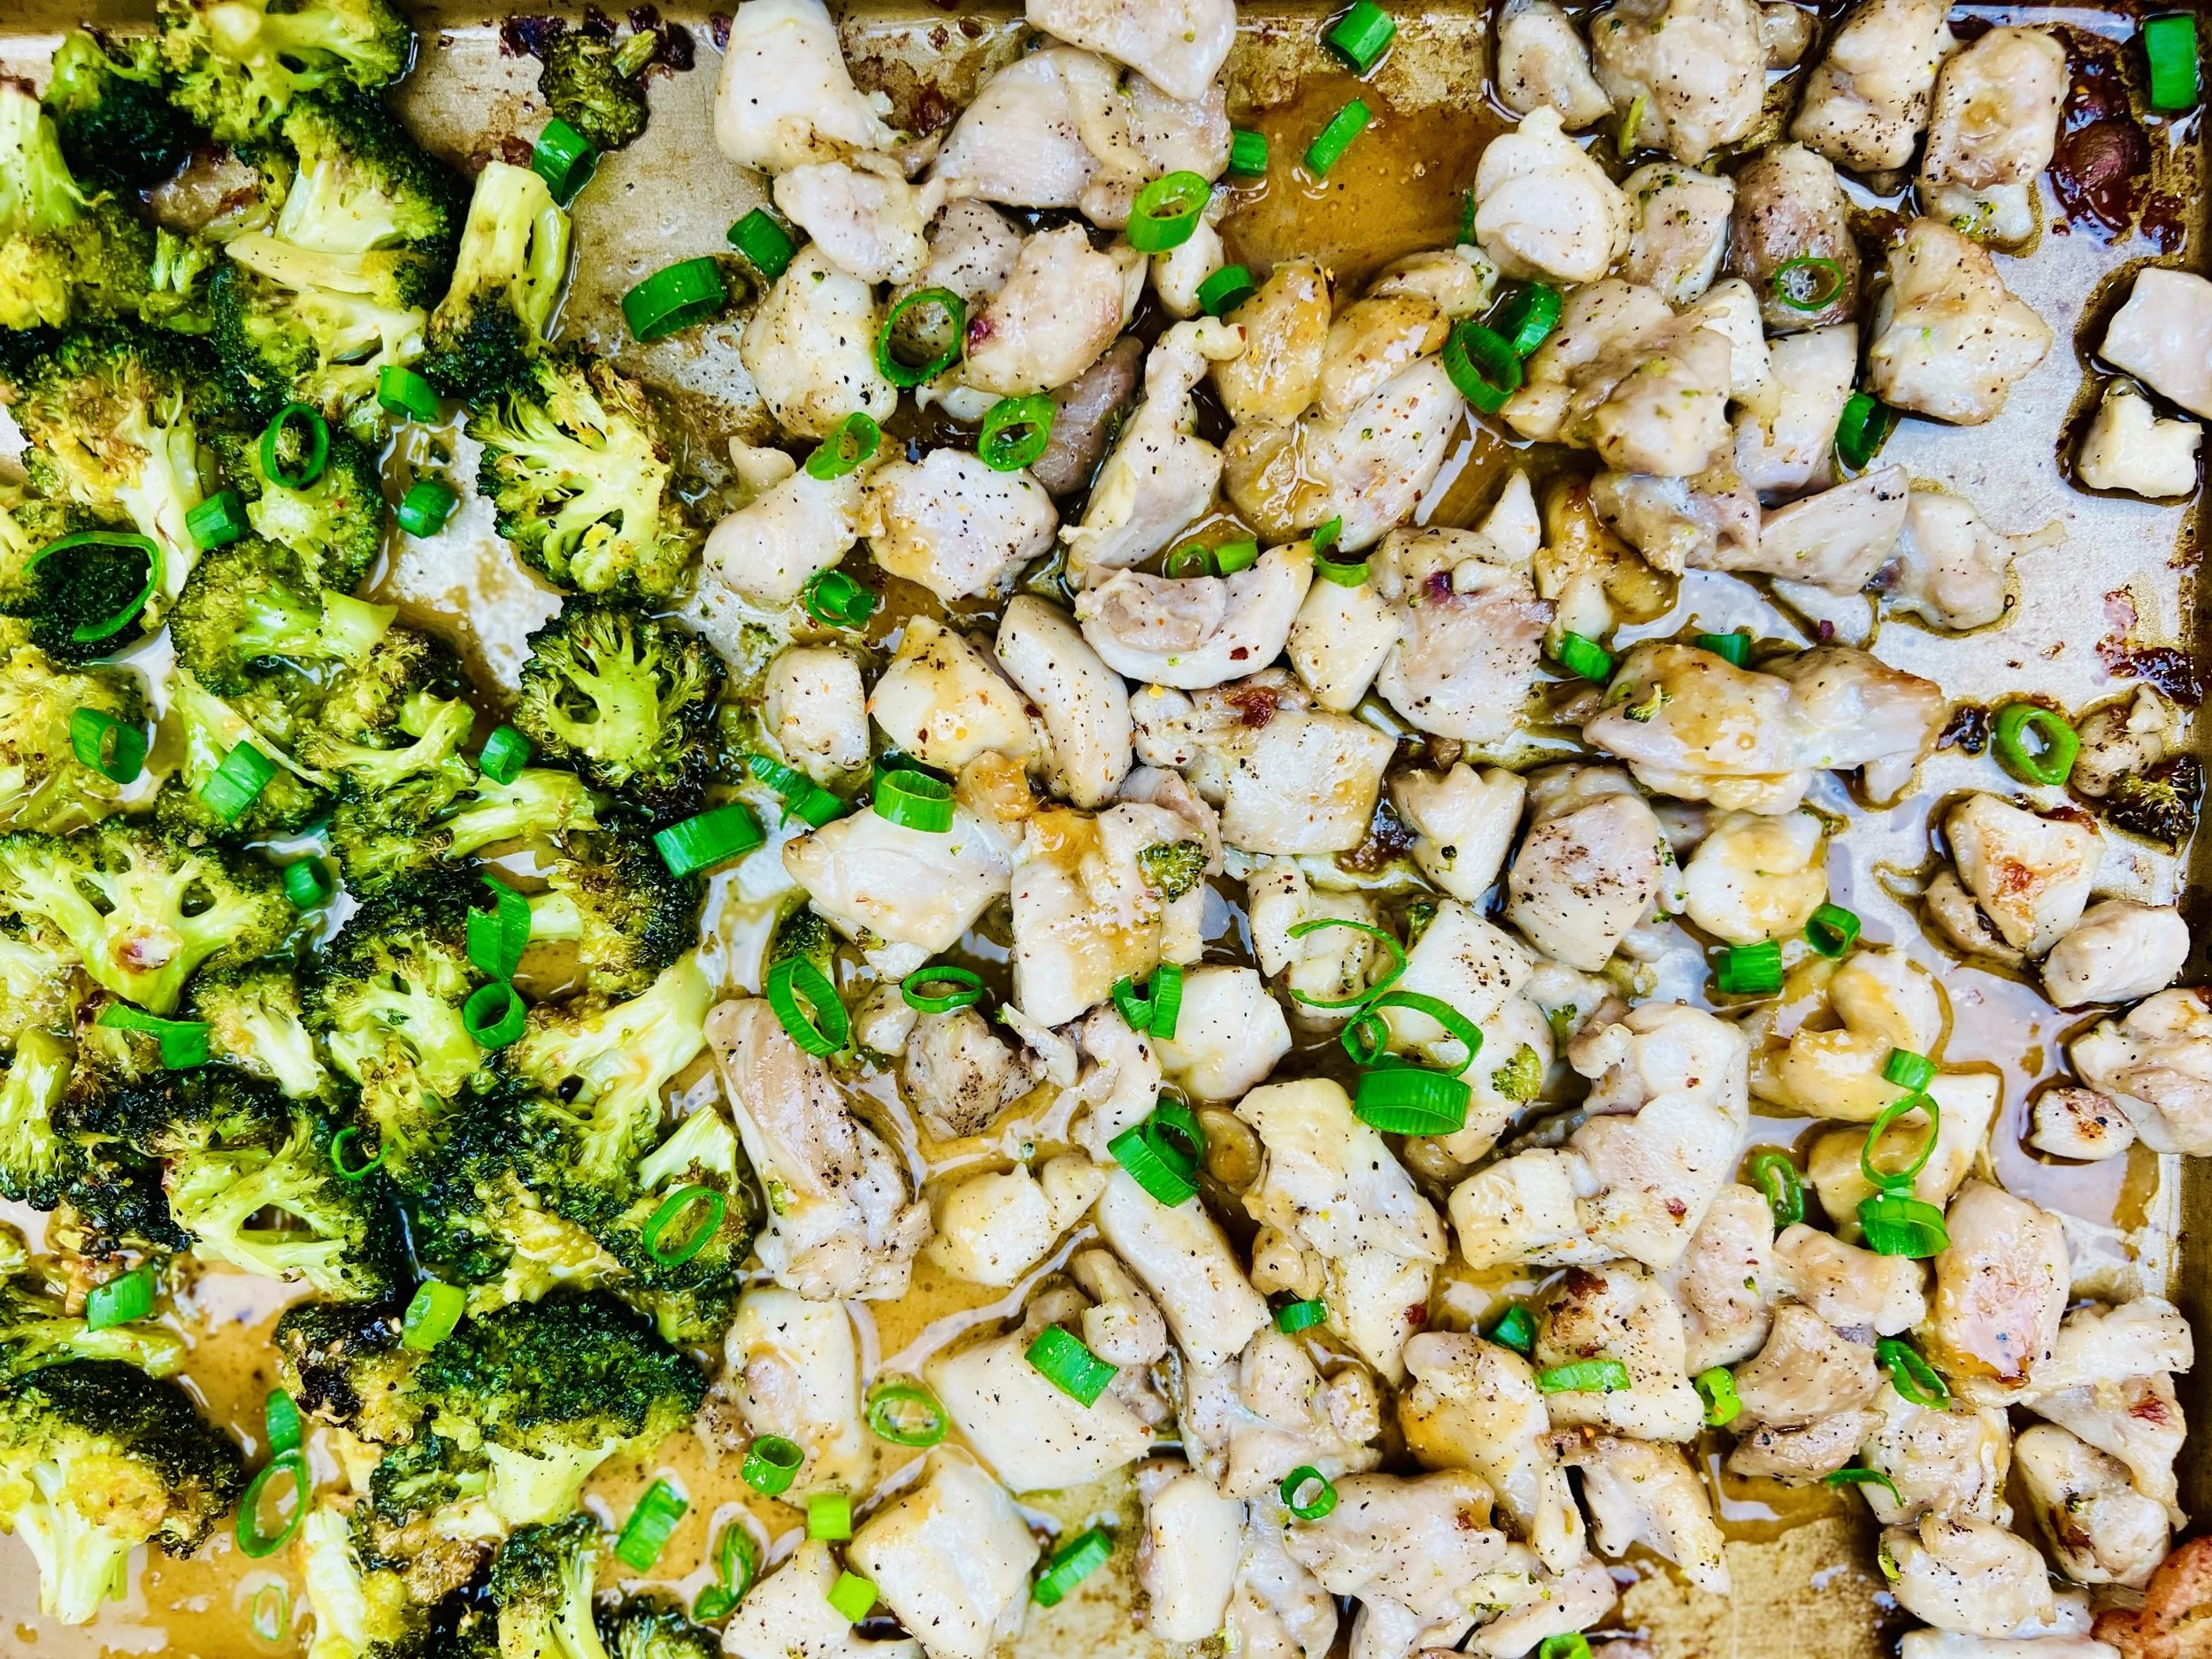
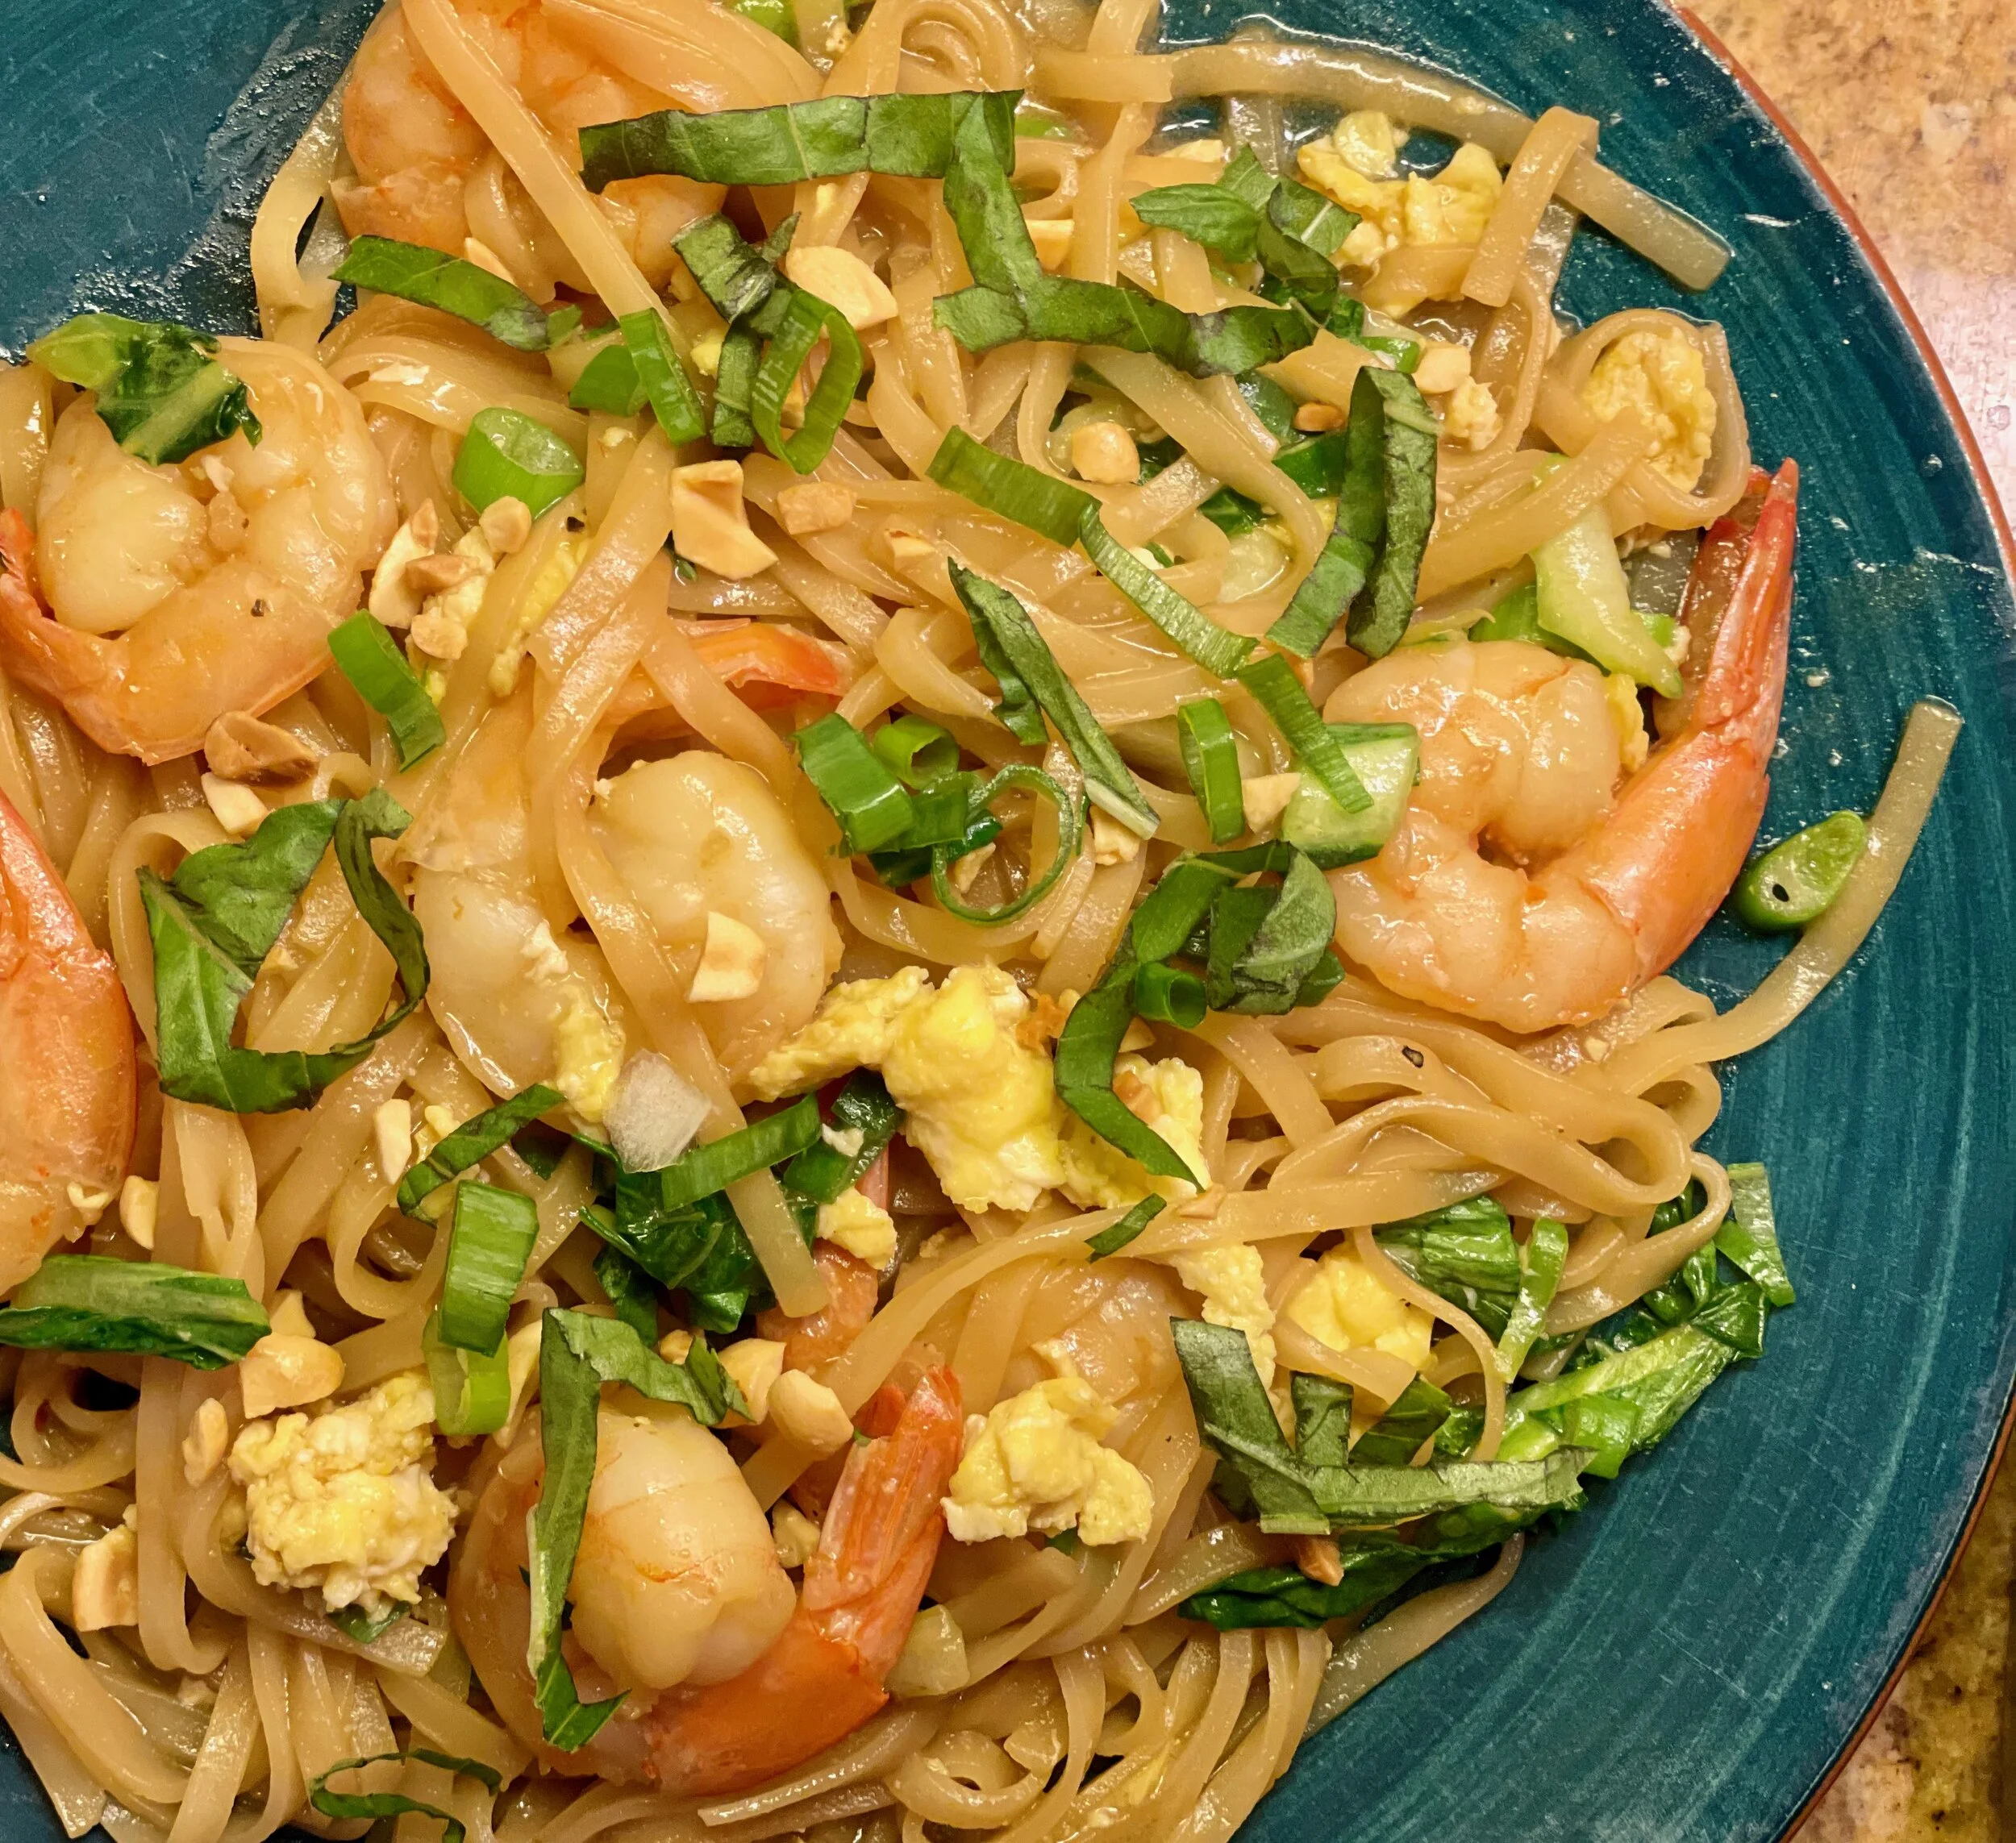
One Pot Coconut Turmeric Chicken and Sweet Potatoes (low FODMAP)
45 Minutes prep/marinate • 20 Minutes cook • Low FODMAP • Gluten-Free • Lactose-Free • Serves 4
45 Minutes prep/marinate • 20 Minutes cook • Low FODMAP • Gluten-Free • Lactose-Free • Serves 4 • Ok to make-ahead: Steps 1 - 2
Creamy coconut milk, tangy lime, tender sweet potatoes, and flavorful spices make this coconut turmeric chicken a delicious, and comforting, meal that’s wonderful for family, friends, and company. Cooking it all in one pot makes clean up a snap so it’s a perfect weeknight or any night dinner.
Ingredients
2 pounds boneless, skinless, chicken thighs or breasts, cut into 1-inch chunks
1 tablespoon ground turmeric
1 tablespoon ground ginger
1 teaspoon ground cumin
1 teaspoon black pepper
Kosher salt to taste
3 tablespoons garlic-infused olive oil
2 bell peppers, sliced
1/2 teaspoon red pepper flakes, or more
2 cups sweet potatoes, peeled and cubed
2 cans (14 ounce) full-fat coconut milk
2 tablespoons low sodium gluten-free soy sauce
2 teaspoons rice vinegar
1/2 cup fresh cilantro, chopped
1 1/2 cups Jasmine Rice, for serving (+ 1 can coconut milk if you like)
For serving: 2 limes cut into wedges, fresh basil leaves, chopped, roasted and salted peanuts.
Directions
(1) Prepare the chicken: This step is optional but adds to the flavor and texture of the meat. Remove chicken from packaging and season both sides of each piece of chicken lightly with Kosher salt. Put on a plate, cover with plastic wrap, and refrigerate overnight or at least 4 hours before cooking.
(2) Marinate the chicken: Remove any skin or fat, and cut the chicken into cubes. Toss the chicken with the turmeric, ginger, cumin, pepper, a pinch of salt, and 1 tablespoon of garlic-infused olive oil. Let sit at least 5 minutes or up to overnight in the fridge.
Make-ahead note: At this point, you can leave the chicken in the refrigerator overnight or until you’re ready to cook it.
(3) Sear the chicken: Heat 1 tablespoon oil in a large Dutch oven set over medium-high heat. Add the chicken and sear on both sides until browned, about 2 minutes. Remove the chicken from the pan and set it aside.
(4) Steam the rice: Meanwhile, rinse 1 1/2 cups of white rice and cook per package instructions or substitute coconut milk for some or all of the water when you cook the rice.
(5) Cook the sweet potatoes: To the same pot, add 1 tablespoon garlic-infused olive oil. When the oil is hot, add the peppers, and the chili flakes, cook 1 - 2 minutes, then toss in the sweet potatoes. Reduce the heat to low. Pour in the coconut milk, soy sauce and rice vinegar. Add the chicken and any juices on the plate into the coconut milk mixture. Cover and simmer for 20-30 minutes, or until the chicken is cooked through. If the sauce gets too thick, add a bit of water or chicken broth.
(6) Finish: Stir in the cilantro, taste, and season with salt if needed.
(7) Plate and serve: Divide rice between bowls, then spoon the chicken and sauce over the rice. Top with basil, peanuts, and a generous squeeze of lime juice. Keep any leftovers in the fridge and reheat on the stove (not the microwave!) for the best flavor.
Eat and enjoy every bite because you can!
This post may contain links for you to easily purchase items listed on the page. In some cases, we have provided a special discount code for IBS Game Changers so be sure to use it when you purchase an item to get the discount that has been arranged just for you! As an Amazon Associate, I earn a commission from qualifying Amazon purchases.
More Deliciously Low FODMAP™ main course recipes you might enjoy


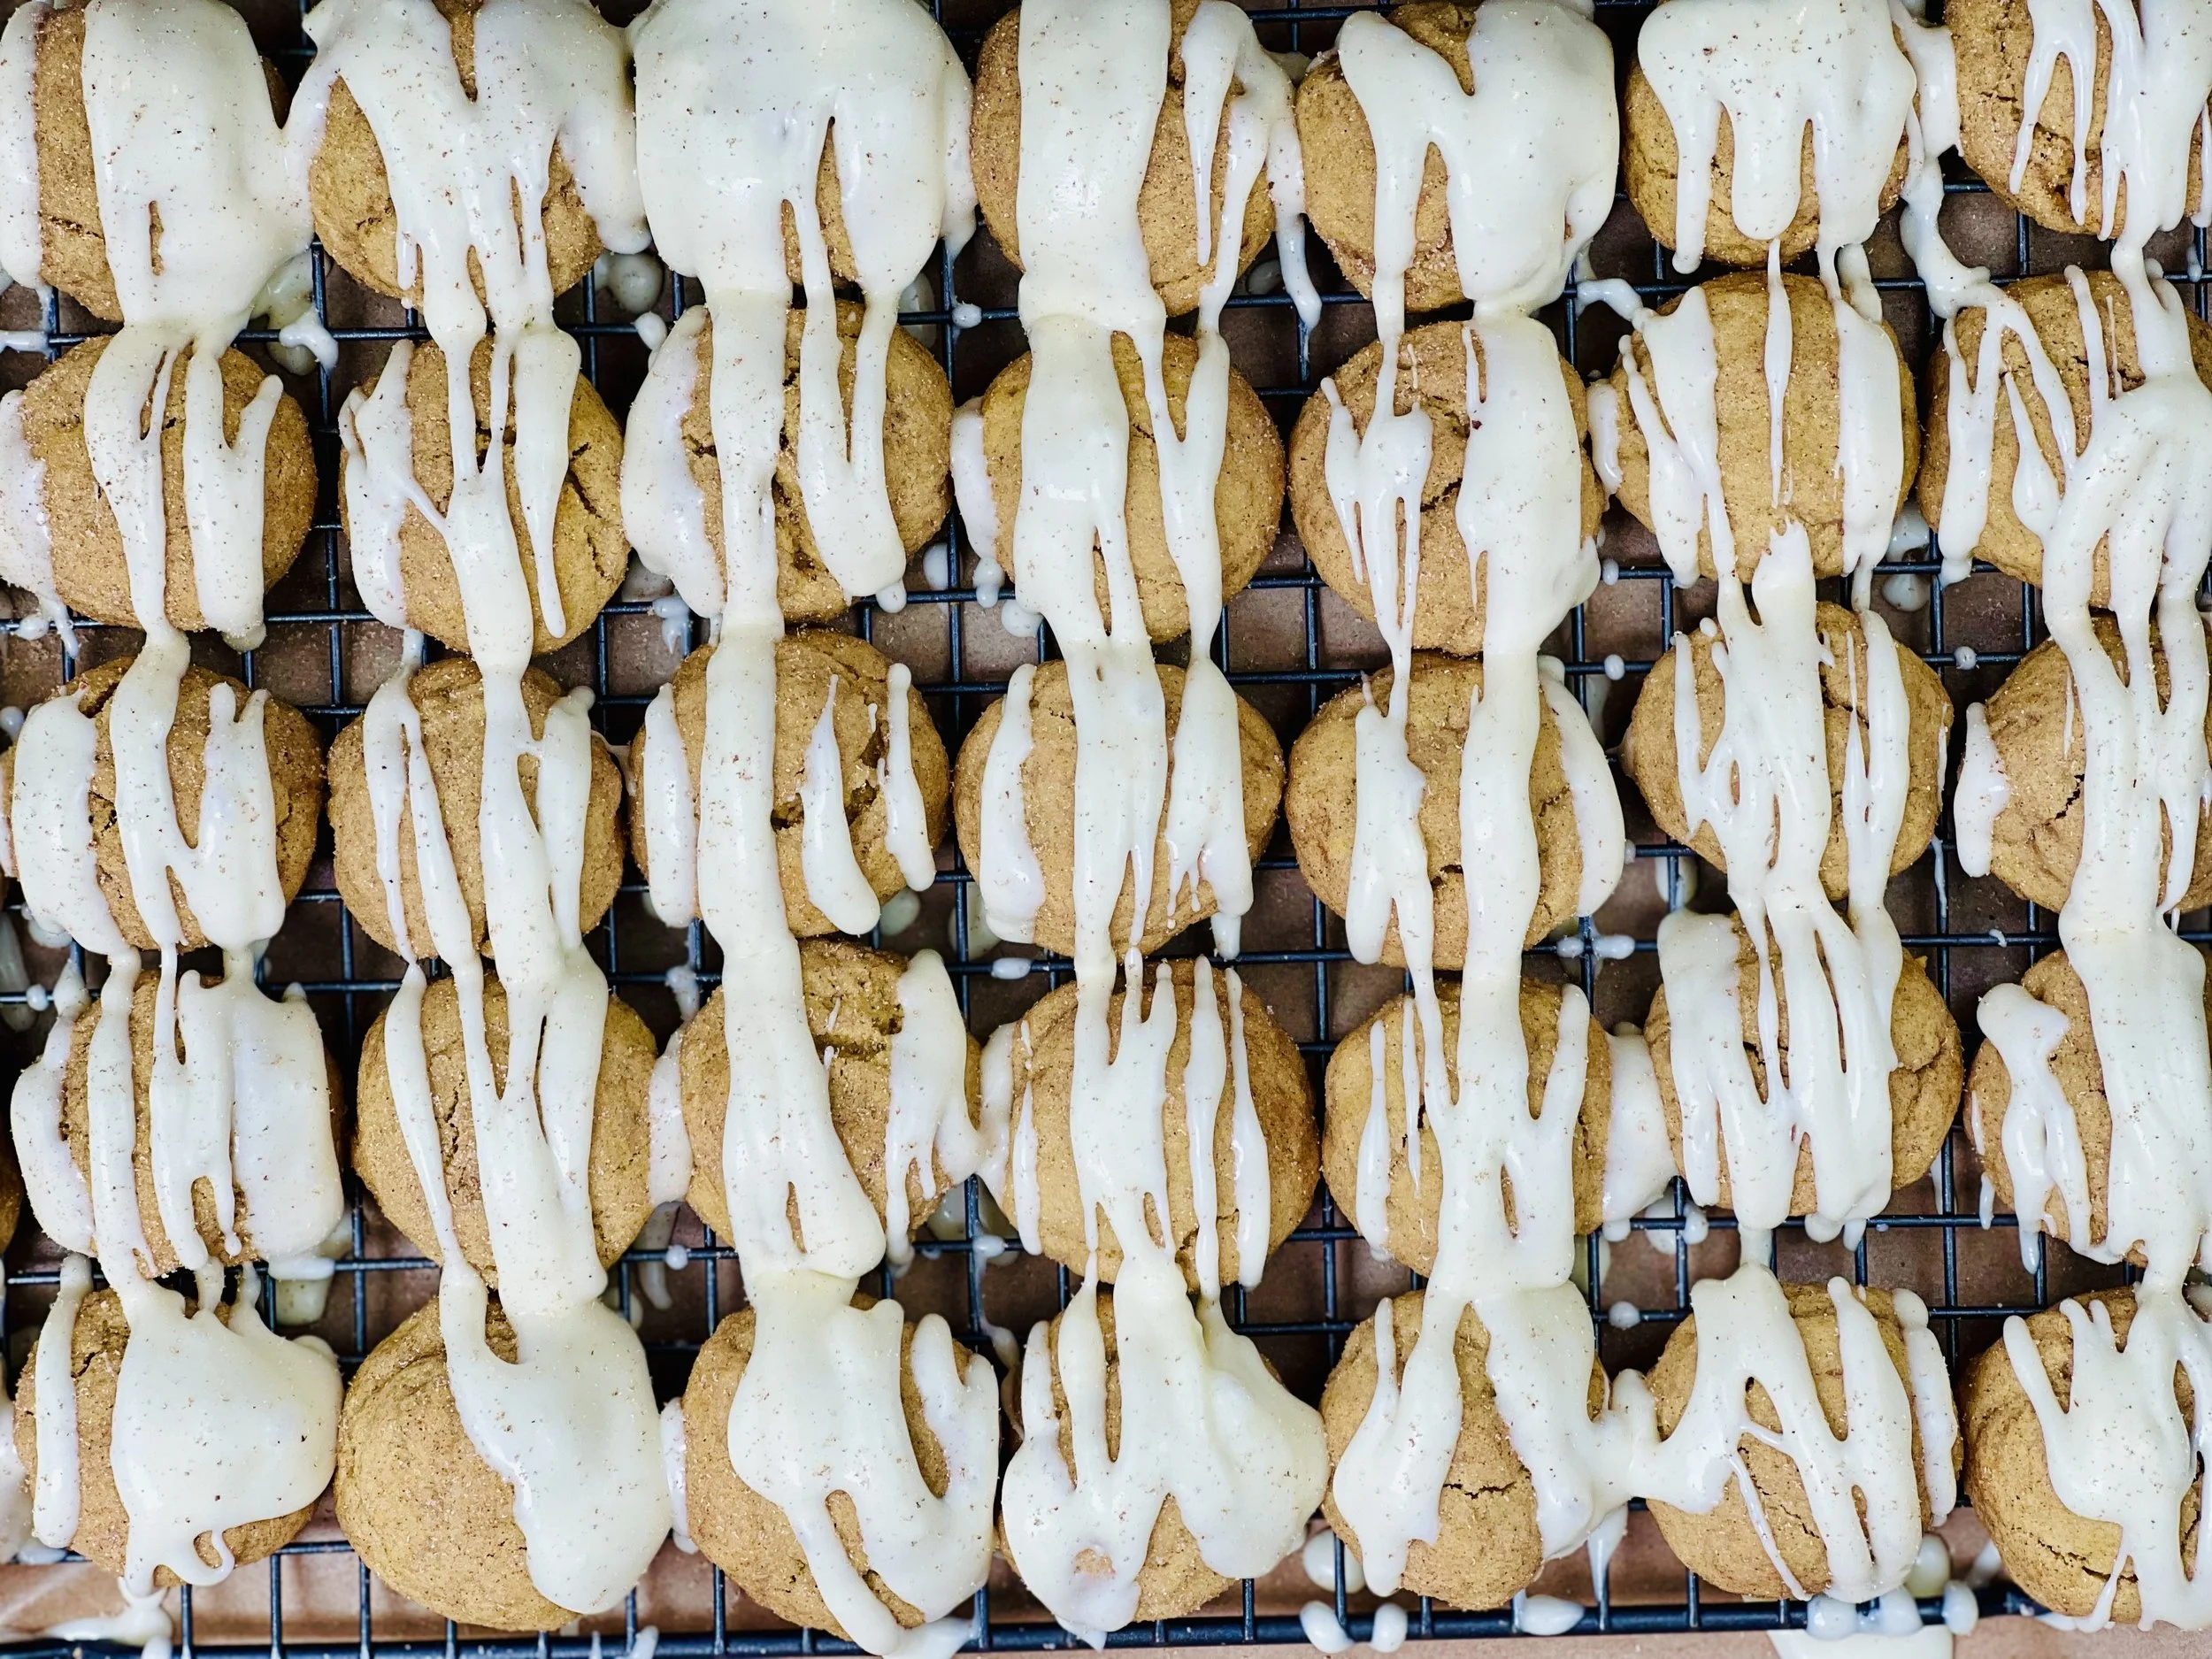
Spiced Ginger Whoopie Pies (low FODMAP)
45 Minutes prep/chill • 20 Minutes cook • Low FODMAP • Gluten-Free • Makes 3 dozen
45 Minutes prep/chill • 20 Minutes cook • Low FODMAP • Gluten-Free • Makes 3 dozen • Ok to make-ahead: Steps 1 - 3
Soft ginger molasses cookies with a crisp sugar top melded together with cinnamon-spiced cream cheese filling. What’s not to love? These low FODMAP whoopie pies are fun, delicious, and a bit addicting! You can make the cookies small for a two-bite version of the whoopie pie, or make them large for a real whoopie pie extravaganza! The combination of the cake-like cookies with the creamy filling is simply wonderful. Chilling the cookie dough before you bake is an important step so the cookies don’t spread out too much as they cook—so don’t skip this step!

Ingredients: Cookies
2 cups gluten-free flour (I used Bob’s Red Mill 1 to 1)
1 teaspoon baking soda
1 teaspoon cinnamon
1 teaspoon ground ginger
1/2 teaspoon ground cloves
1/4 teaspoon Kosher salt
3/4 cup salted butter, at room temperature
3/4 cup light brown sugar
1 egg, at room temperature
1/4 cup dark molasses*
1 teaspoon vanilla extract
1/2 cup cold water
1/2 cup granulated sugar, for dipping
Ingredients: Spiced Cream Cheese Filling
6 ounces lactose-free cream cheese, at room temperature (I used Green Valley Organics)
1/4 cup salted butter, softened at room temperature
1 and 1/2 cups confectioners’ sugar, sifted
1/2 teaspoon pure vanilla extract
1/4 teaspoon pumpkin pie spice (or 1/4 teaspoon of the combination of ground ginger, ground cinnamon, ground nutmeg, ground cloves—really just a pinch of each spice)
Directions: Cookies
(1) Combine dry ingredients: In a medium bowl, whisk flour, baking soda, cinnamon, ginger, cloves, and salt to combine. Set aside.
(2) Cream butter and sugar: Add softened butter and brown sugar to the bowl of your stand mixer and beat until light and fluffy. Scrape down the sides of the bowl then add the egg, molasses, and vanilla and beat until smooth.
(3) Add the dry ingredients: Scrape down the sides of the bowl then add dry ingredients in two batches, mixing until just combined before adding the second batch.
Make-ahead note: At this point, you should cover the dough and refrigerate until firm. This can be 30 minutes to overnight.
(4) Prepare: When ready to bake, preheat the oven to 375 degrees F, line a baking sheet with parchment paper, and remove the dough from the refrigerator. Put the granulated sugar in a small bowl. Put the cold water in a second small bowl.
(5) Scoop and roll: For each cookie, scoop out about 1 tablespoon of dough (less for smaller cookies, more for larger cookies), roll it into a ball then flatten the ball slightly so it won’t roll. Dip the top of the ball quickly in cold water, then in granulated sugar. Place sugar side up on the prepared baking sheet about 2 inches apart. (I cooked one dozen at a time.)
(6) Bake: For 8 minutes or until cookies are lightly browned around the edges and crackly on the top. Watch so you don’t overbake! 8 minutes was the perfect bake time in my oven.
(7) Finish: Remove the cookie sheet from the oven and let cookies cool on the sheet for 2 minutes before transferring them to a cooling rack to cool completely.
*A note about molasses: 1 teaspoon is considered low FODMAP so each cookie will have 1/2 teaspoon if you make 2 dozen.
Directions: Filling and Assembly
(1) Combine the cream cheese and butter: Make sure your ingredients are at room temperature. In the bowl of a stand mixer fitted with the paddle attachment, beat the cream cheese on high speed until completely smooth and creamy, about 1 minute. Add the butter and beat until smooth and combined.
(2) Add the powdered sugar: Scrape down the sides of the bowl and add the sifted powdered sugar, vanilla, and spices, then beat on medium speed until combined. Scrape down the sides of the bowl, then mix a bit more until fully combined and smooth. If the frosting is too soft to hold its shape, refrigerate for about 10 minutes before frosting the cookies.
(3) Fill the cookies: Match cookies of similar size, spread the filling onto the flat side of one cookie, and sandwich it together with a second cookie. Repeat with the remaining cookies and filling.
(4) Plate and serve: Serve right away or put your filled whoopie pies in an airtight container and store them in the refrigerator for up to 3 or 4 days.
Eat and enjoy every bite because you can!
This post may contain links for you to easily purchase items listed on the page. In some cases, we have provided a special discount code for IBS Game Changers so be sure to use it when you purchase an item to get the discount that has been arranged just for you! As an Amazon Associate, I earn a commission from qualifying Amazon purchases.
More Deliciously Low FODMAP™ dessert recipes you might enjoy
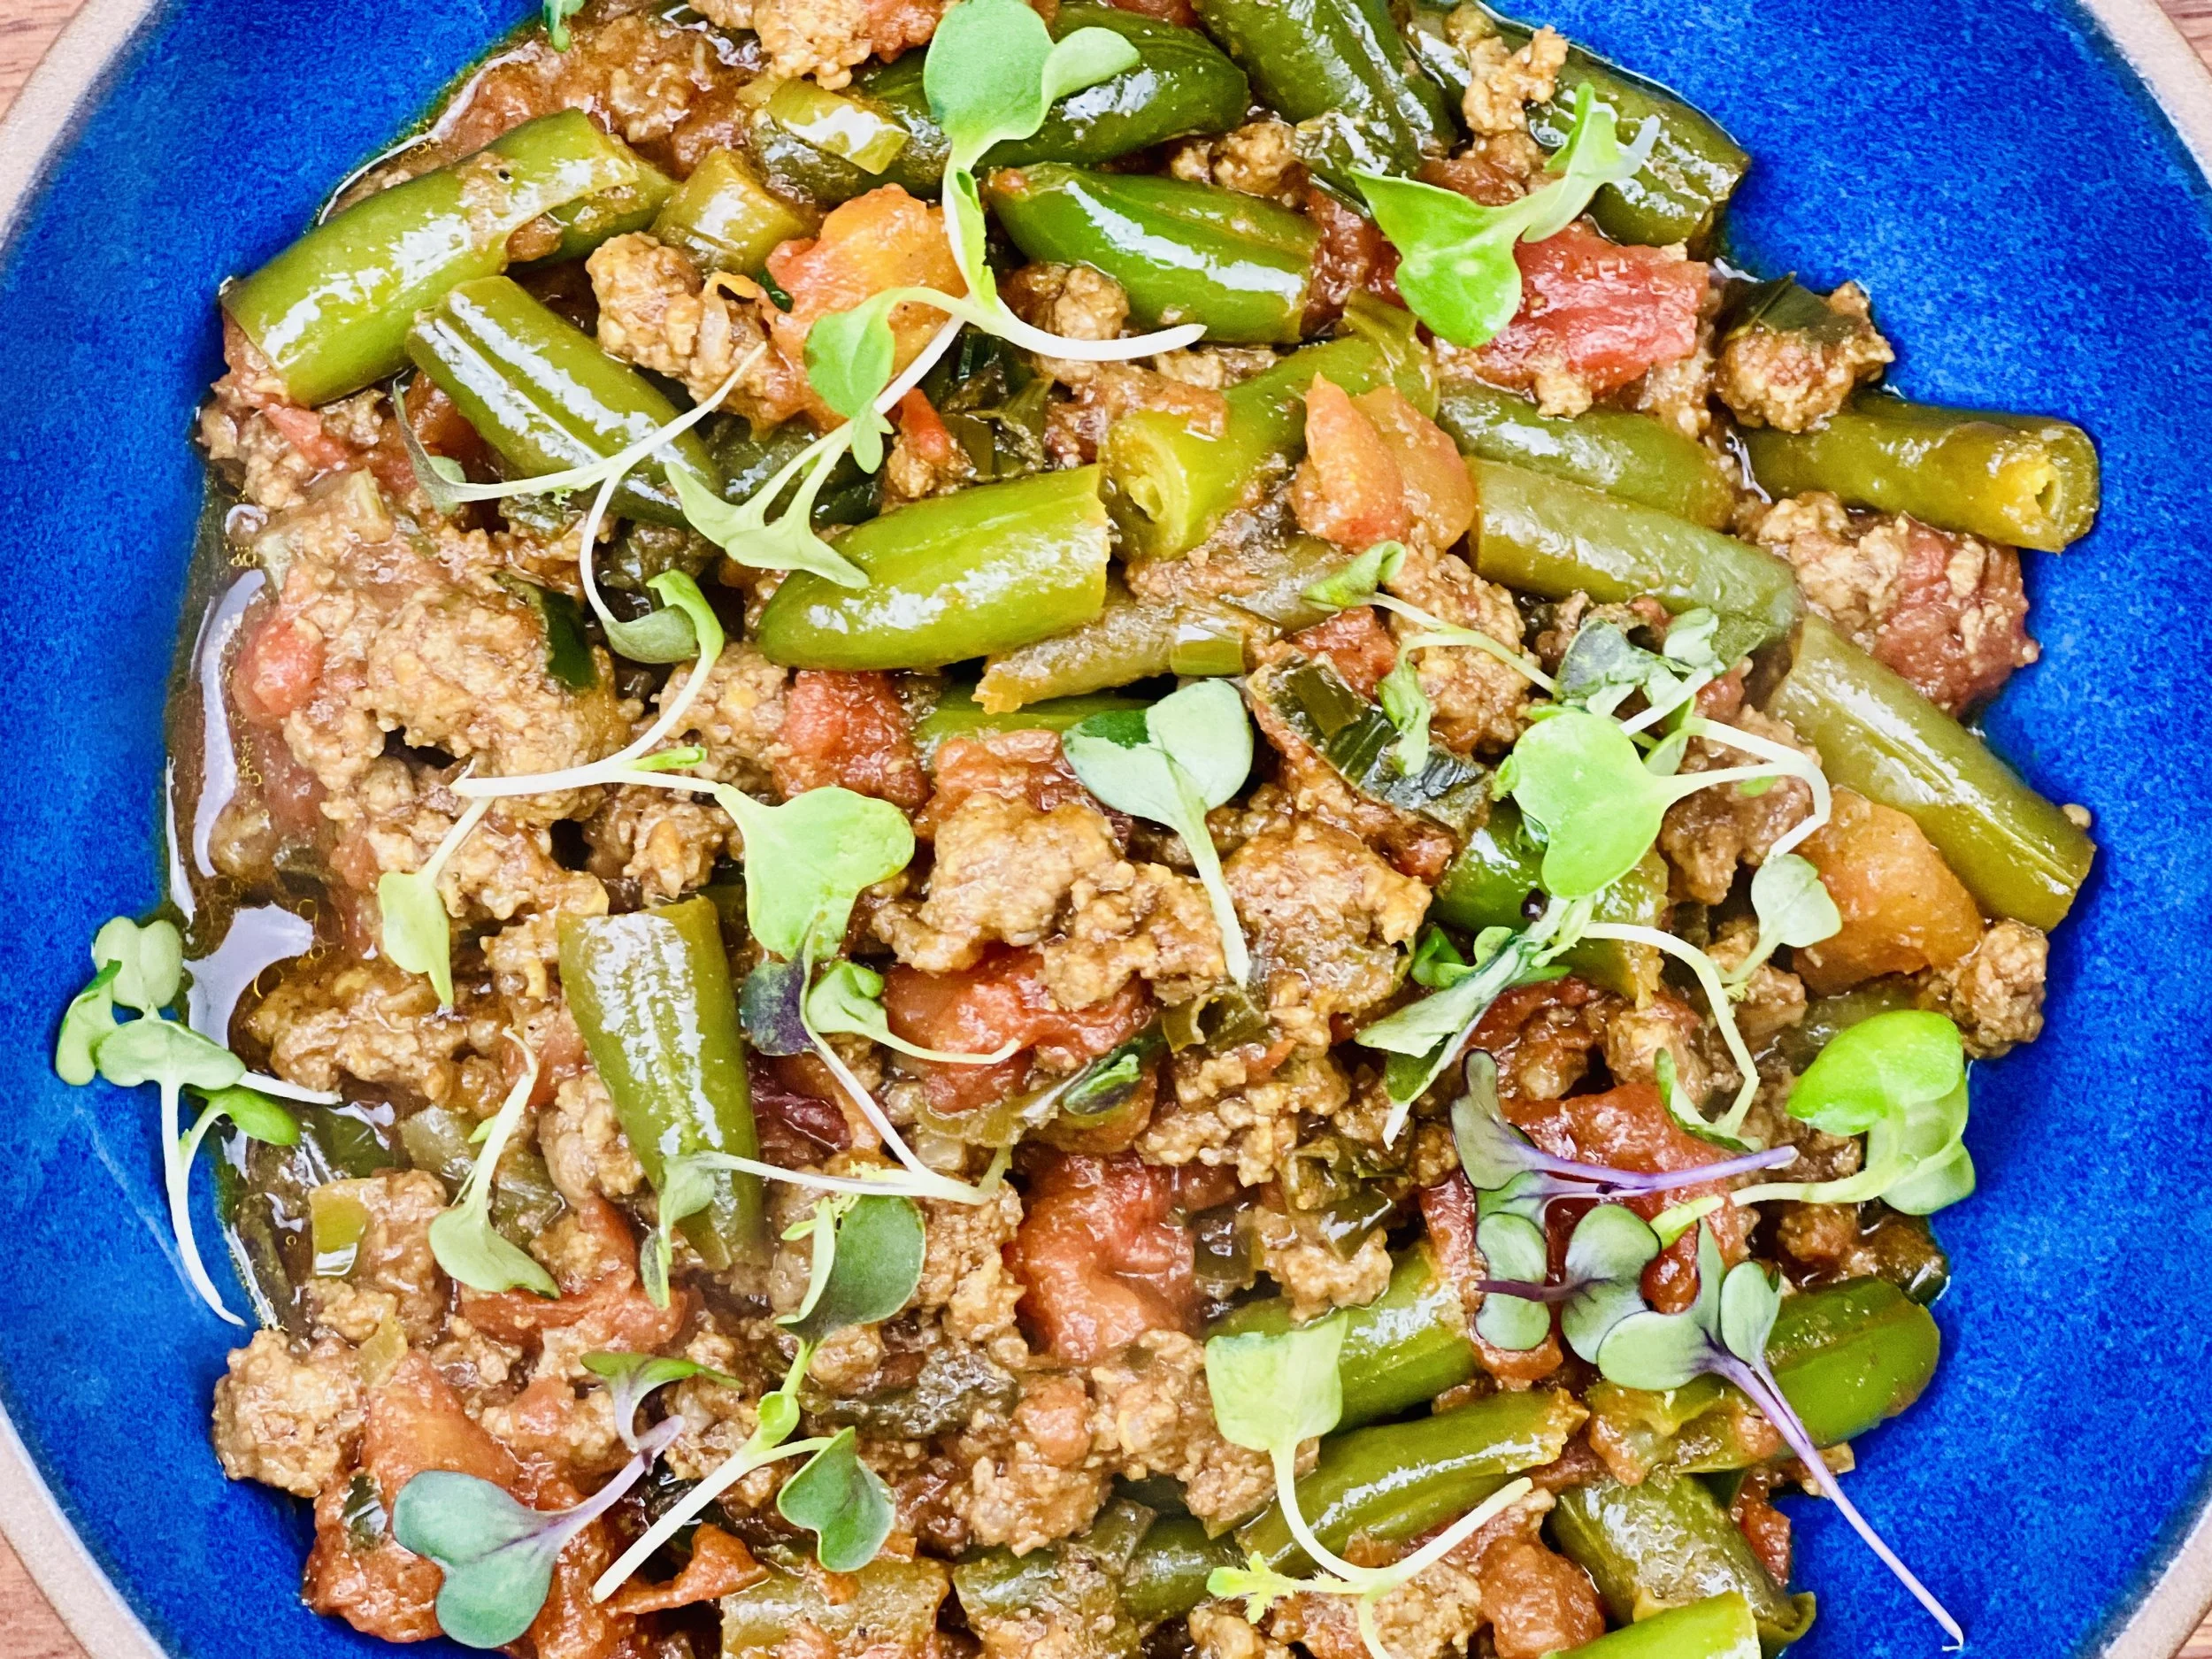
Sausage and Castelvetrano Olive Pizza (low FODMAP)
15 Minutes prep • 20 Minutes cook • Low FODMAP • Gluten-Free • Serves 4
15 Minutes prep • 20 Minutes cook • Low FODMAP • Gluten-Free • Serves 4 • Ok to make-ahead: Step 1
This delicious and hearty pizza is full of amazing flavors you probably thought were off your low FODMAP protocol. Sausage pizza? Yes! Because you make it yourself following my easy low FODMAP recipe, you know it will be delicious AND easy on your stomach. Don’t be afraid to use the peppers—just be sure to remove the seeds. Can’t get Castelvetrano olives? Feel free to substitute another type of olive in this recipe.

This is an exclusive recipe just for recipe club members.
Each week I am creating and delivering one very special recipe just for my recipe club members. If you’re not yet a member, I encourage you to join! Membership in the club includes access to the complete archive of recipes with filters so it can become your virtual low FODMAP cookbook plus, I am creating and delivering one special NEW recipe every week ONLY for recipe club members. And, for my true fans, I’ll be sharing behind-the-scenes content, and updates on the progress of the new cookbook.
Your membership in the club helps me continue creating new, delicious, easy-to-make, low FODMAP recipes just for you.
As always, all recipes will emphasize simple ingredients, easy preparation, and delicious low FODMAP results. Recipes will be for everything from main courses, salads, soups, side dishes, appetizers, desserts, sauces, breakfast and lunch, and even mocktails and cocktails. Everything you need to prepare fantastic low FODMAP meals everyone will love.
Join the club. Become a Patron. Let’s keep making delicious Low FODMAP meals together.
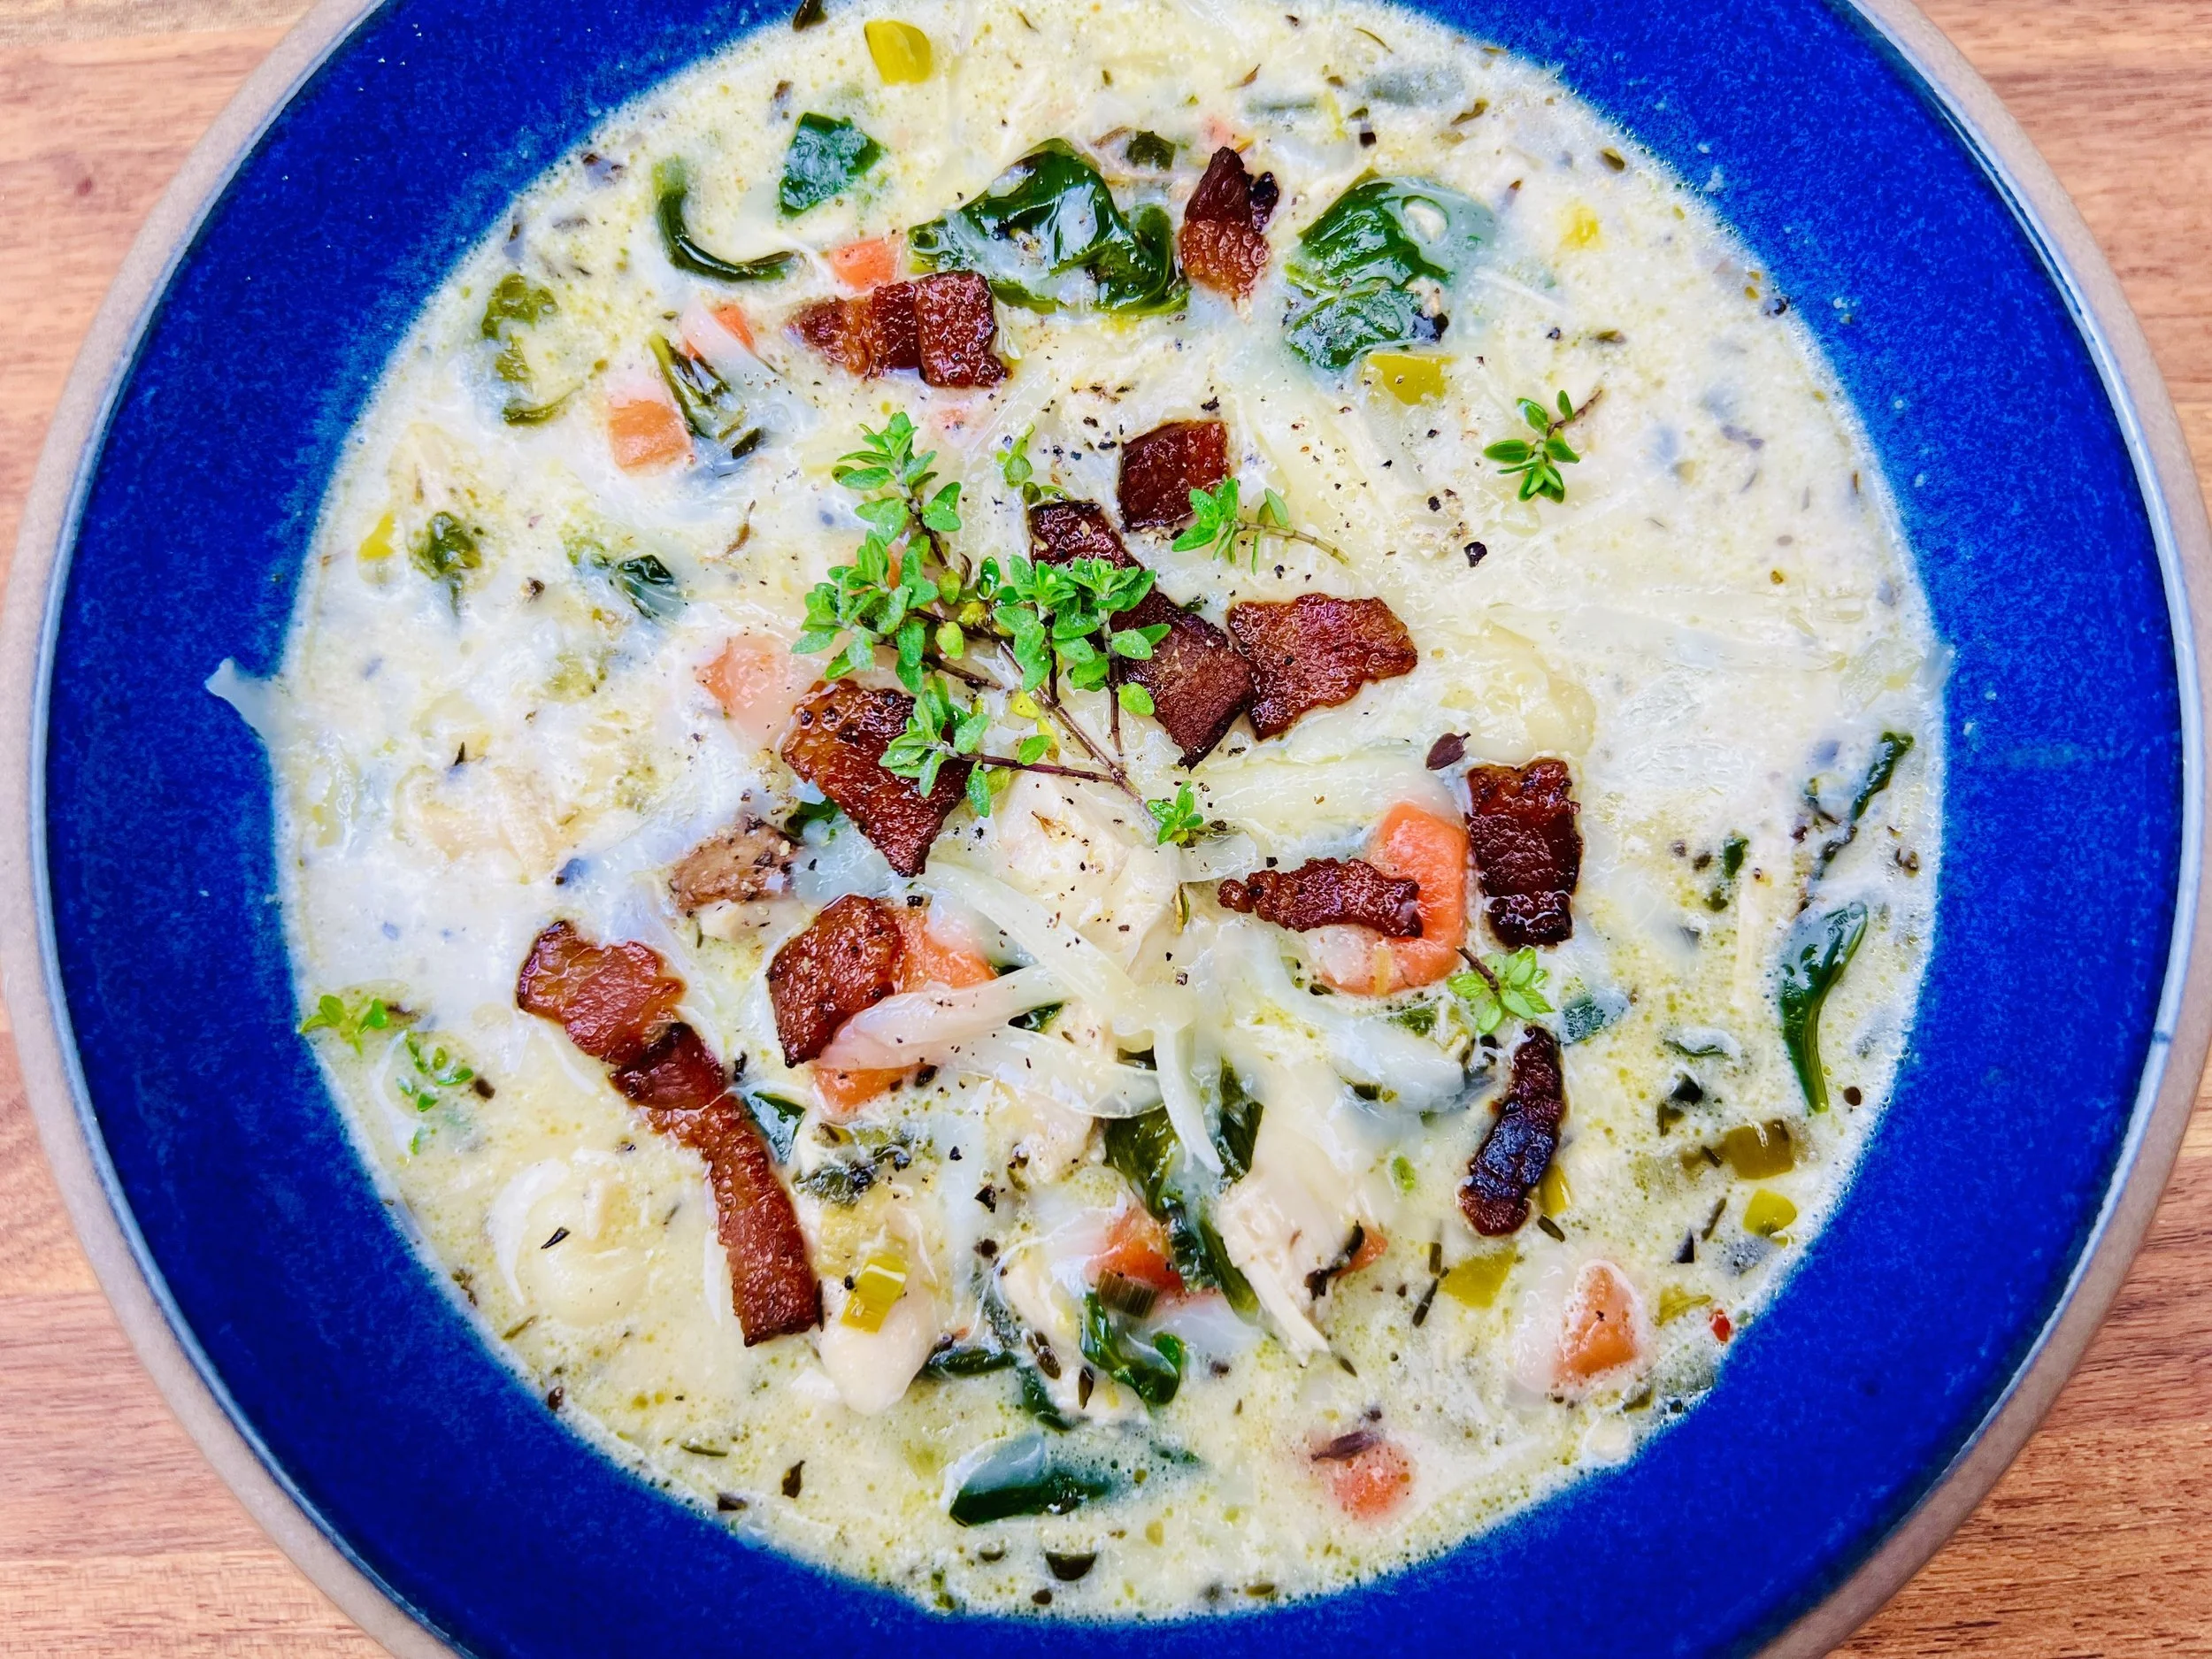
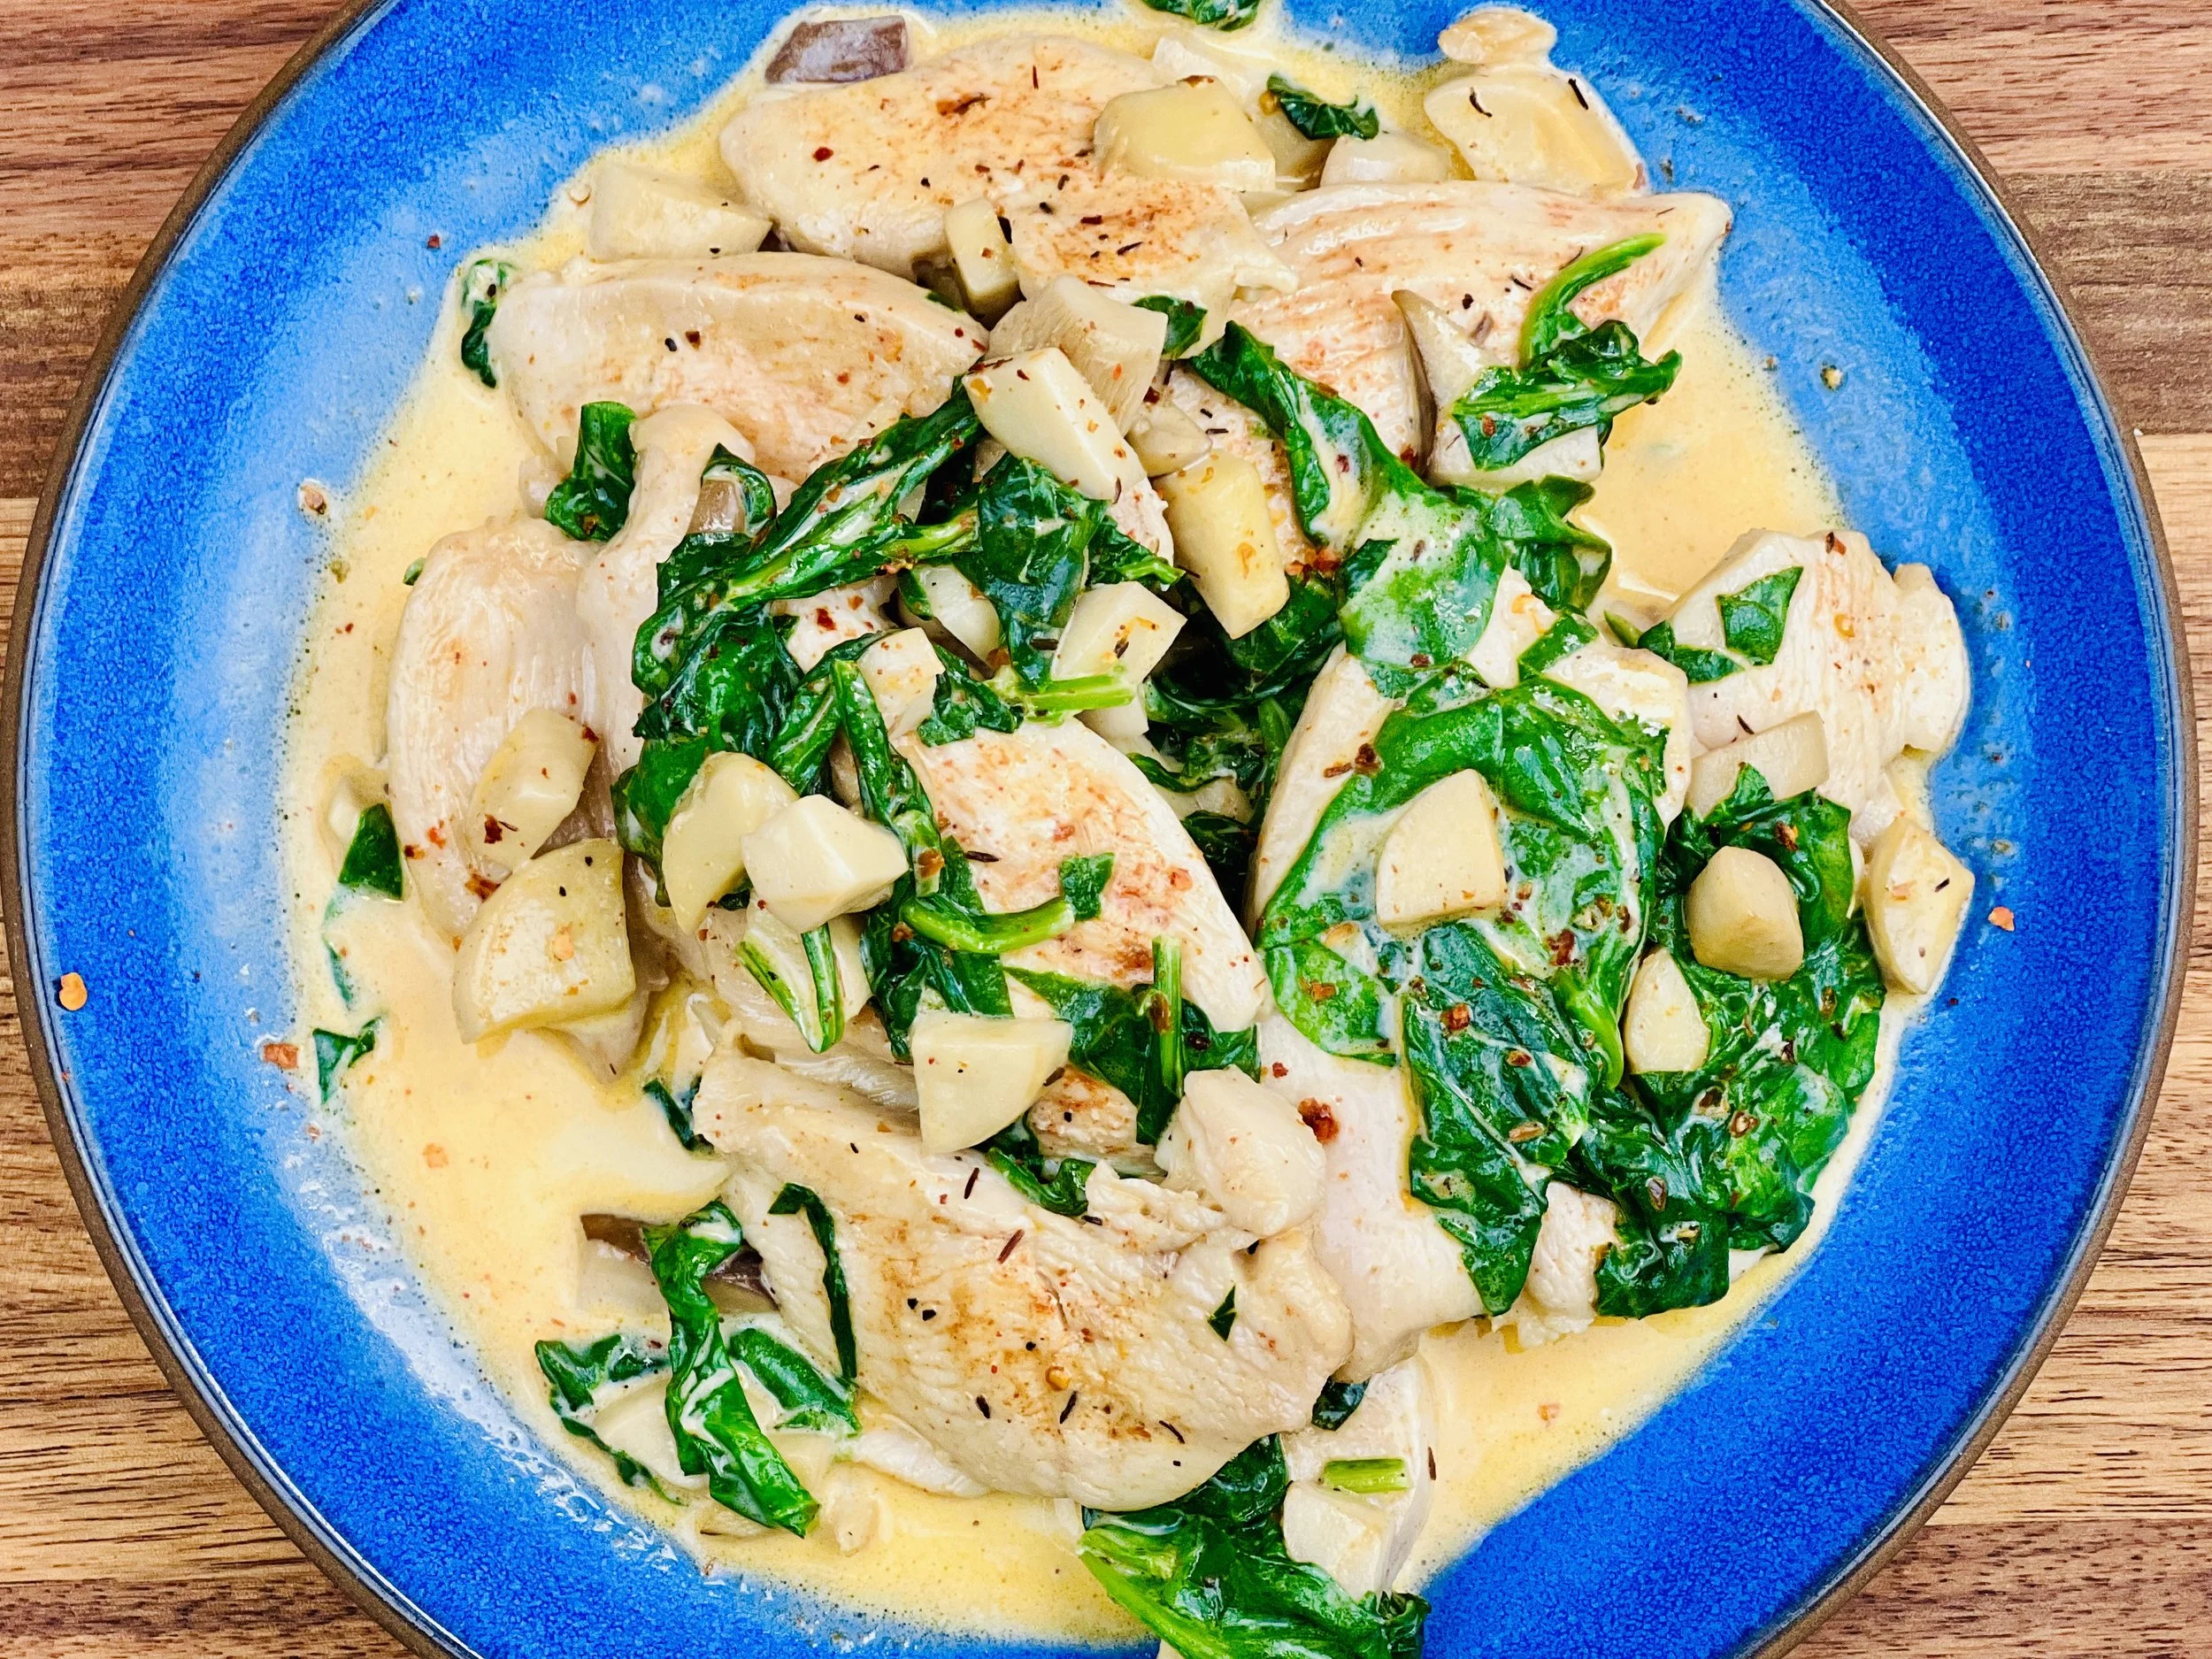
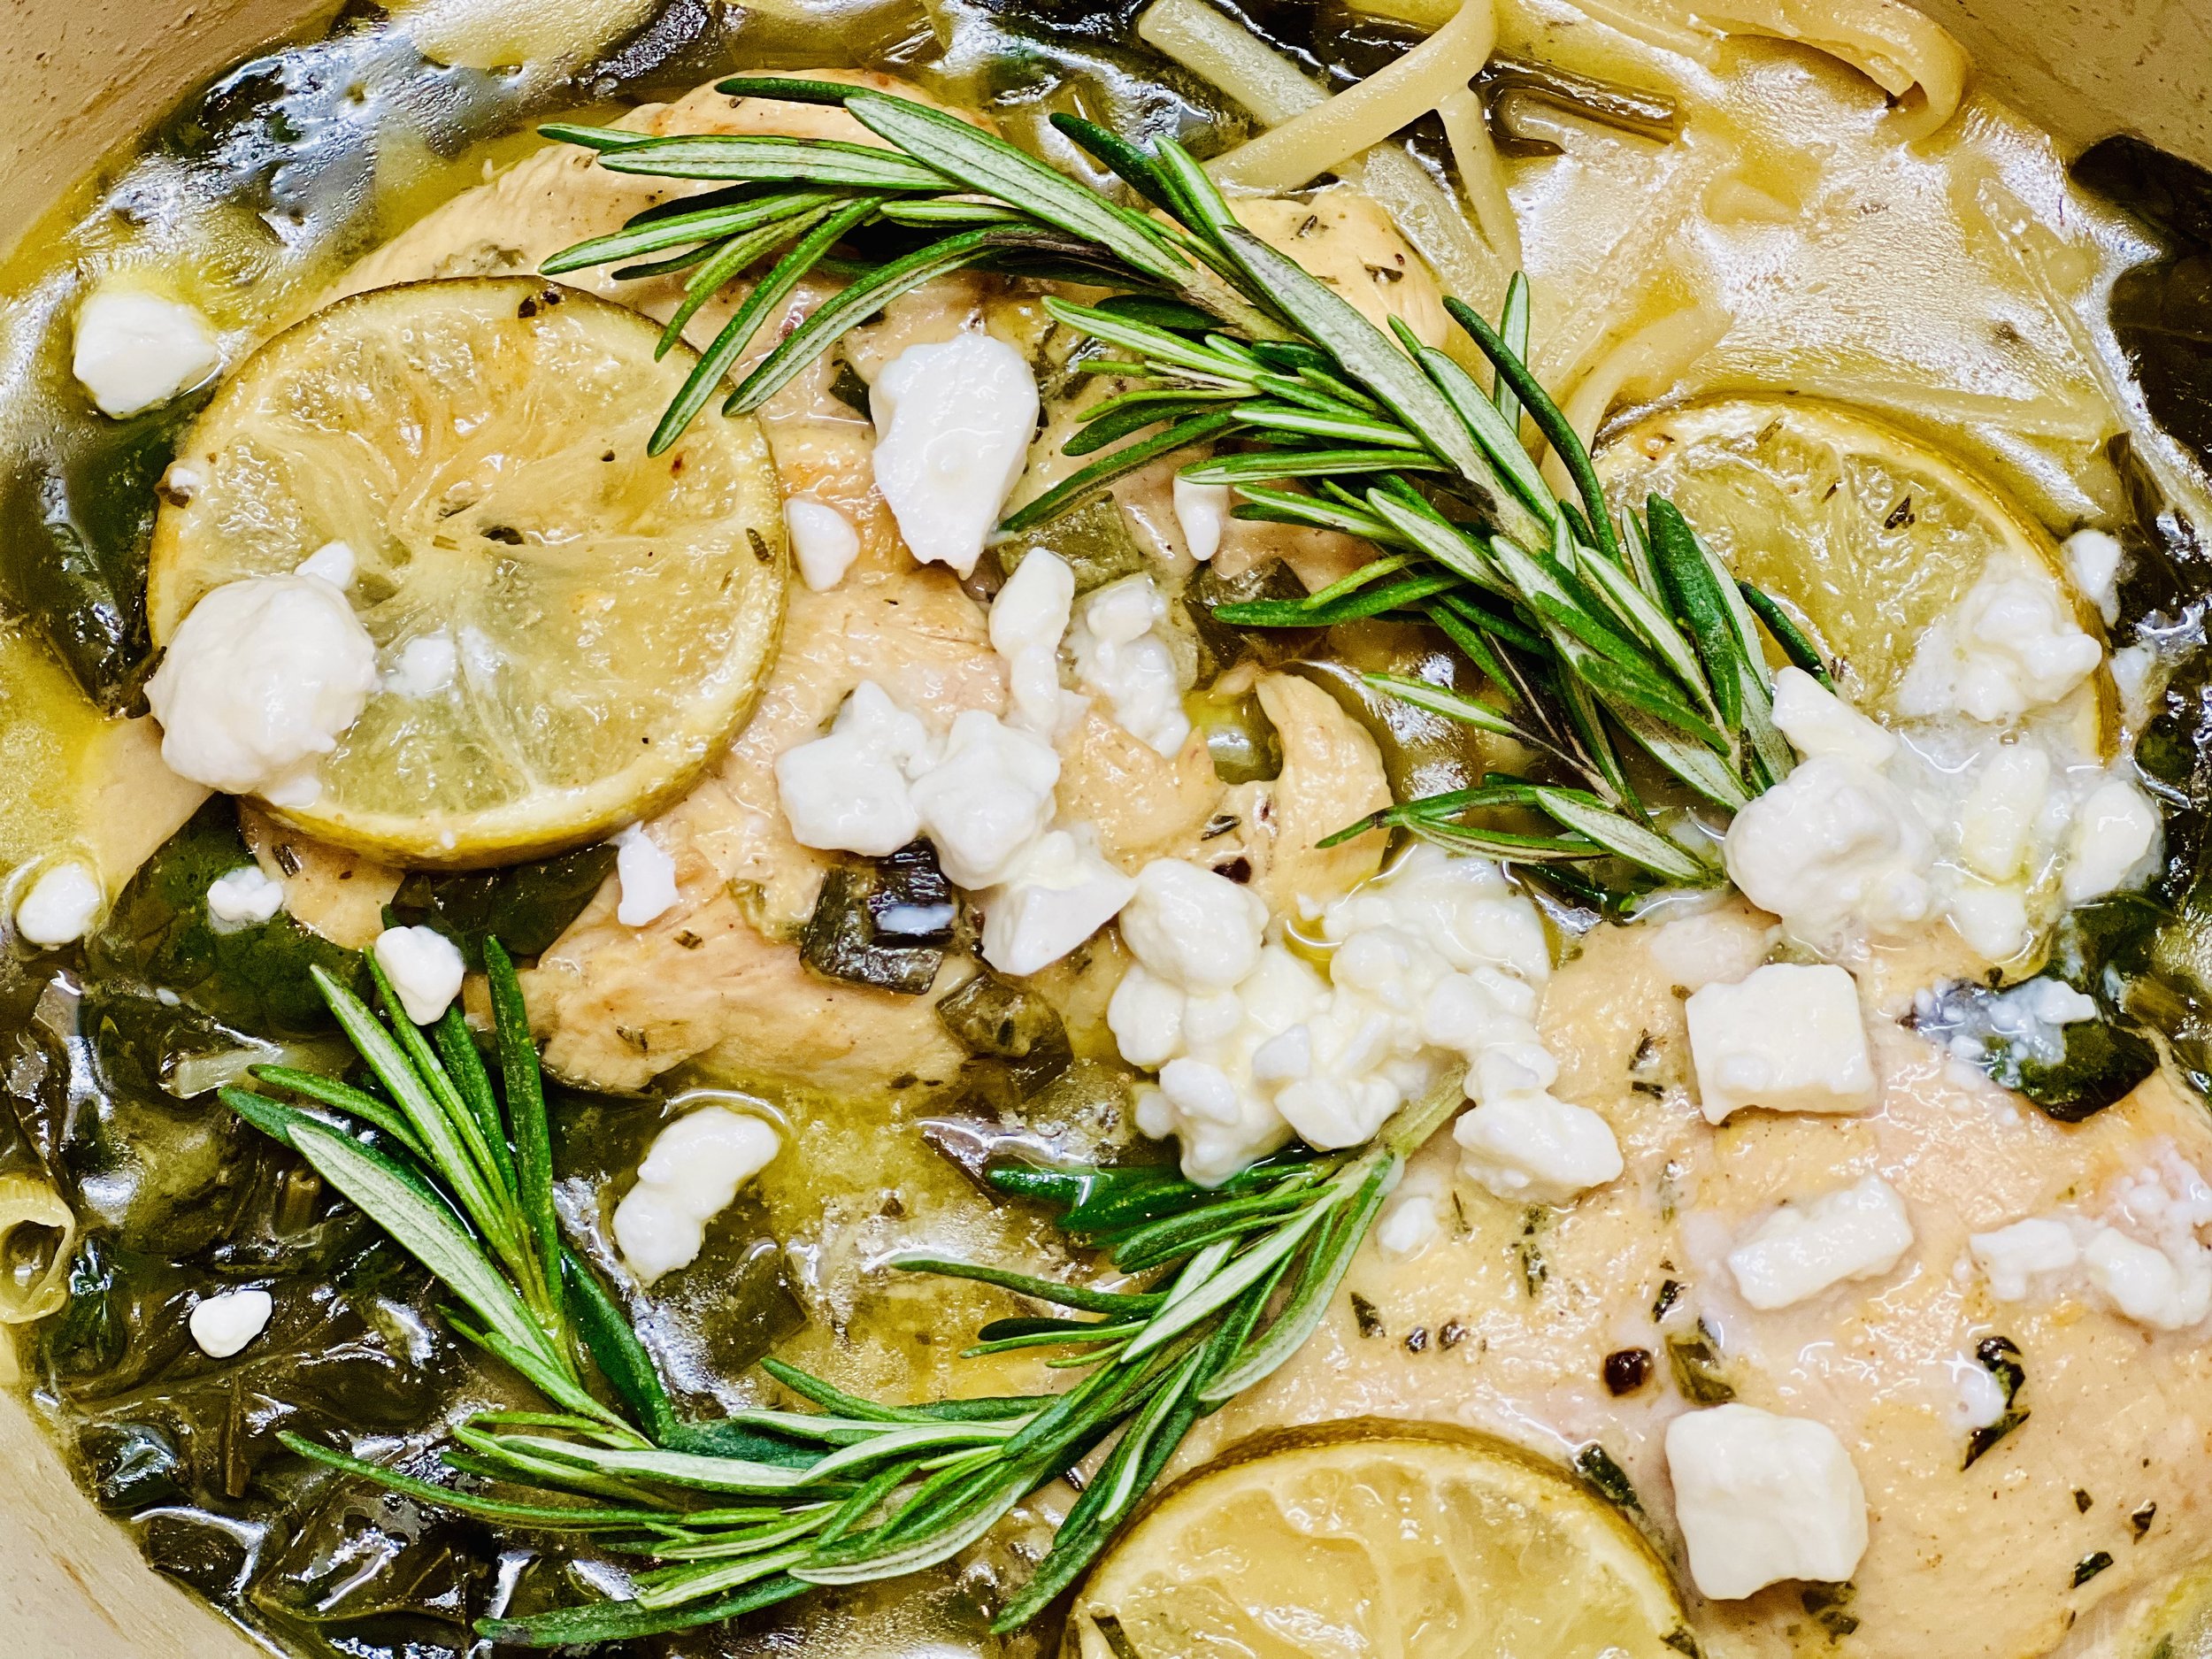
One Pan Lemon & Rosemary Butter Chicken and Pasta (low FODMAP)
30 Minutes prep • 25 Minutes cook • Low FODMAP • Gluten-Free • Serves 4
30 Minutes prep • 25 Minutes cook • Low FODMAP • Gluten-Free • Serves 4 • Ok to make-ahead: Steps 1 - 3
This delicious chicken and pasta dish is tangy, creamy, and incredibly flavorful. I was in Mexico when I developed the recipe, so I used Mexican limons but you can use Meyer or regular lemons as well. The rosemary, limon, Dijon, and garlic-infused olive oil make a truly delicious combination.
Ingredients
3 tablespoons garlic-infused olive oil
2 tablespoons Dijon mustard
2 spring onions or green onions (green part only), chopped
2 tablespoons chopped fresh rosemary
2 pounds boneless skinless chicken breasts or thighs
3 tablespoons salted butter
1 lemon or limon, sliced
1 1/2 cups gluten-free spaghetti or linguine broken into 2-inch pieces (I used Rummo Gluten-free linguine)
2 1/2 - 3 cups low FODMAP chicken broth (I used Gourmend Organic Chicken Broth, use code IBSGC15 for 15% discount)
2 cups chopped kale or spinach.
Juice of one lemon or limon
For serving:
1/2 cup crumbled Feta
Juice of 1 lemon or limon
Rosemary sprigs (optional)
Directions
(1) Prepare chicken: Trim any fat around the edges of the chicken and slice thick pieces of chicken in half horizontally. This next step is optional but adds to the flavor and texture of the meat. Season both sides of each piece of chicken lightly with Kosher salt. Put on a plate, cover with plastic wrap, and refrigerate overnight or at least 4 hours before cooking.
(2) Prepare: Preheat oven to 400 degrees F. Chop the spring onion greens and rosemary, and juice the limon or lemon.
(3) Make marinade: In a bowl large enough to hold the chicken, mix 2 tablespoons garlic-infused olive oil, Dijon mustard, chopped spring onion greens, chopped rosemary, and a sprinkle each of salt and pepper. Add the chicken to the bowl and spoon the marinade over the chicken to coat both sides of all pieces.
Make-ahead note: At this point, you can leave the chicken in the marinade, covered, in the refrigerator until you’re ready to cook it.
(4) Sear the chicken: Heat 1 tablespoon garlic-infused olive oil in a large oven-safe skillet or Dutch oven over medium-high heat. Add the chicken. Sear on both sides until golden, 3-5 minutes. During the last 2 minutes of cooking, add the butter and lemon slices to the pan. Remove the chicken and the lemon slices from the skillet and set them aside on a plate.
(5) Add remaining ingredients: Add the gluten-free pasta. Cook until the pasta, stirring intermittently until it is toasted, about 2 minutes. Add the broth, kale or spinach, and Limon or lemon juice. Season with salt and pepper. Bring to a boil over medium-high heat. Put the chicken, Limon or lemon slices, and any juices left on the plate back into the skillet.
(6) Finish: Bake, uncovered for 15 minutes or until the chicken is just cooked through. Remove from the oven and let cool for a few minutes before serving. Meanwhile, combine the feta and the lemon juice in a small bowl.
(7) Plate and serve: Spoon the pasta, spinach, and sauce into bowls. Layer on the chicken and Limon or lemon slices. Top with the feta and lemon juice and garnish with rosemary if you like.
Eat and enjoy every bite because you can!
*This post may contain links for you to easily purchase items listed on the page. In some cases, we have provided a special discount code for IBS Game Changers so be sure to use it when you purchase an item to get the discount that has been arranged just for you! As an Amazon Associate, I earn a commission from qualifying Amazon purchases.
More Deliciously Low FODMAP™ main course recipes you might enjoy
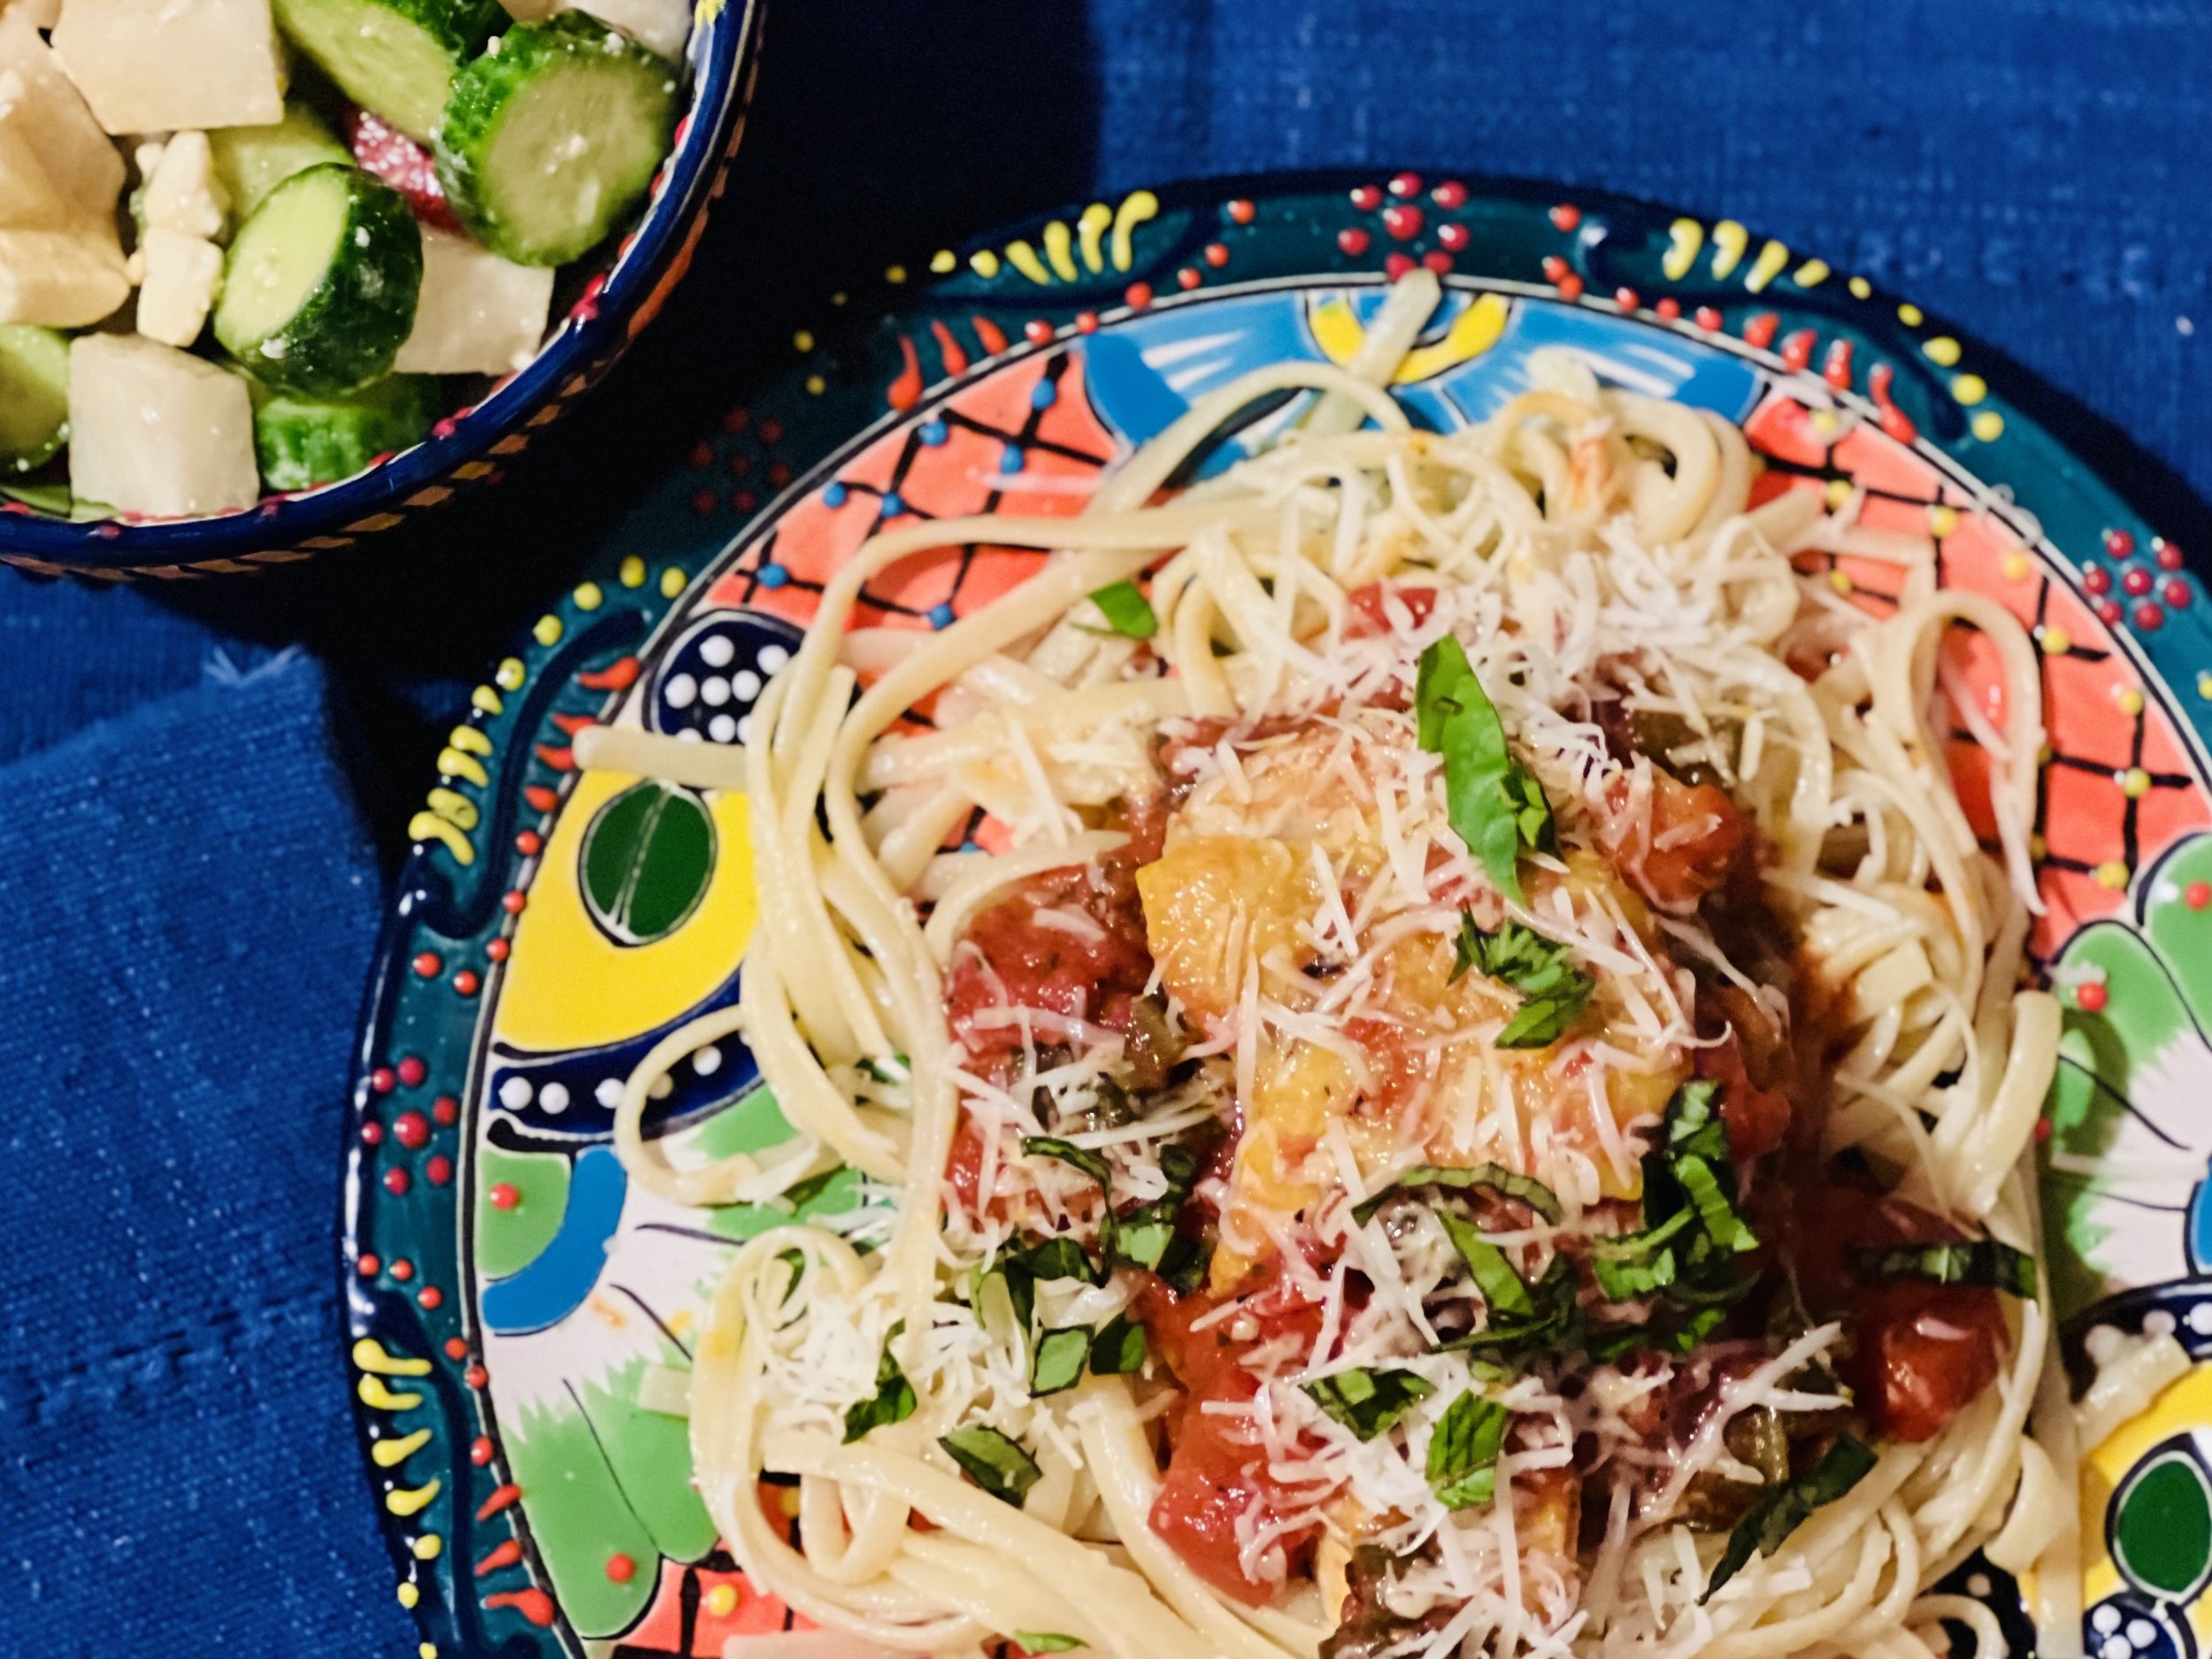
Chicken Linguini Marinara (low FODMAP)
15 Minutes prep • 30 Minutes cook • Low FODMAP • Gluten-Free • Lactose-free • Serves 4
15 Minutes prep • 30 Minutes cook • Low FODMAP • Gluten-Free • Lactose-free • Serves 4 • Ok to make-ahead: Step 1
Chicken thighs cooked in a rich marinara sauce and served on a bed of pasta is a classic and memorable combination! This version of the classic is wonderfully flavorful, with tender chicken and delicious sauce and it’s low FODMAP of course! I used a combination of fresh tomatoes and finely chopped tomatoes from a carton to deliver a marinara that is robust and delicious. Using boneless chicken thighs keeps the cook-time down and makes it wonderfully easy to eat.
Ingredients
4 boneless chicken thighs or breasts (skin on)
4 tablespoons garlic-infused olive oil
1 bunch spring onions or green onions (green part only) chopped
3 - 4 Roma tomatoes, chopped
3 teaspoons Italian seasoning
14-ounce box finely chopped tomatoes (I used Pomi)
8 ounces gluten-free linguini (I used Rummo)
1 - 2 tablespoons butter or olive oil
Fresh-grated Parmesan cheese and fresh basil for serving (optional)
Directions
(1) Prepare chicken: This step is optional but adds to the flavor and texture of the meat. Remove chicken from packaging and season both sides of each piece of chicken lightly with Kosher salt. Put on a plate, cover with plastic wrap, and refrigerate overnight or at least 4 hours before cooking.
Make-ahead note: This chicken is delicious and easy to cook but the texture and flavor benefit from early salting. So, if you have time to salt your chicken and let it sit for at least 4 hours before you cook it, you will like the results.
(2) Prepare: Preheat oven to 375 degrees F. Chop the green onions and tomatoes.
(3) Brown the chicken: In an oven-proof skillet or Dutch oven, heat 2 tablespoons garlic-infused olive oil over medium-high heat. Add the chicken and brown on both sides (about 3 minutes on each side). Remove the chicken from the pan and set it aside.
(4) Make the marinara: Add another tablespoon of garlic-infused olive oil. Then add the chopped green onions, the chopped tomatoes, and the Italian seasoning. Cook for a few minutes so the seasoning releases its flavor. Add the carton of tomatoes and about 1/2 cup of water. Let the sauce simmer for about 15 minutes to blend the flavors. If it gets too thick add a bit of hot water (1/4 cup at a time) and stir to combine. Taste and add a bit of salt and pepper if needed.
(5) Cook the chicken: Add the chicken to the pan with the marinara sauce and put it, uncovered, in the oven. Cook just until the chicken is cooked through (about 15 minutes for boneless chicken—shorter for breast meat than for thighs).
(6) Prepare the pasta: Prepare the pasta per package instructions. When cooked to your liking, drain but do not rinse the pasta, put it back in the pan you cooked it in, toss with butter or olive oil, cover and keep warm until ready to serve.
(7) Plate and serve: Put the pasta on the plate, add a generous scoop of marinara and a piece of chicken. Finish with freshly grated parmesan and chopped basil if you like. Serve with a side salad and warm (real) sourdough bread if you like.
Eat and enjoy every bite because you can!
*This post may contain links for you to easily purchase items listed on the page. In some cases, we have provided a special discount code for IBS Game Changers so be sure to use it when you purchase an item to get the discount that has been arranged just for you! As an Amazon Associate, I earn a commission from qualifying Amazon purchases.
More Deliciously Low FODMAP™ main course recipes you might enjoy
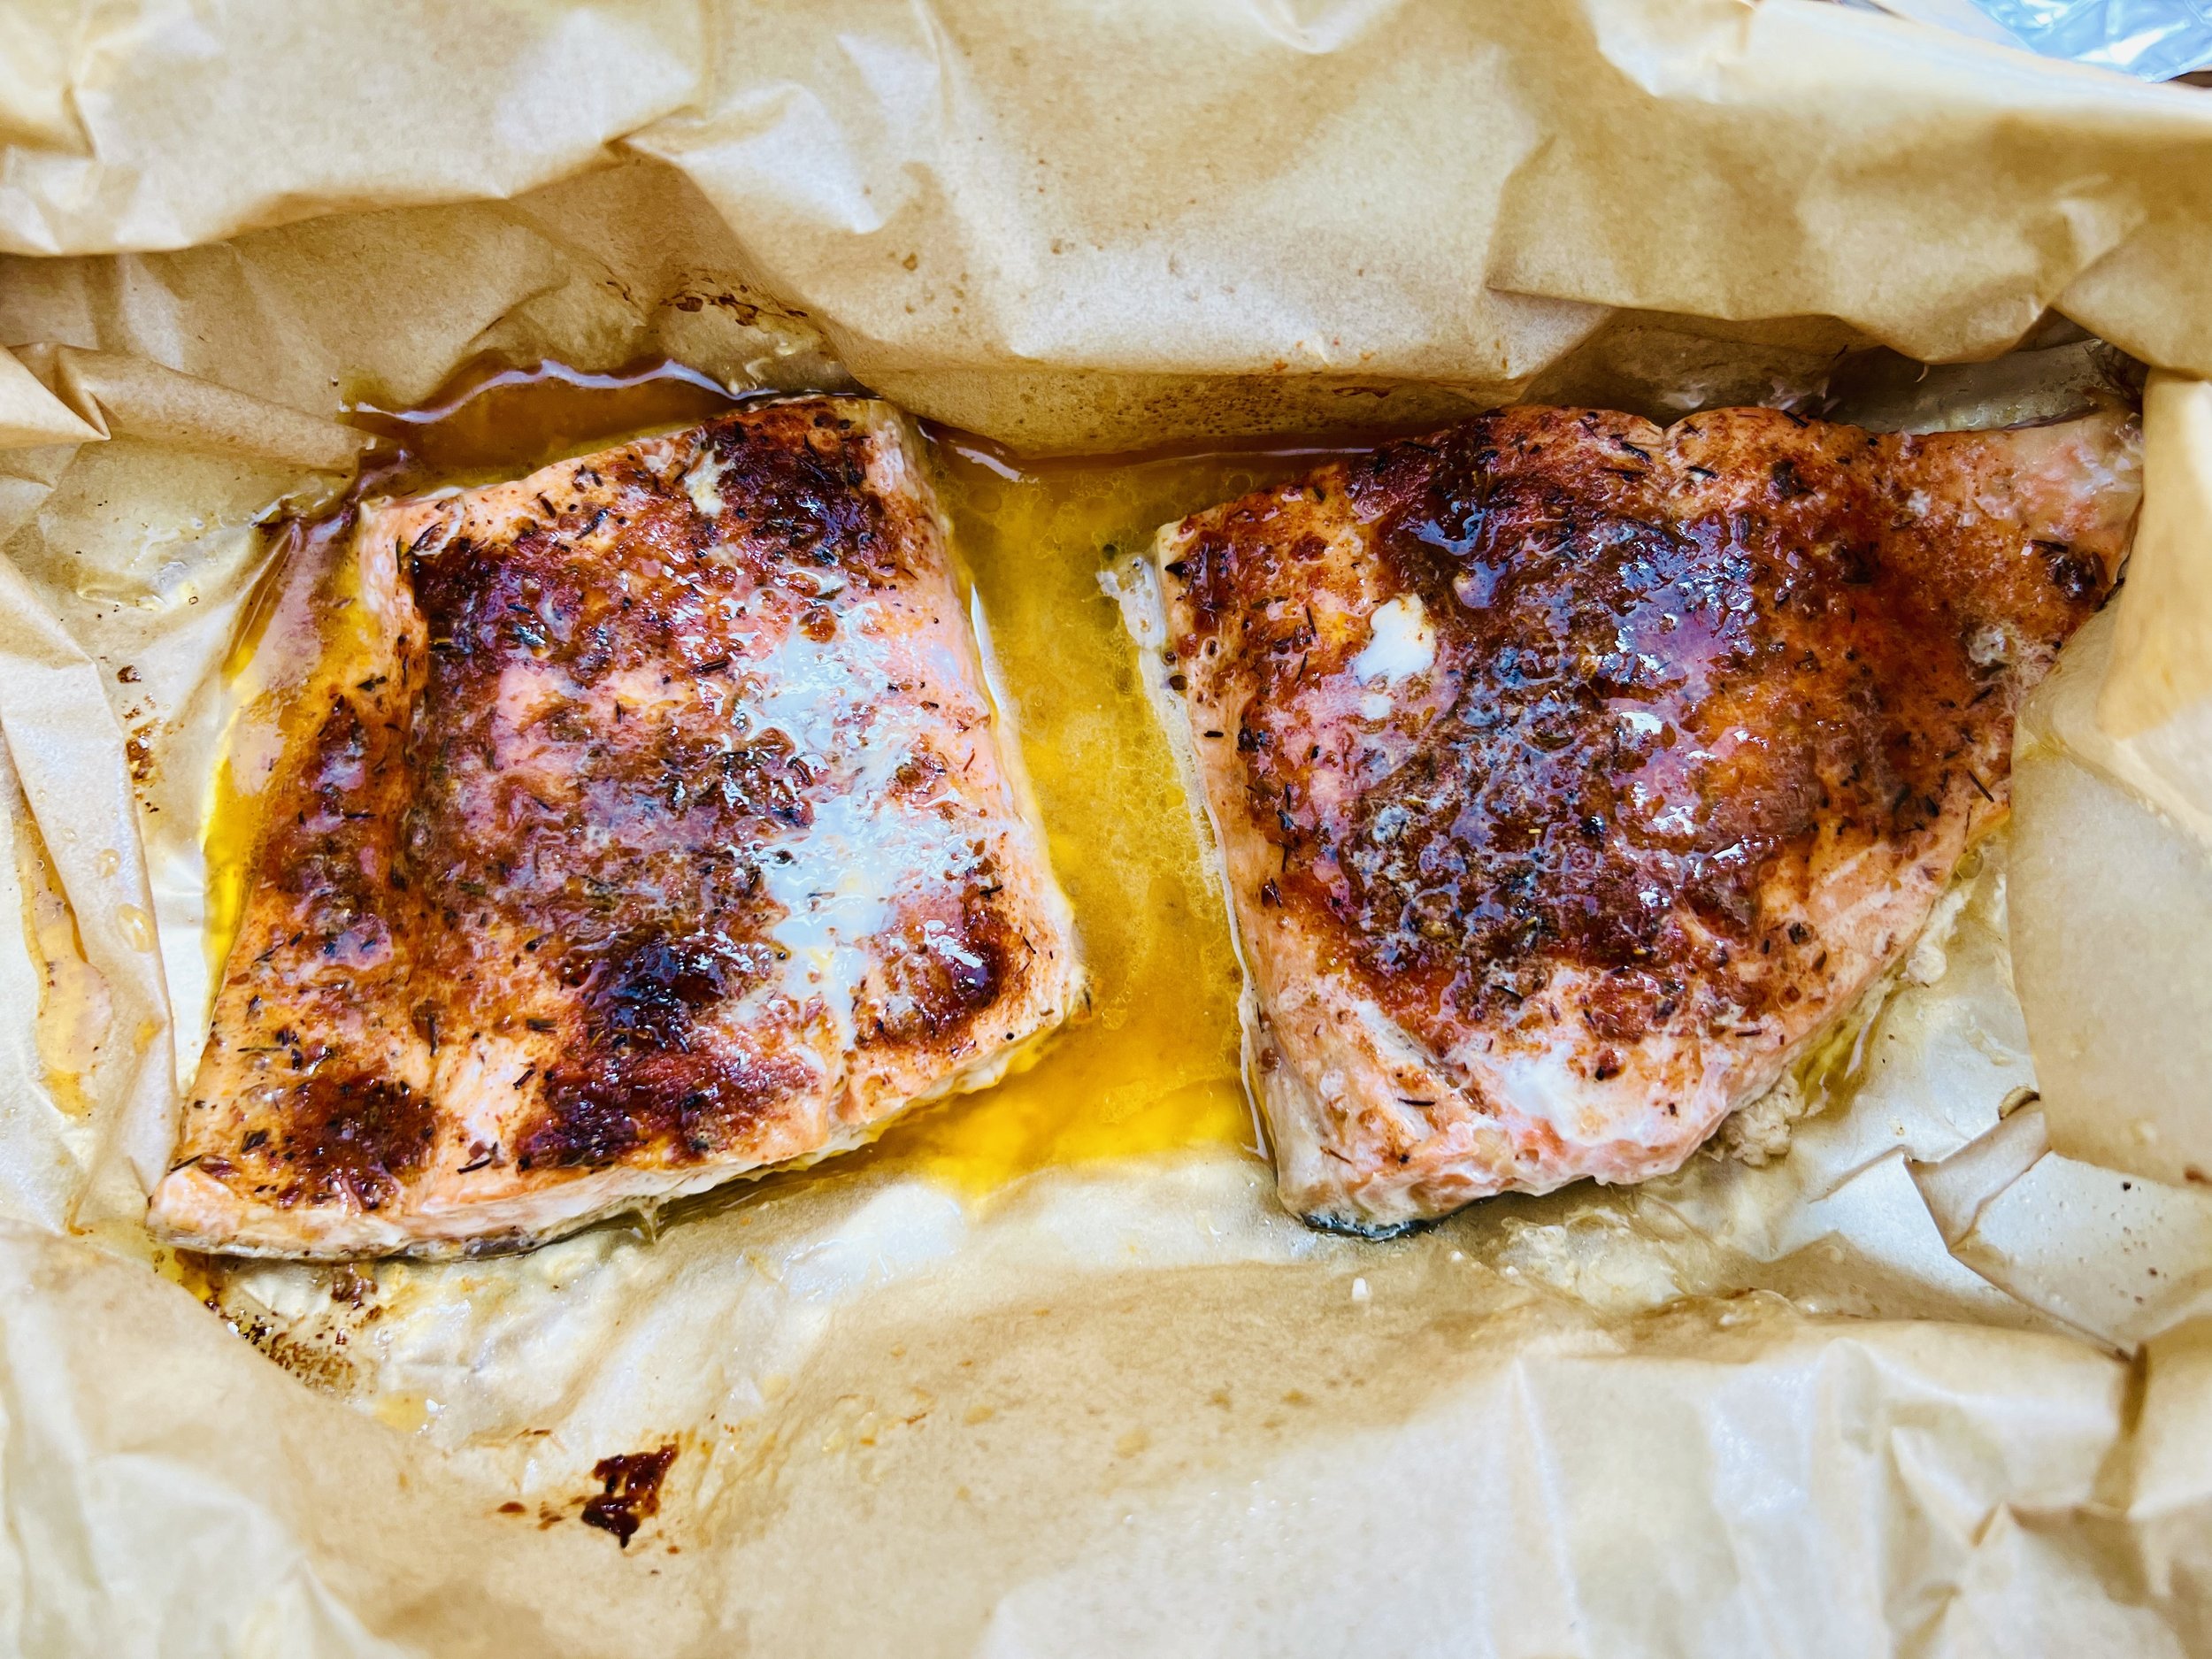
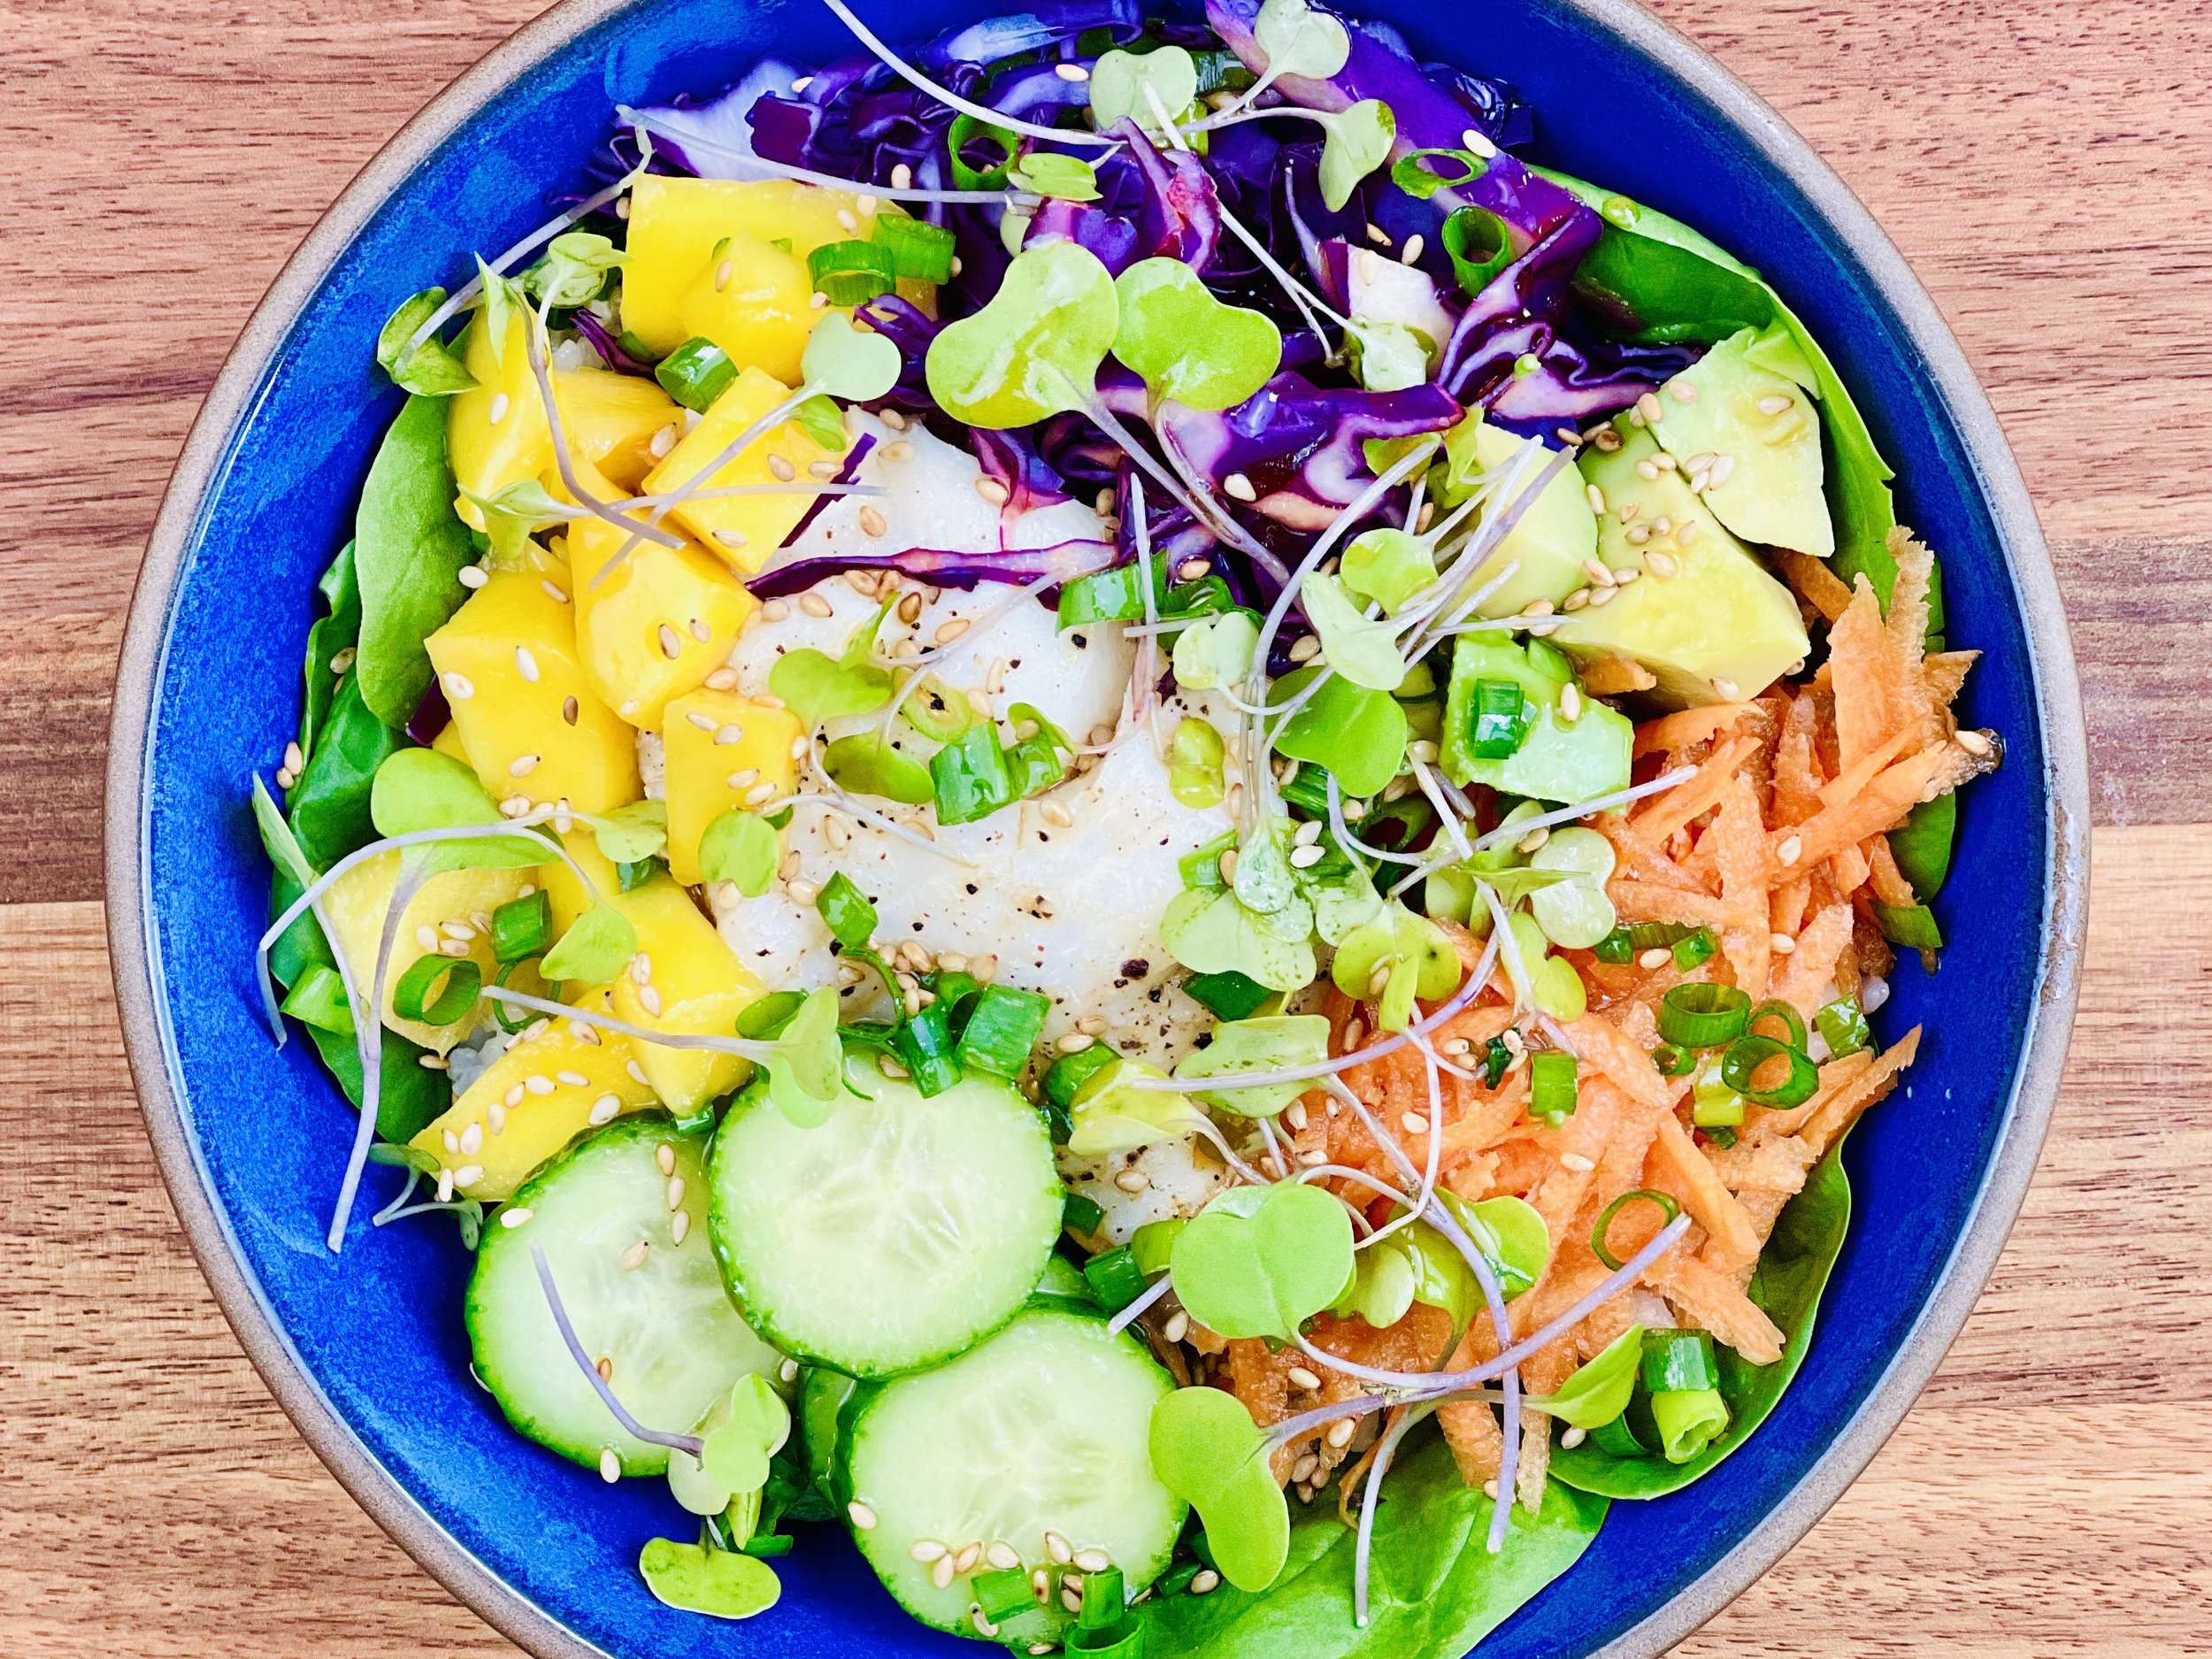
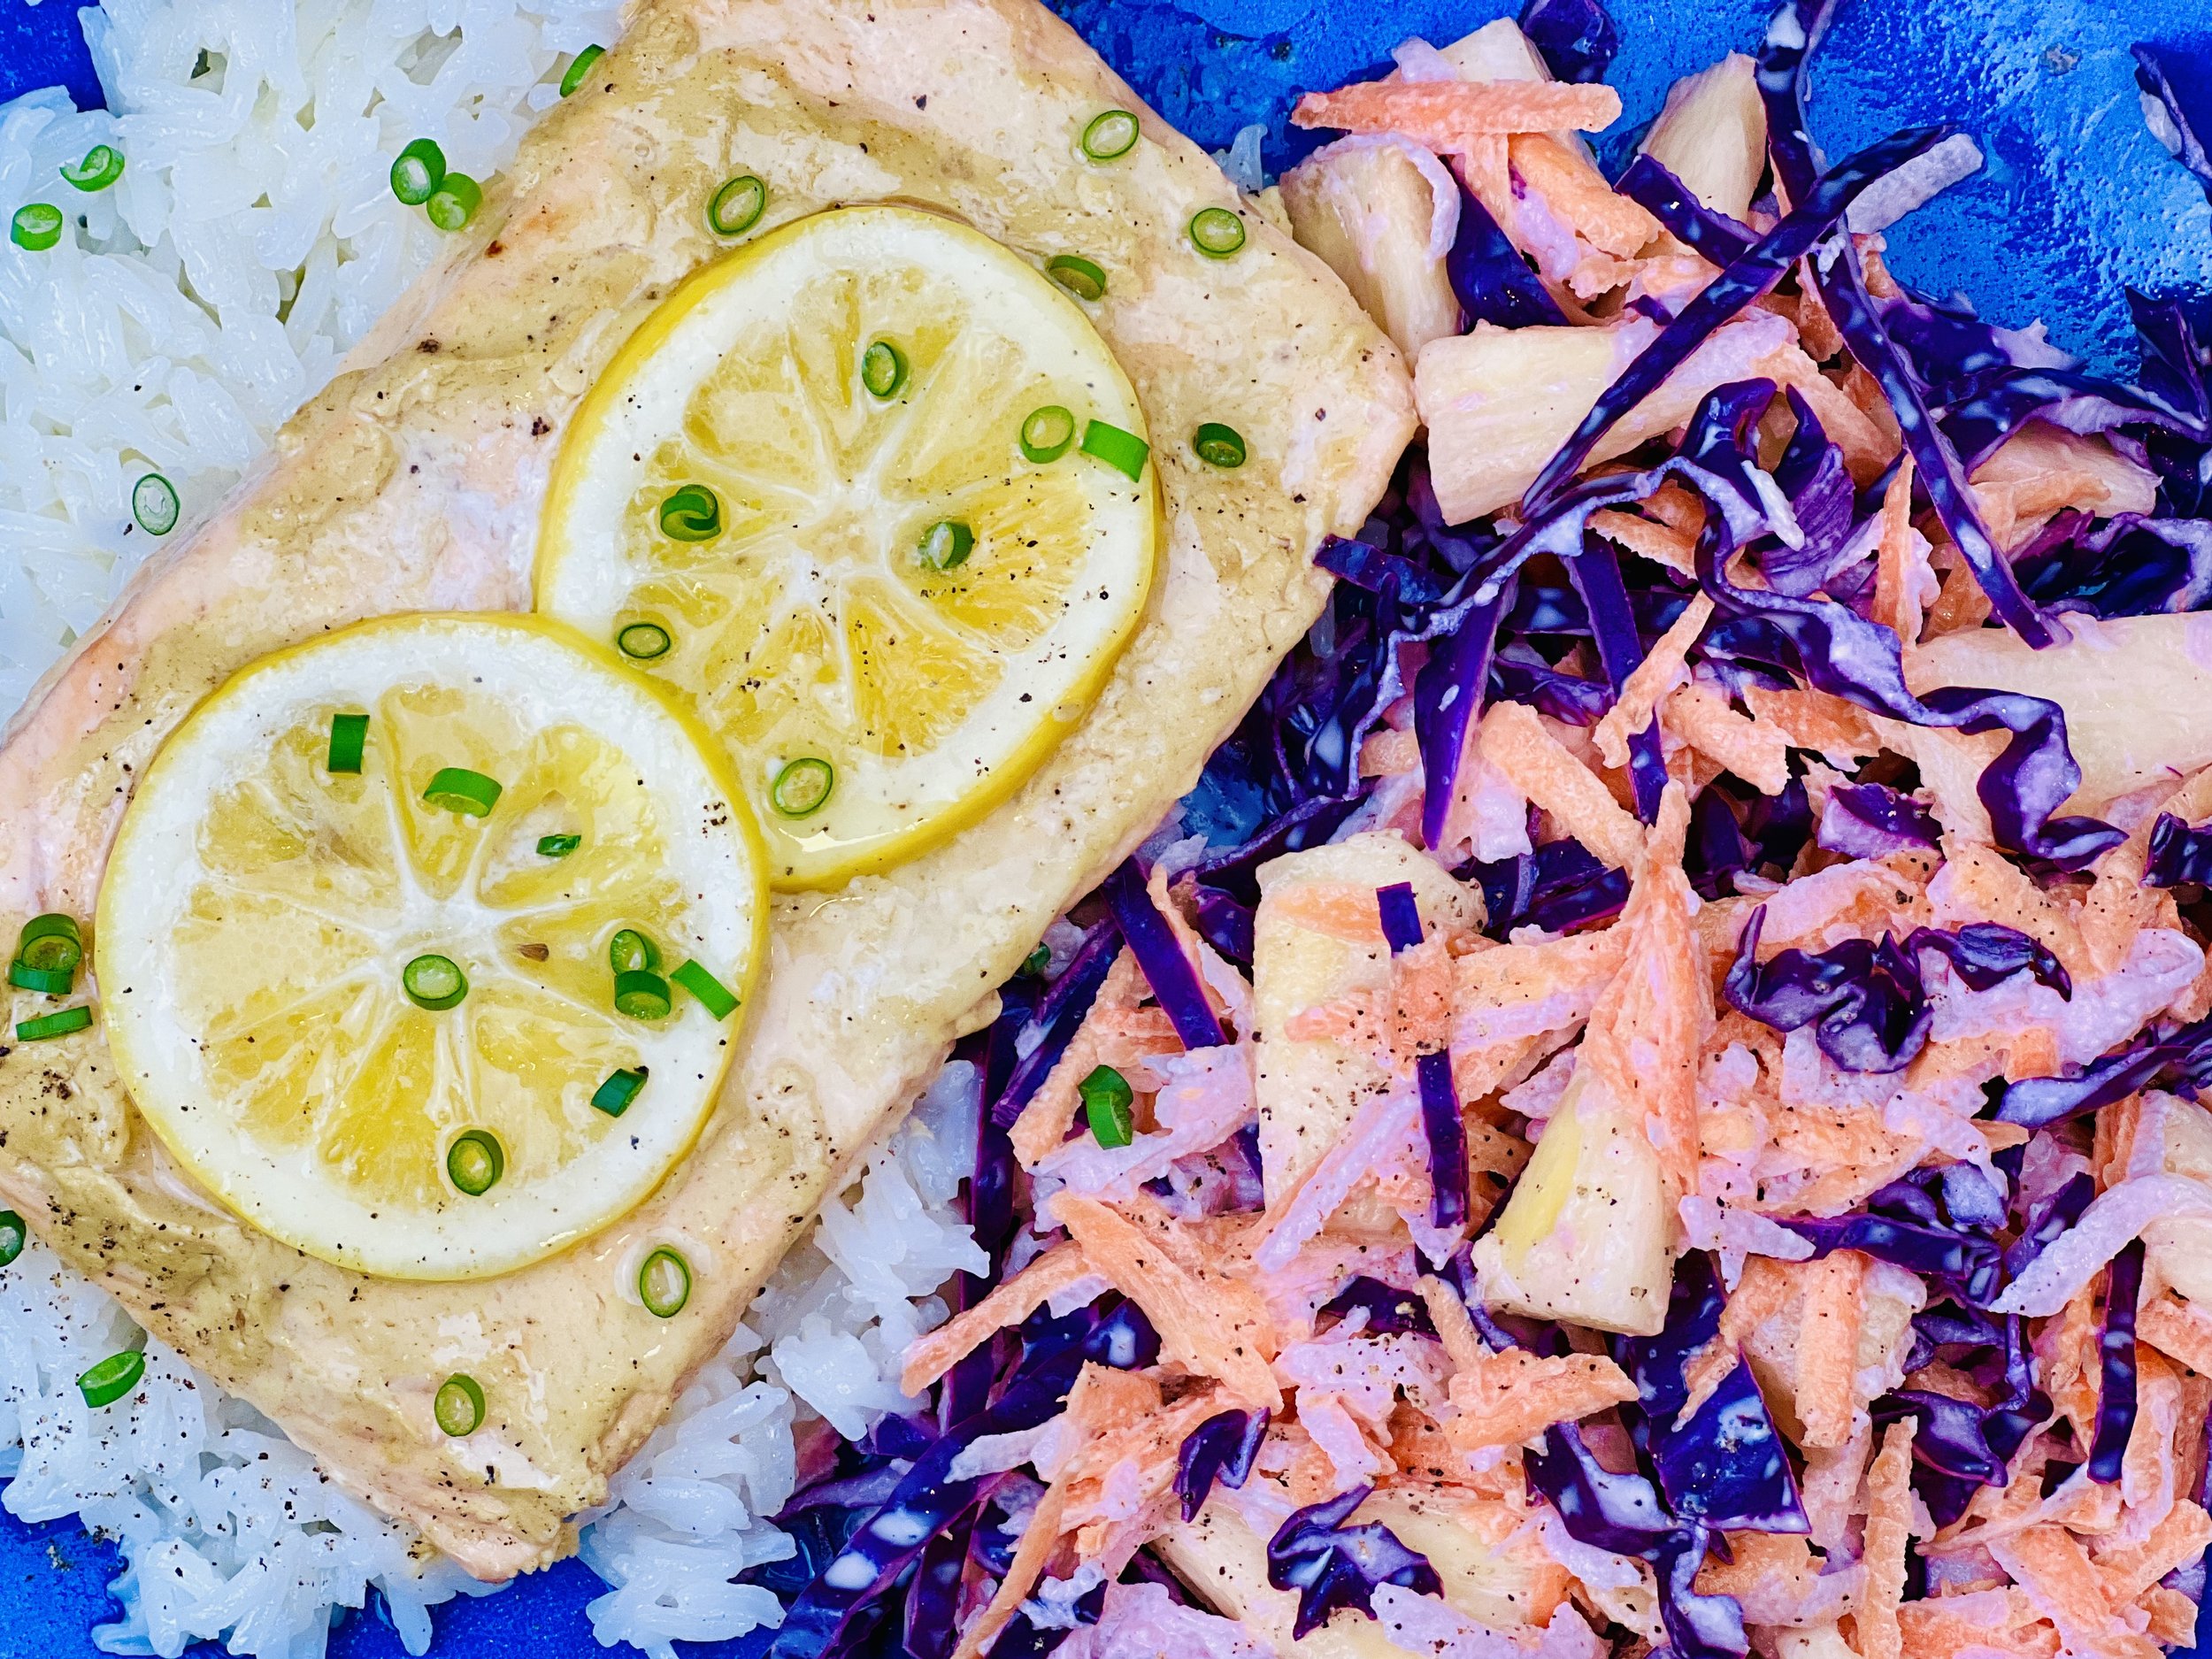
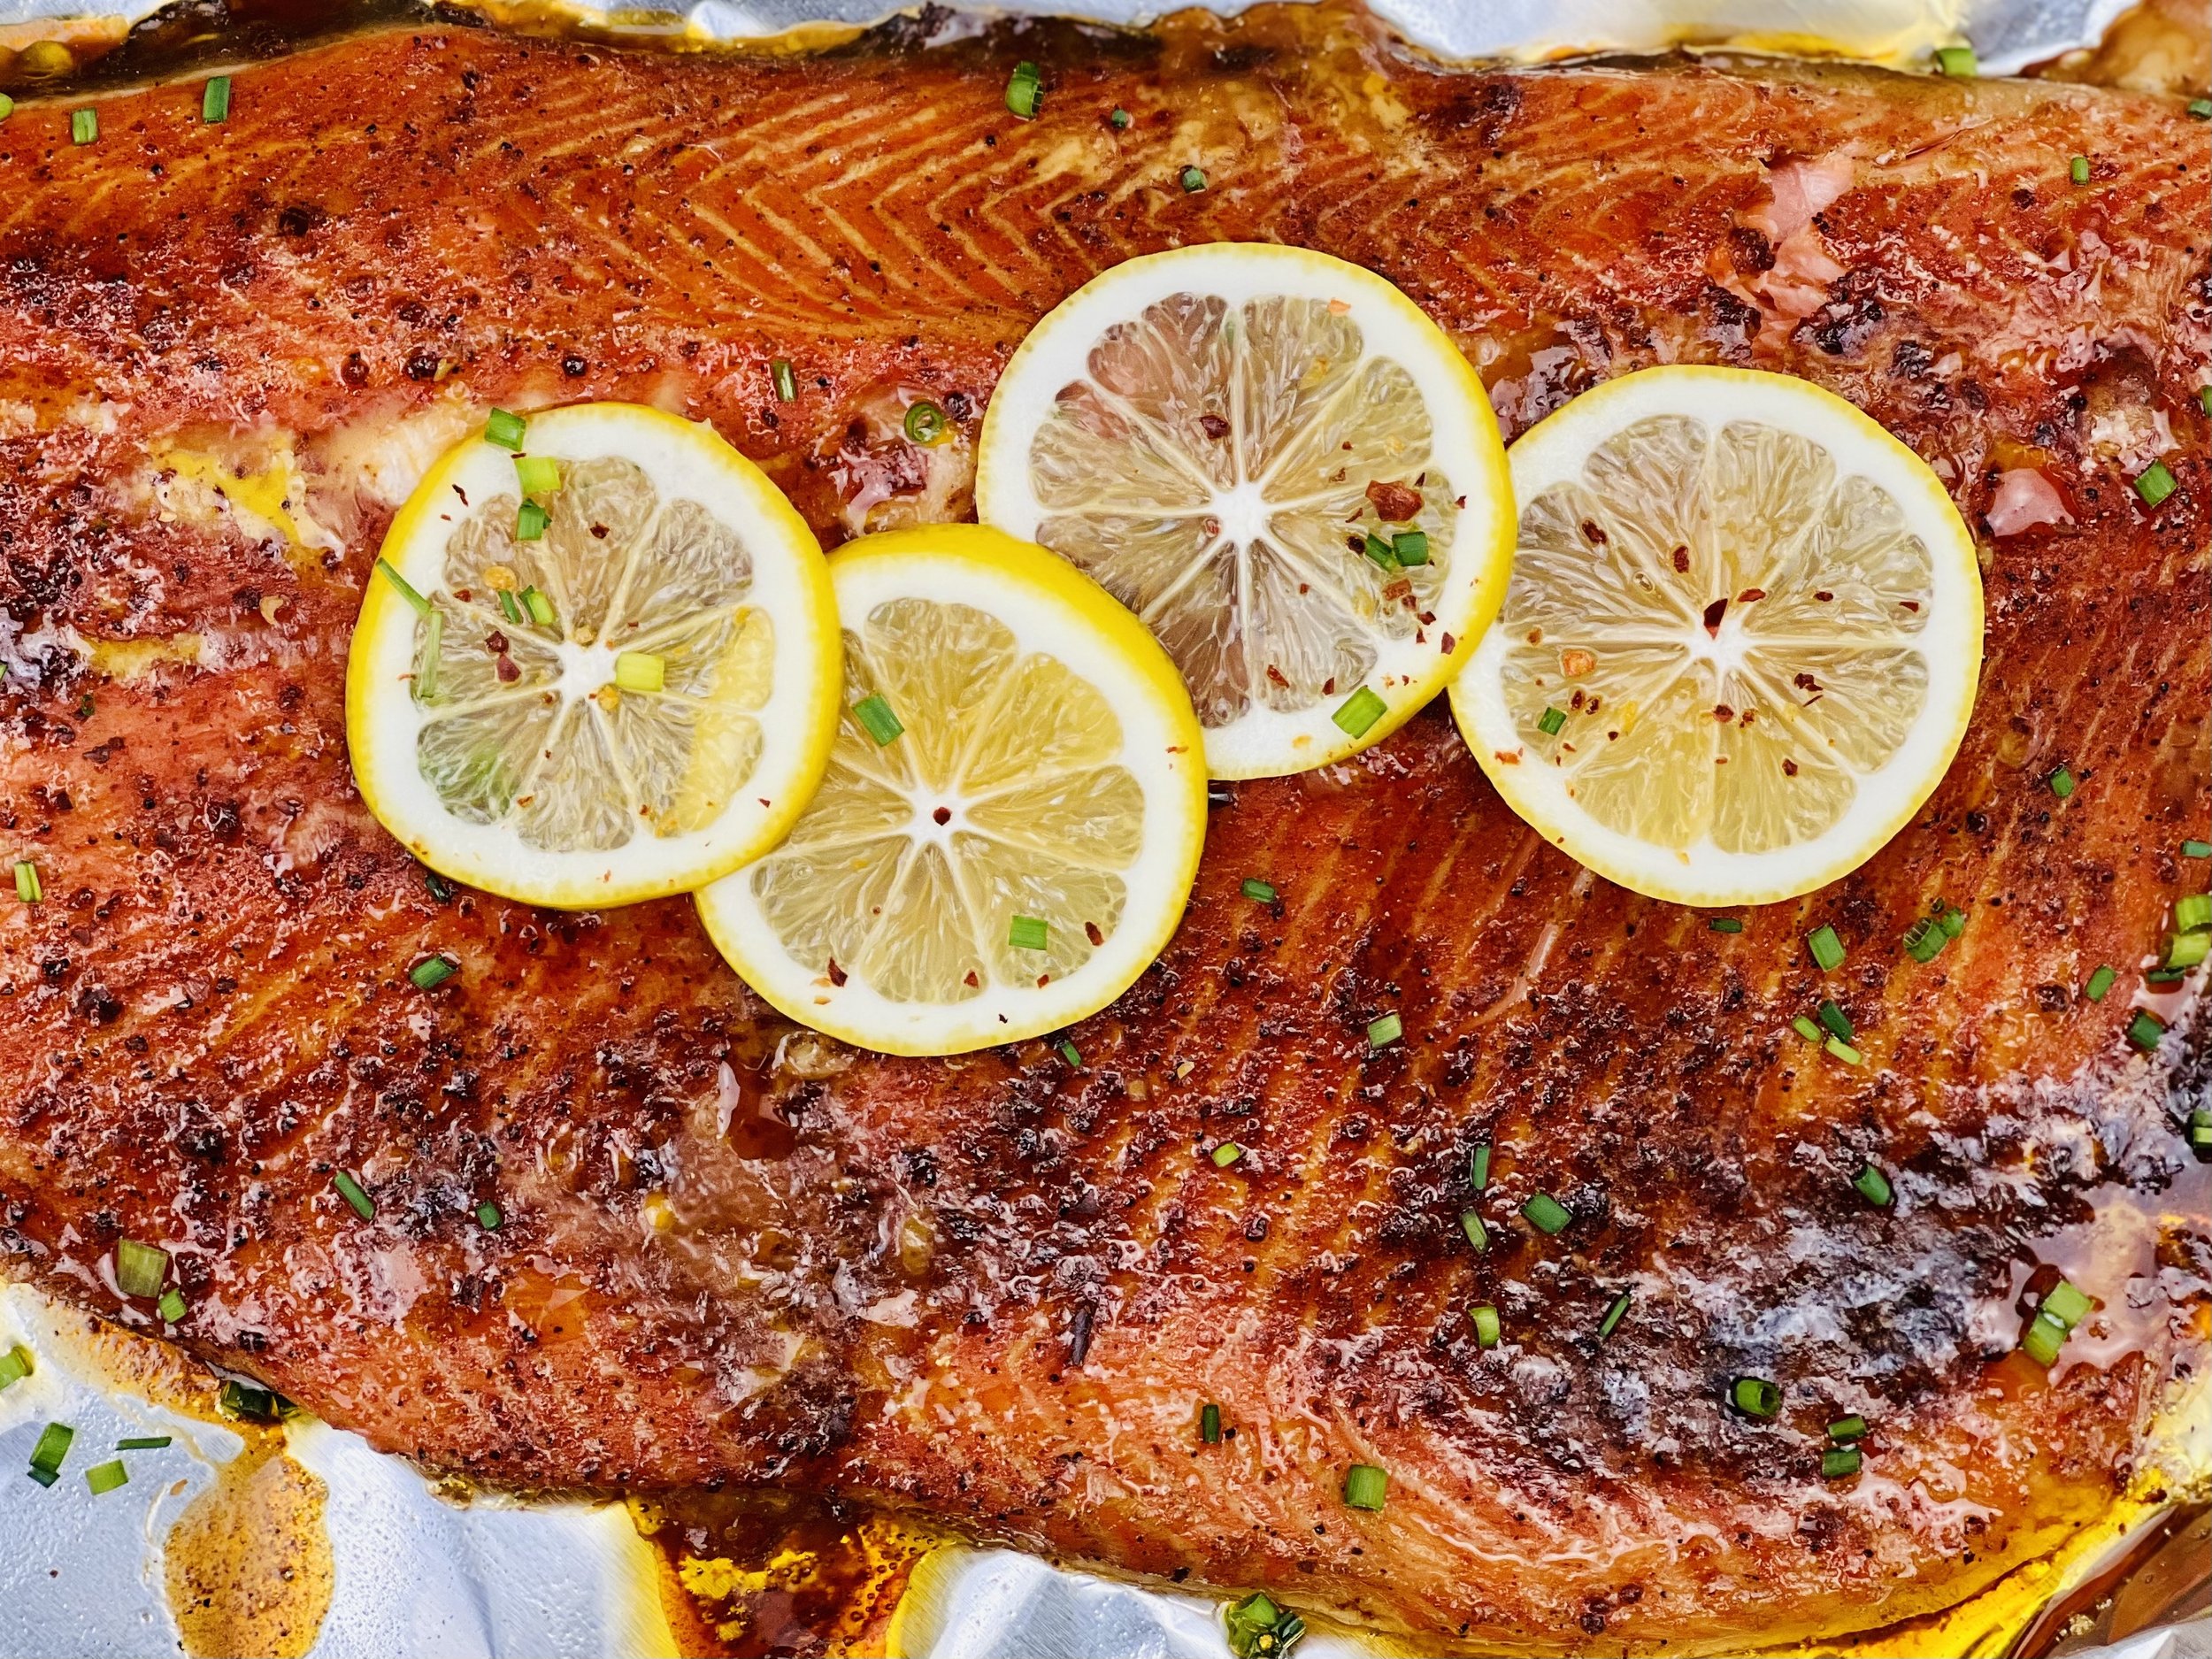
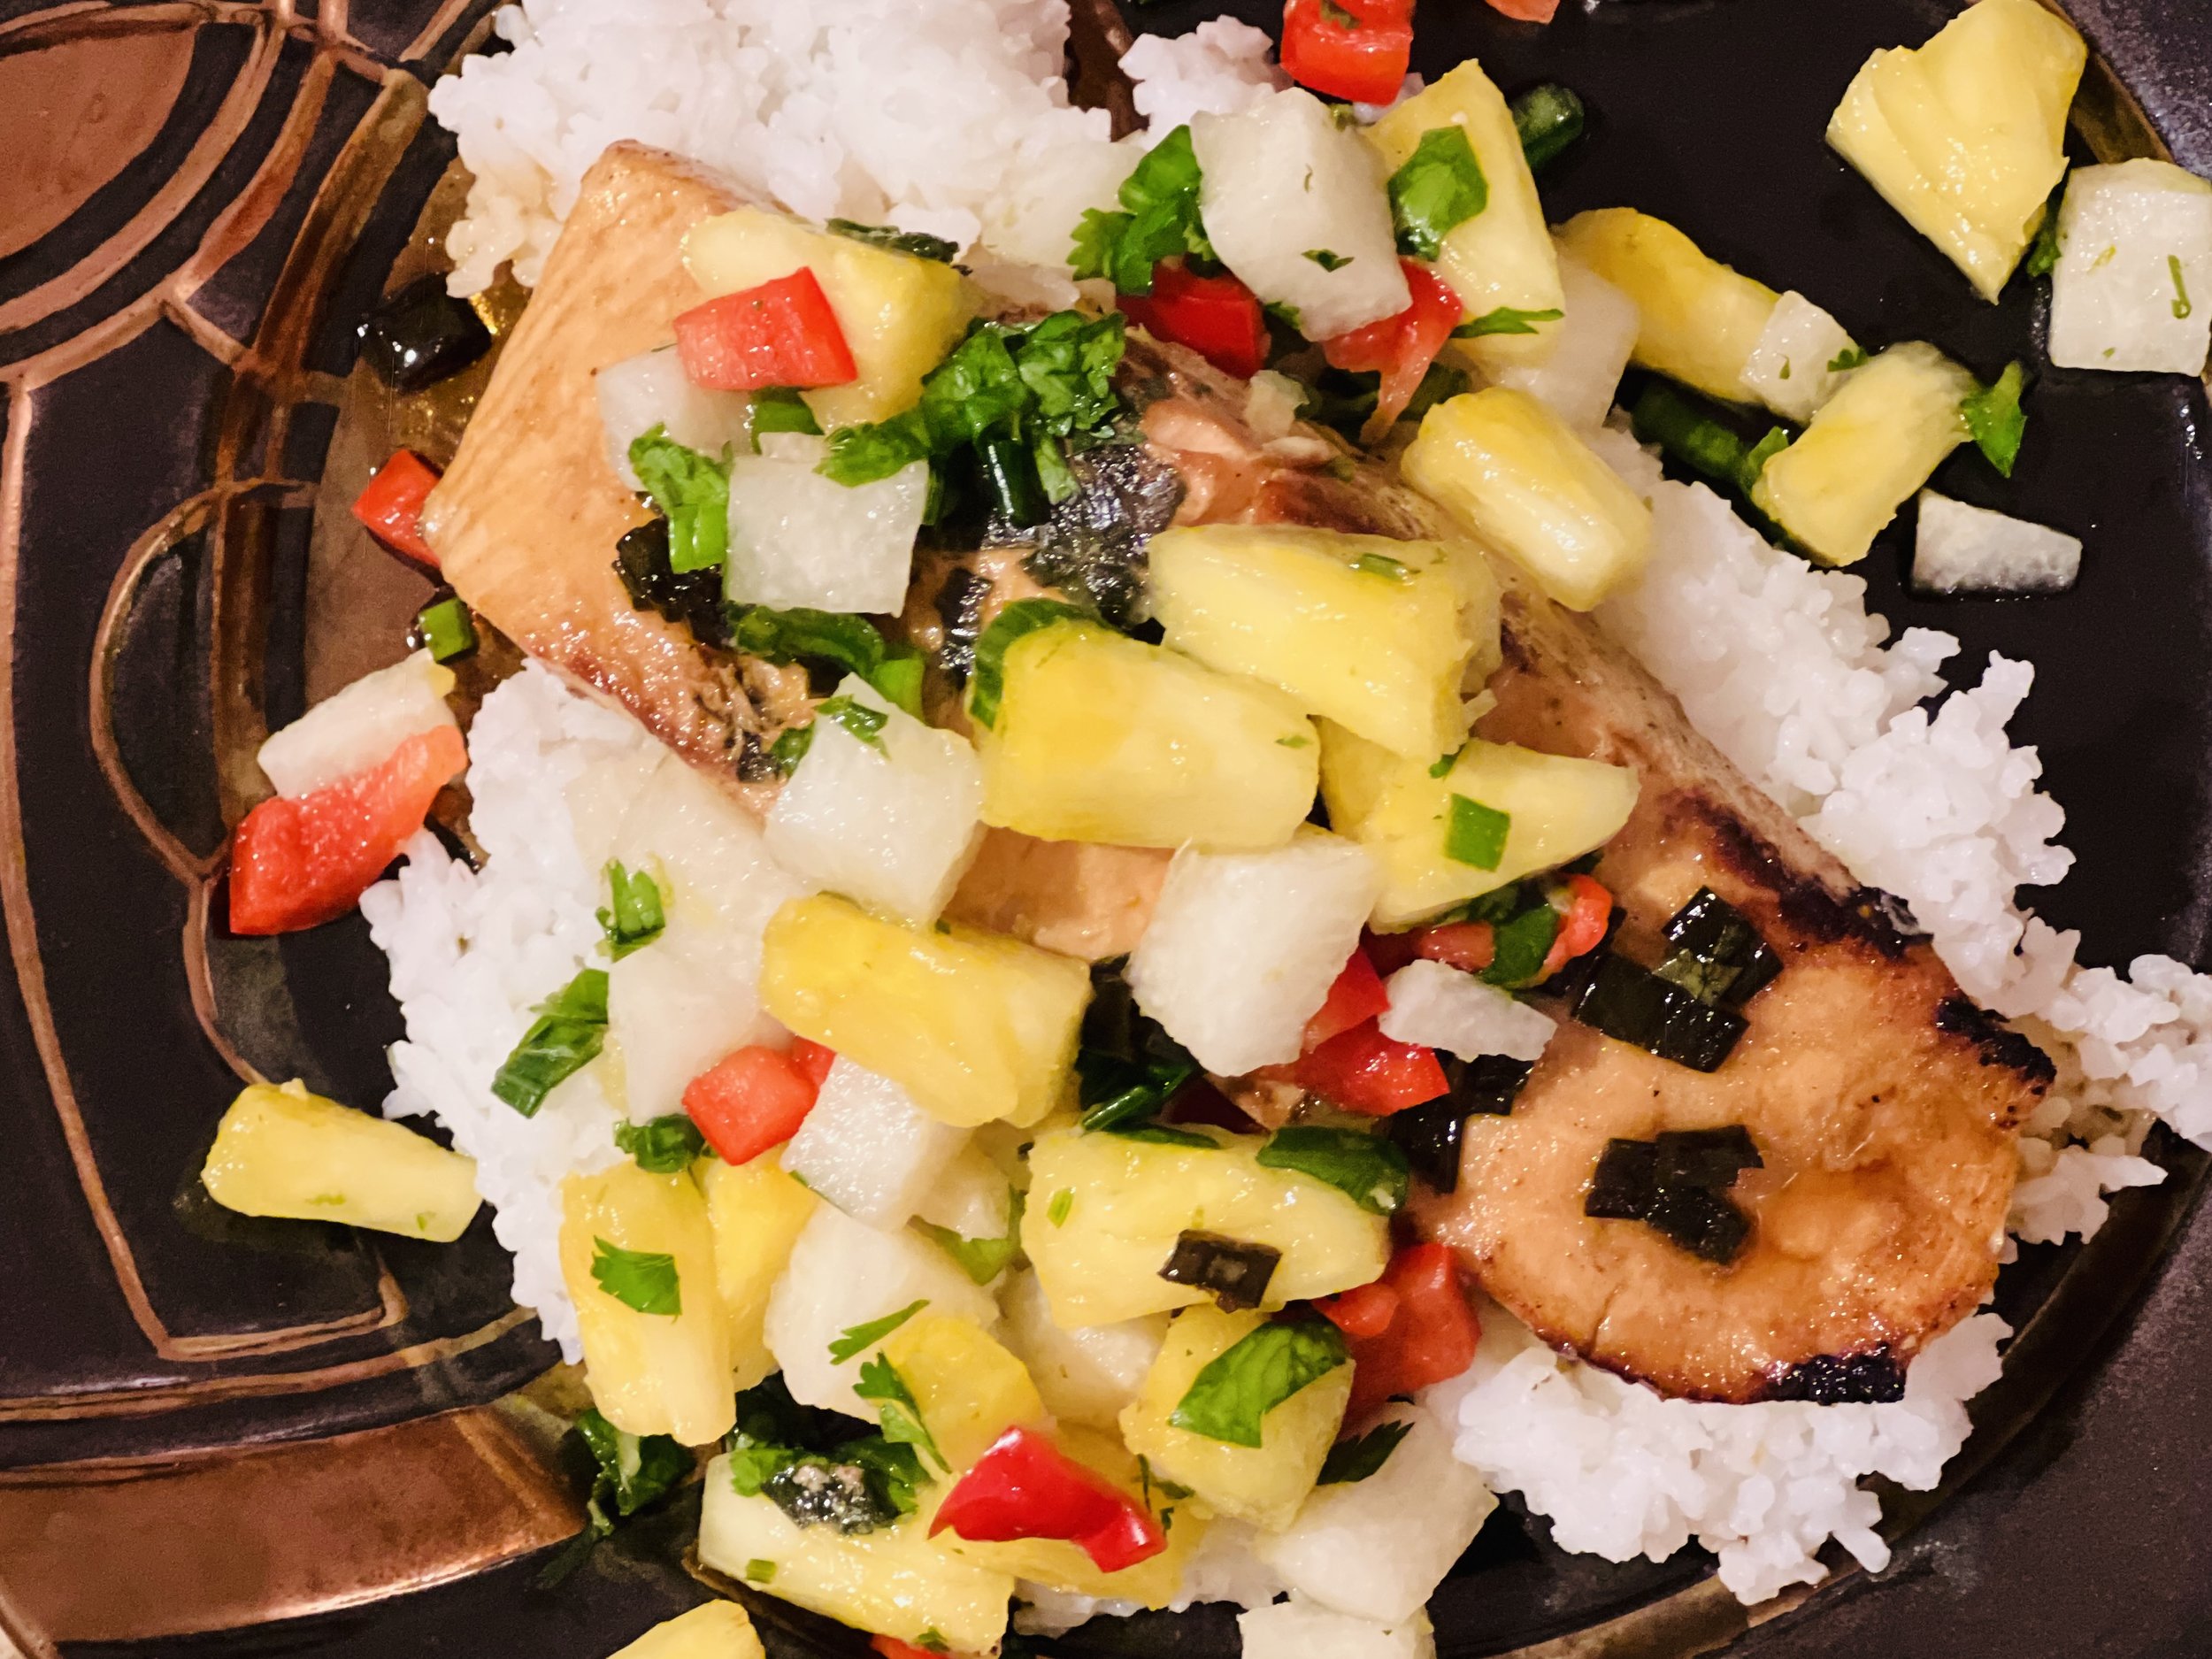
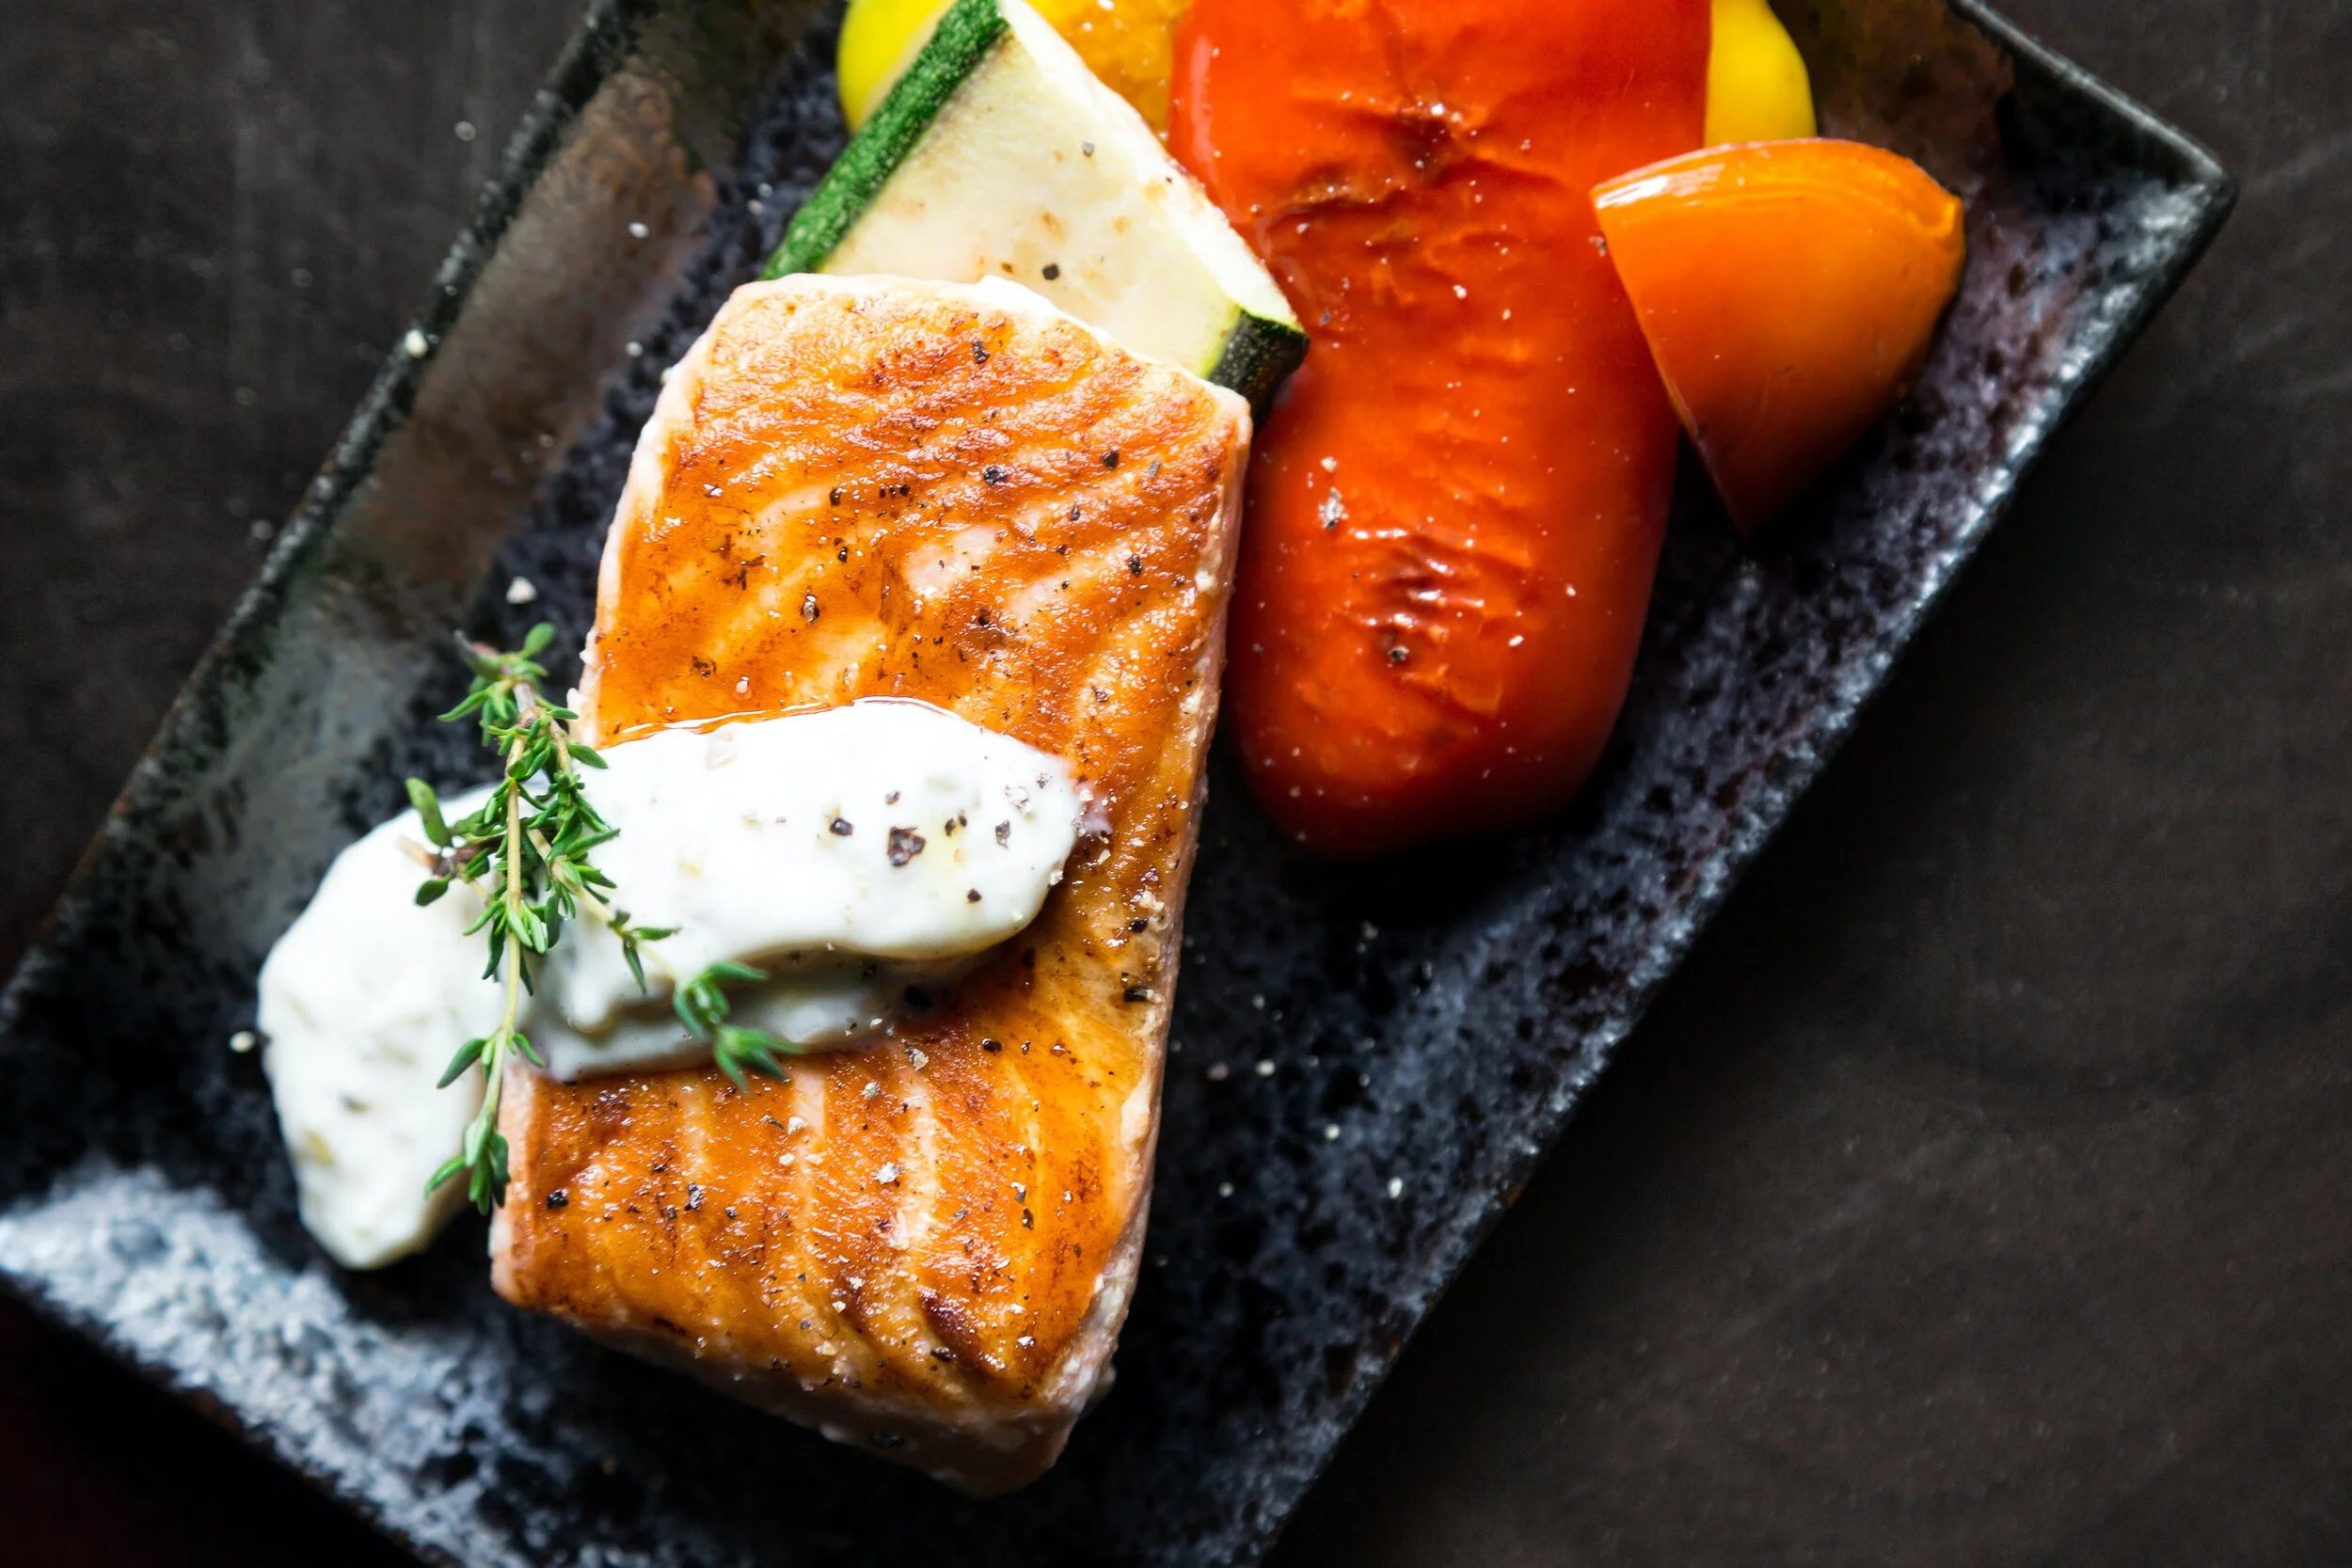
Teriyaki Salmon with Pineapple Jicama Salsa and Coconut Rice (low FODMAP)
30 Minutes prep • 20 Minutes cook • Low FODMAP • Gluten-Free • Lactose-free • Serves 2
30 Minutes prep • 20 Minutes cook • Low FODMAP • Gluten-Free • Lactose-free • Serves 2 • Ok to make-ahead: Steps 1 - 3
My dad loves pineapple, coconut, teriyaki, and salmon. So, this recipe came about as the result of considering how to put all those wonderful flavors together into one delicious meal. It’s tropical, flavorful, and beautiful to look at. I was in Mexico when I created this recipe so I used limon instead of lemon or lime in the pineapple salsa, and it was really delicious. You can, of course, use lemon or lime if you can’t get limon where you live and it will still be great.
Ingredients: Salsa
1 1/2 cups finely chopped fresh pineapple
1 cup jicama, peeled and finely chopped
1/2 cup red bell pepper, finely chopped
1/2 cup green onions or spring onions (green part only) chopped
1 tablespoon lime, lemon, or limon juice
1/2 teaspoon lime, lemon, or limon zest
2 tablespoons cilantro, chopped
Ingredients: Salmon
2 salmon filets (with or without skin)
1 tablespoon garlic-infused olive oil
1/2 cup green onions or spring onions (green part only) chopped
1/4 cup gluten-free low sodium soy sauce*
1/8 cup water
2-3 tablespoons brown sugar (depending on how sweet you like it)
1 tablespoon rice vinegar
Ingredients: Coconut Rice
2 teaspoons olive oil or toasted sesame oil*
1 cup jasmine rice*, rinsed and drained
1 can coconut milk* (14 ounces)
1/2 teaspoon kosher salt*
Directions
(1) Prepare the salsa: Combine all ingredients in a bowl. Set aside in the refrigerator. The flavor will be best if it can rest for at least an hour before serving. Stir it a couple of times while it sits.
(2) Make marinade: Combine garlic-infused olive oil, soy sauce, 1/8 cup water, brown sugar, and rice vinegar in a medium bowl.
(3) Marinate the salmon: Add half of the marinade to a ziplock bag or shallow bowl and the other half to a small saucepan and set aside. Place salmon filets in the bag or bowl and marinate for at least 30 minutes.
Make-ahead note: At this point, you can set everything aside for an hour or so until you’re ready to cook.
(4) Cook the rice: Put the rice in a fine strainer and rinse under cold water until the water runs clear. Set aside and let drain. Heat the olive oil or toasted sesame oil in a medium saucepan over medium-high heat. Add the rice and sauté for 2 minutes. Add the coconut milk and salt and bring to a boil. Reduce heat to a simmer, cover, and cook 15-20 minutes, until the liquid has been absorbed. Fluff with a fork.
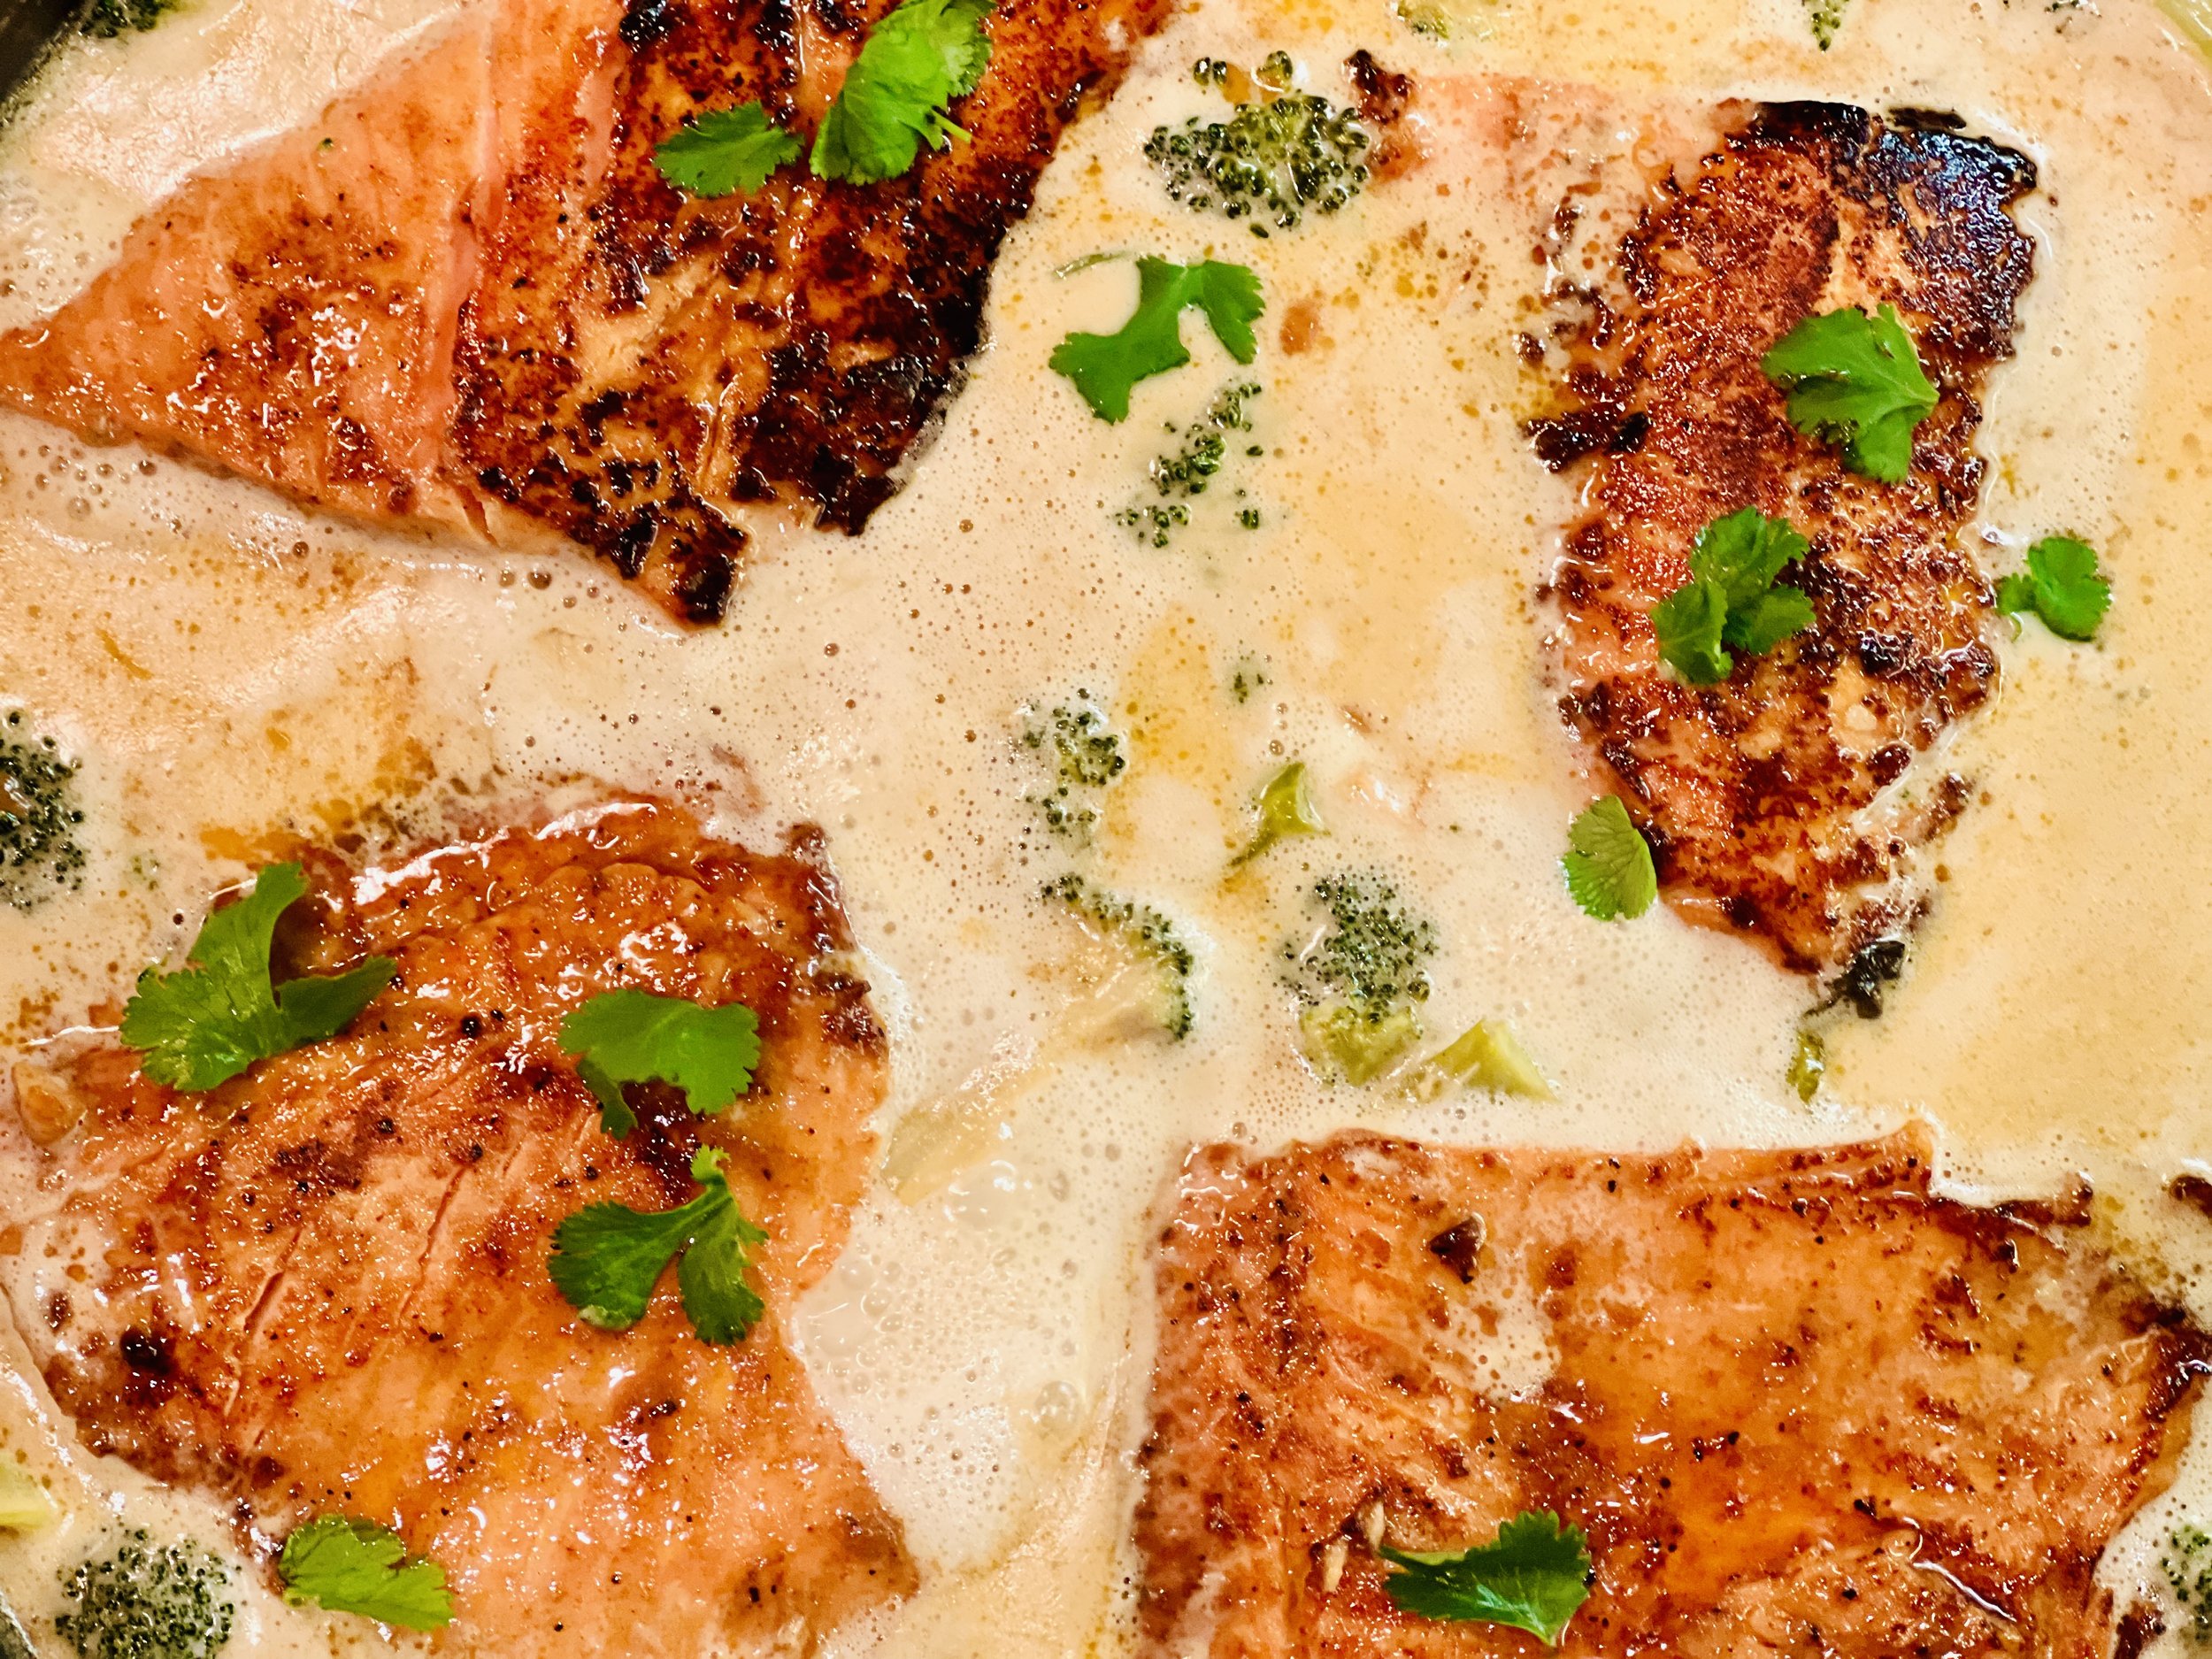
(5) Cook the salmon: Meanwhile, heat 1 tablespoon garlic-infused olive oil in a medium skillet over medium-high heat. Once hot, add the salmon filets without overcrowding the pan. If the filets have skin, cook them skin side up first. Cook 3-10 minutes on each side depending on the thickness until cooked to your desired doneness. (I like them to be nearly opaque but not dry.)
(6) Make the teriyaki sauce: Meanwhile, heat the reserved marinade in the saucepan over medium heat until it reaches a simmer. Continue to simmer until the sauce is thickened slightly (about 5 minutes).
(7) Plate and serve: On each plate add a scoop of coconut rice, a salmon filet, a drizzling of the teriyaki sauce, and a generous scoop of the pineapple jicama salsa. Serve with additional teriyaki sauce and salsa.
Eat and enjoy every bite because you can!
*This post may contain links for you to easily purchase items listed on the page. In some cases, we have provided a special discount code for IBS Game Changers so be sure to use it when you purchase an item to get the discount that has been arranged just for you! As an Amazon Associate, I earn a commission from qualifying Amazon purchases.
More Deliciously Low FODMAP™ seafood recipes you might enjoy


45 Minutes • Low FODMAP • Gluten-Free • Serves 4 • Ok to make-ahead: Steps 1 - 4