Deliciously Low FODMAP

Inspire yourself with hundreds of delicious low FODMAP recipes, tips, and tools, and enjoy the abundance that is yours even when you have IBS.
Use the buttons and filters to find something specific or browse the complete collection for inspiration.
Discover a treasure trove of recipes with my FREE recipe club! Get new ideas delivered straight to your inbox every week.
Deliciously Low FODMAP is a trademark of IBS Game Changer, LLC
Filter to find Recipes and Tools
More Filtering Options
- All 728
- Appetizer 50
- BBQ 46
- Bowl 32
- Breakfast 58
- Cocktails 13
- Collection 1 58
- Collection 10 27
- Collection 11 30
- Collection 12 27
- Collection 13 31
- Collection 14 29
- Collection 15 31
- Collection 16 34
- Collection 17 31
- Collection 18 33
- Collection 19 36
- Collection 2 32
- Collection 20 33
- Collection 21 33
- Collection 22 40
- Collection 23 10
- Collection 24 1
- Collection 3 28
- Collection 4 29
- Collection 5 30
- Collection 6 32
- Collection 7 31
- Collection 8 31
- Collection 9 32
- Condiments 6
- Crock Pot 4
- Dessert 107
- Diabetes Game Changer Exception Protocol Contains Alcohol 11
- Diabetes Game Changer Exception Protocol Contains Flour 108
- Diabetes Game Changer Exception Protocol Contains Flour AND Sugar 77
- Diabetes Game Changer Exception Protocol Contains Sugar 49
- Diabetes Game Changer First Four Weeks 363
- Dinner 330
- Drink 8
- Free Guide 17
- Gluten-free 590
- Gut Microbiome 2
- Guthealth 3
- Holidays 68
- IBS Triggers 4
- Keto Friendly 124
- Lactose-Free 175
- Low FODMAP Diet 714
- Low Net Carb 138
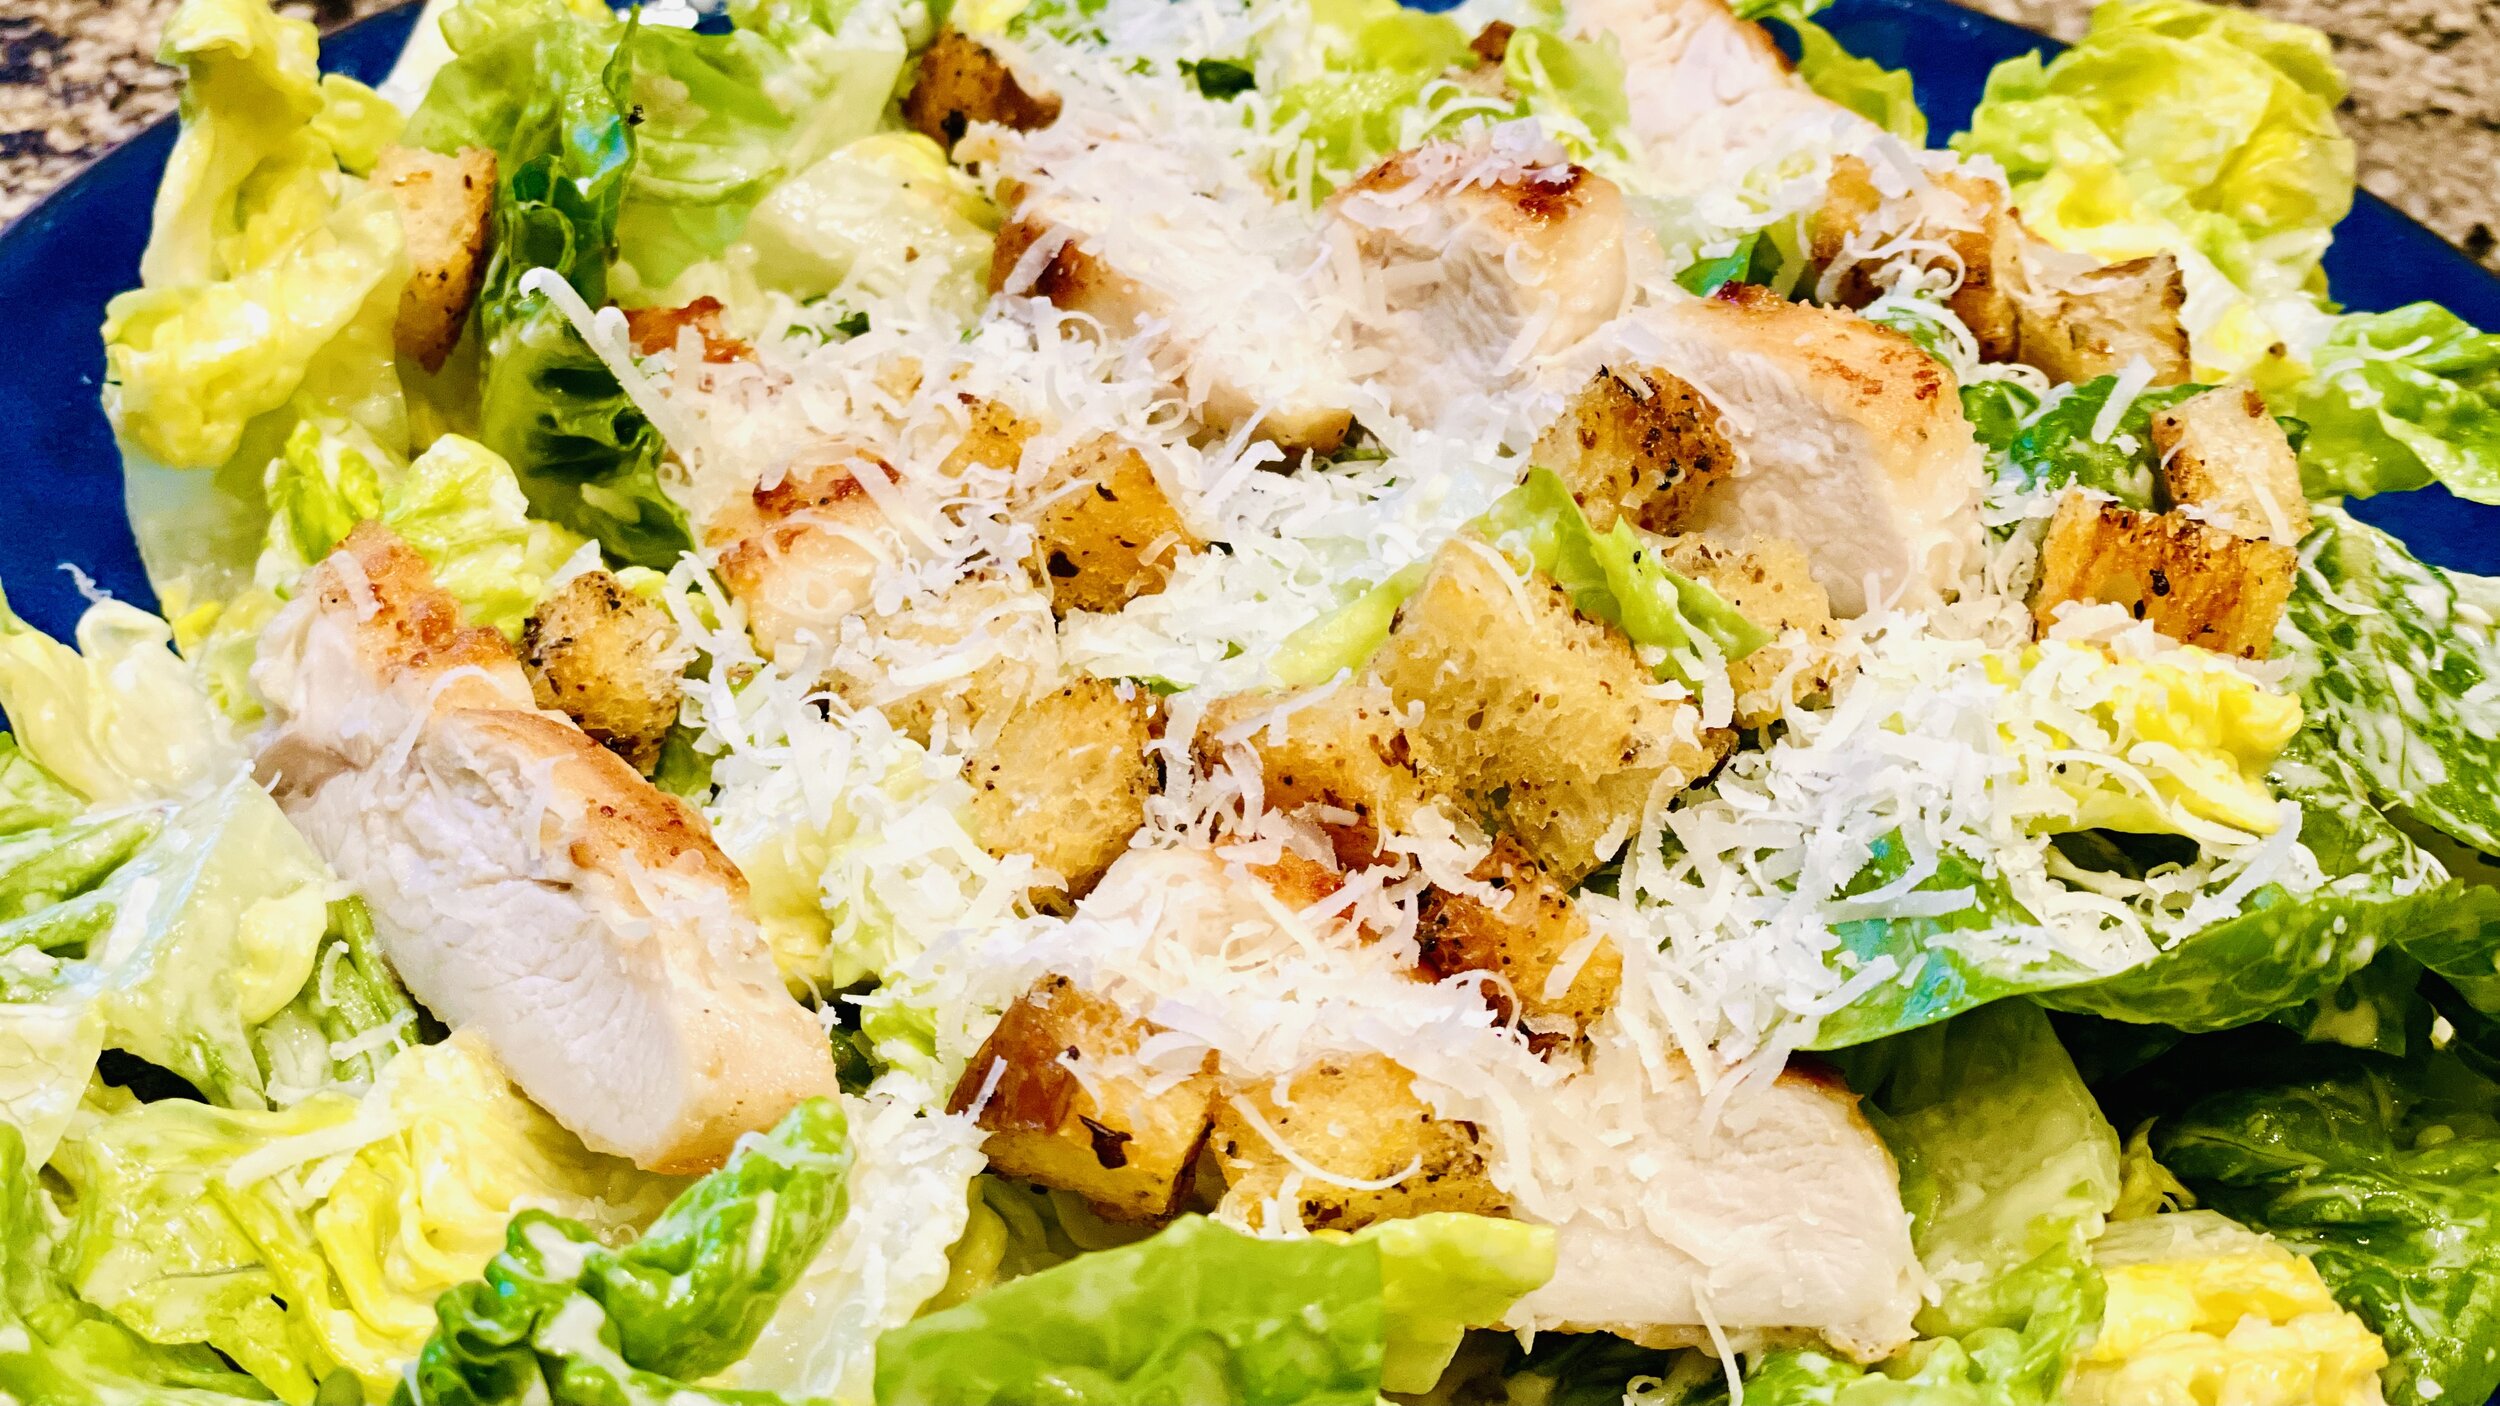
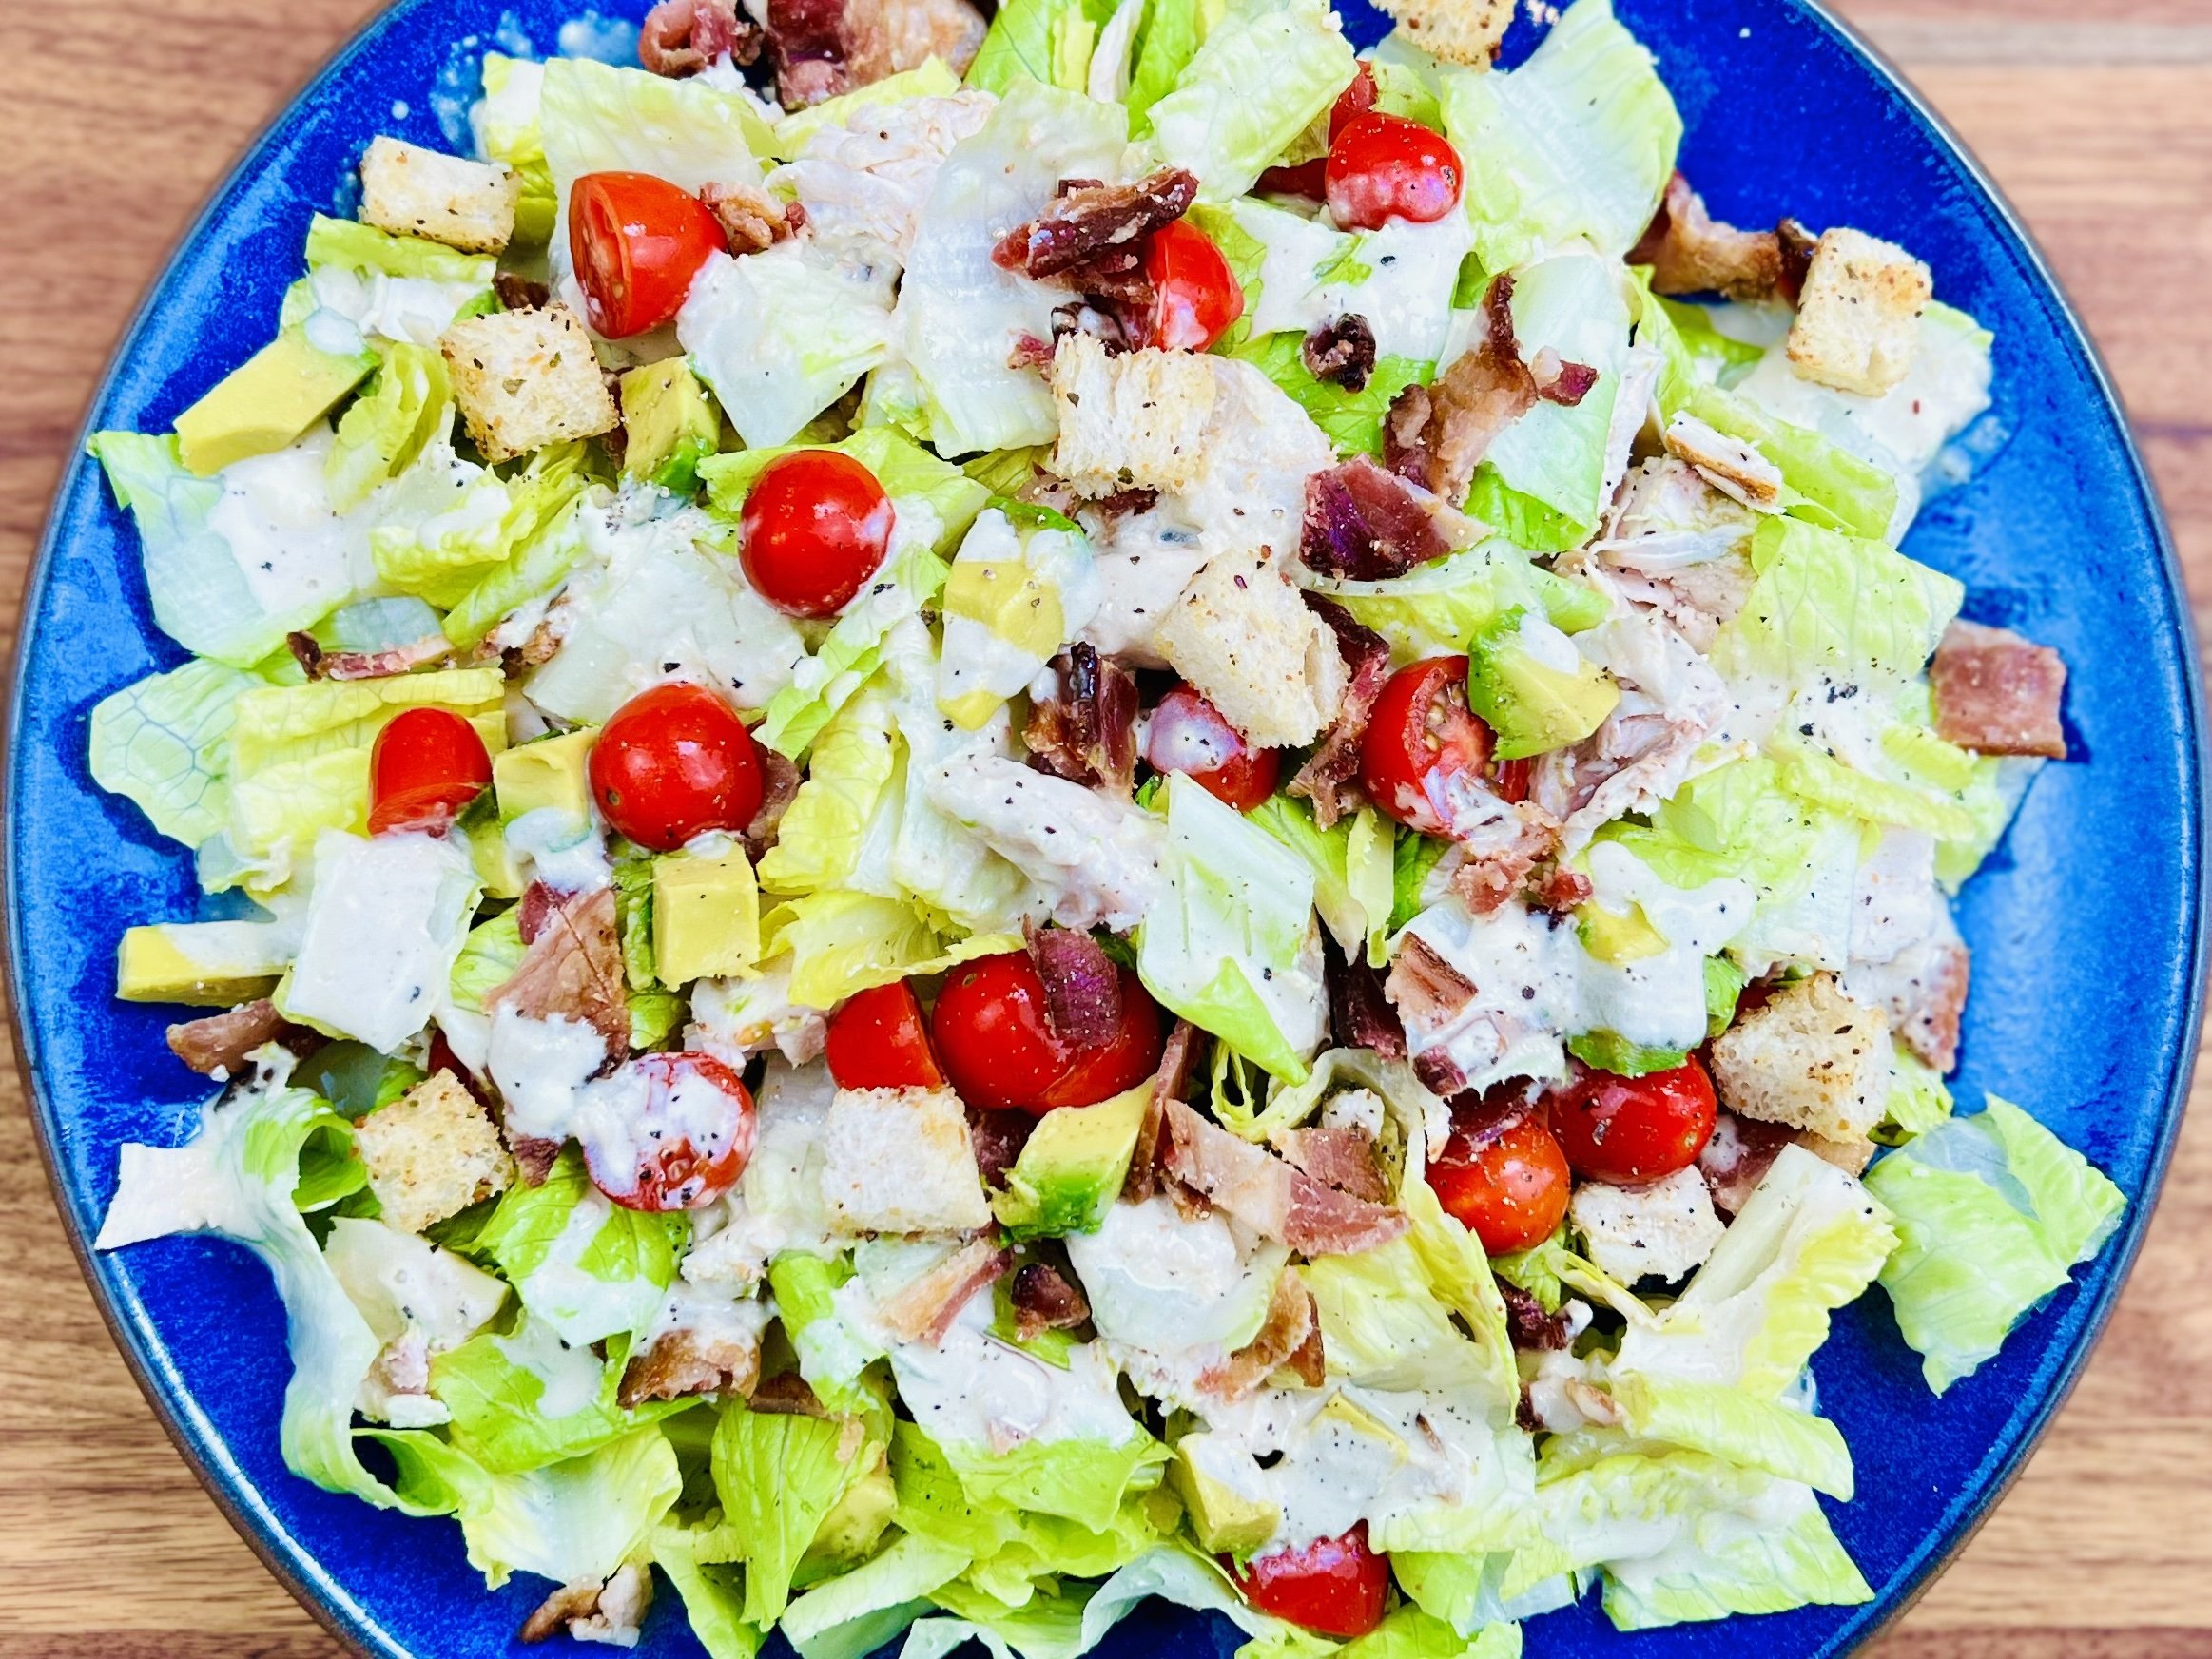
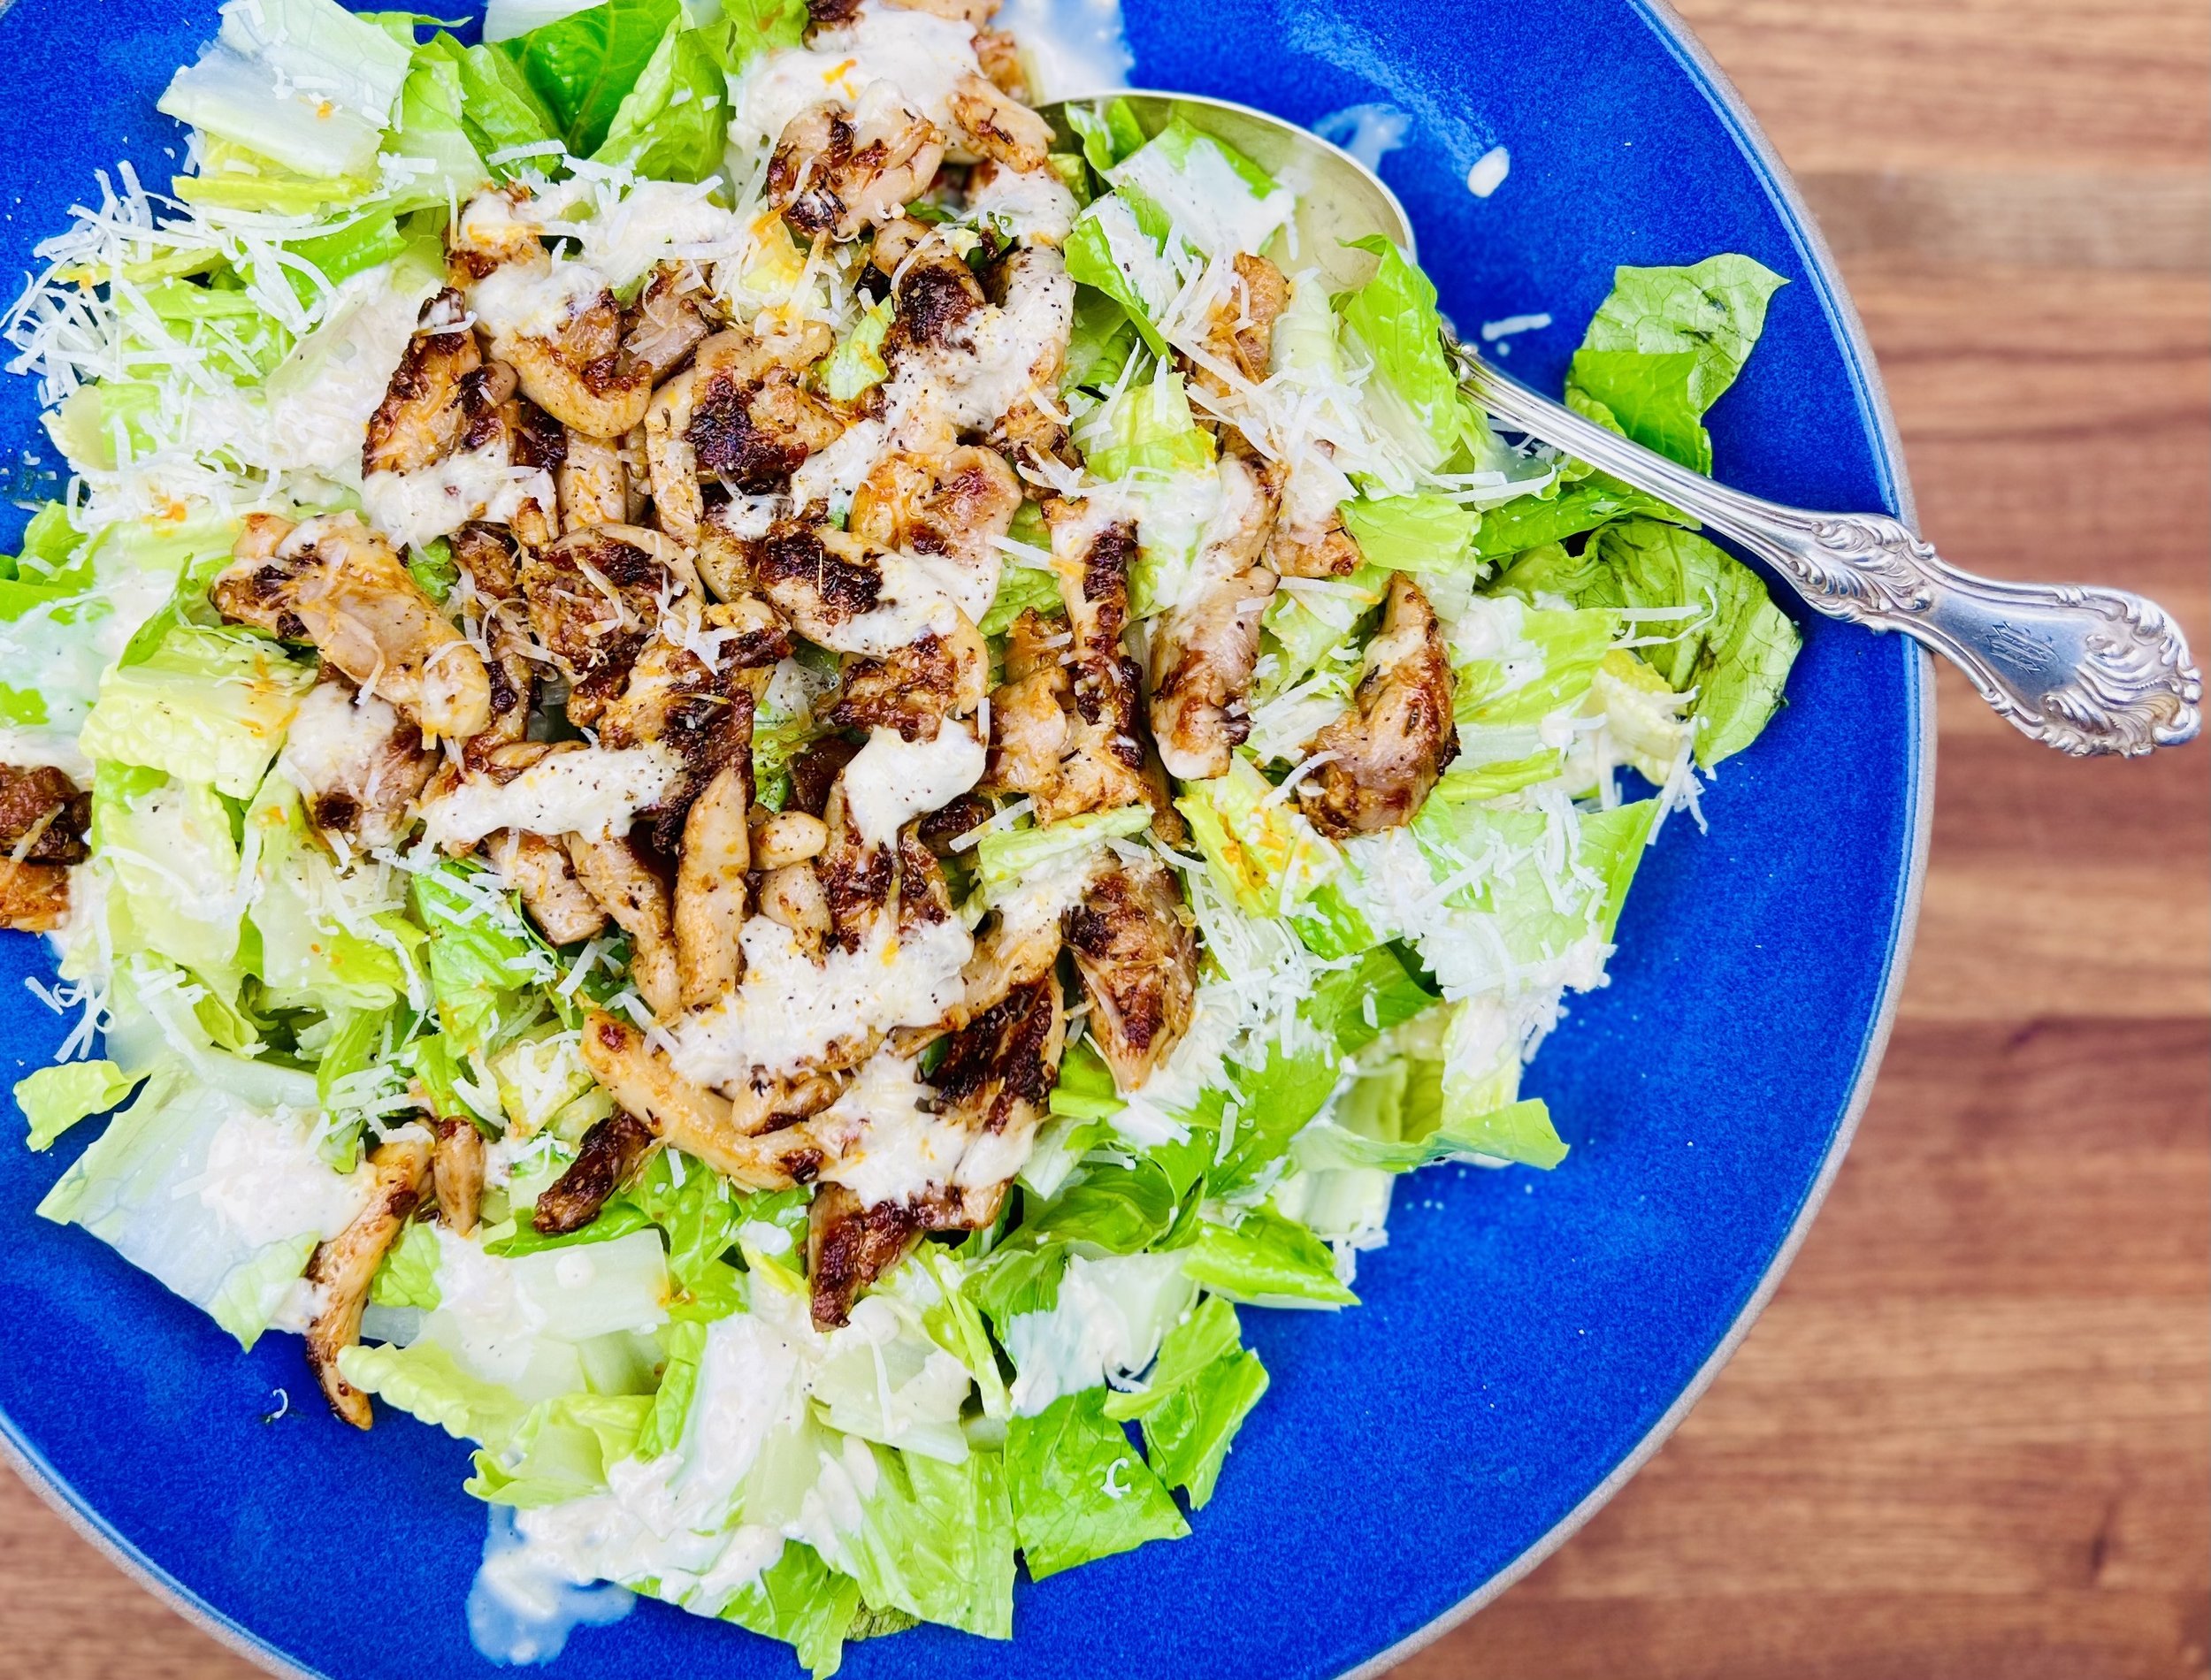
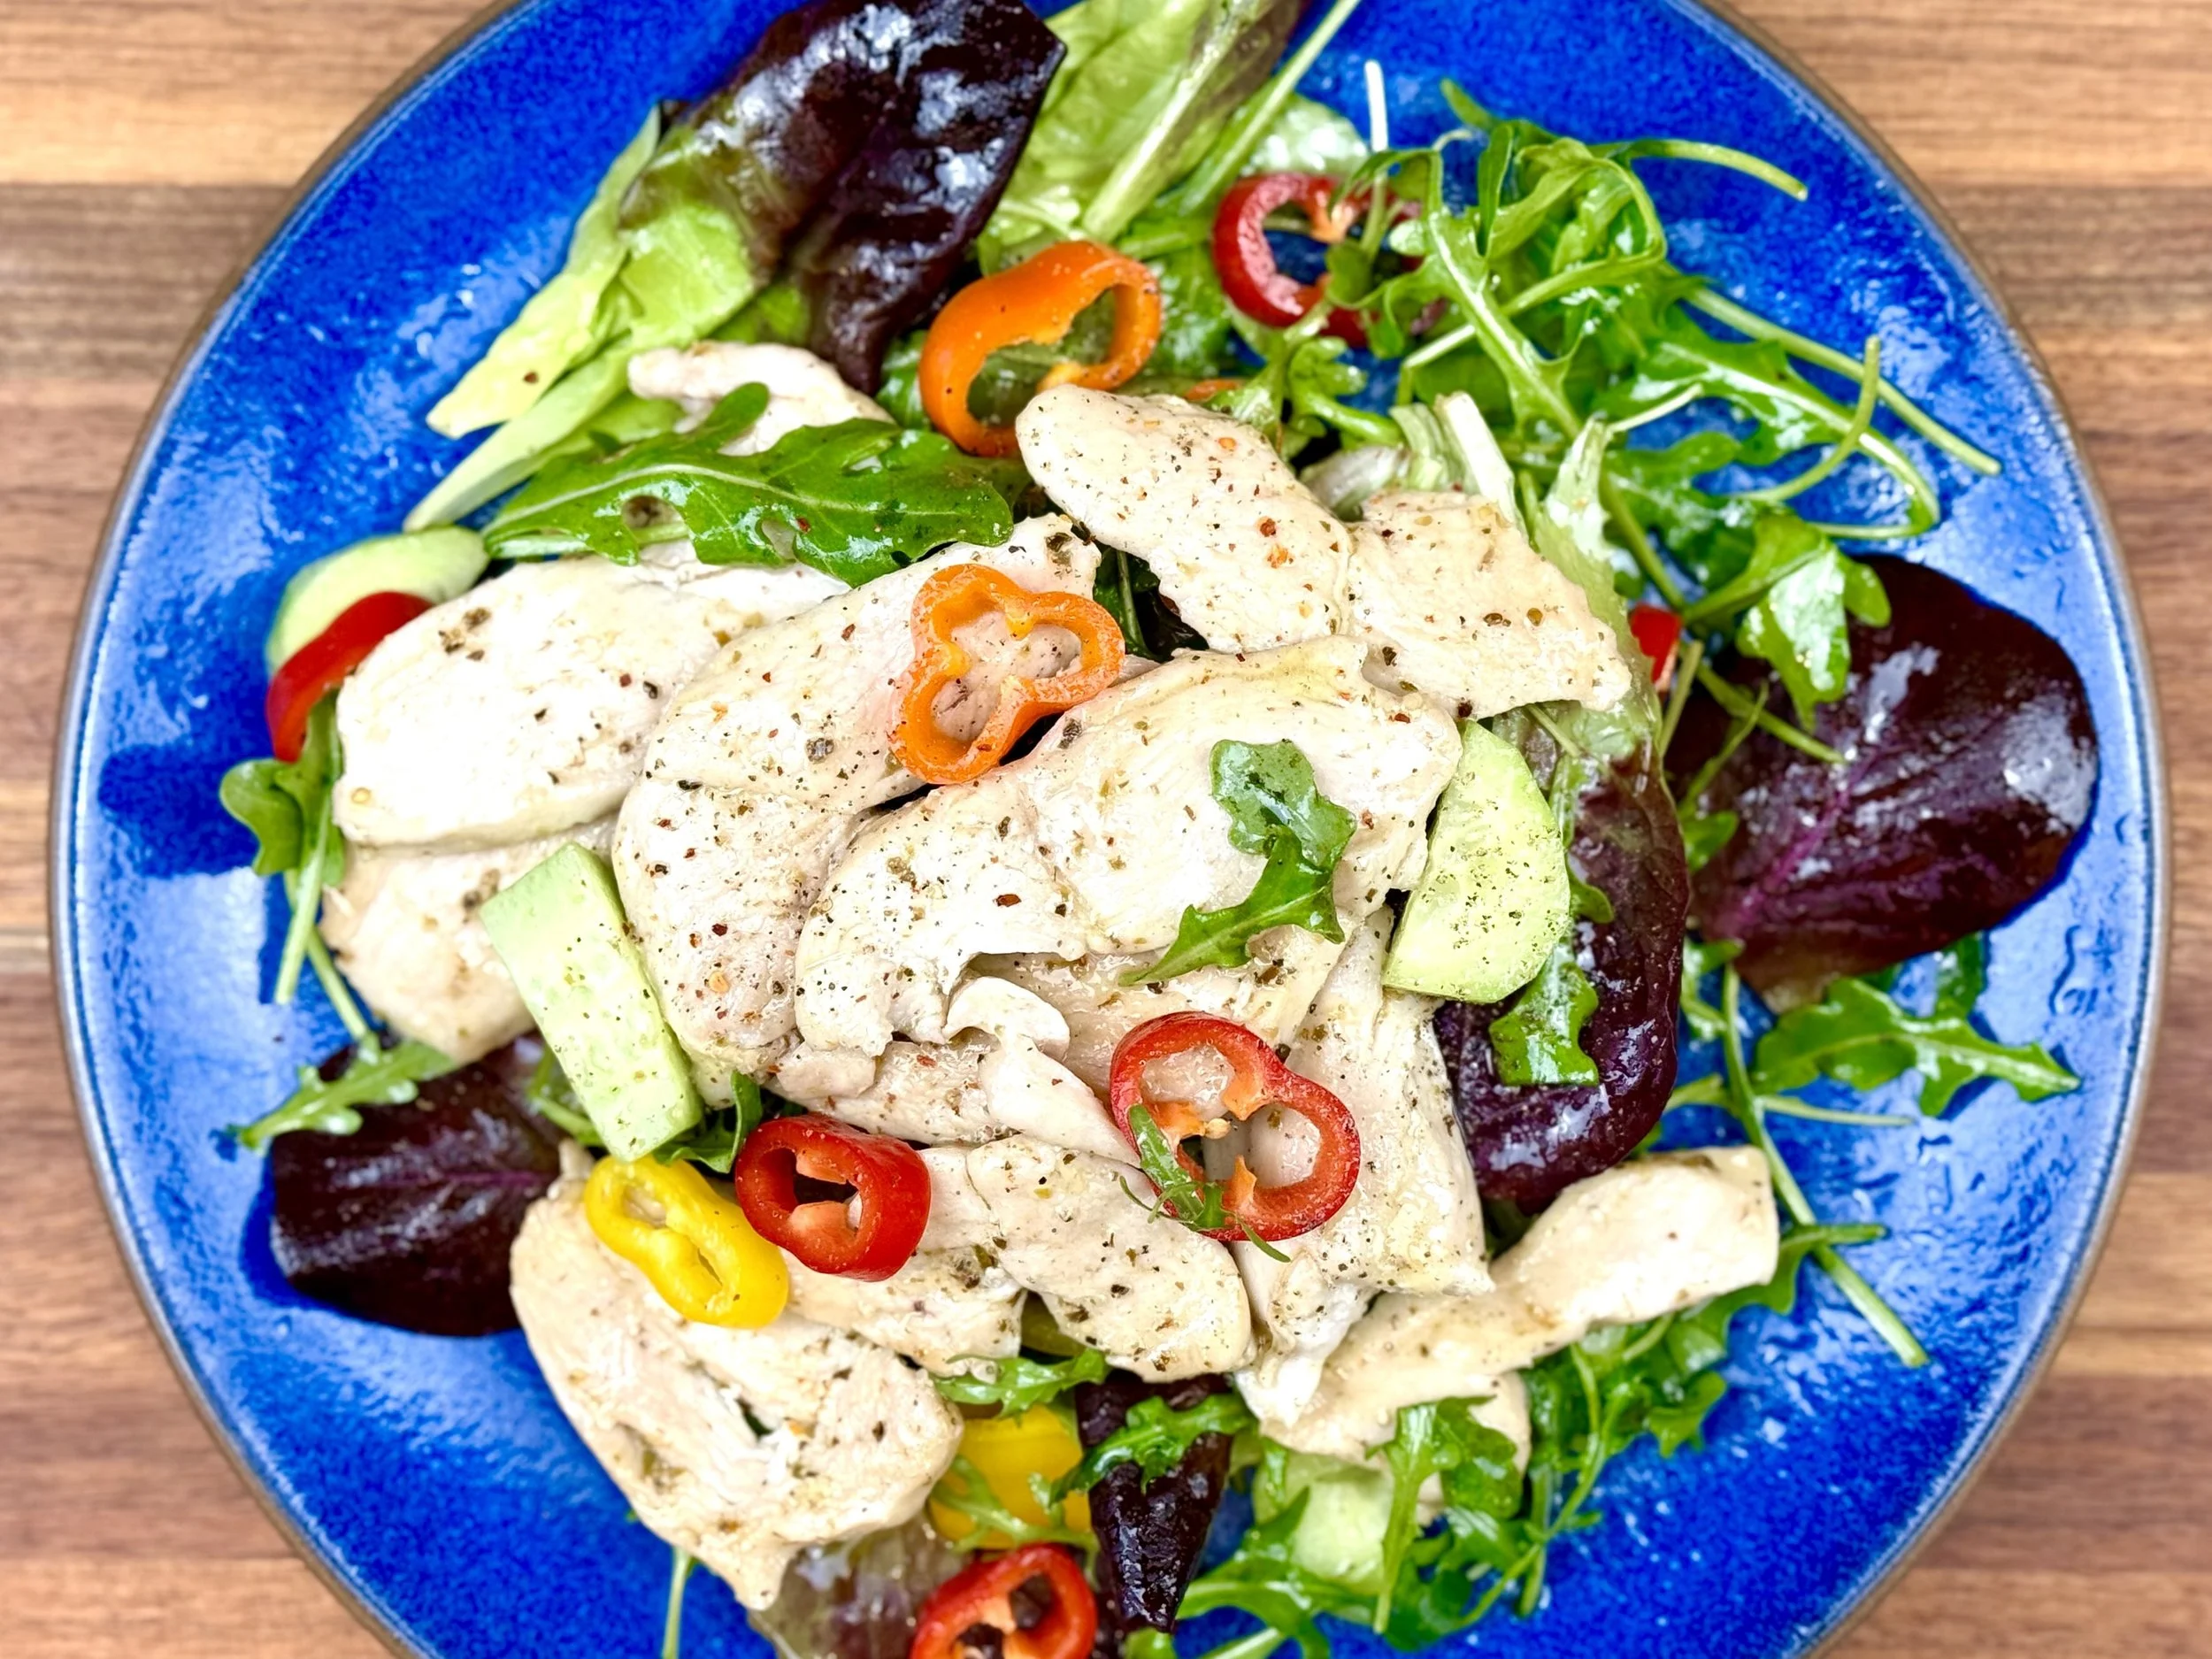
Chicken Caesar Salad (low FODMAP)
20 Minutes prep • 10 Minutes cook • Low FODMAP • Serves 4 - 6 • Ok to make-ahead: Steps 1 - 3
20 Minutes prep • 10 Minutes cook • Low FODMAP • Serves 4 - 6 • Ok to make-ahead: Steps 1 - 3
Who doesn’t love a great Caesar salad!? It’s a robust side or a delicious main course. This recipe is indeed great without including any of those ingredients that might upset your stomach. You can make it with or without the chicken, depending on what you want and what you have on hand. Making your own low FODMAP croutons is easy and it means they will be crisp, delicious, and tummy-friendly. I’m pretty certain this salad is going to become a family favorite at your house just like it is at mine!
Ingredients: Salad
2 heads of romaine lettuce, chopped, washed, and spun dry
1/2 cup fresh grated parmesan cheese
2 cups of cooked chicken, chopped (optional)
2 slices of real sourdough bread, cut into crouton-size pieces (real sourdough will not have yeast or vinegar in the list of ingredients)
1 tablespoon garlic-infused olive oil
1/2 teaspoon dry thyme
1/2 teaspoon each Kosher salt and black pepper
Ingredients: Dressing
Juice of 1 lemon (about 2 tablespoons)
2 tablespoons lactose-free yogurt
2 tablespoons mayonnaise
1 tablespoon garlic-infused olive oil
2 teaspoons dijon mustard
1 teaspoon gluten-free Worcestershire sauce
1/4 cup fresh grated parmesan cheese
Kosher salt and black pepper to taste
Directions
(1) Make the croutons: Preheat oven to 400 degrees F and line a rimmed baking sheet with parchment paper. Chop bread into crouton-size pieces and transfer to a mixing bowl. Drizzle with olive oil and toss. Sprinkle with thyme, salt, and pepper, and toss again. Spread on the prepared baking sheet and bake at 400 degrees for about 10 minutes or until golden brown. Remove from oven and let cool on the baking sheet. Taste, and add a sprinkle of salt if they need a little more zing. Set aside.
(2) Prepare the dressing: Combine all dressing ingredients except parmesan cheese, salt, and pepper in a small jar. Shake to combine. Add parmesan cheese and shake again. Taste on a lettuce leaf and add salt and pepper to taste. Set aside in the fridge.
(3) Prepare the lettuce: Chop, wash, and spin dry the Romaine lettuce. If you’re not going to make your salad right away, store the lettuce in the fridge. Pro tip: After washing and spinning dry, put the lettuce in a plastic bag with a paper towel. Squeeze the air out of the bag and twist to seal. Then store in the fridge. Your lettuce will be super crisp and any extra water will be absorbed so your salad will taste its best.
Make-ahead note: At this point, you can keep the lettuce and the dressing in the fridge and store the cooled croutons in an air-tight container until you’re ready to assemble your salad.
(4) Prepare salad: Put the lettuce and chicken in a large salad bowl. Add about half the parmesan cheese and the dressing. Toss to combine.
(5) Finish: Sprinkle the croutons and the rest of the parmesan cheese on top of the salad. This makes a nice presentation if you’re bringing the salad bowl to the table. If not, toss it all together. Plate and serve.
Eat and enjoy every bite because you can!
This post may contain affiliate links so you can easily purchase items listed on the page. In some cases, we have provided a special discount code for IBS Game Changers so be sure to use it when you purchase an item to get the discount that has been arranged just for you!
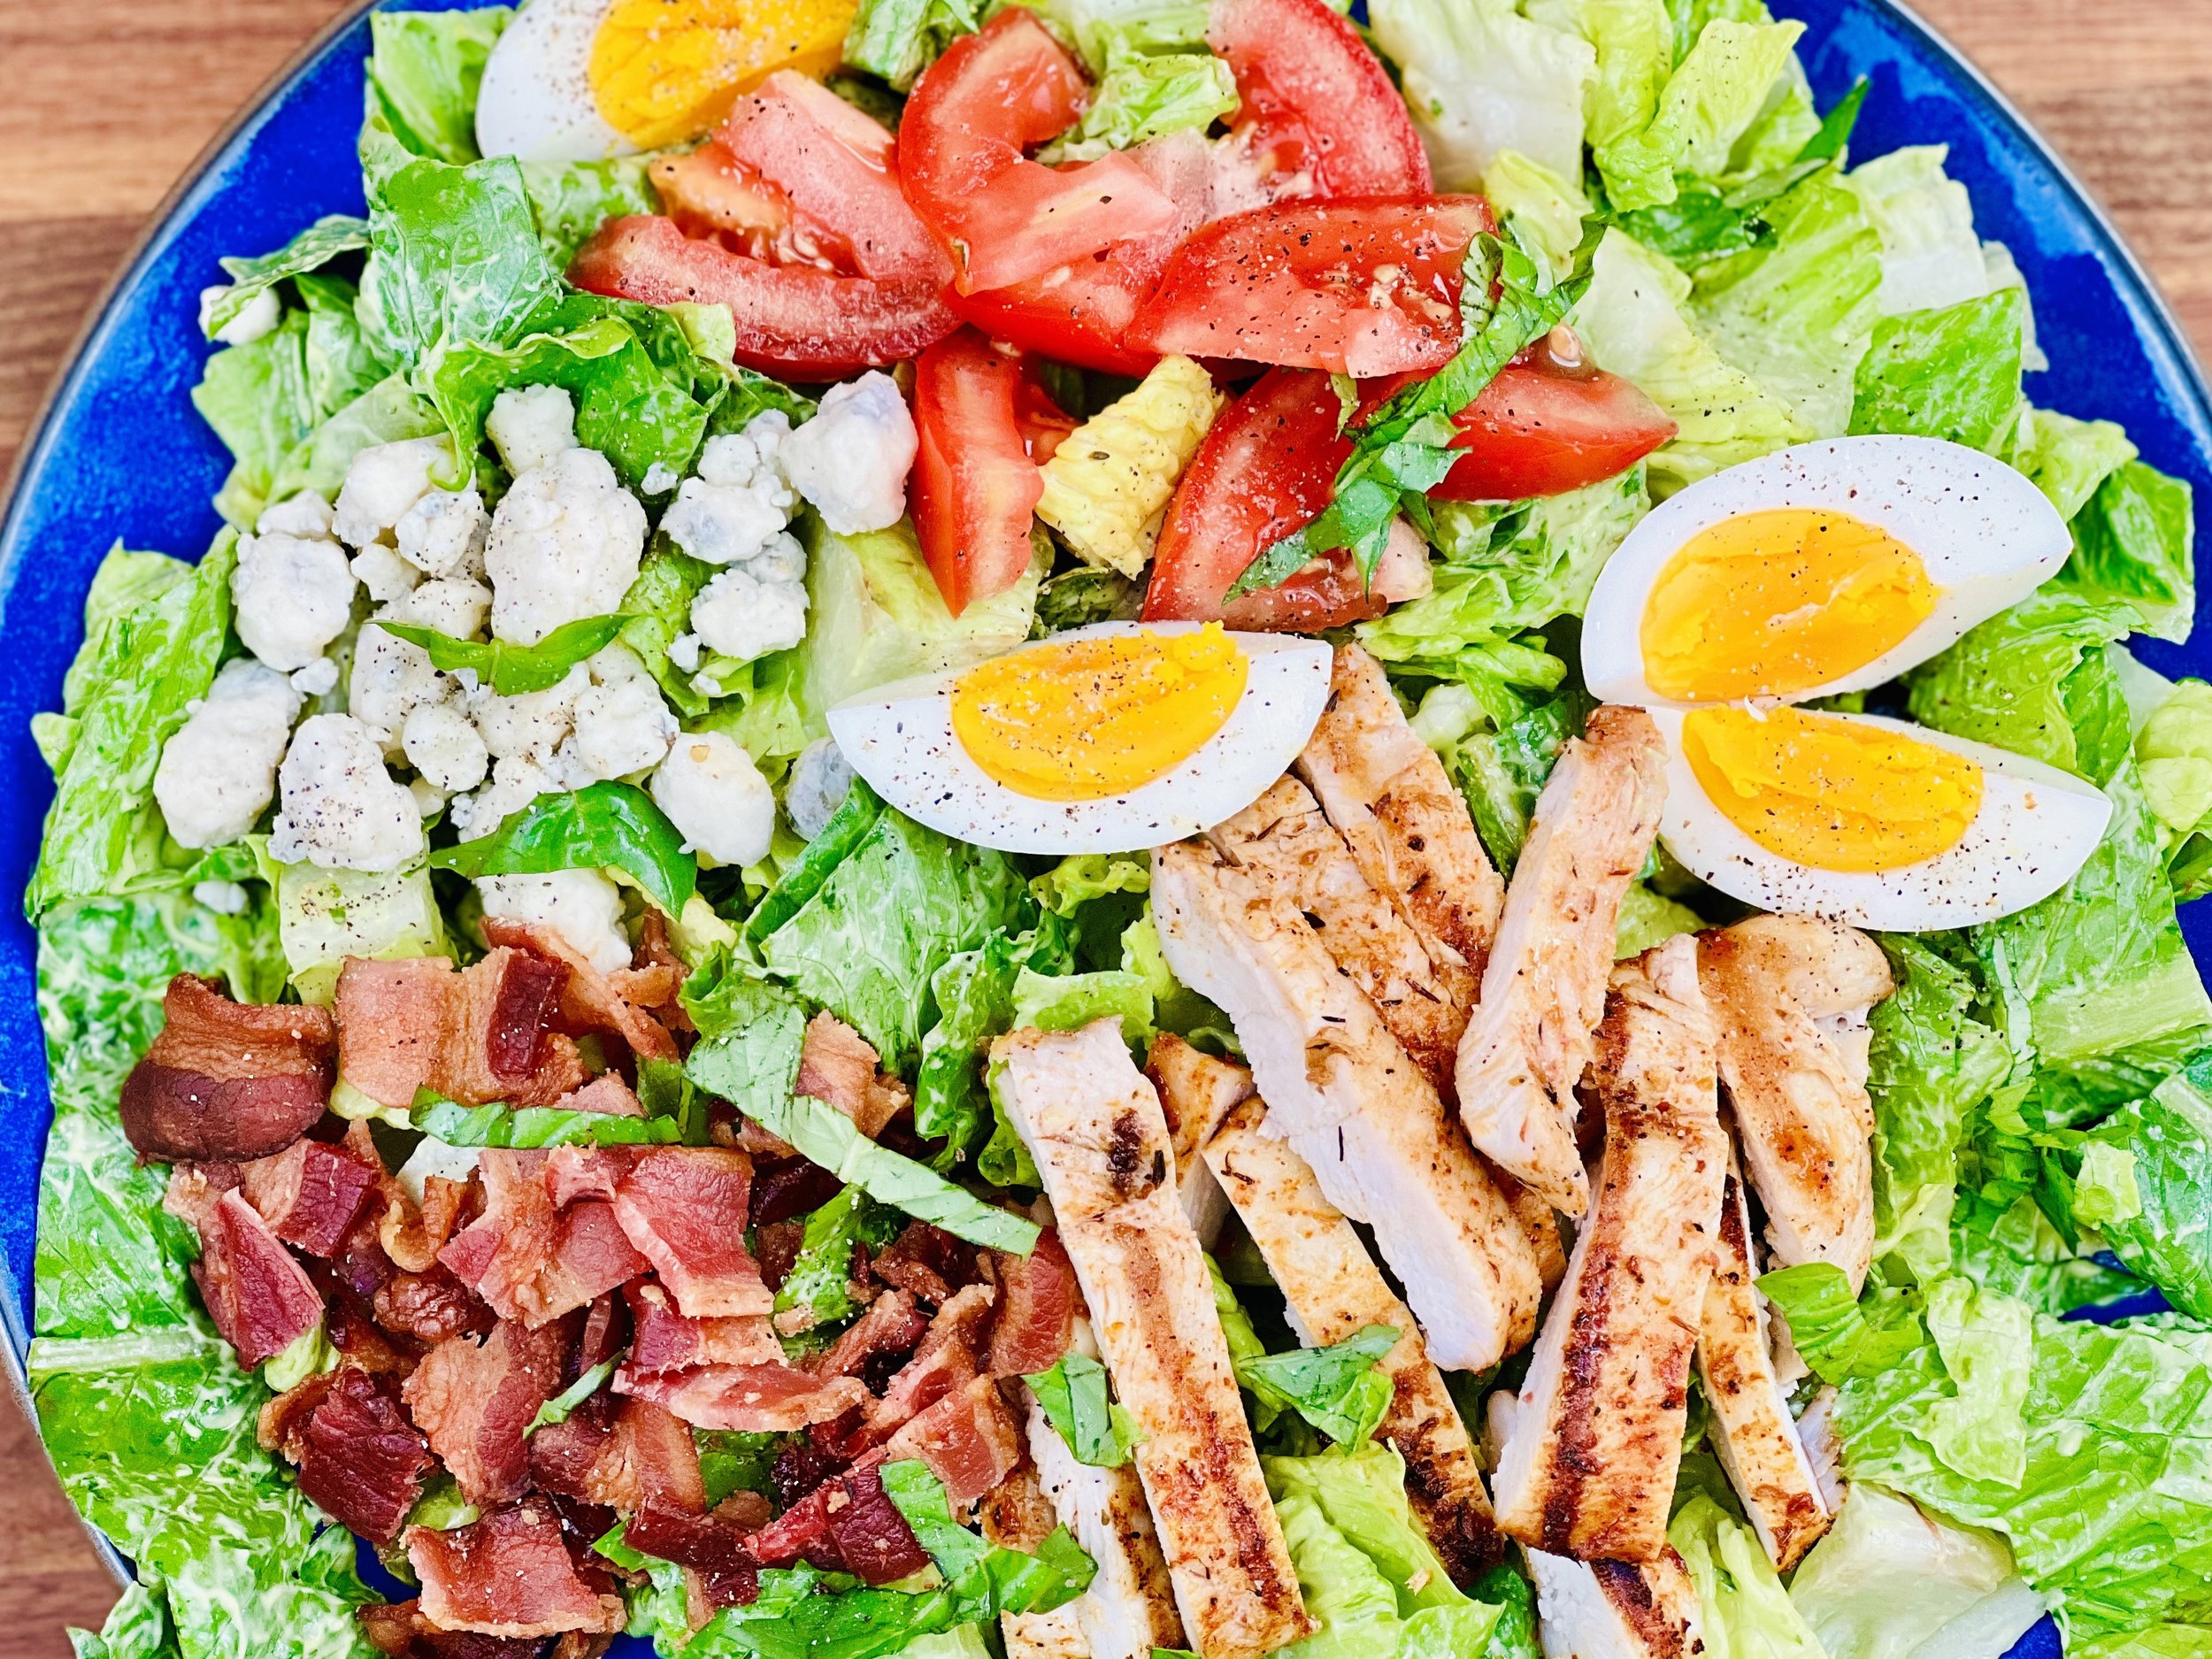
More Deliciously Low FODMAP™ salads you might enjoy


Lemony Blueberry Muffins (low FODMAP)
35 Minutes • Low FODMAP • Gluten-Free • Makes 12 • Ok to make-ahead: Yes (freezes well)
35 Minutes • Low FODMAP • Gluten-Free • Makes 12 • Ok to make-ahead: Yes (freezes well)
Inspired by a recipe from one of my best friends, these lemony blueberry muffins are light and airy, full of berries, and packed with flavor. They’re perfect with afternoon tea and I’m sure you’re going to love them. Best of all, they keep nicely in the freezer so you can have a fresh muffin every day if you like!
This is an exclusive recipe just for recipe club members.
Each week I am creating and delivering one very special recipe just for my recipe club members. If you’re not yet a member, I encourage you to join! Membership in the club includes access to the complete archive of recipes with filters so it can become your virtual low FODMAP cookbook plus, I am creating and delivering one special NEW recipe every week ONLY for recipe club members. And, for my true fans, I’ll be sharing behind-the-scenes content, and updates on the progress of the new cookbook.
Your membership in the club helps me continue creating new, delicious, easy-to-make, low FODMAP recipes just for you.
As always, all recipes will emphasize simple ingredients, easy preparation, and delicious low FODMAP results. Recipes will be for everything from main courses, salads, soups, side dishes, appetizers, desserts, sauces, breakfast and lunch, and even mocktails and cocktails. Everything you need to prepare fantastic low FODMAP meals everyone will love.
Join the club. Become a Patron. Let’s keep making delicious Low FODMAP meals together.
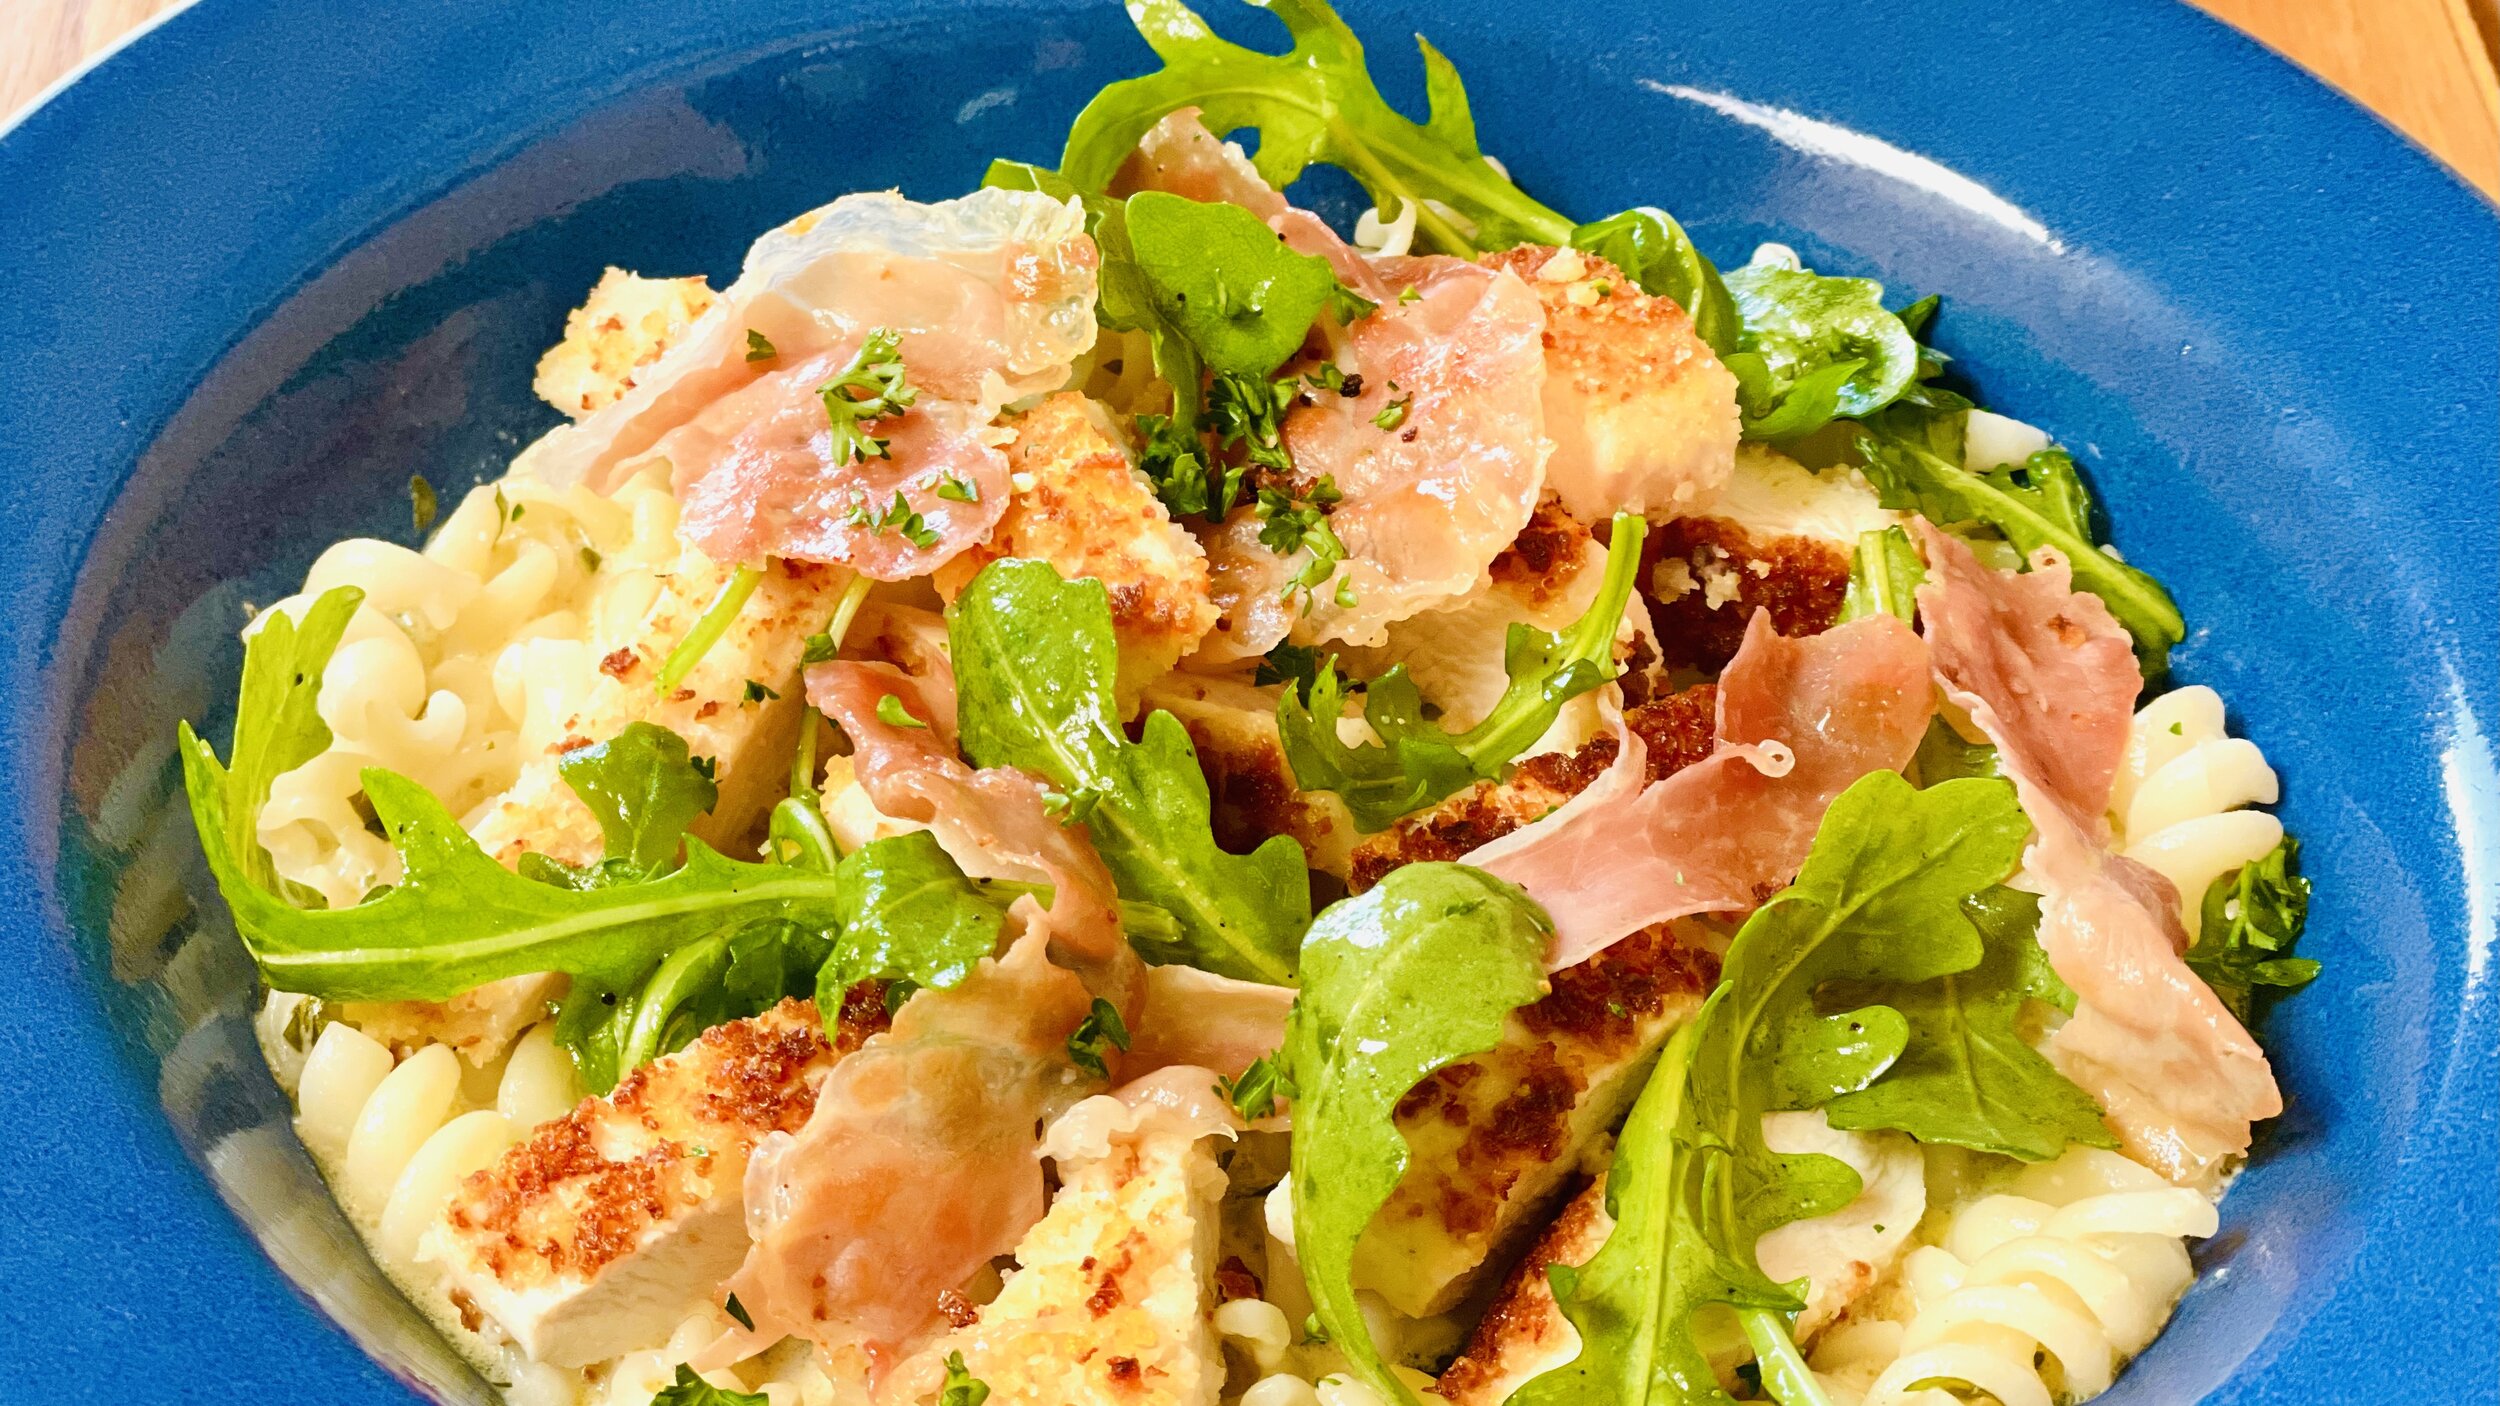
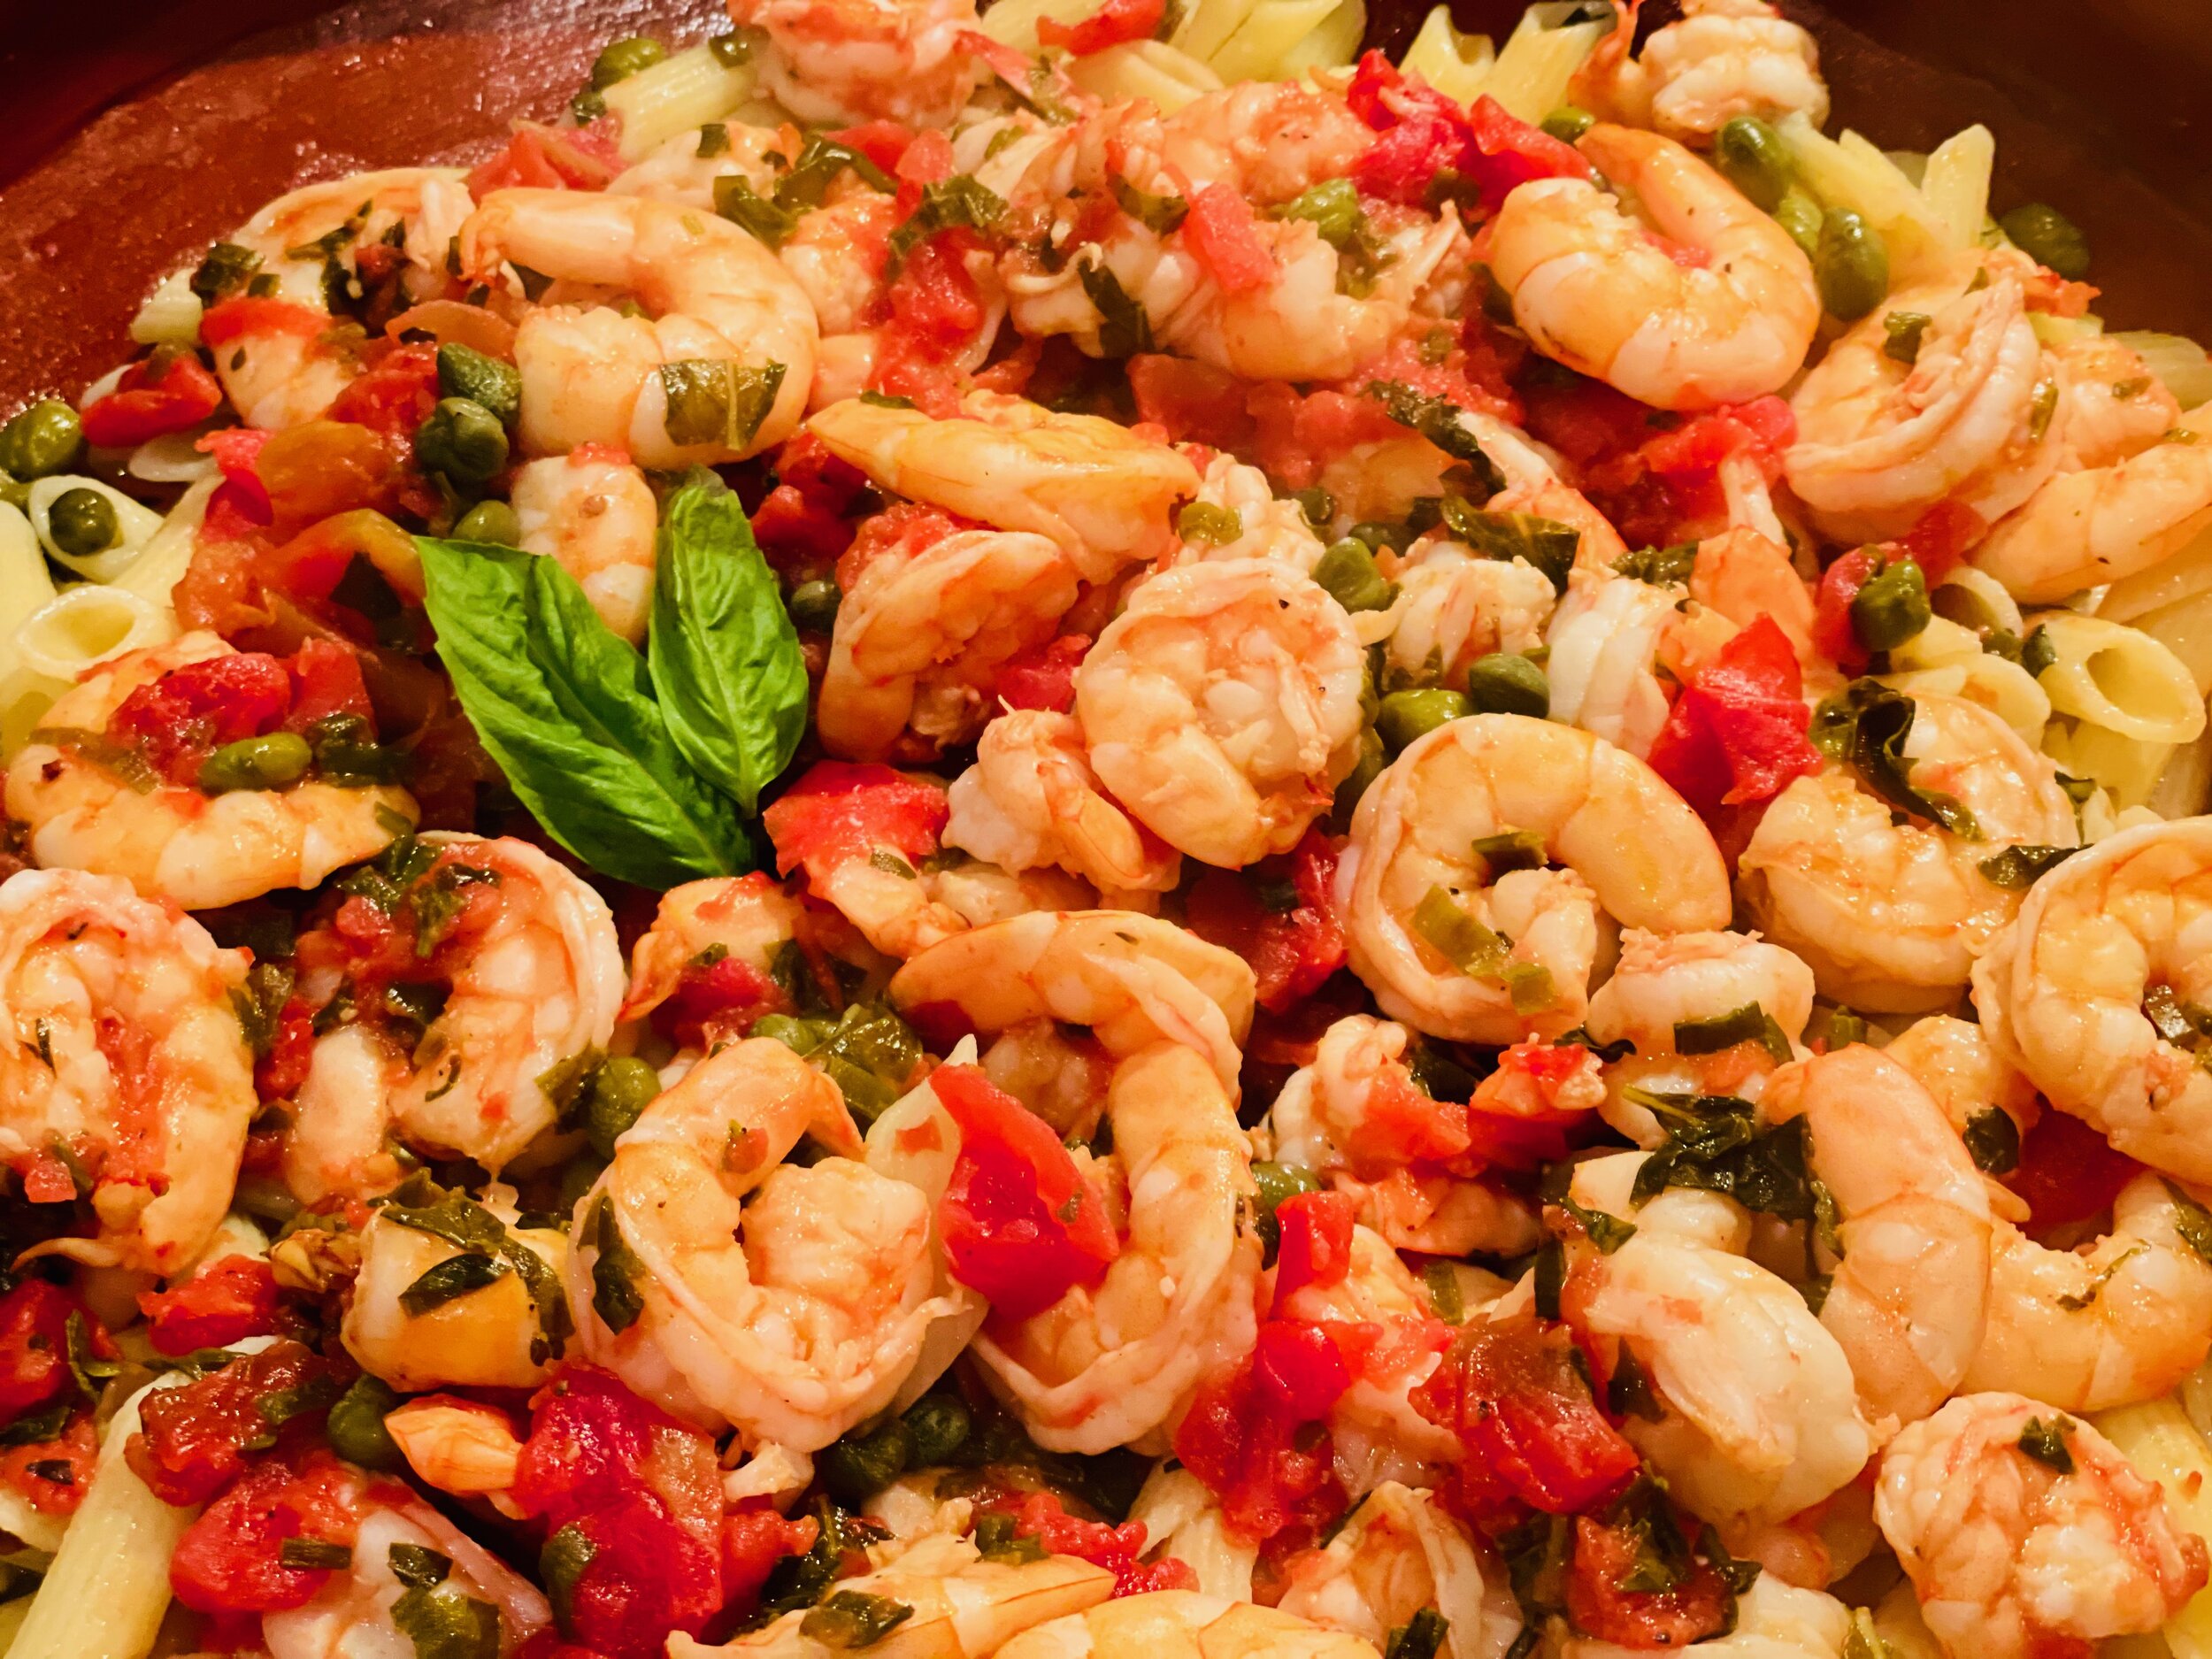
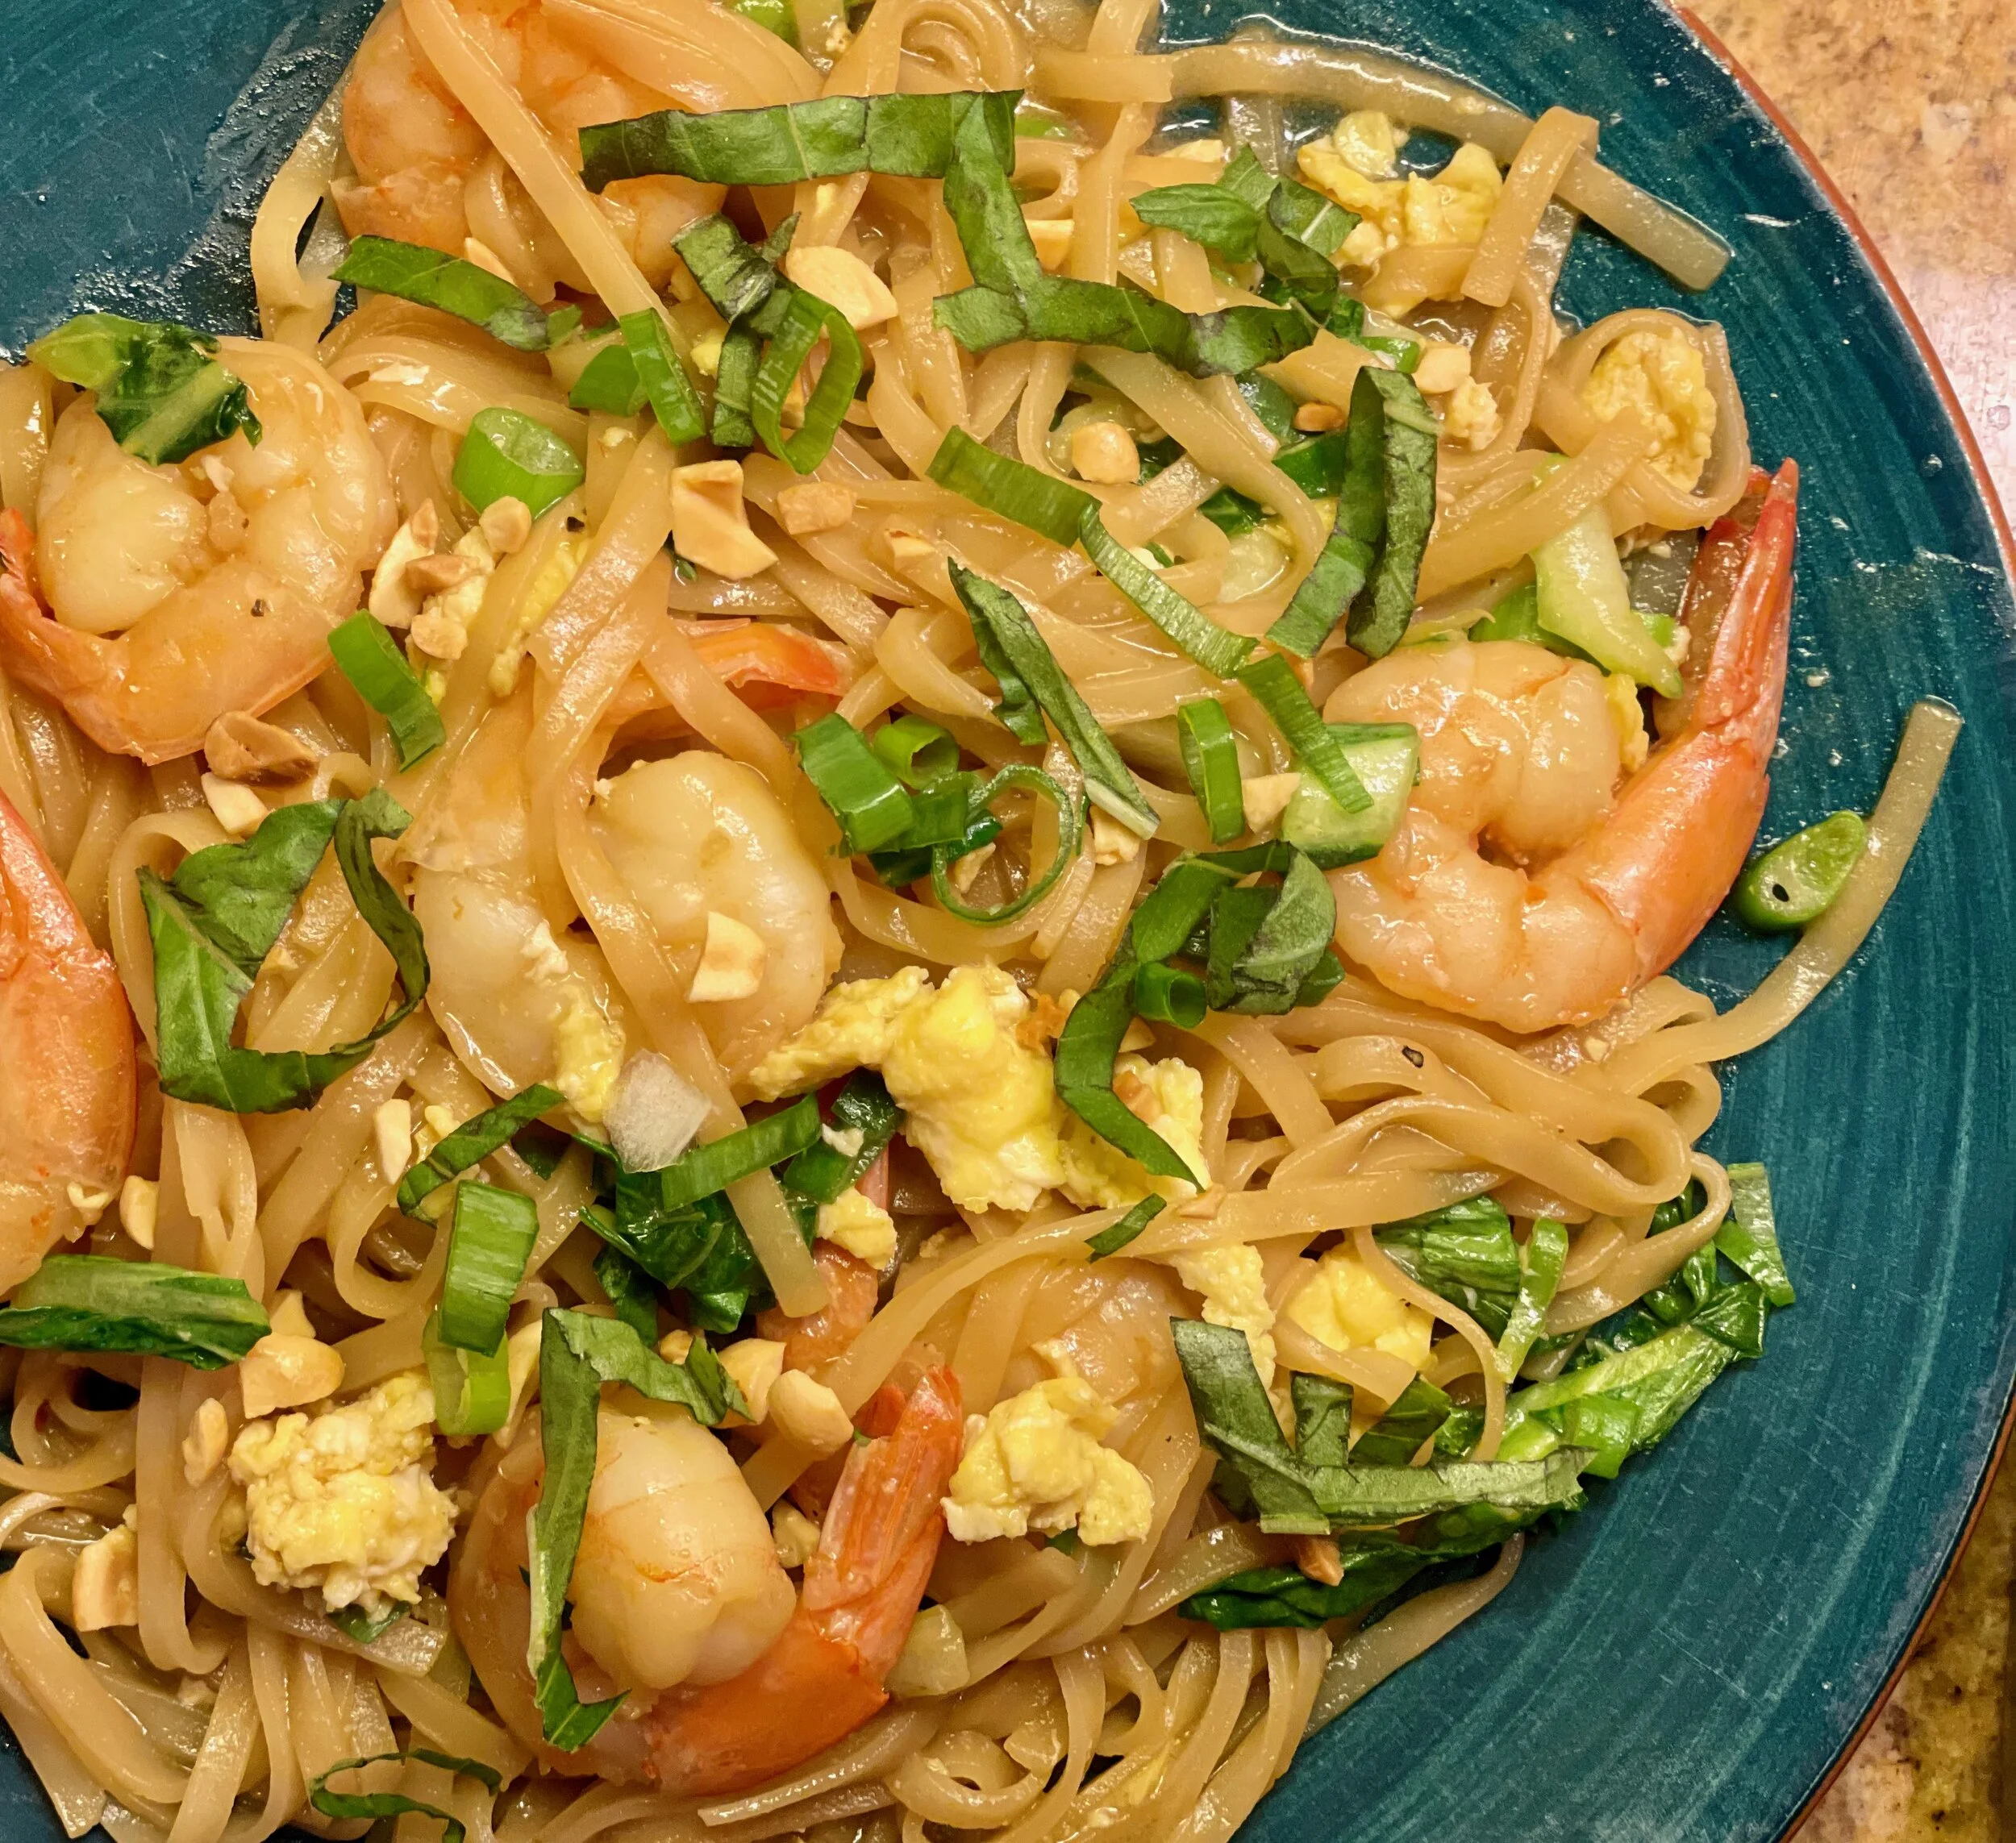
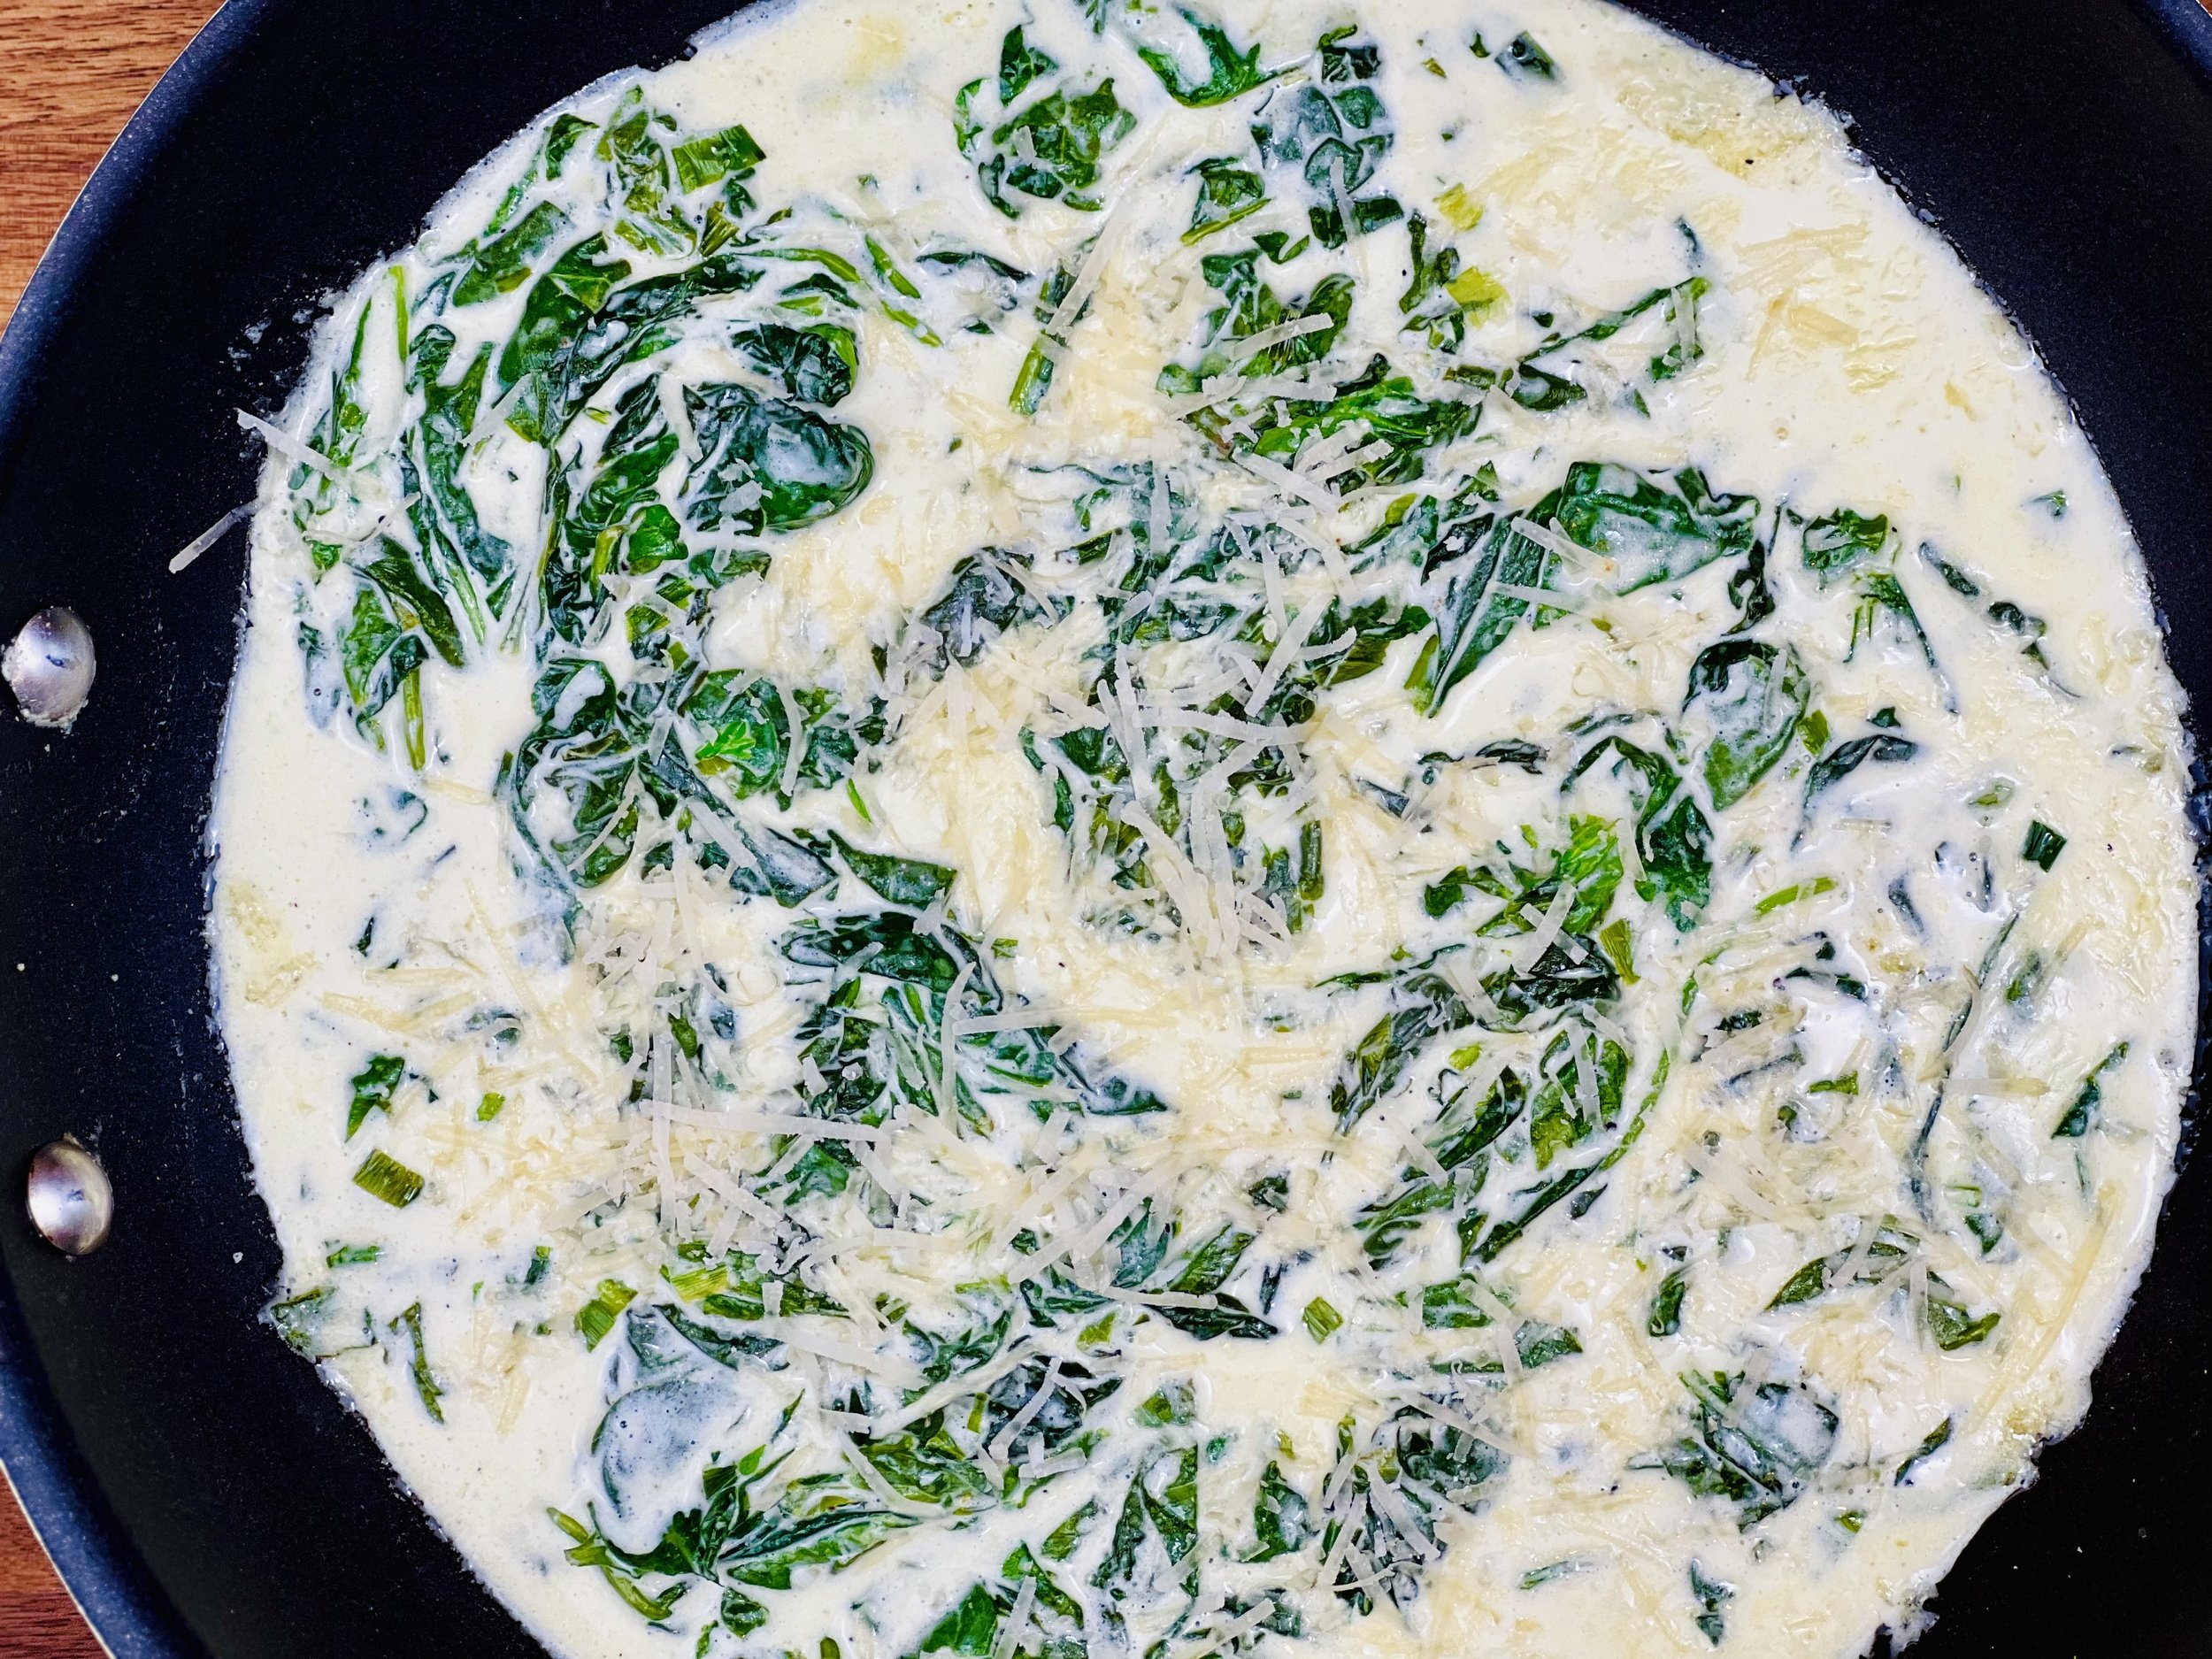
Crispy Chicken and Prosciutto with Creamy Herbed Pasta and Greens (low FODMAP)
20 Minutes prep • 15 Minutes cook • Low FODMAP • Gluten-Free • Serves 4 • Ok to make-ahead: Steps 1 - 4
20 Minutes prep • 15 Minutes cook • Low FODMAP • Gluten-Free • Serves 4 • Ok to make-ahead: Steps 1 - 4
Creamy herbed pasta provides the perfect contrast to crisp chicken and prosciutto. Add the lemon-dressed arugula and you have a dish that’s perfect to hit all your taste senses. Warm and comforting, yet fresh and healthy. This is a great dish when you have a variety of preferences at your table. The pasta and greens are delicious without the meat and sure to please any vegetarians at your table.
Ingredients
1 pound chicken cutlets or tenders
3/4 cup gluten-free Panko bread crumbs
1 1/2 cups grated parmesan
1 teaspoon Smoke N Sanity Essence of Onion Salt (use code IBSGC10 for 10% discount)
3 tablespoons garlic-infused olive oil + more for drizzling pasta
1 pound gluten-free pasta (I like Andean Dream quinoa fusilli)
Crushed red pepper flakes
2 tablespoons salted butter
1 1/2 cups fresh basil, finely chopped
2 cups low FODMAP chicken broth (I like Gourmend Organic Chicken Broth - Use code IBSGC15 for 15% discount)
3/4 cup heavy cream
2 ounces lactose-free cream cheese, at room temperature
3 ounces thinly sliced prosciutto
2 cups baby arugula
1/8 cup (a drizzle) of garlic-infused olive oil
Juice from 1/2 lemon
2 tablespoons chopped fresh parsley
Instructions
(1) Prepare your ingredients: Grate the parmesan cheese, wash and chop the basil and the parsley, wash and spin dry the arugula and set aside. If you don’t have chicken cutlets, slice boneless skinless chicken breasts horizontally (like you’re filleting a fish) into 1/4” - 1/2” thick slices, heat cream cheese in the microwave for 20-30 seconds if not already at room temperature.
(2) Prepare the chicken: Combine the Panko, 1/2 cup parmesan, and the essence of onion salt in a shallow bowl. Dredge both sides of the chicken through the Panko mixture several times, pressing down to make sure the crumbs stick to the chicken. Place the chicken on a plate. Set aside.
(3) Cook the pasta: Bring a large pot of salted water to a boil. Cook the pasta according to package directions until al dente. Drain (do not rinse) and drizzle with garlic-infused olive oil, toss and set aside.
(4) Prepare the sauce: While the pasta is cooking, Heat 1 tablespoon garlic-infused olive oil in a medium frying pan or saucepan over medium-high heat. Add the butter and stir in the basil. Add a pinch each of red pepper flakes, salt, and pepper. Cook another minute, until the basil is fragrant, then pour in the chicken broth and the cream. Add the cream cheese and bring the sauce to a gentle simmer (do not boil) and cook 5-8 minutes, until thickened slightly. Stir to dissolve any lumps of cream cheese.
Make-ahead note: At this point, you can set your ingredients aside in the refrigerator until you’re ready to cook the meat, finish and serve. You will need to re-heat the sauce if it has been more than an hour or so.
(5) Cook the chicken: Heat 2 tablespoons of garlic-infused olive oil in a large skillet over medium-high heat. Add the chicken and cook until golden brown, 3-4 minutes on each side. Cook until just barely cooked through so the chicken stays moist. Transfer to a cutting board and slice into thin strips. Taste, season with salt as needed.
(6) Cook the prosciutto: Add the prosciutto to the pan and cook for 1 - 2 minutes to crisped. Remove from the pan and set aside.
(7) Finish the pasta: To the sauce, stir in the remaining 1 cup parmesan. Add the cooked pasta and cook for about 3 minutes until pasta is heated through. Remove from the heat and stir in the parsley.
(8) Finish the greens: Toss the arugula with a drizzle of olive oil, a squeeze of lemon, and a pinch each of salt and pepper. Toss to combine. (If you’re not an arugula fan, you don’t have to include the greens at all, or you can choose another green.
(9) Plate and serve: Divide the pasta between plates or bowls and top with the sliced chicken, chopped prosciutto, and arugula.
Eat and enjoy every bite because you can!
Inspired by a recipe published by Tieghan Gerard, Half Baked Harvest
More Deliciously Low FODMAP™ main courses you might enjoy


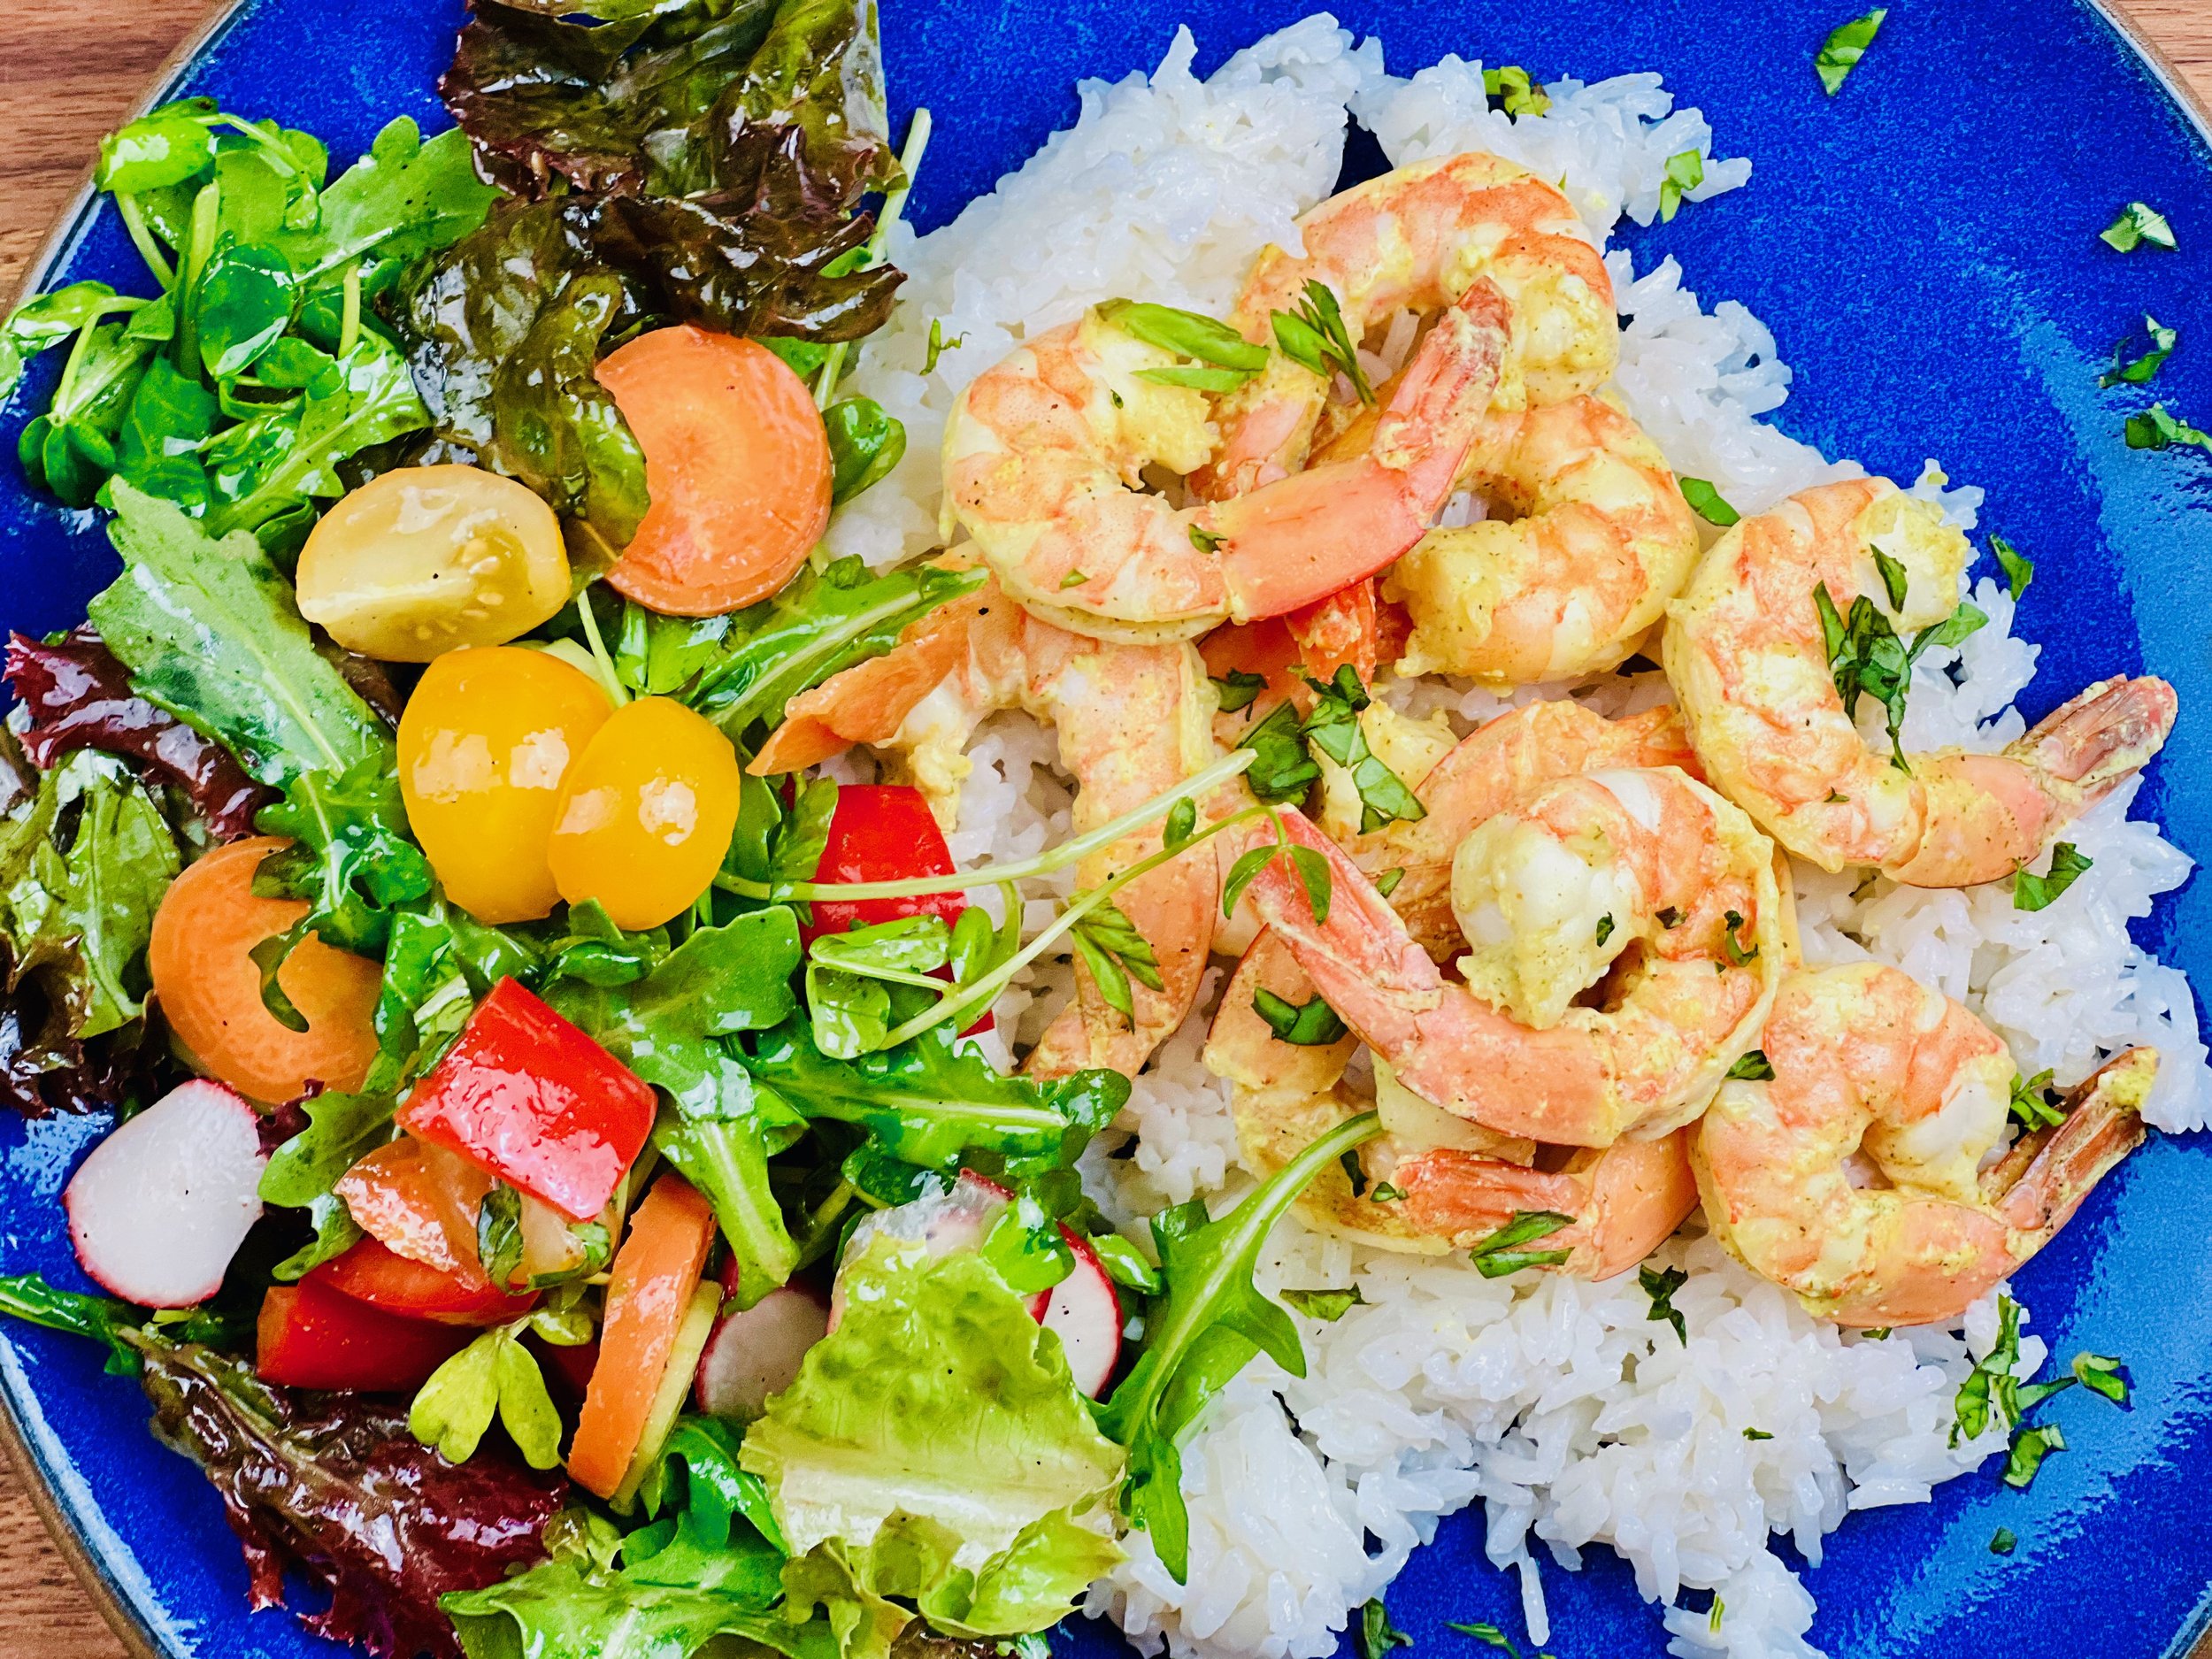
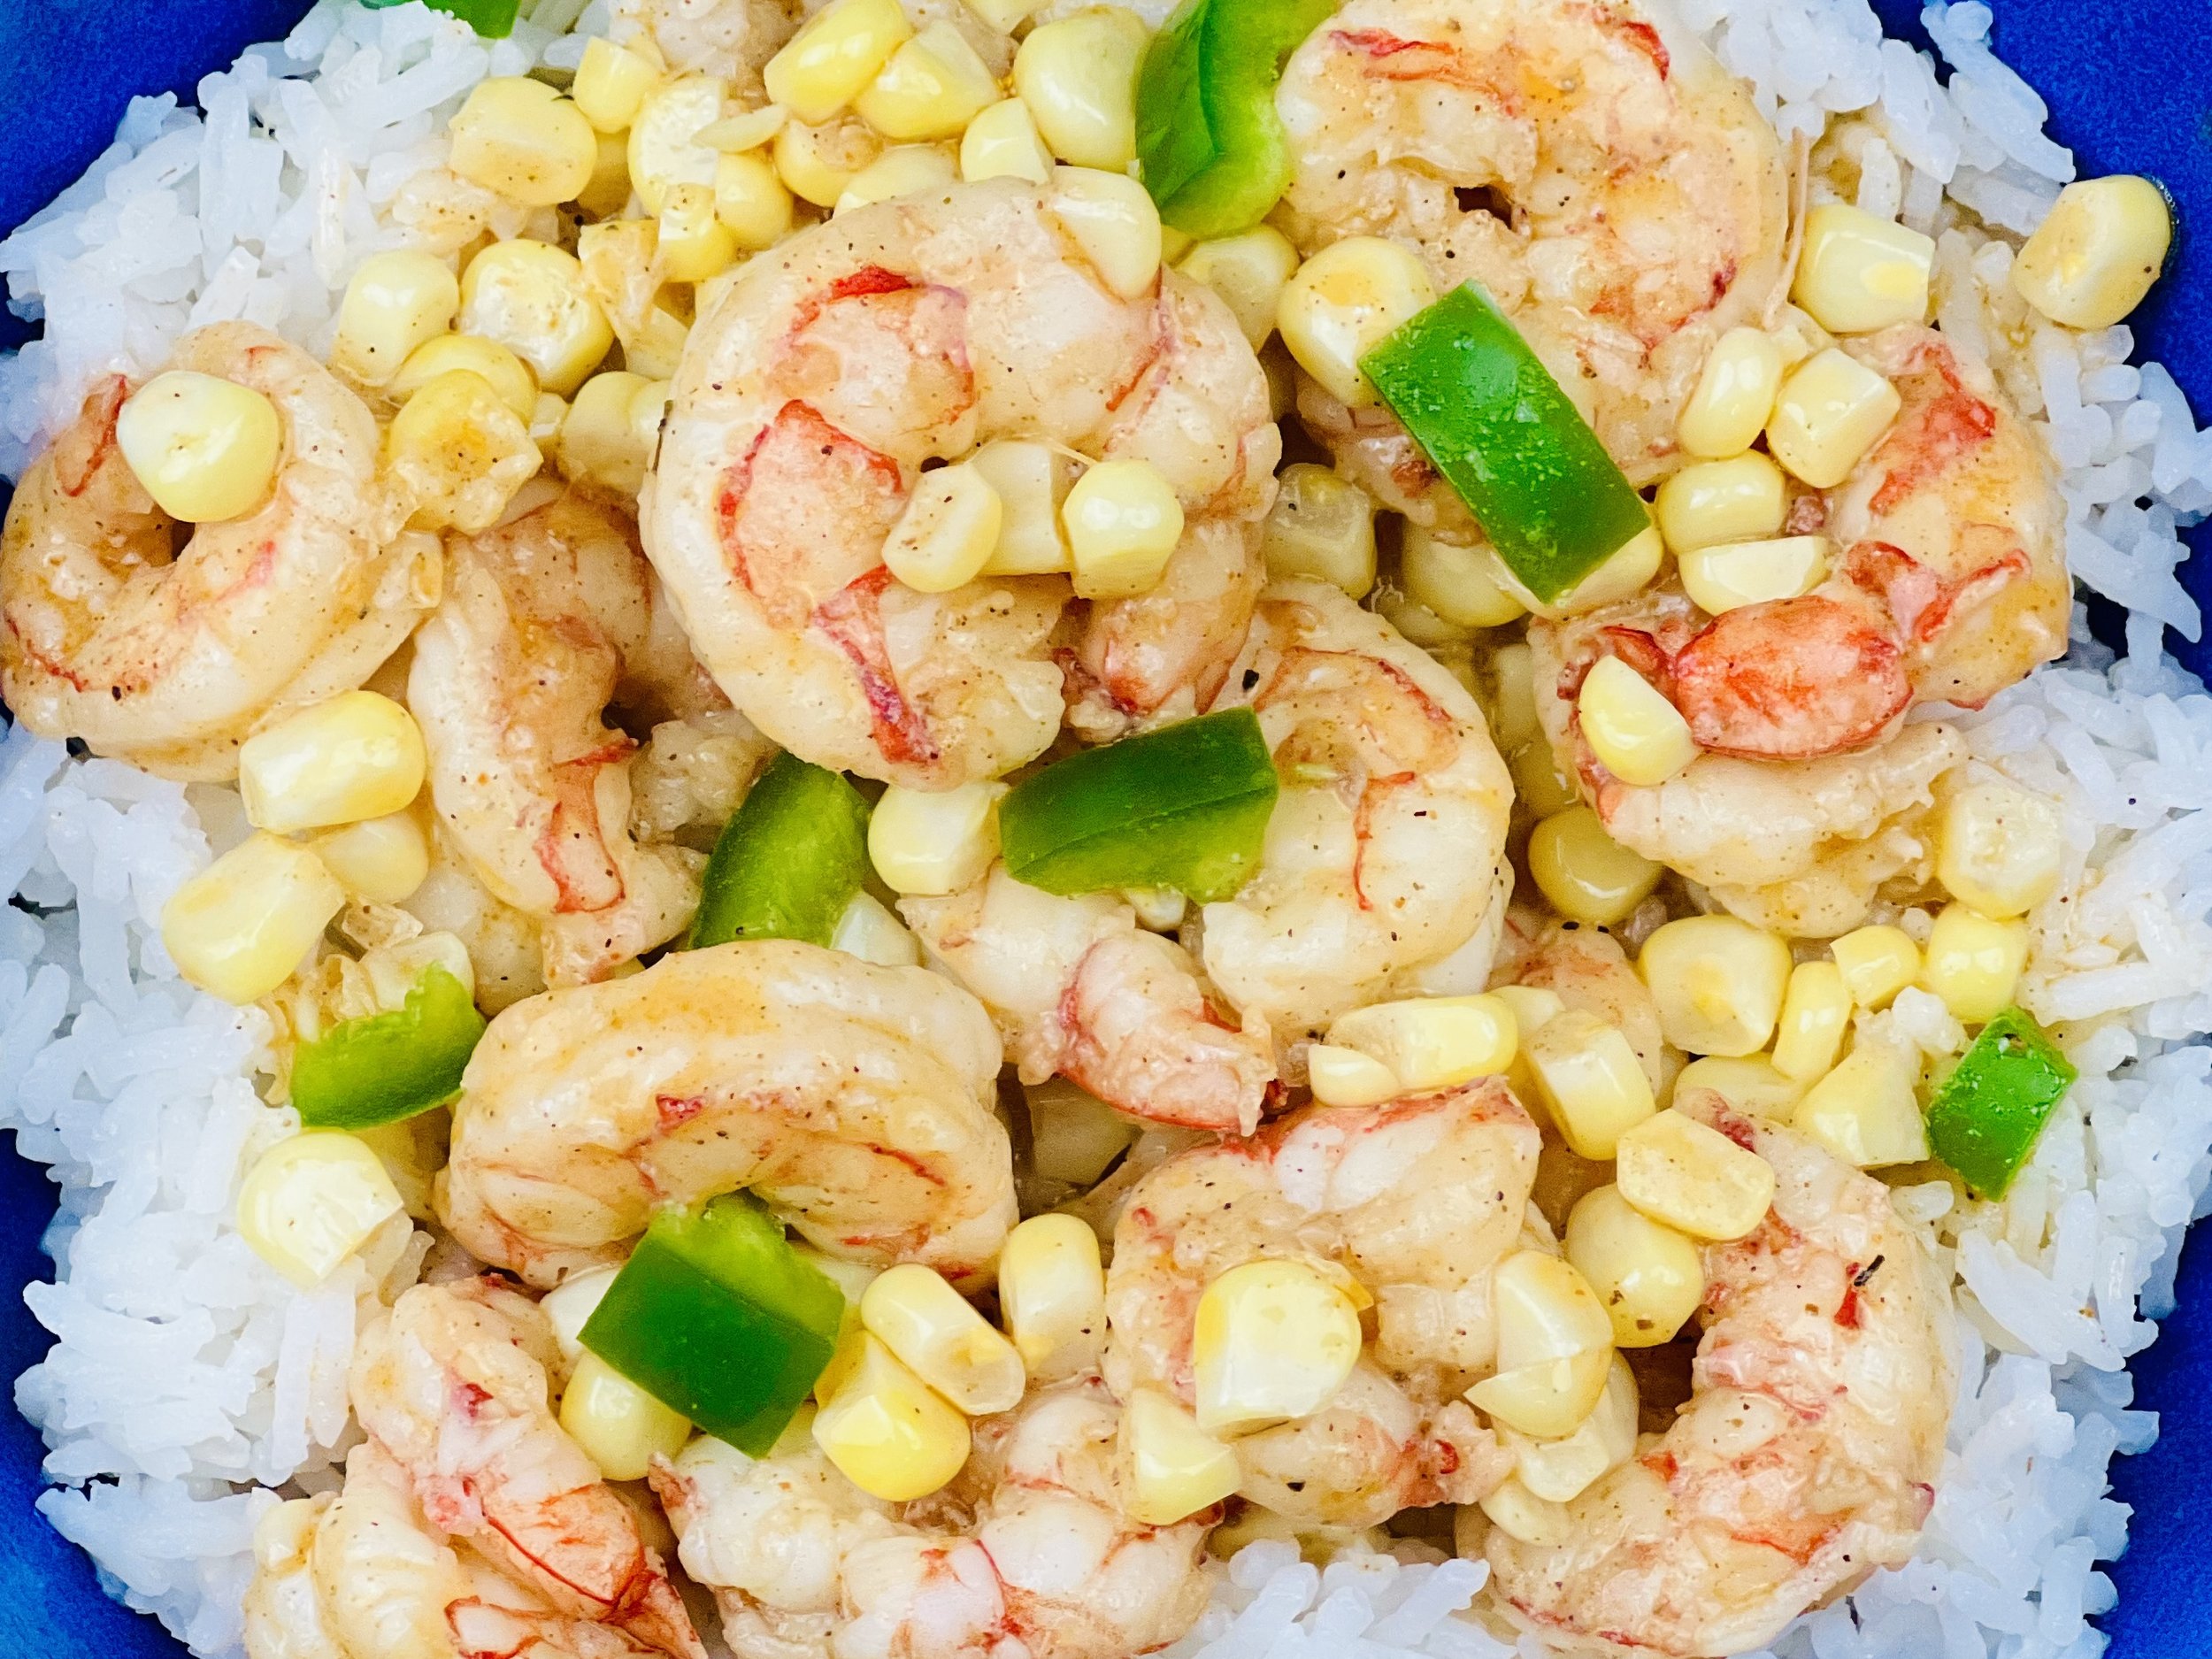
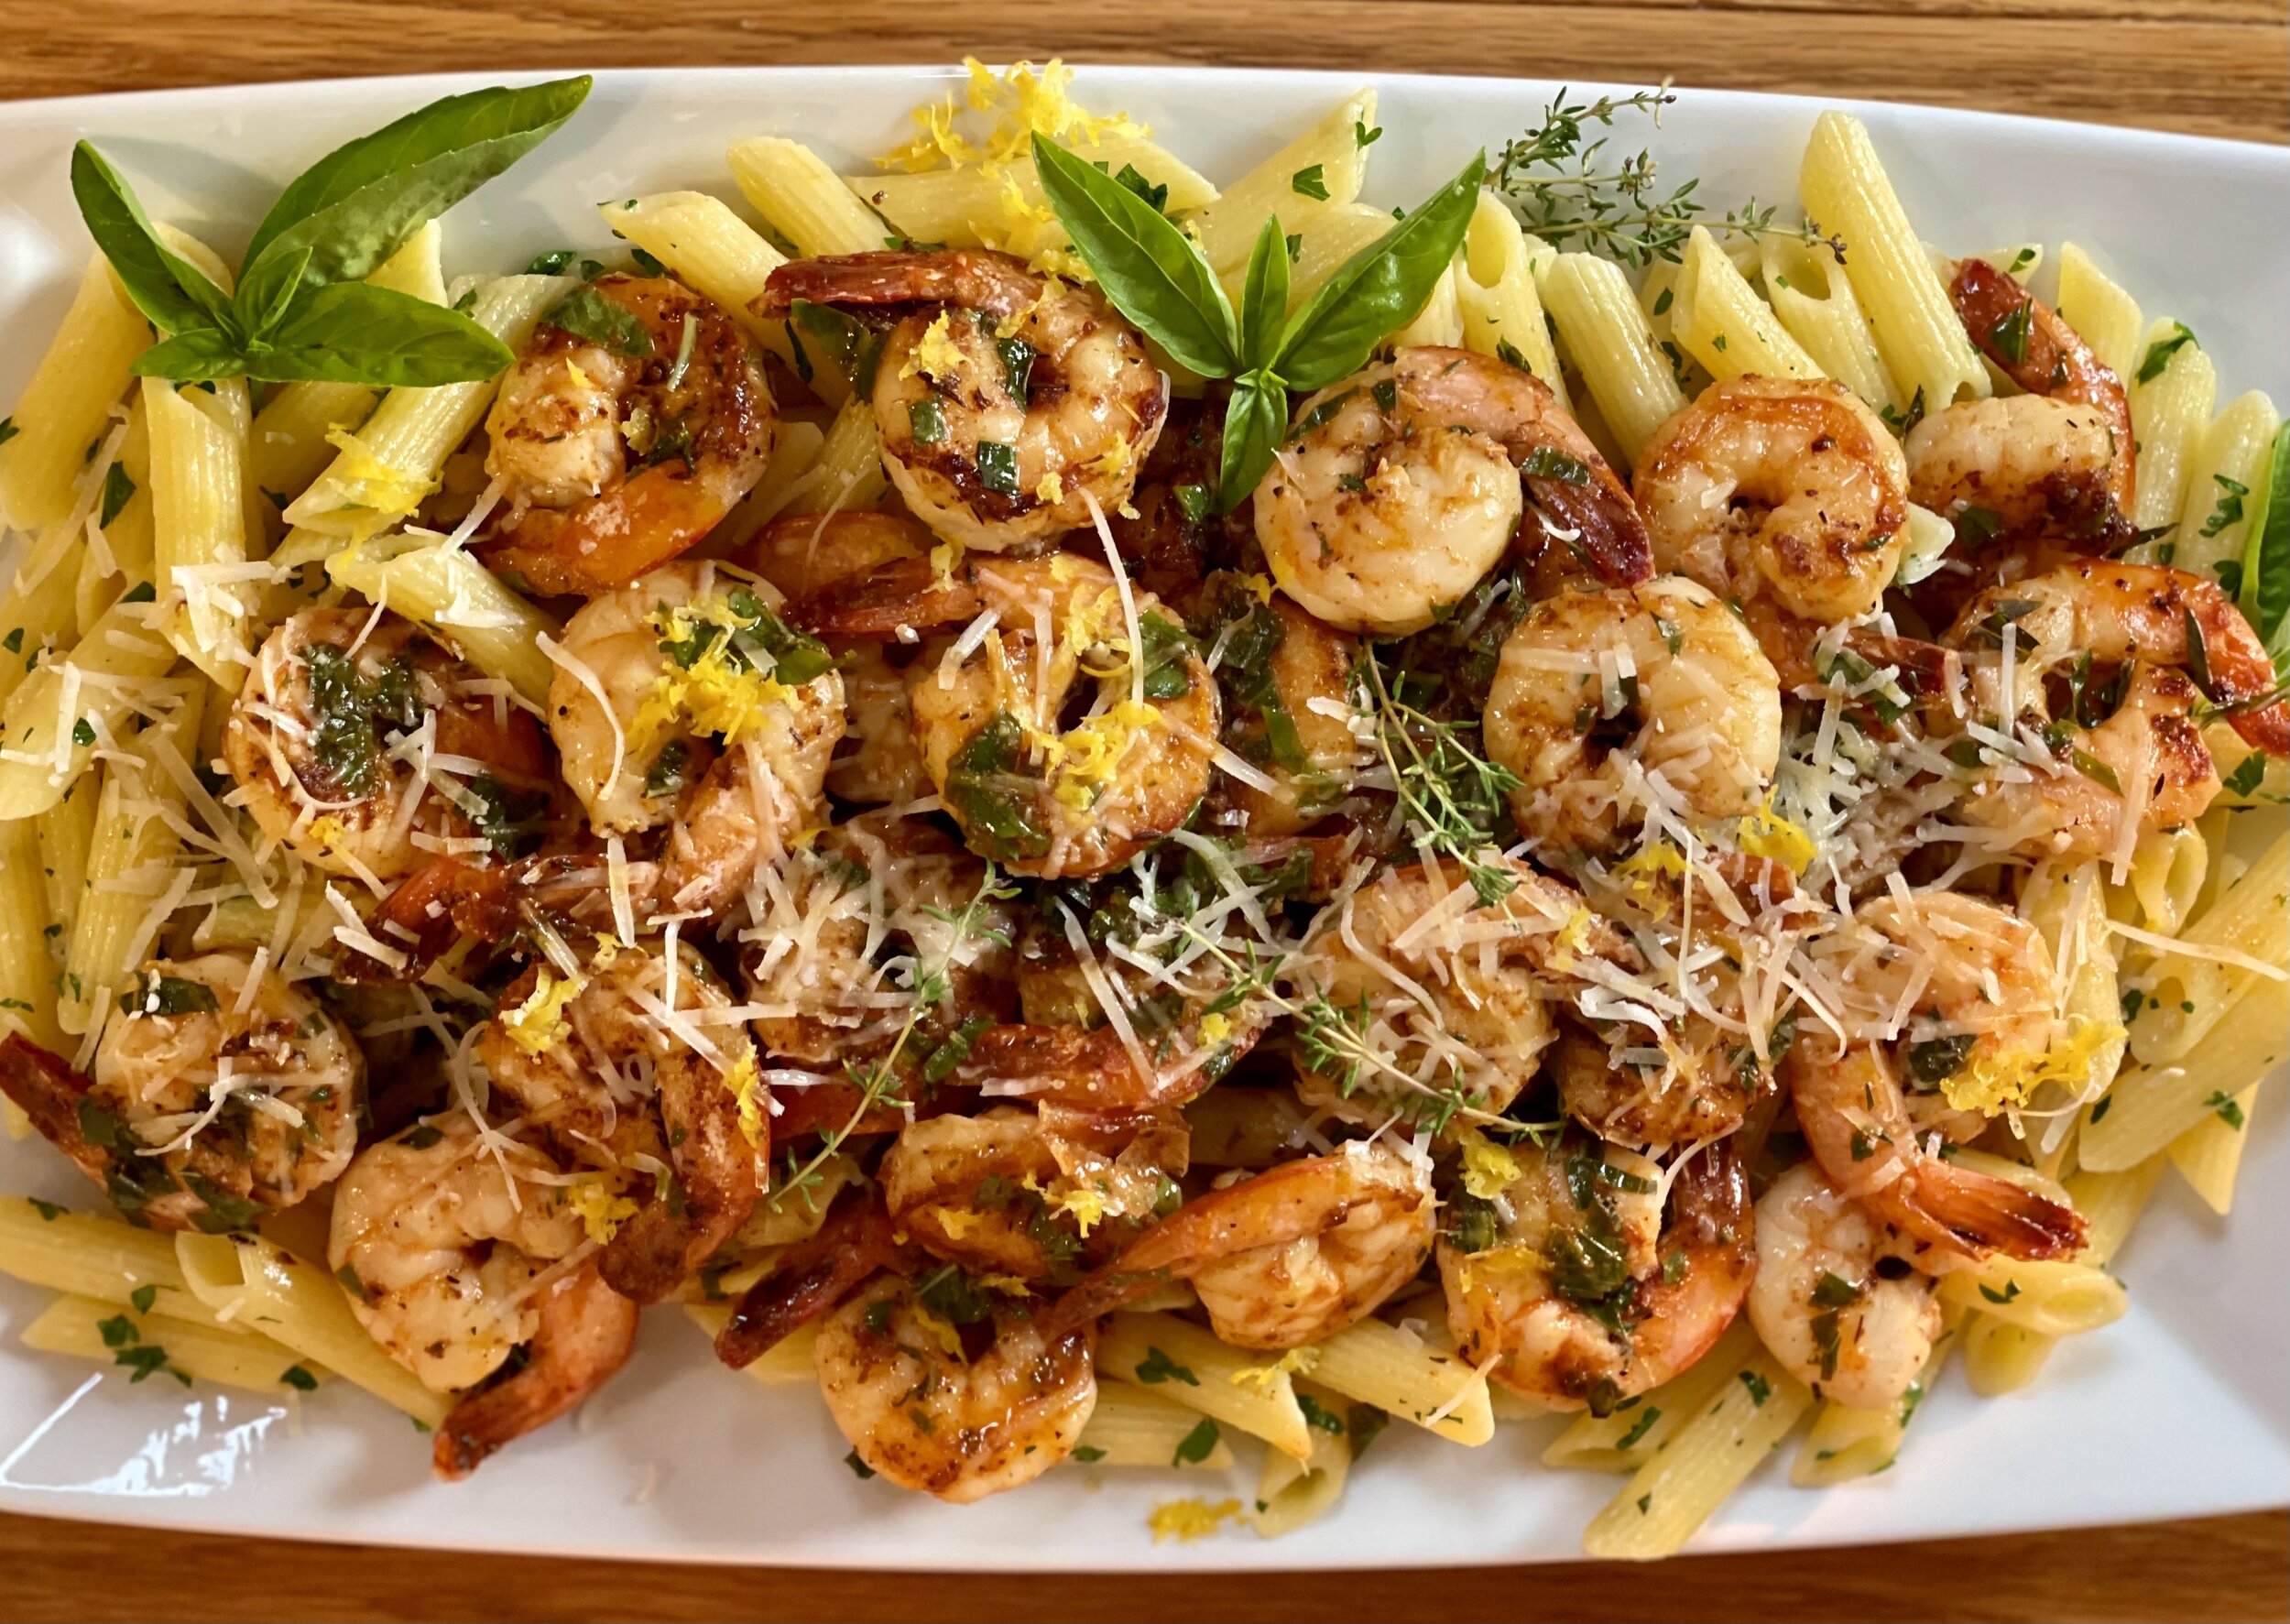
Cajun creole lemon butter shrimp (low FODMAP)
25 Minutes • Low FODMAP • Gluten-free • Serves 6
25 Minutes • Low FODMAP • Gluten-Free • Serves 6 • Ok to make-ahead: Steps 1 - 2
Shrimp are delicious with just about any kind of seasoning and this cajun lemon butter combination is particularly wonderful. It’s quick and easy to make so don’t hesitate to prepare this one for company or as a quick (but very special) weeknight meal. Leftover shrimp are wonderful in a salad or heated briefly on the stove.
This is an exclusive recipe just for recipe club members.
Each week I am creating and delivering one very special recipe just for my recipe club members. If you’re not yet a member, I encourage you to join! Membership in the club includes access to the complete archive of recipes with filters so it can become your virtual low FODMAP cookbook plus, I am creating and delivering one special NEW recipe every week ONLY for recipe club members. And, for my true fans, I’ll be sharing behind-the-scenes content, and updates on the progress of the new cookbook.
Your membership in the club helps me continue creating new, delicious, easy-to-make, low FODMAP recipes just for you.
As always, all recipes will emphasize simple ingredients, easy preparation, and delicious low FODMAP results. Recipes will be for everything from main courses, salads, soups, side dishes, appetizers, desserts, sauces, breakfast and lunch, and even mocktails and cocktails. Everything you need to prepare fantastic low FODMAP meals everyone will love.
Join the club. Become a Patron. Let’s keep making delicious Low FODMAP meals together.
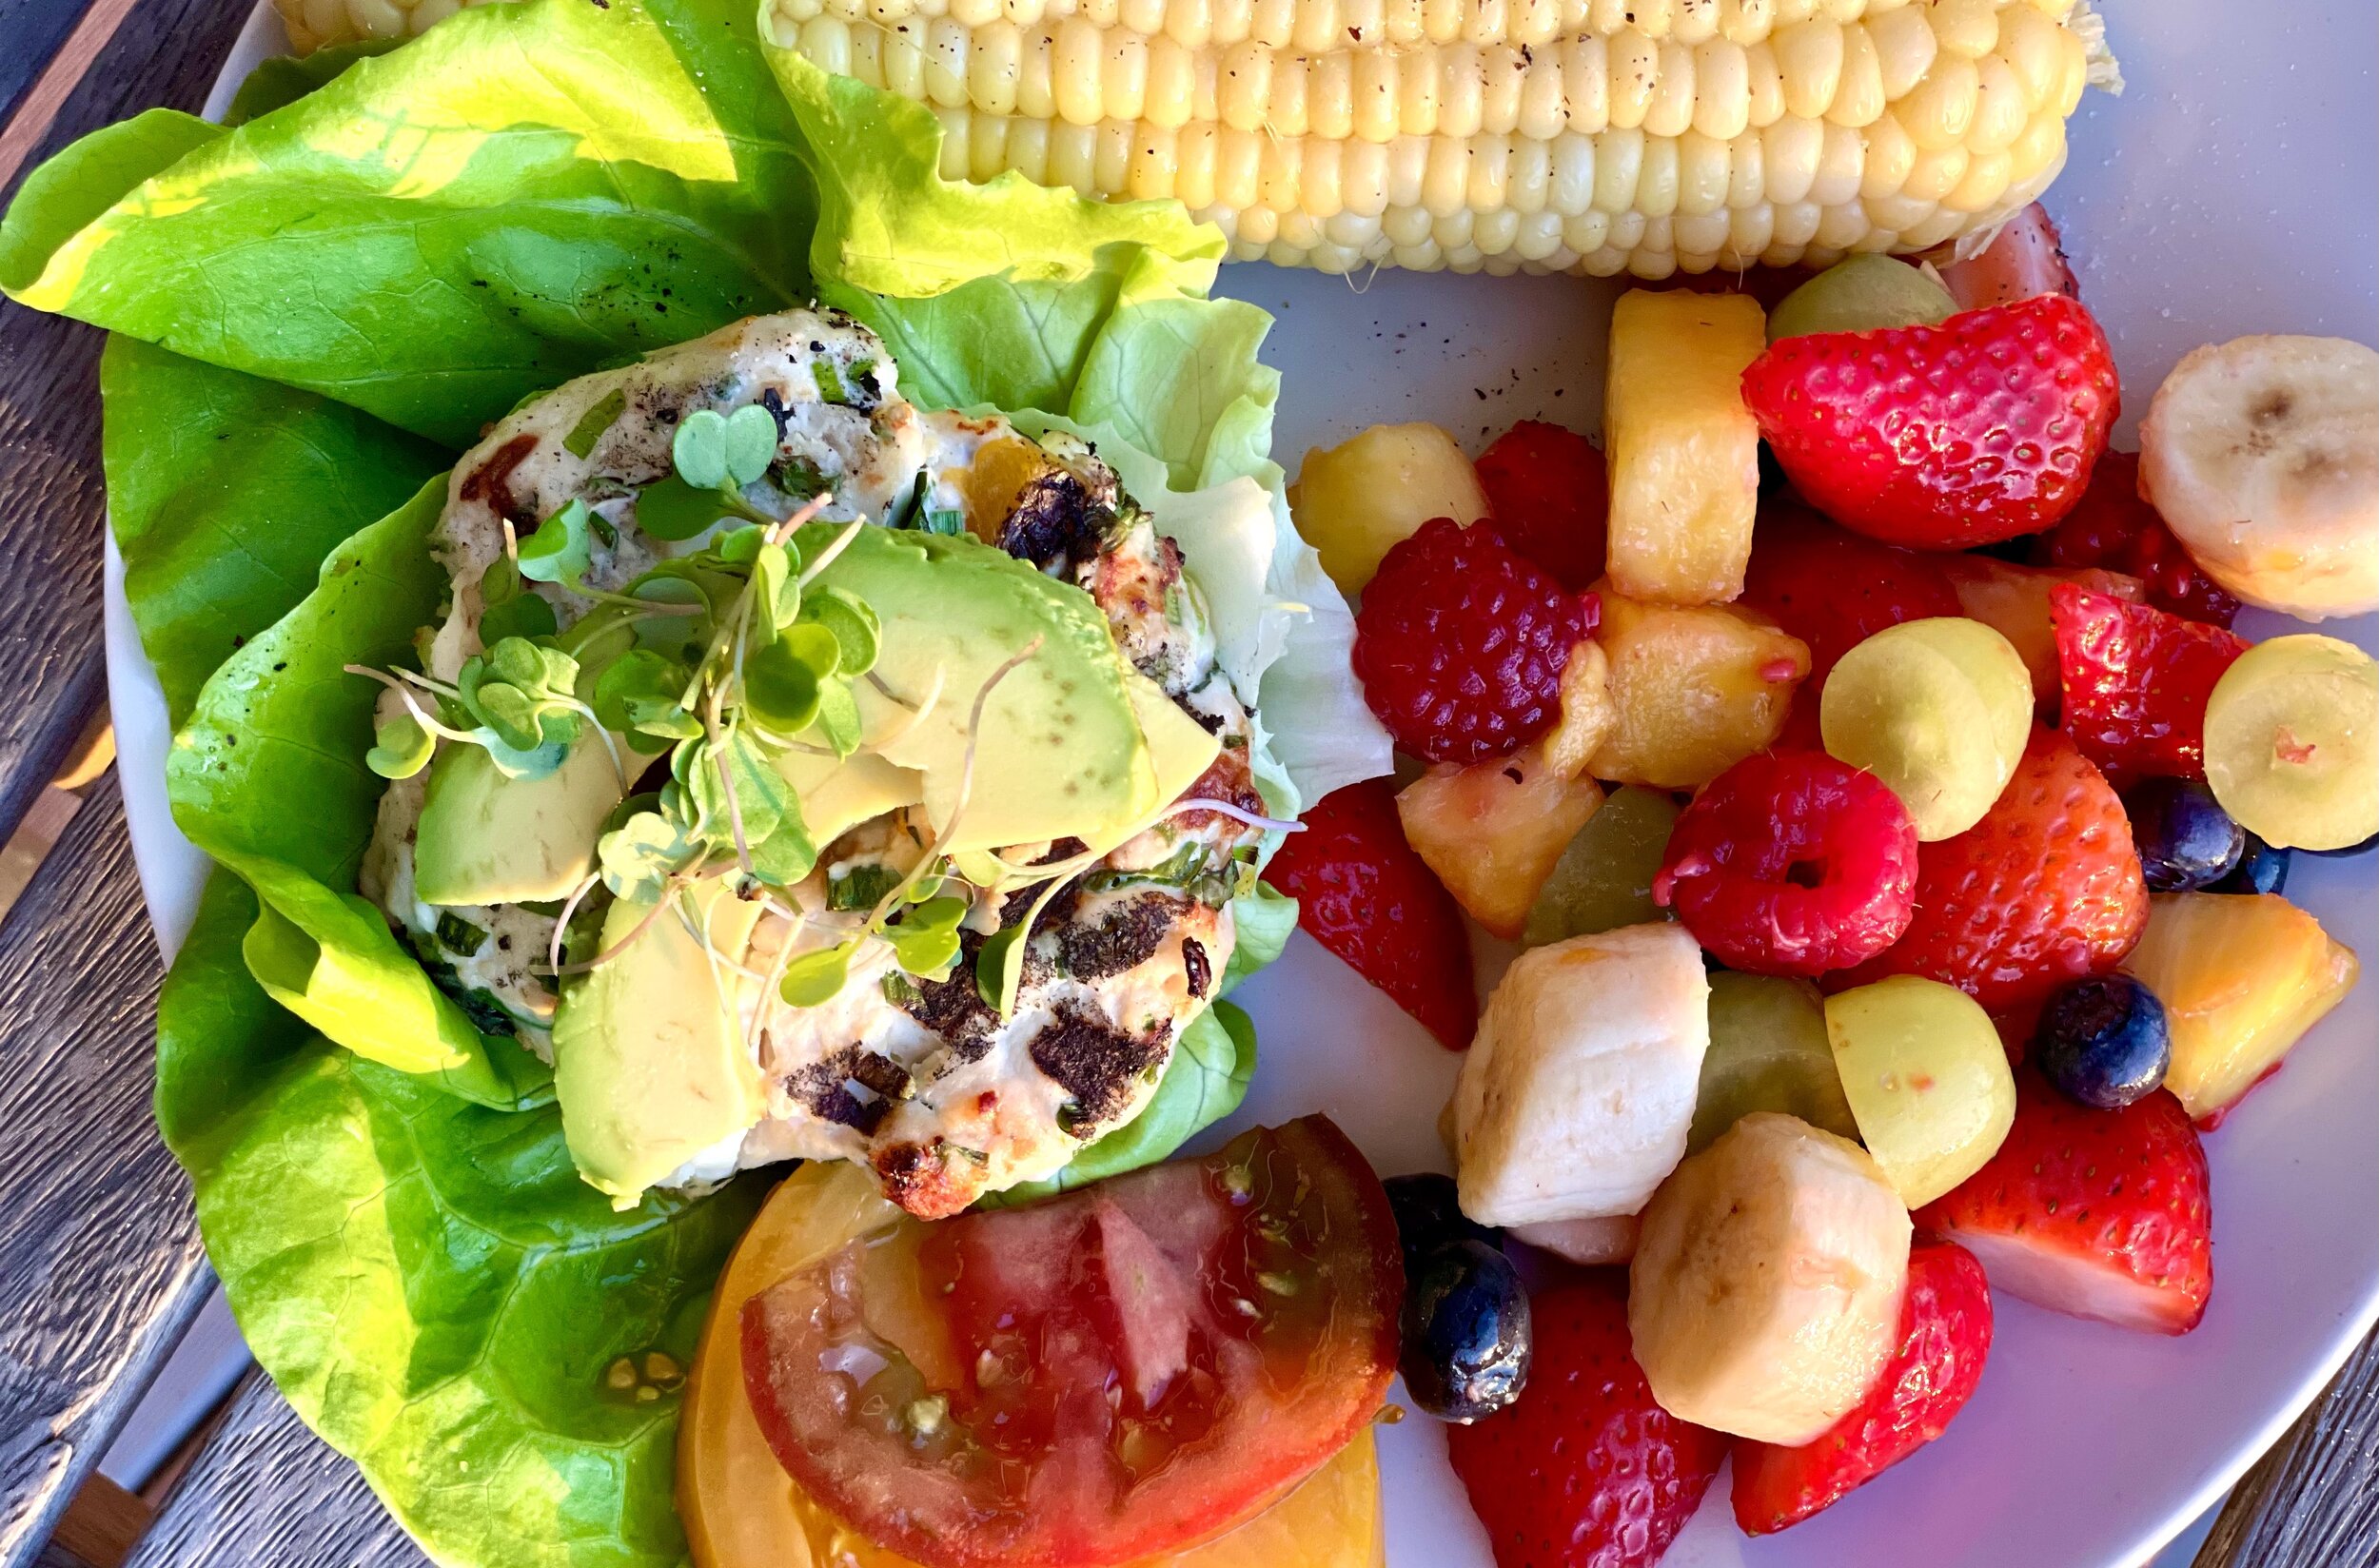
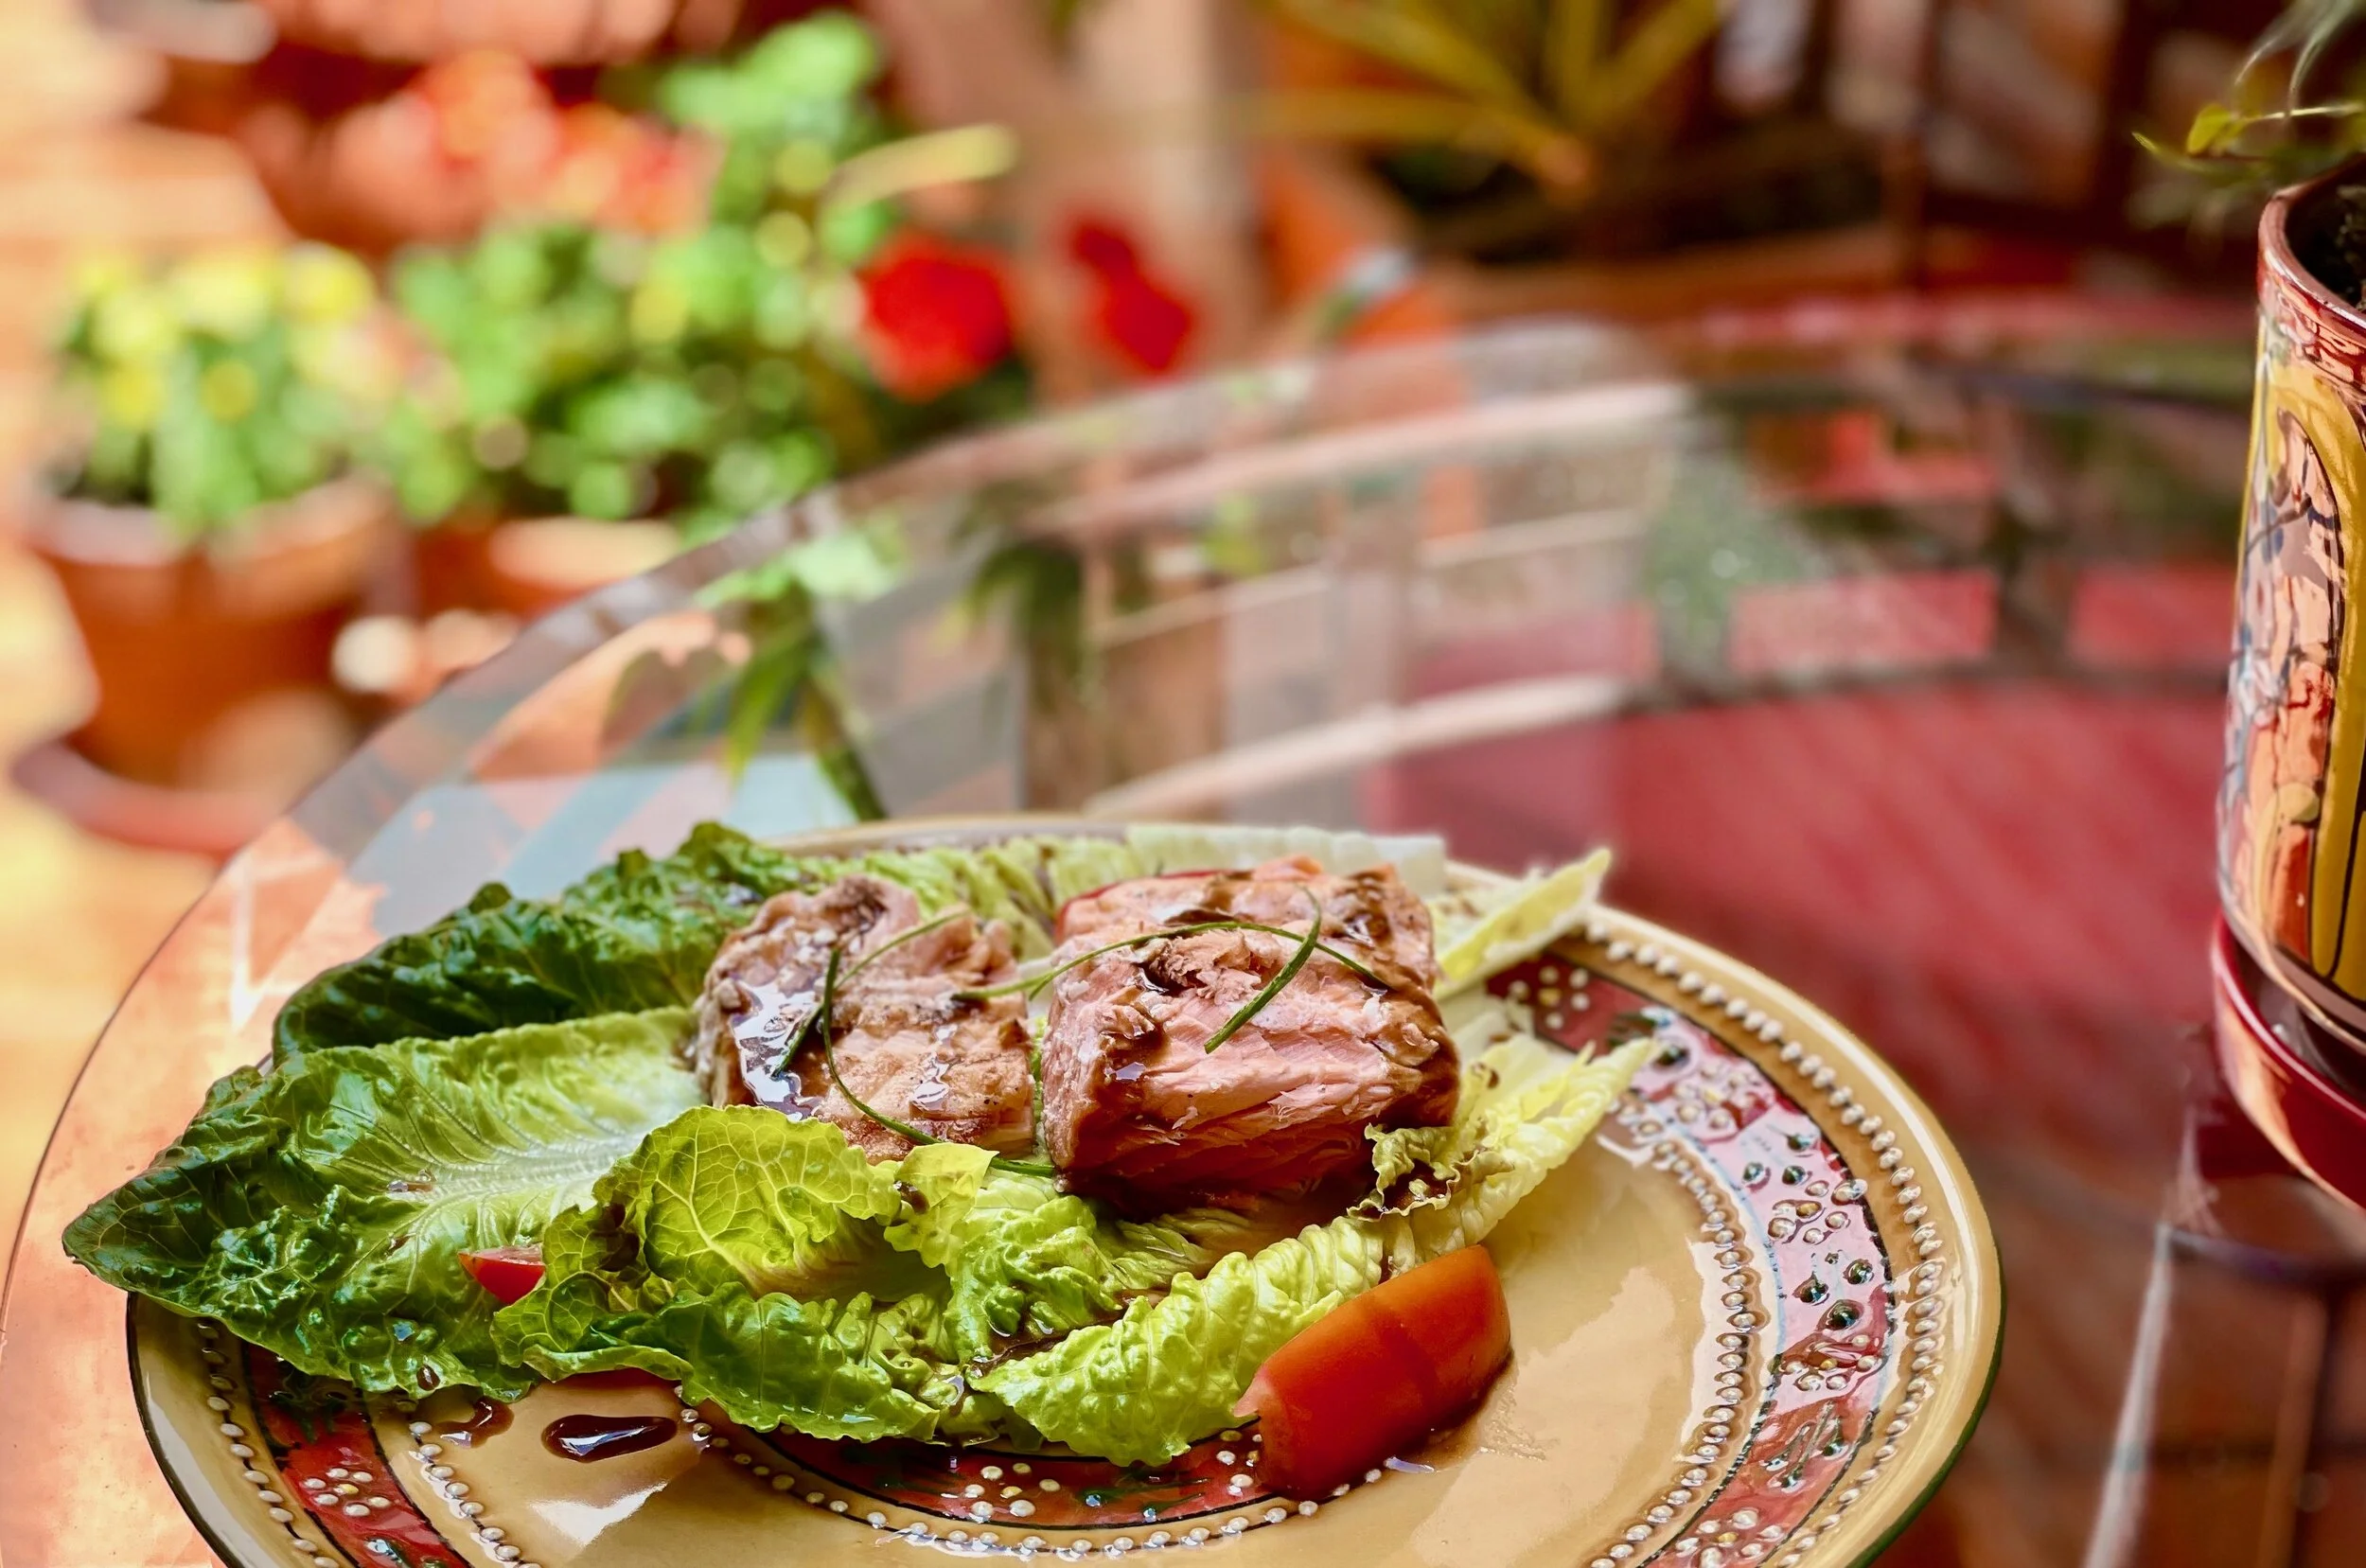
Herby Feta Turkey Burgers (low FODMAP)
30 Minutes • Low FODMAP • Gluten-Free • Serves 4 • Ok to make-ahead: Steps 1 - 3
30 Minutes • Low FODMAP • Gluten-Free • Serves 4 • Ok to make-ahead: Steps 1 - 3
This super flavorful burger stands up to the grill and provides a delicious alternative to traditional hamburgers. Serve them hot off the grill with some buttered sweet corn and fruit salad for a perfect fall barbecue. They are also delicious the following day so don’t be afraid to make a few extra and have them for lunch!
Ingredients
1 pound ground turkey
4 ounces crumbled feta
1 heirloom tomato, or 2 Roma tomatoes, chopped
1/2 cup fresh basil, chopped
4 green onions, green part only, chopped
2 tablespoons fresh chives, chopped
Gluten-free buns (optional), lettuce, sliced avocado, and micro greens for serving
Directions
(1) Prepare the grill: Preheat the grill to medium-high.
(2) Prepare the meat: Combine all ingredients in a bowl and mix well.
(3) Form the patties: Form patties, sprinkle each patty with additional salt and fresh ground pepper, and stack on a plate with parchment or waxed paper between layers of patties as needed. Set aside in the refrigerator until ready to cook.
Make-ahead note: At this point, you may cover and chill the prepared patties until you are ready to grill and serve.
(4) Cook the patties: When the grill is hot, place burgers directly on a lightly oiled grill and cook for 3-5 minutes, then flip and cook for another 3-5 minutes until lightly charred and cooked through. Remove from grill and cover with foil to keep warm until ready to serve.
(5) Plate and serve: Serve with lettuce leaves (or gluten-free buns of your choice), sliced tomato and avocado, mustard, mayo, and optional microgreens of your choice.
Eat and enjoy every bite because you can!
More Deliciously Low FODMAP™ main courses you might enjoy
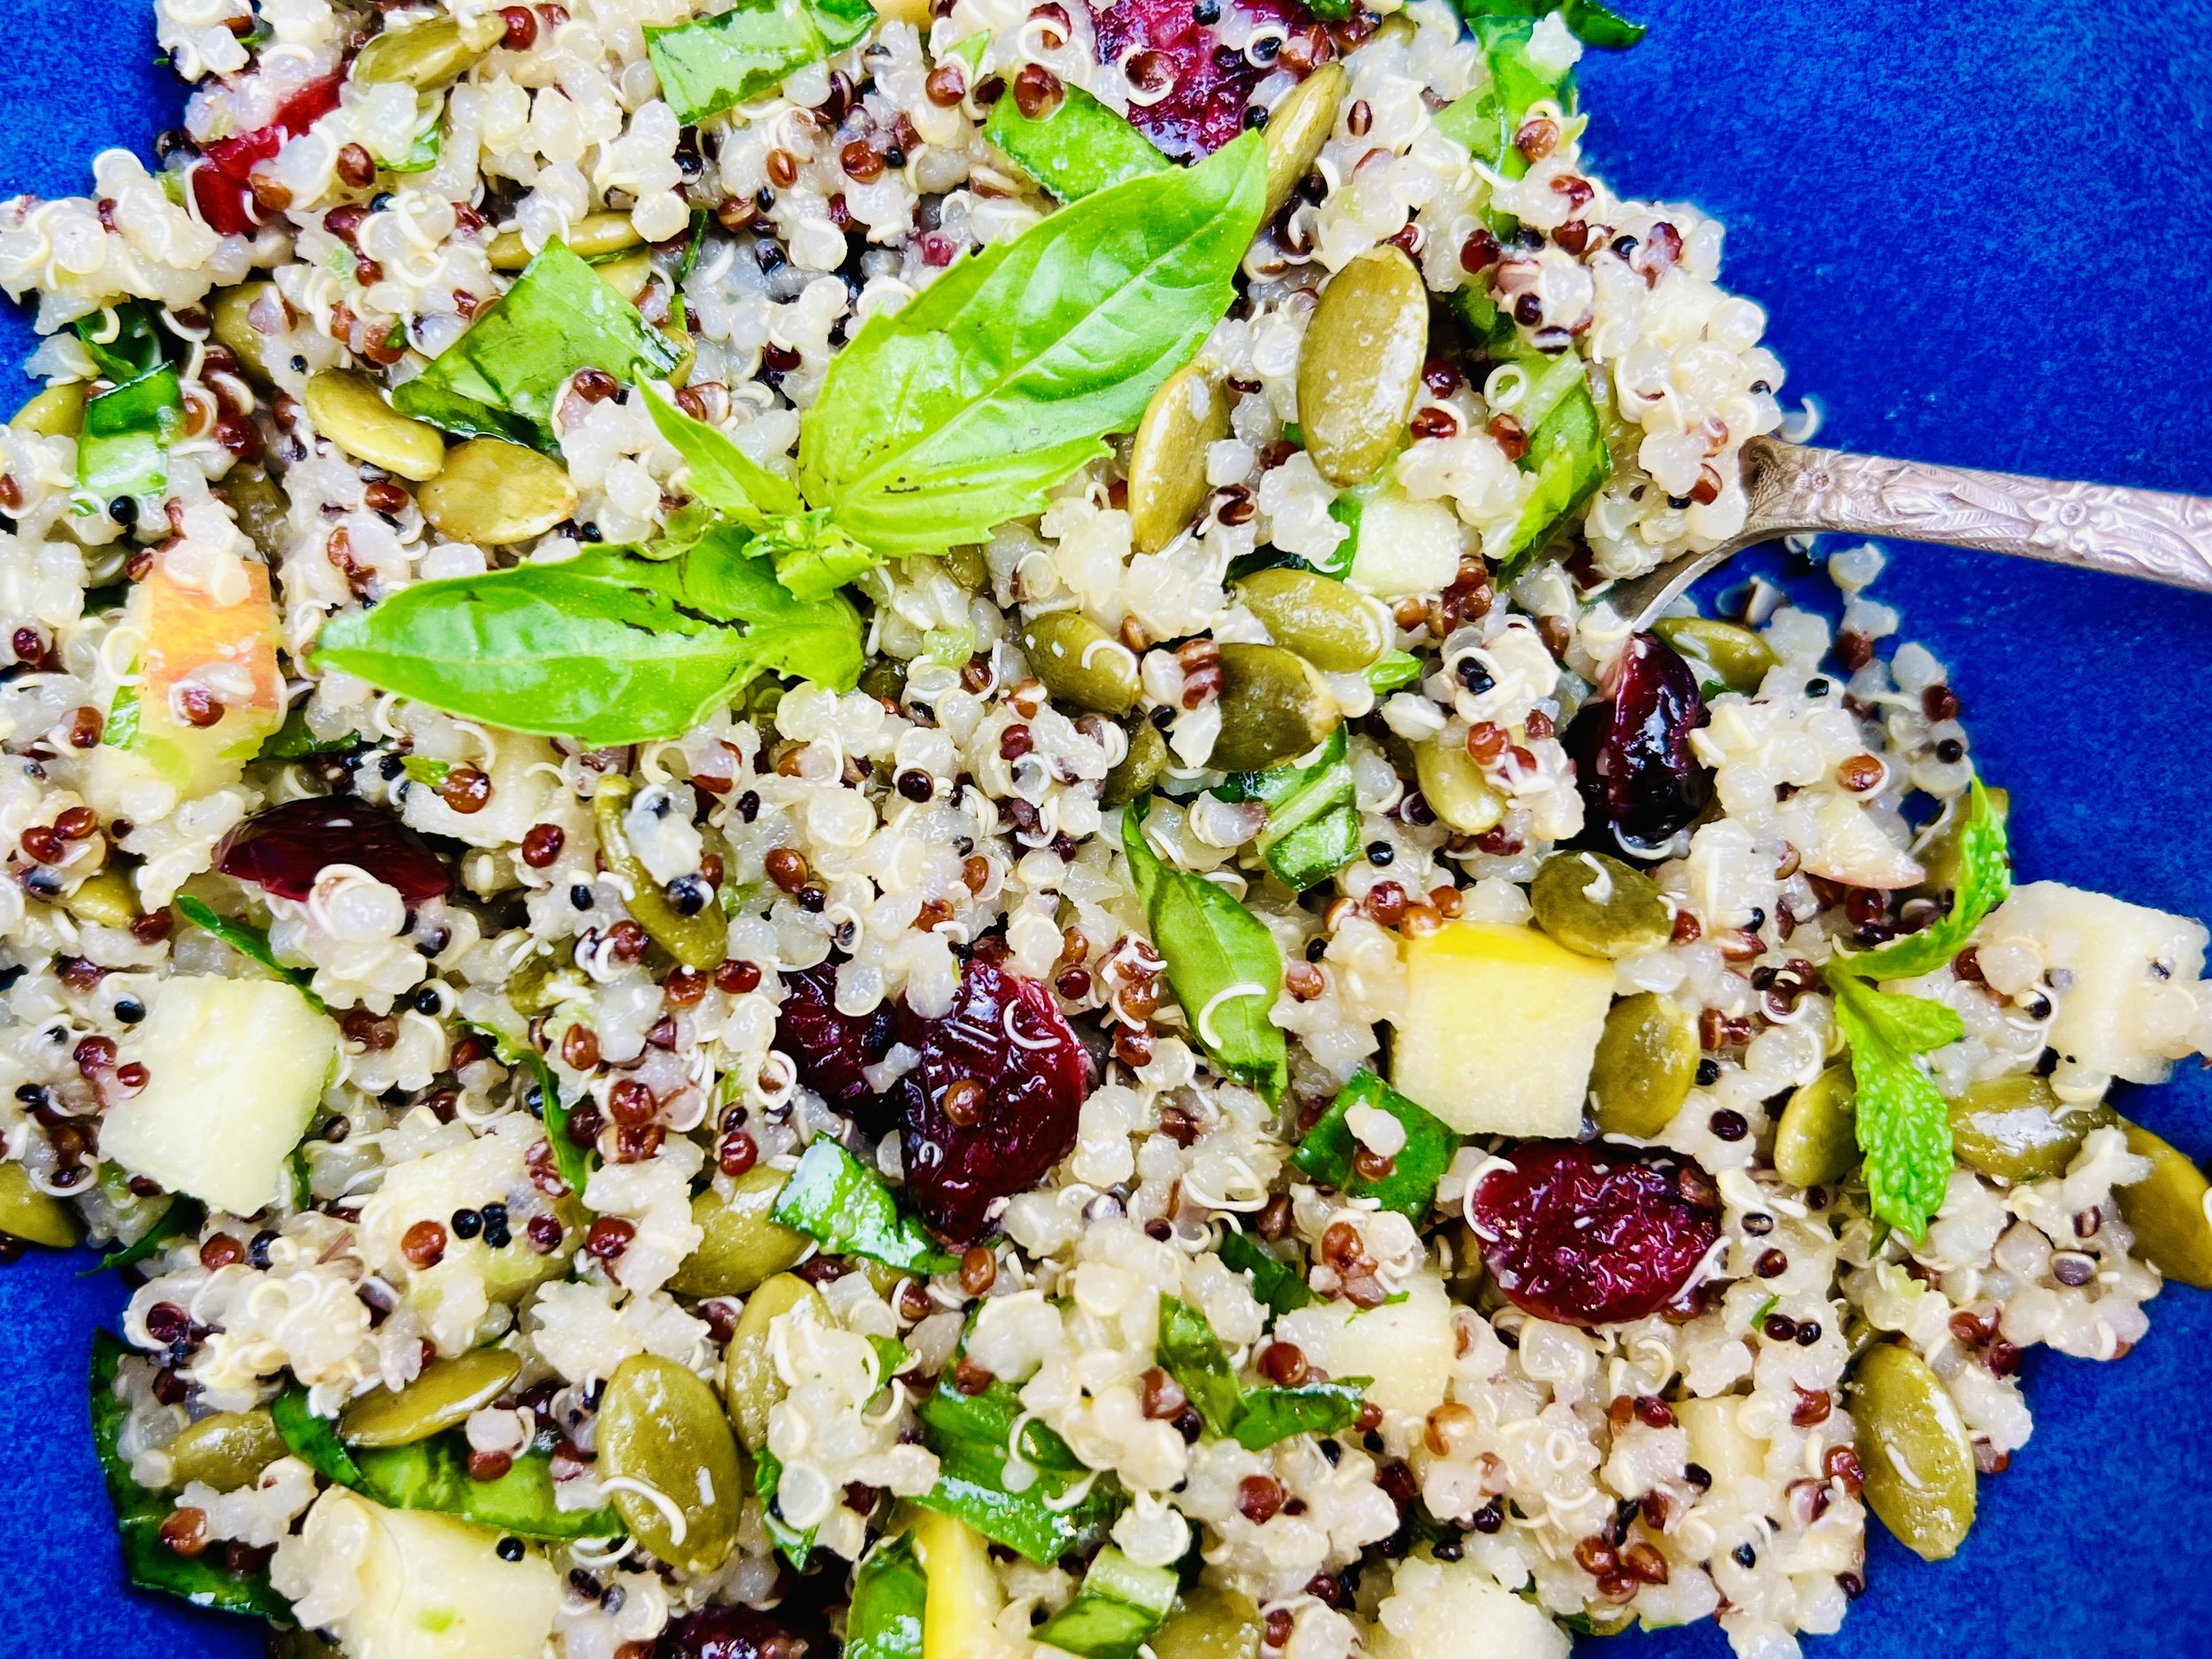
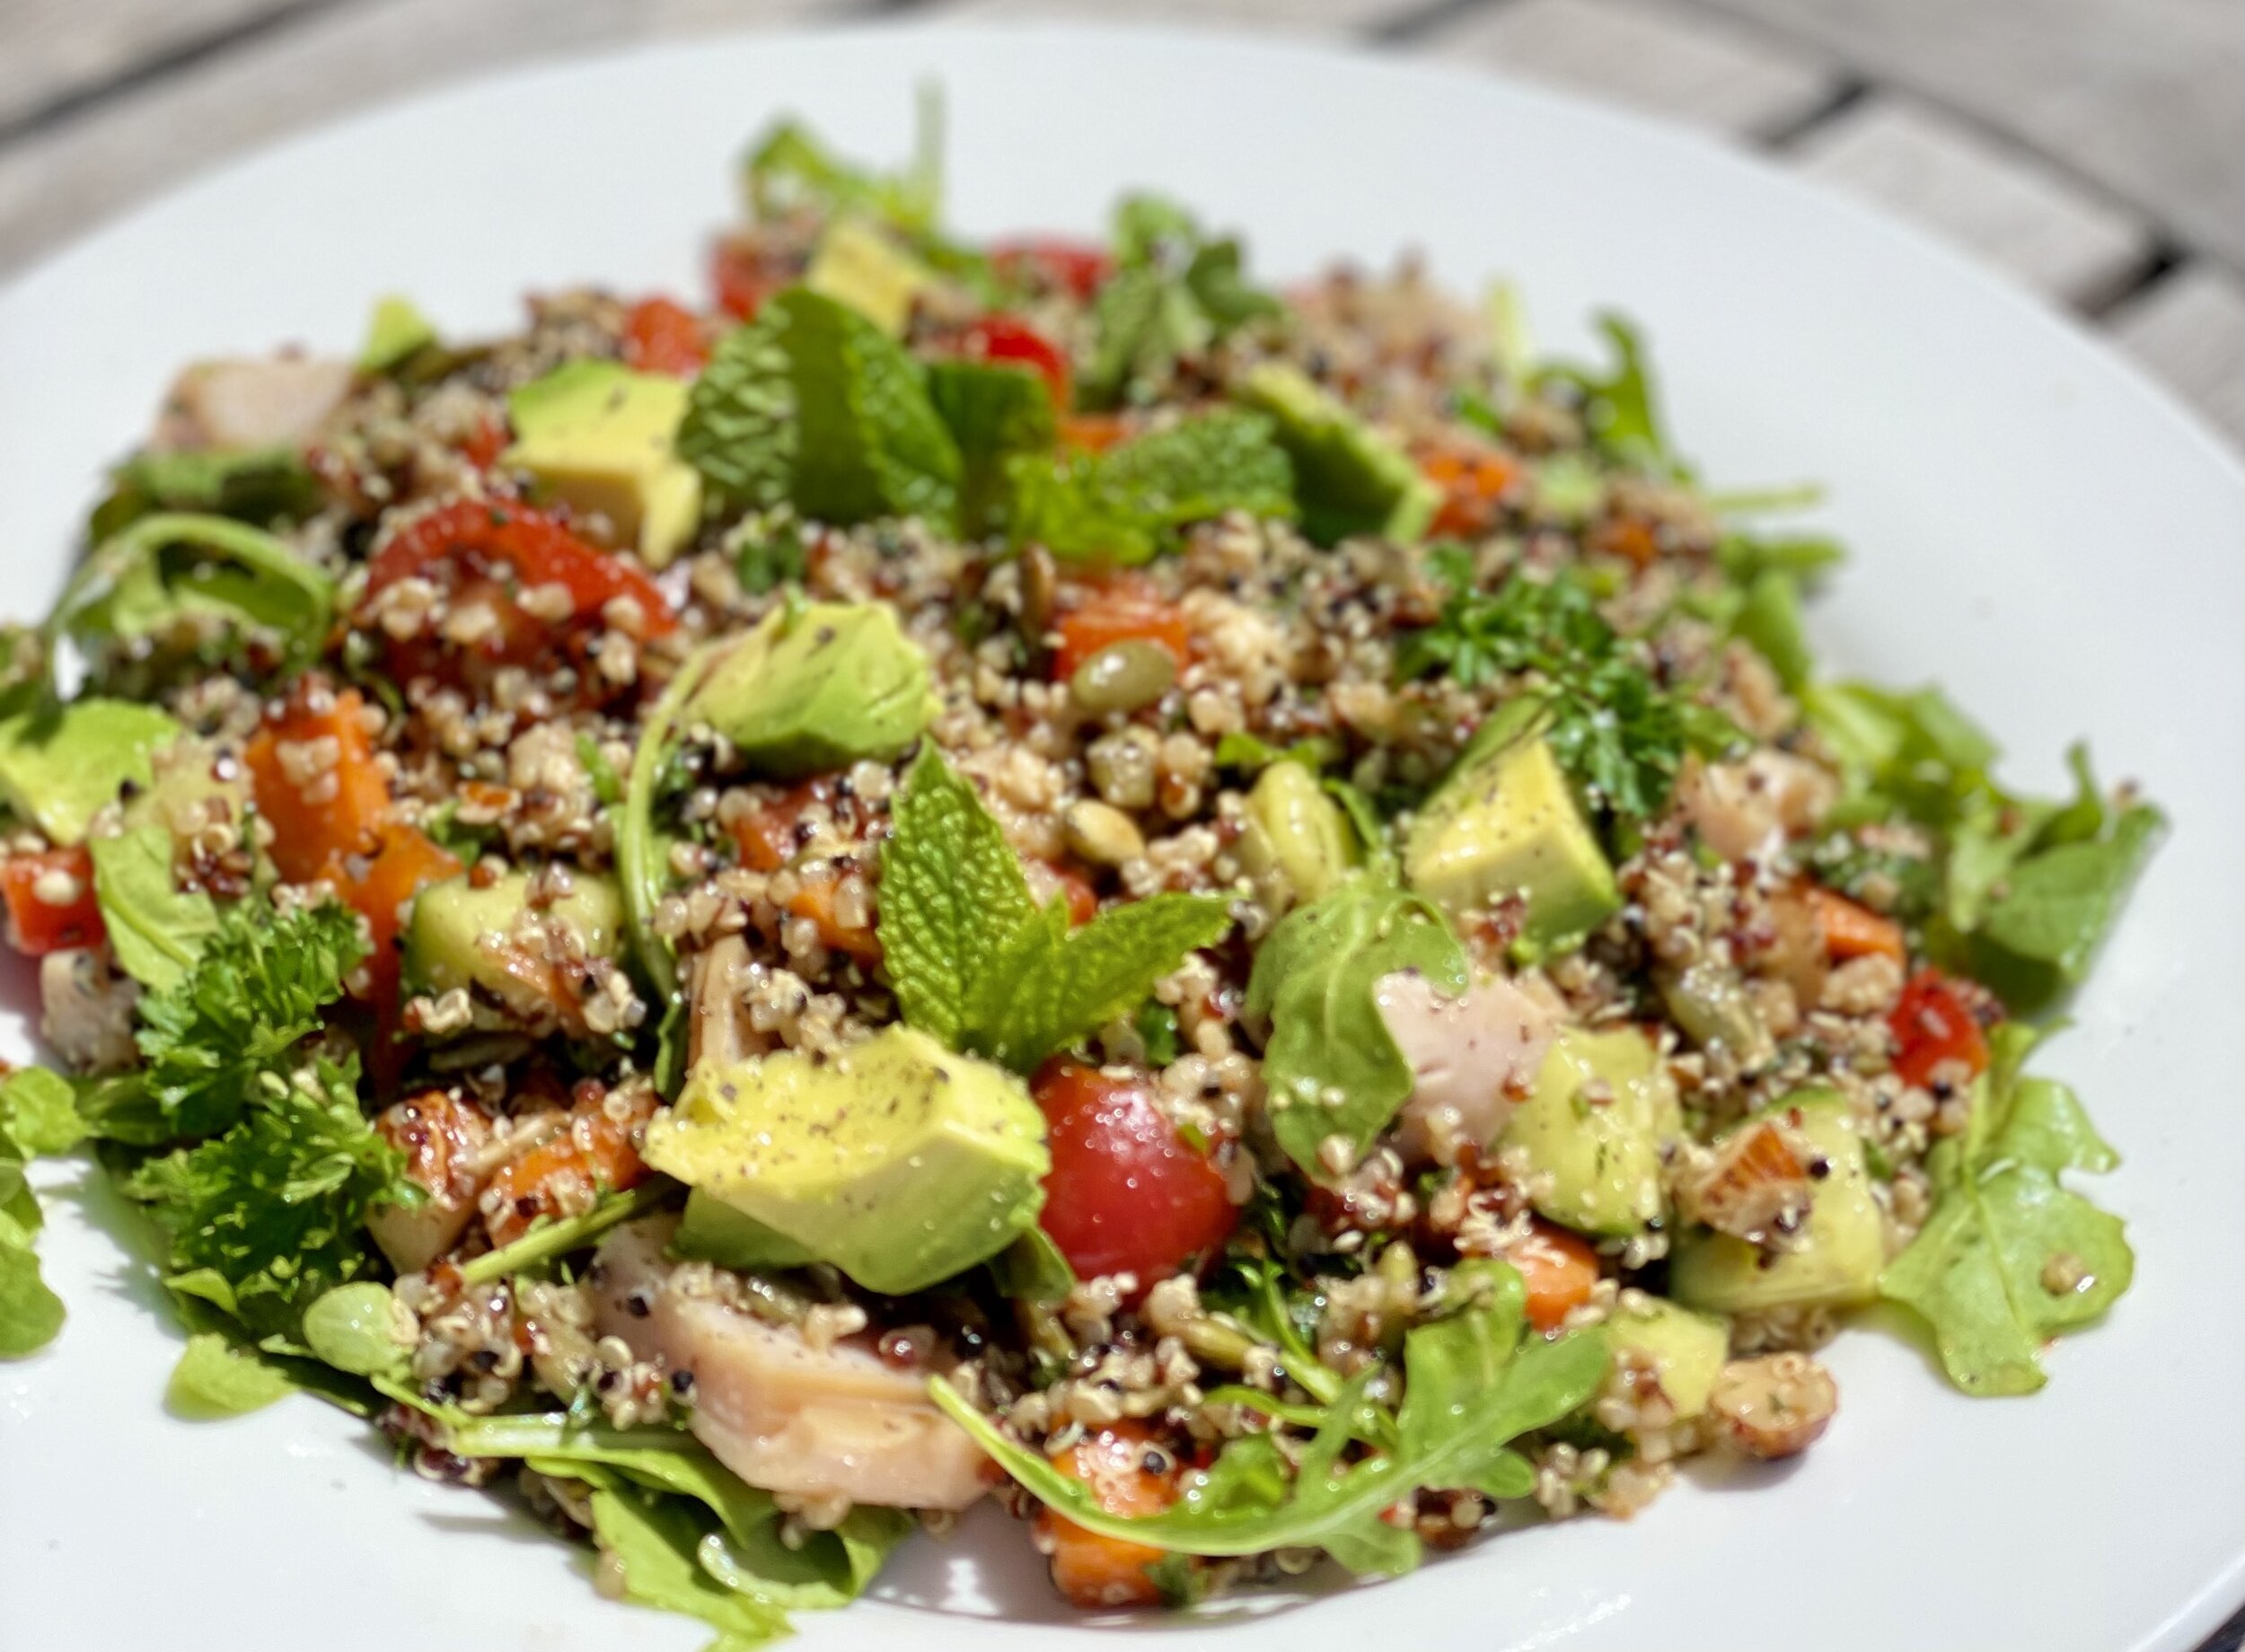
Quinoa Chopped Salad (low FODMAP)
60 Minutes • Low FODMAP • Gluten-Free • Serves 8 • Ok to make-ahead: Steps 1 - 5
60 Minutes • Low FODMAP • Gluten-Free • Serves 8 • Ok to make-ahead: Steps 1 - 5
This salad is as beautiful as it is healthy and delicious. It’s the perfect weekday working-from-home lunch or the main event for your next fancy luncheon. Keep in mind it improves with time so it’s the perfect salad to make ahead and keep in the fridge. Serve it as is, or add a little of whatever you have on hand to change things up each time (roasted vegetables, chunks of cheese or cooked meat, a few more nuts, some grated parmesan, whatever you like!)
Ingredients: Salad
1 cup tri-color (or any color) quinoa (yielding about 2 cups cooked)
3/4 cup diced carrots
3/4 cup diced English or Persian mini cucumber
1/2 cup diced red, orange, or yellow bell pepper
1/4 cup fresh mint - chopped
1/4 cup green onions (green part only) chopped
1/4 cup chopped parsley
3/4 cup raw almonds, chopped
1/2 cup roasted and salted pepitas (pumpkin seeds)
3/4 cup crumbled feta
1 cup cherry tomatoes (cut in half)
1 cup cooked turkey, chicken, or other low FODMAP cooked meat, cut into bite-size pieces
1 medium avocado, chopped
2 cups arugula, baby spinach, or other low FODMAP salad green
Additional chopped mint or parsley for serving
Ingredients: Dressing
1/4 cup lime juice
3/4 cup olive oil
1/4 cup Balsamic vinegar
1 teaspoon ground cumin
1 - 2 teaspoons Kosher salt (or to taste)
1 teaspoon freshly ground black pepper
Directions
(1) Prepare quinoa: Rinse and cook the quinoa according to package instructions and set aside to cool.
(2) Prepare salad ingredients: Wash, chop, and put in a large bowl all salad ingredients except the greens.
(3) Prepare salad dressing: Combine all dressing ingredients in a jar or small bowl and shake or whisk to combine. Taste and add additional salt and pepper as needed to suit your taste.
(4) Prepare salad greens: Wash and spin dry the salad greens and avocado.
(5) Dress the salad: If you’re going to serve right away, add a bit of the dressing to the greens and toss to combine. Then add the rest of the dressing to the quinoa salad and stir to combine.
(6) Finish: Taste and add additional salt and pepper as needed to suit your taste.
Make-ahead note: This salad improves with time so make the whole thing ahead and just toss fresh greens with oil and vinegar before plating with the salad.
(7) Plate and serve: Put a bed of greens on each plate then top with a generous scoop of the quinoa chopped salad mix. Add the chopped avocado and sprinkle with additional chopped mint or parsley.
Eat and enjoy every bite because you can!
This post may contain affiliate links so you can easily purchase items listed on the page. In some cases, we have provided a special discount code for IBS Game Changers so be sure to use it when you purchase an item to get the discount that has been arranged just for you!
More Deliciously Low FODMAP™ salad recipes you might enjoy
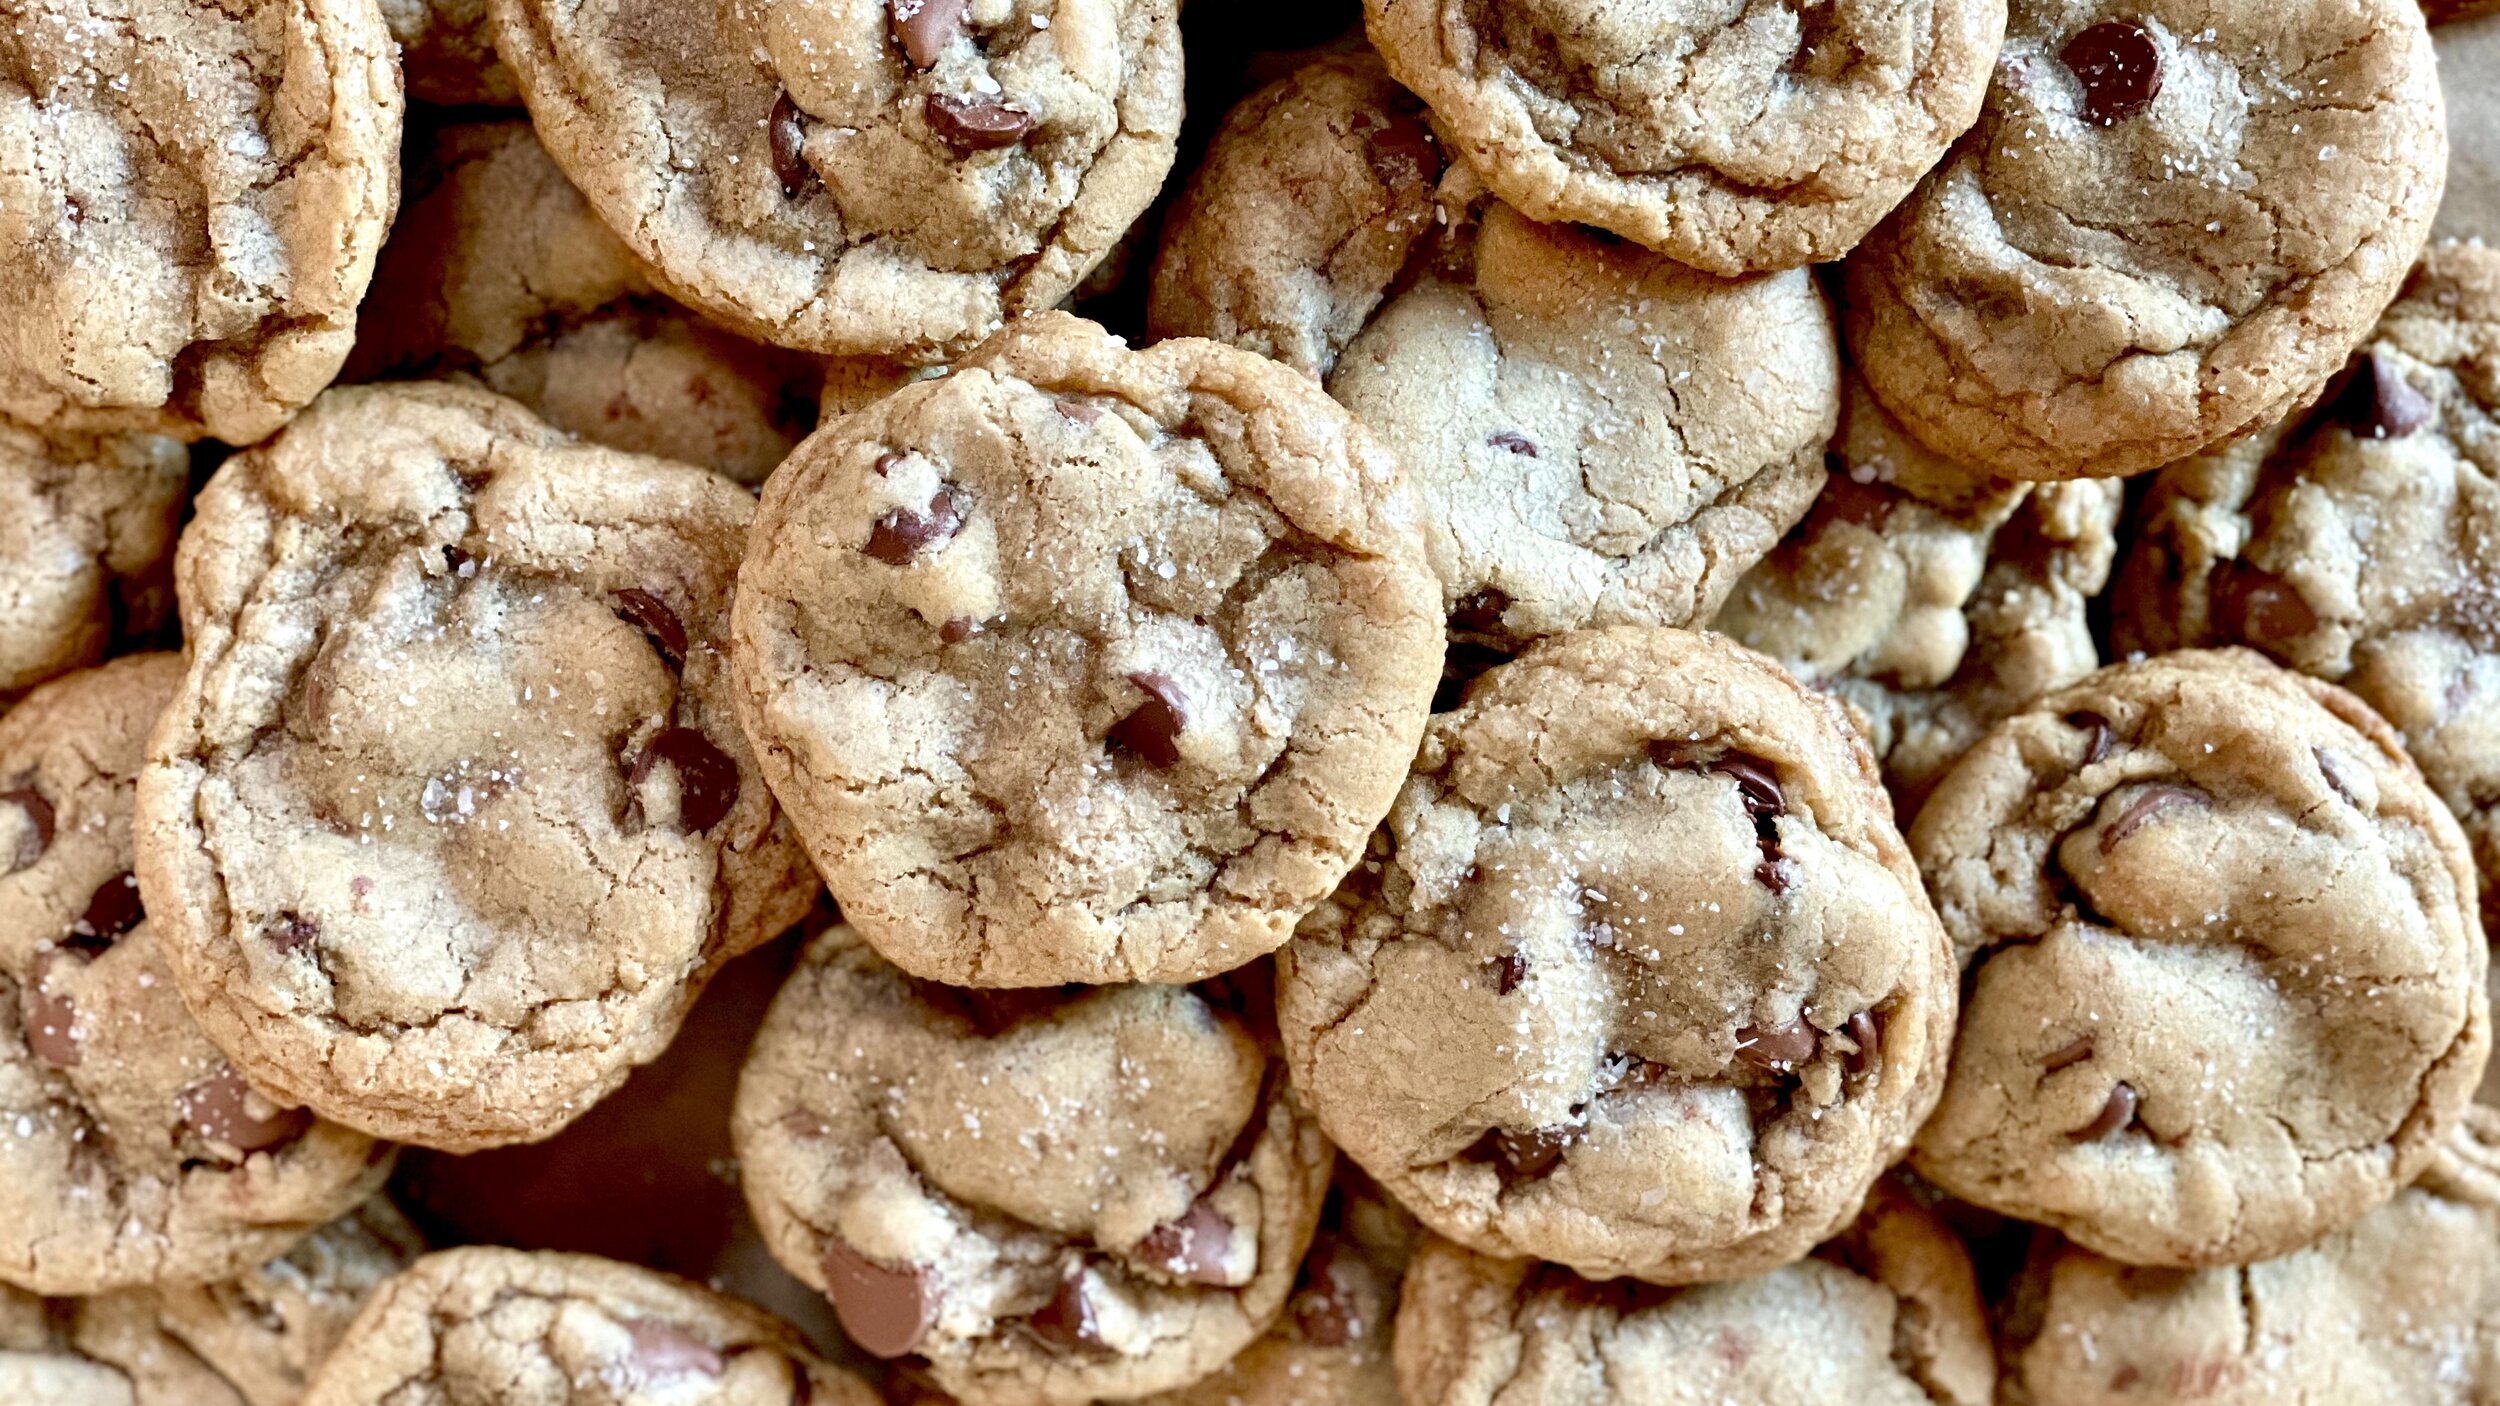
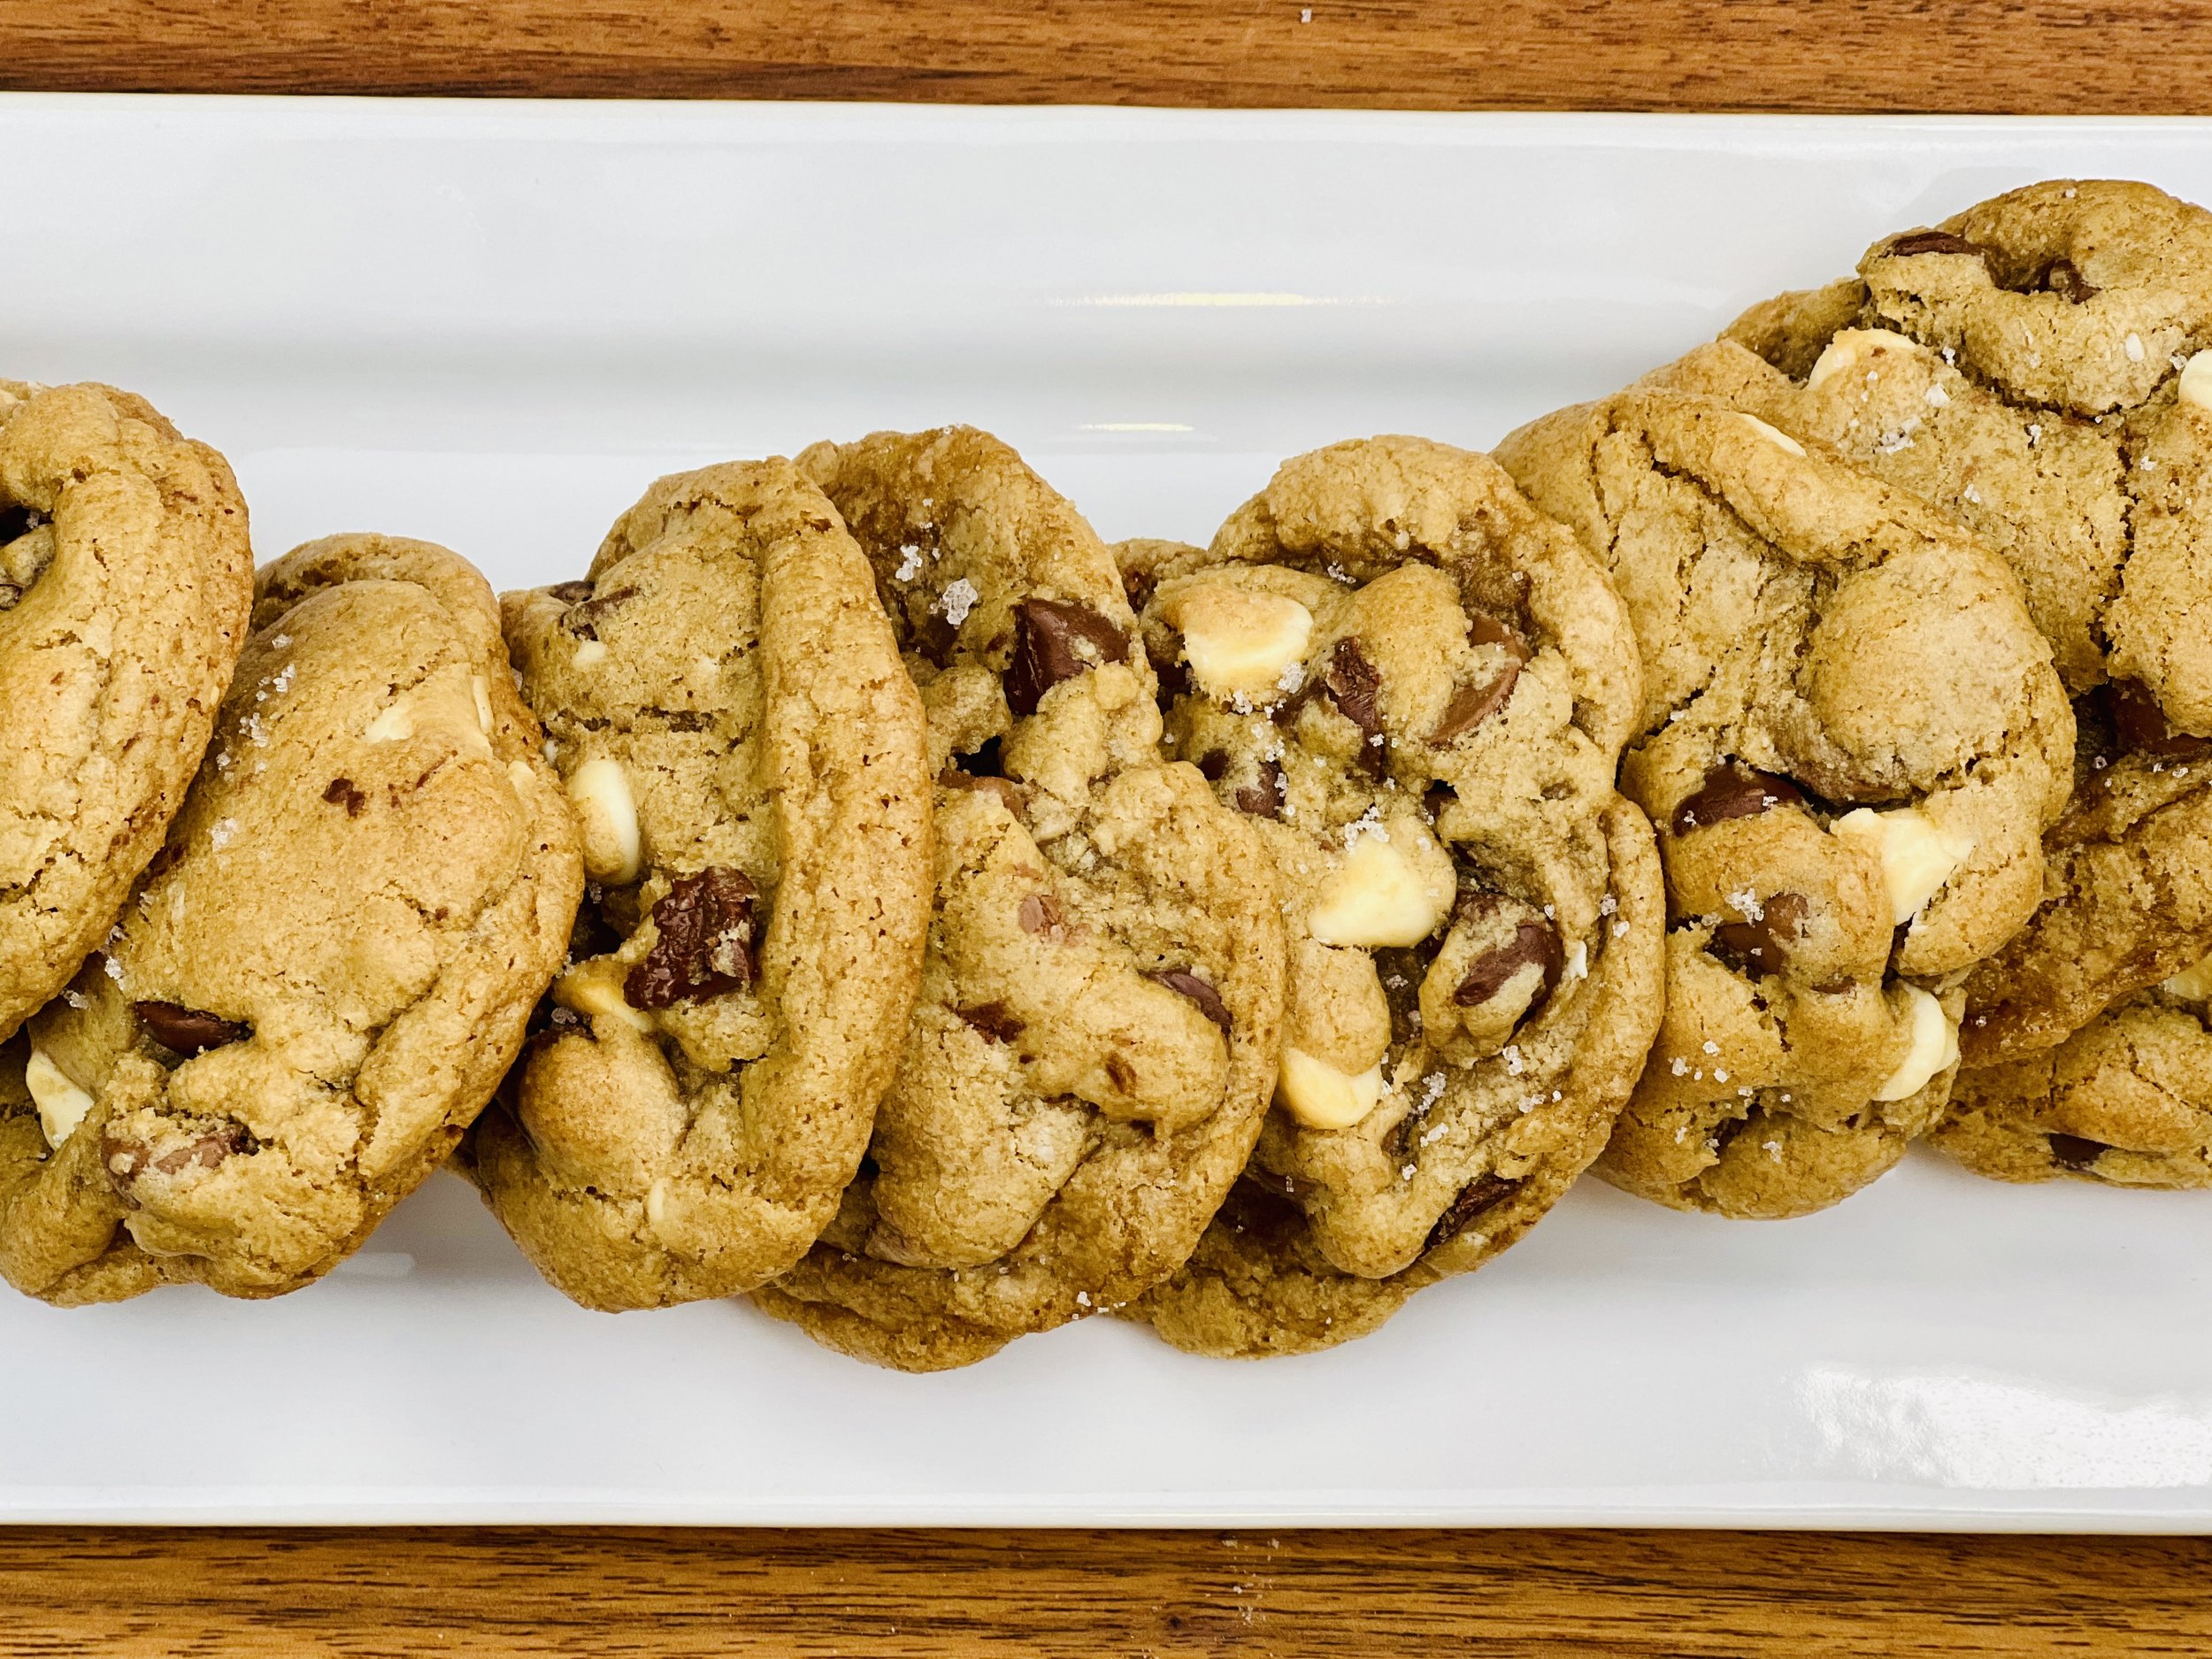
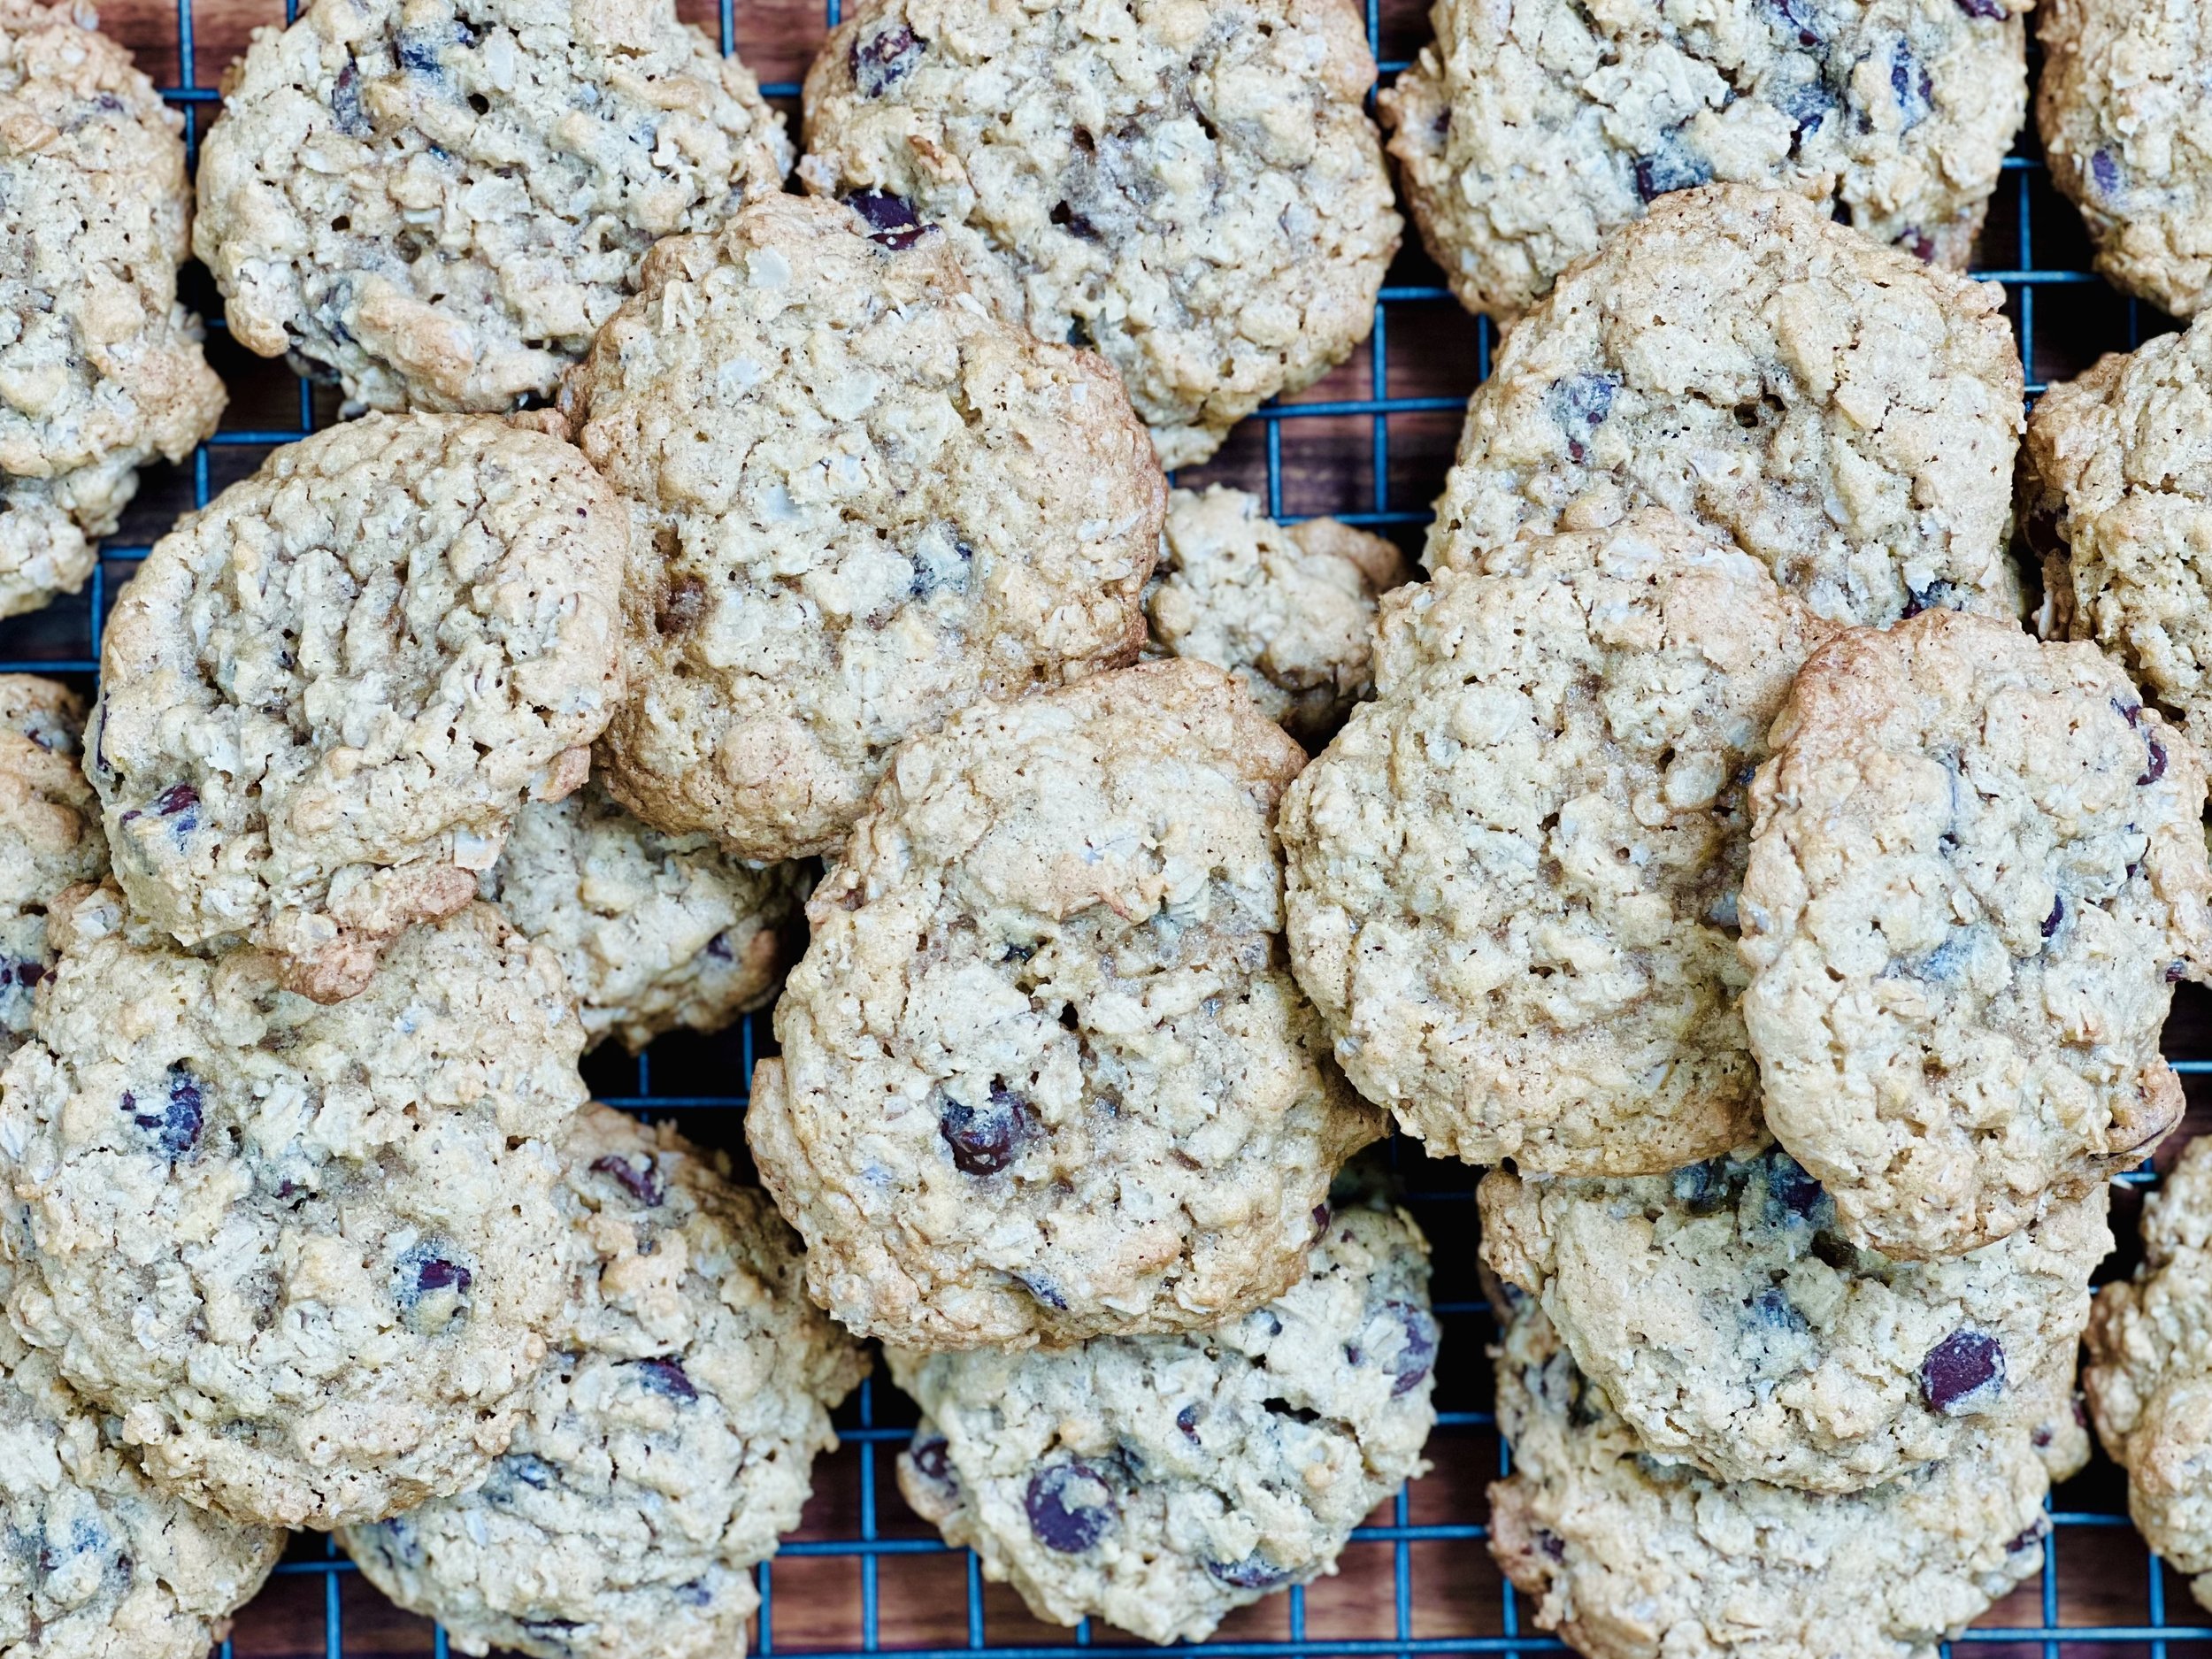
Brown Butter Salted Chocolate Chip Cookies (low FODMAP)
20 Minutes prep • 2 1/4 hours chill & Cook • Low FODMAP • Gluten-Free • Makes 24 - 36 • Ok to make-ahead: Steps 1 - 4
20 Minutes prep • 2 hours chill • 15 Minutes cook and cool • Low FODMAP • Gluten-Free • Makes 24 - 36 • Ok to make-ahead: Steps 1 - 4
If you love a rich, chewy, chocolate chip cookie, you can forget all your other chocolate chip cookie recipes. This is THE ONE. We have all searched for that perfect chocolate chip cookie recipe. And the search is made more difficult when your ingredients are restricted. I have made many chocolate chip cookies but none are as good as these. Hands down. You won’t even know they’re gluten-free. These cookies are rich and chewy and they hold together and taste perfect at room temperature. So there’s no need to feel like you have to eat them all when they’re hot out of the oven! The brown butter and salt bring out a wonderful flavor so don’t skip these important ingredients.
Ingredients
2 1/4 cups gluten-free all-purpose flour (I used King Arthur Measure for Measure)
1 teaspoon baking soda
1 teaspoon Kosher salt (see pro tip)
2 sticks unsalted butter
1 1/2 cups packed dark brown sugar
1/4 cup granulated sugar
1 large egg + 1 additional egg yolk, at room temperature (see pro tip)
1 tablespoon vanilla extract
1 tablespoon lactose-free plain yogurt, Greek yogurt, or lactose-free sour cream
3/4 cup semi-sweet chocolate chips
3/4 cup milk chocolate chips
Kosher salt to sprinkle the tops (don’t skip this! It really brings out the flavor)
Directions
(1) Brown the butter: Put butter in a medium frying pan over medium heat. Whisking almost constantly, watch the butter as it begins to crackle, and then eventually foam. After a couple of minutes, the butter will begin to brown and turn a nice golden amber color on the bottom of the pan. Continue to whisk and remove from heat as soon as the butter begins to brown and give off a nutty aroma. Immediately transfer the butter to the bowl of your stand mixer to prevent burning and set it aside to cool for 10 minutes or until cool enough to touch.
(2) Blend the butter: Once the butter has had a chance to cool a bit, combine the brown butter with the sugars and beat until well combined, about 2 minutes (scraping down the sides as needed). Beat in the egg, egg yolk, vanilla, and yogurt until well combined.
(3) Combine dry ingredients: In a separate bowl, whisk together the flour, baking soda, and salt. Slowly add the dry ingredients to the wet ingredients and beat on medium speed just until combined. Add in both kinds of chocolate chips and mix on low speed until just incorporated into the dough.
(4) Let dough rest: Chill your dough for 2 hours in the refrigerator, or up to 12-24 hours. Do not try to speed up this process. The dough needs to chill in order for your cookies to be perfect.
Make-ahead note: At this point, you can leave the dough in the fridge for 12 - 24 hours until you’re ready to bake the cookies. When you’re ready to scoop and roll the dough, if it has been chilled for more than 2 hours you’ll need to let it sit at room temp for about 20 minutes before scooping.
(5) Prep the oven: Once the dough is chilled, preheat the oven to 350 degrees F and line a couple of baking sheets with parchment paper.
(6) Roll the cookies: When ready to bake, use a medium cookie dough scoop (about 2 heaping tablespoons) to measure the dough for each cookie. Roll the dough into a ball (it doesn't have to be perfectly round). Place dough balls on your prepared baking sheets, 2 inches apart. (Cookies won’t spread much but it’s still good to give them room.)
(7) Bake the cookies: Sprinkle the dough balls with Kosher salt or other flaky salt and bake for 9-11 minutes or until the edges of the cookies just begin to turn golden brown. They will look a bit underdone in the middle but will continue to cook to perfection once out of the oven.
(8) Finish: Cool the cookies on the sheets for 5 minutes to allow them to set up, then sprinkle each cookie with additional Kosher salt (if needed). Remove the cooled cookies from the baking sheets and transfer them to a wire rack to cool completely. Makes 24-36 cookies.
(9) Store the cookies: These seldom keep very long in my house, but if you have some left, keep them in an airtight container at room temperature, or in the freezer for up to 2 months. If frozen, just let sit at room temp for about 20 minutes and enjoy.
Pro Tip: I use Diamond Crystal Kosher salt in my cooking because it has a wonderful light flake and lower salinity than sea salt or other brands of Kosher salt. If you use table salt or sea salt you may need to use less than the recipe specifies to get the same flavor profile.
To bring an egg to room temperature quickly, fill a small or medium bowl with warm water. (You want the temperature to feel warm, not hot—you don't want to end up accidentally cooking the eggs!). Place the eggs in the water and let them sit for 5 to 10 minutes.
Eat and enjoy every bite because you can!
Adapted from the original recipe published by the Ambitious Kitchen.
This post may contain affiliate links so you can easily purchase items listed on the page. In some cases, we have provided a special discount code for IBS Game Changers so be sure to use it when you purchase an item to get the discount that has been arranged just for you!
More Deliciously Low FODMAP™ desserts you might enjoy


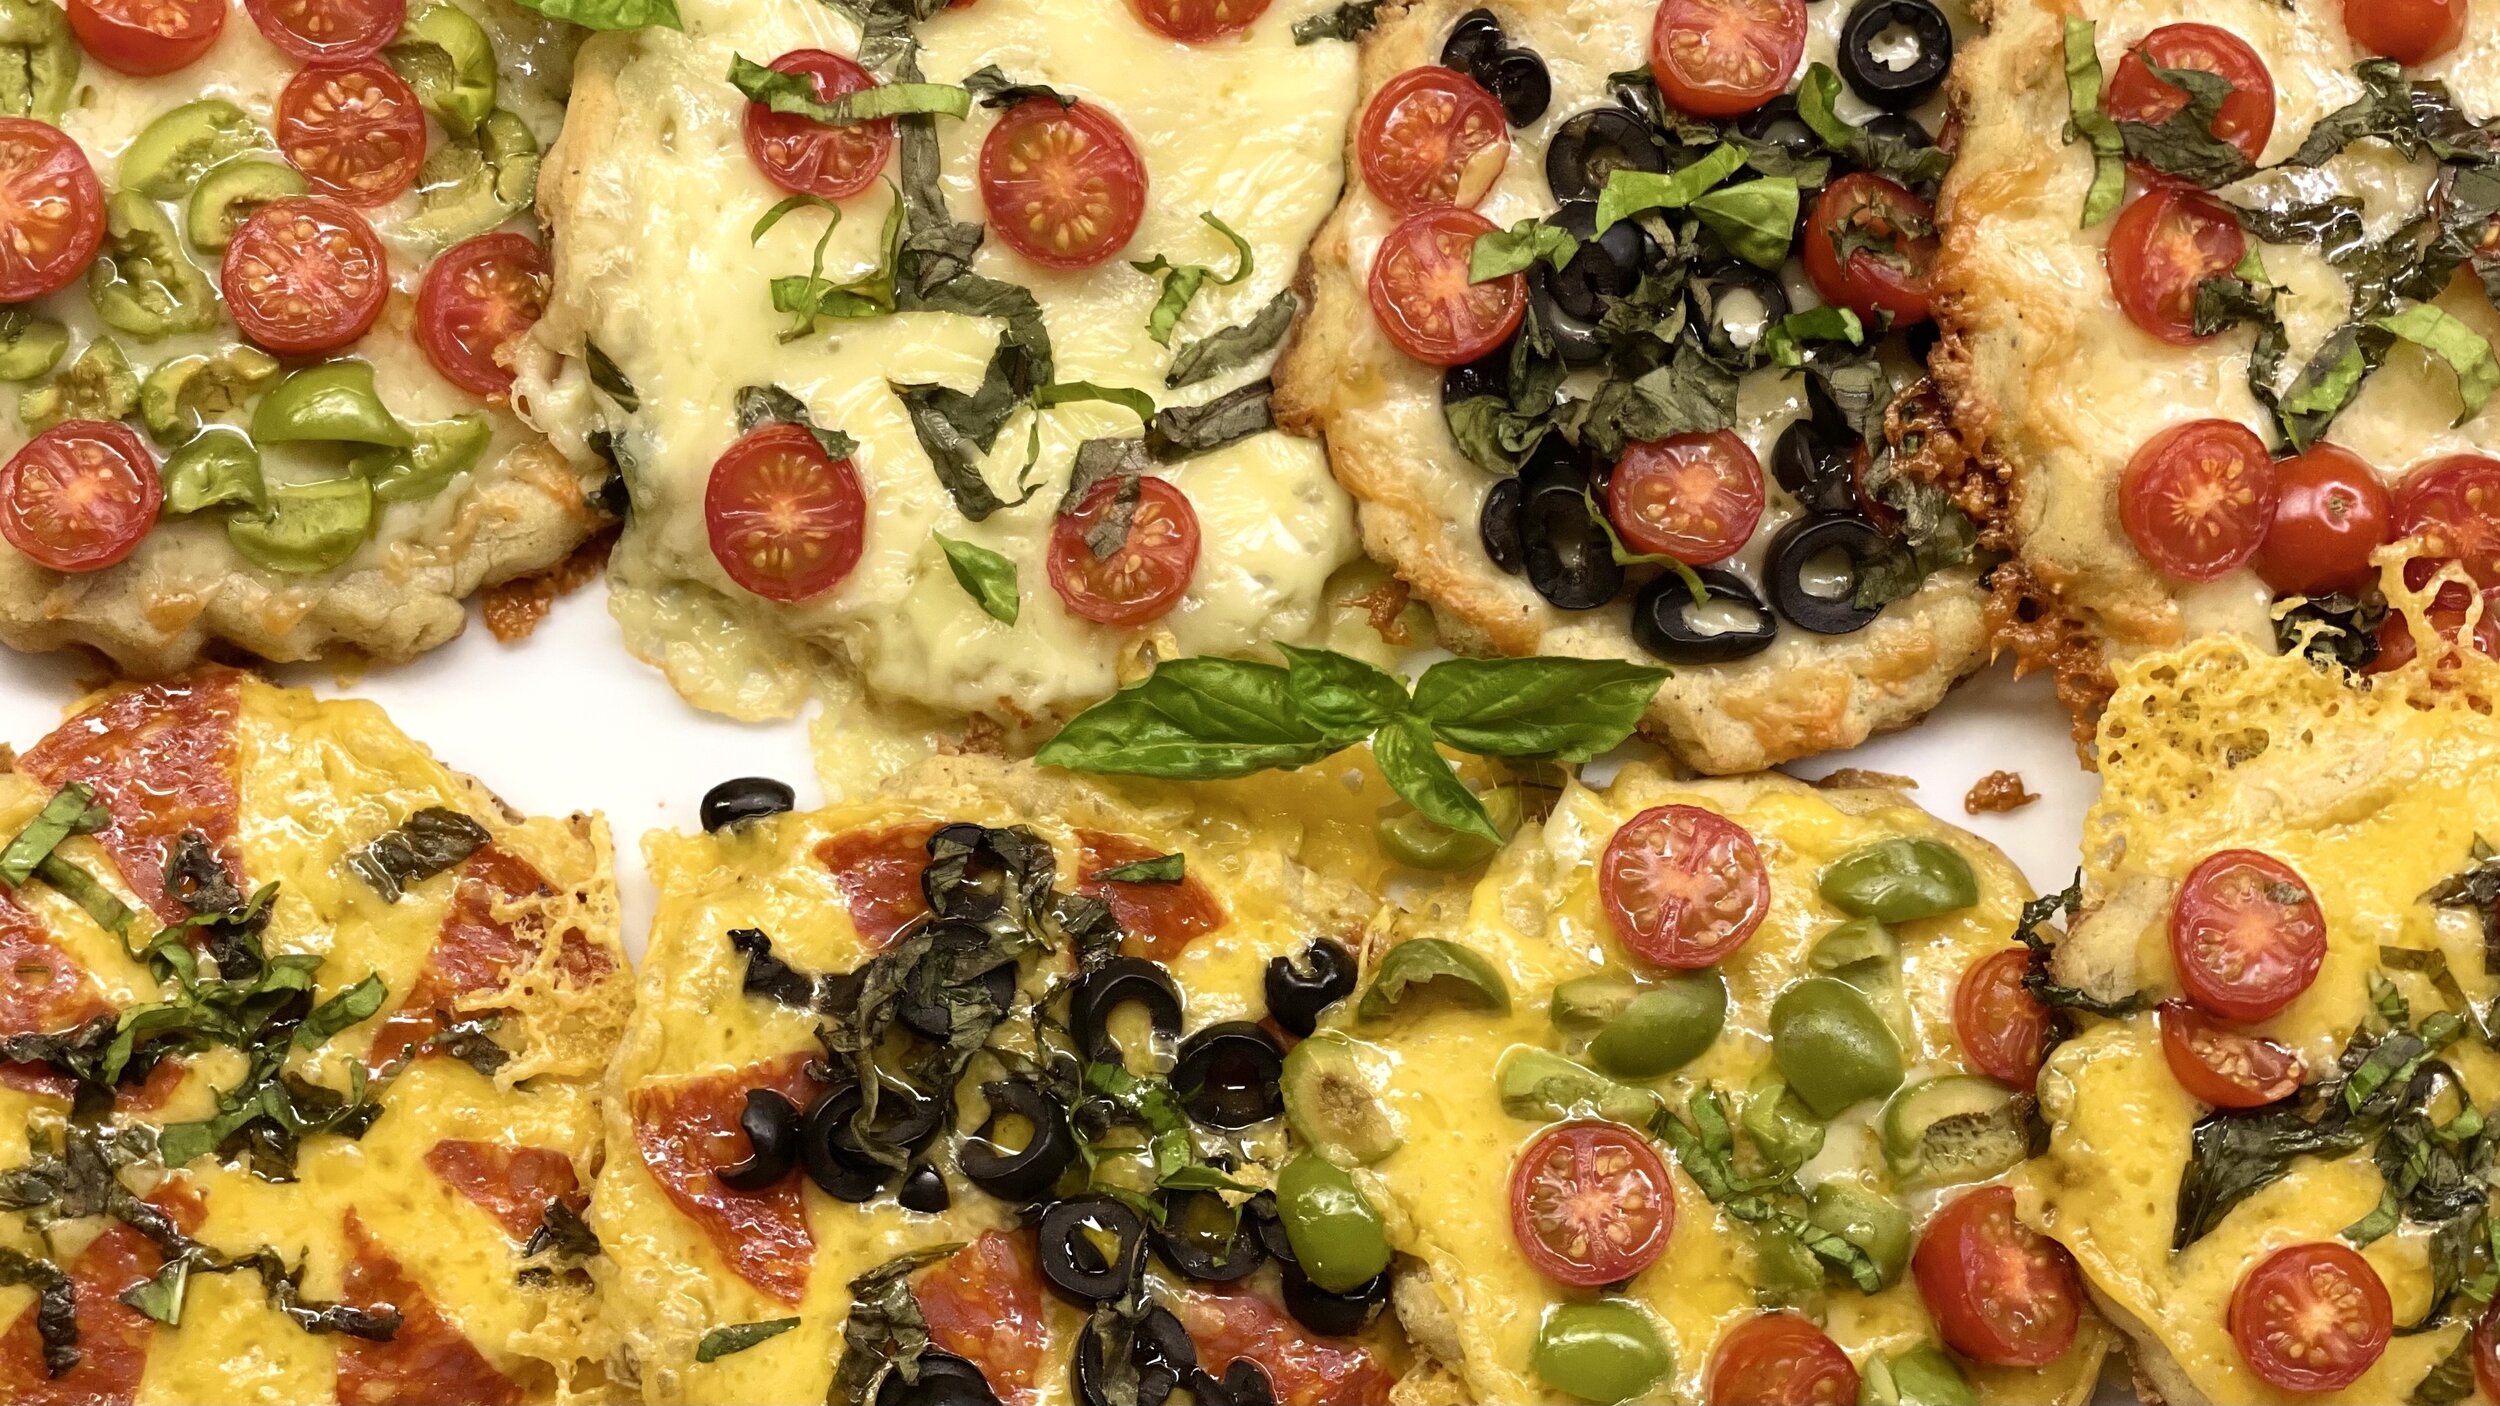
Savory Pizzettas (low FODMAP)
45 Minutes • Low FODMAP • Gluten-Free • Serves 4 • Ok to make-ahead: Steps 1 - 4
45 Minutes • Low FODMAP • Gluten-Free • Serves 4 • Ok to make-ahead: Steps 1 - 4
When you have a little bit of a lot of ingredients, making pizzettas is a great way to showcase each of them in a delicious way! These pizzettas are easy and fun to make and you can try all kinds of different flavor combinations. I have provided suggestions for toppings, but you can be creative and use what you have on hand.
This is an exclusive recipe just for recipe club members.
Each week I am creating and delivering one very special recipe just for my recipe club members. If you’re not yet a member, I encourage you to join! Membership in the club includes access to the complete archive of recipes with filters so it can become your virtual low FODMAP cookbook plus, I am creating and delivering one special NEW recipe every week ONLY for recipe club members. And, for my true fans, I’ll be sharing behind-the-scenes content, and updates on the progress of the new cookbook.
Your membership in the club helps me continue creating new, delicious, easy-to-make, low FODMAP recipes just for you.
As always, all recipes will emphasize simple ingredients, easy preparation, and delicious low FODMAP results. Recipes will be for everything from main courses, salads, soups, side dishes, appetizers, desserts, sauces, breakfast and lunch, and even mocktails and cocktails. Everything you need to prepare fantastic low FODMAP meals everyone will love.
Join the club. Become a Patron. Let’s keep making delicious Low FODMAP meals together.
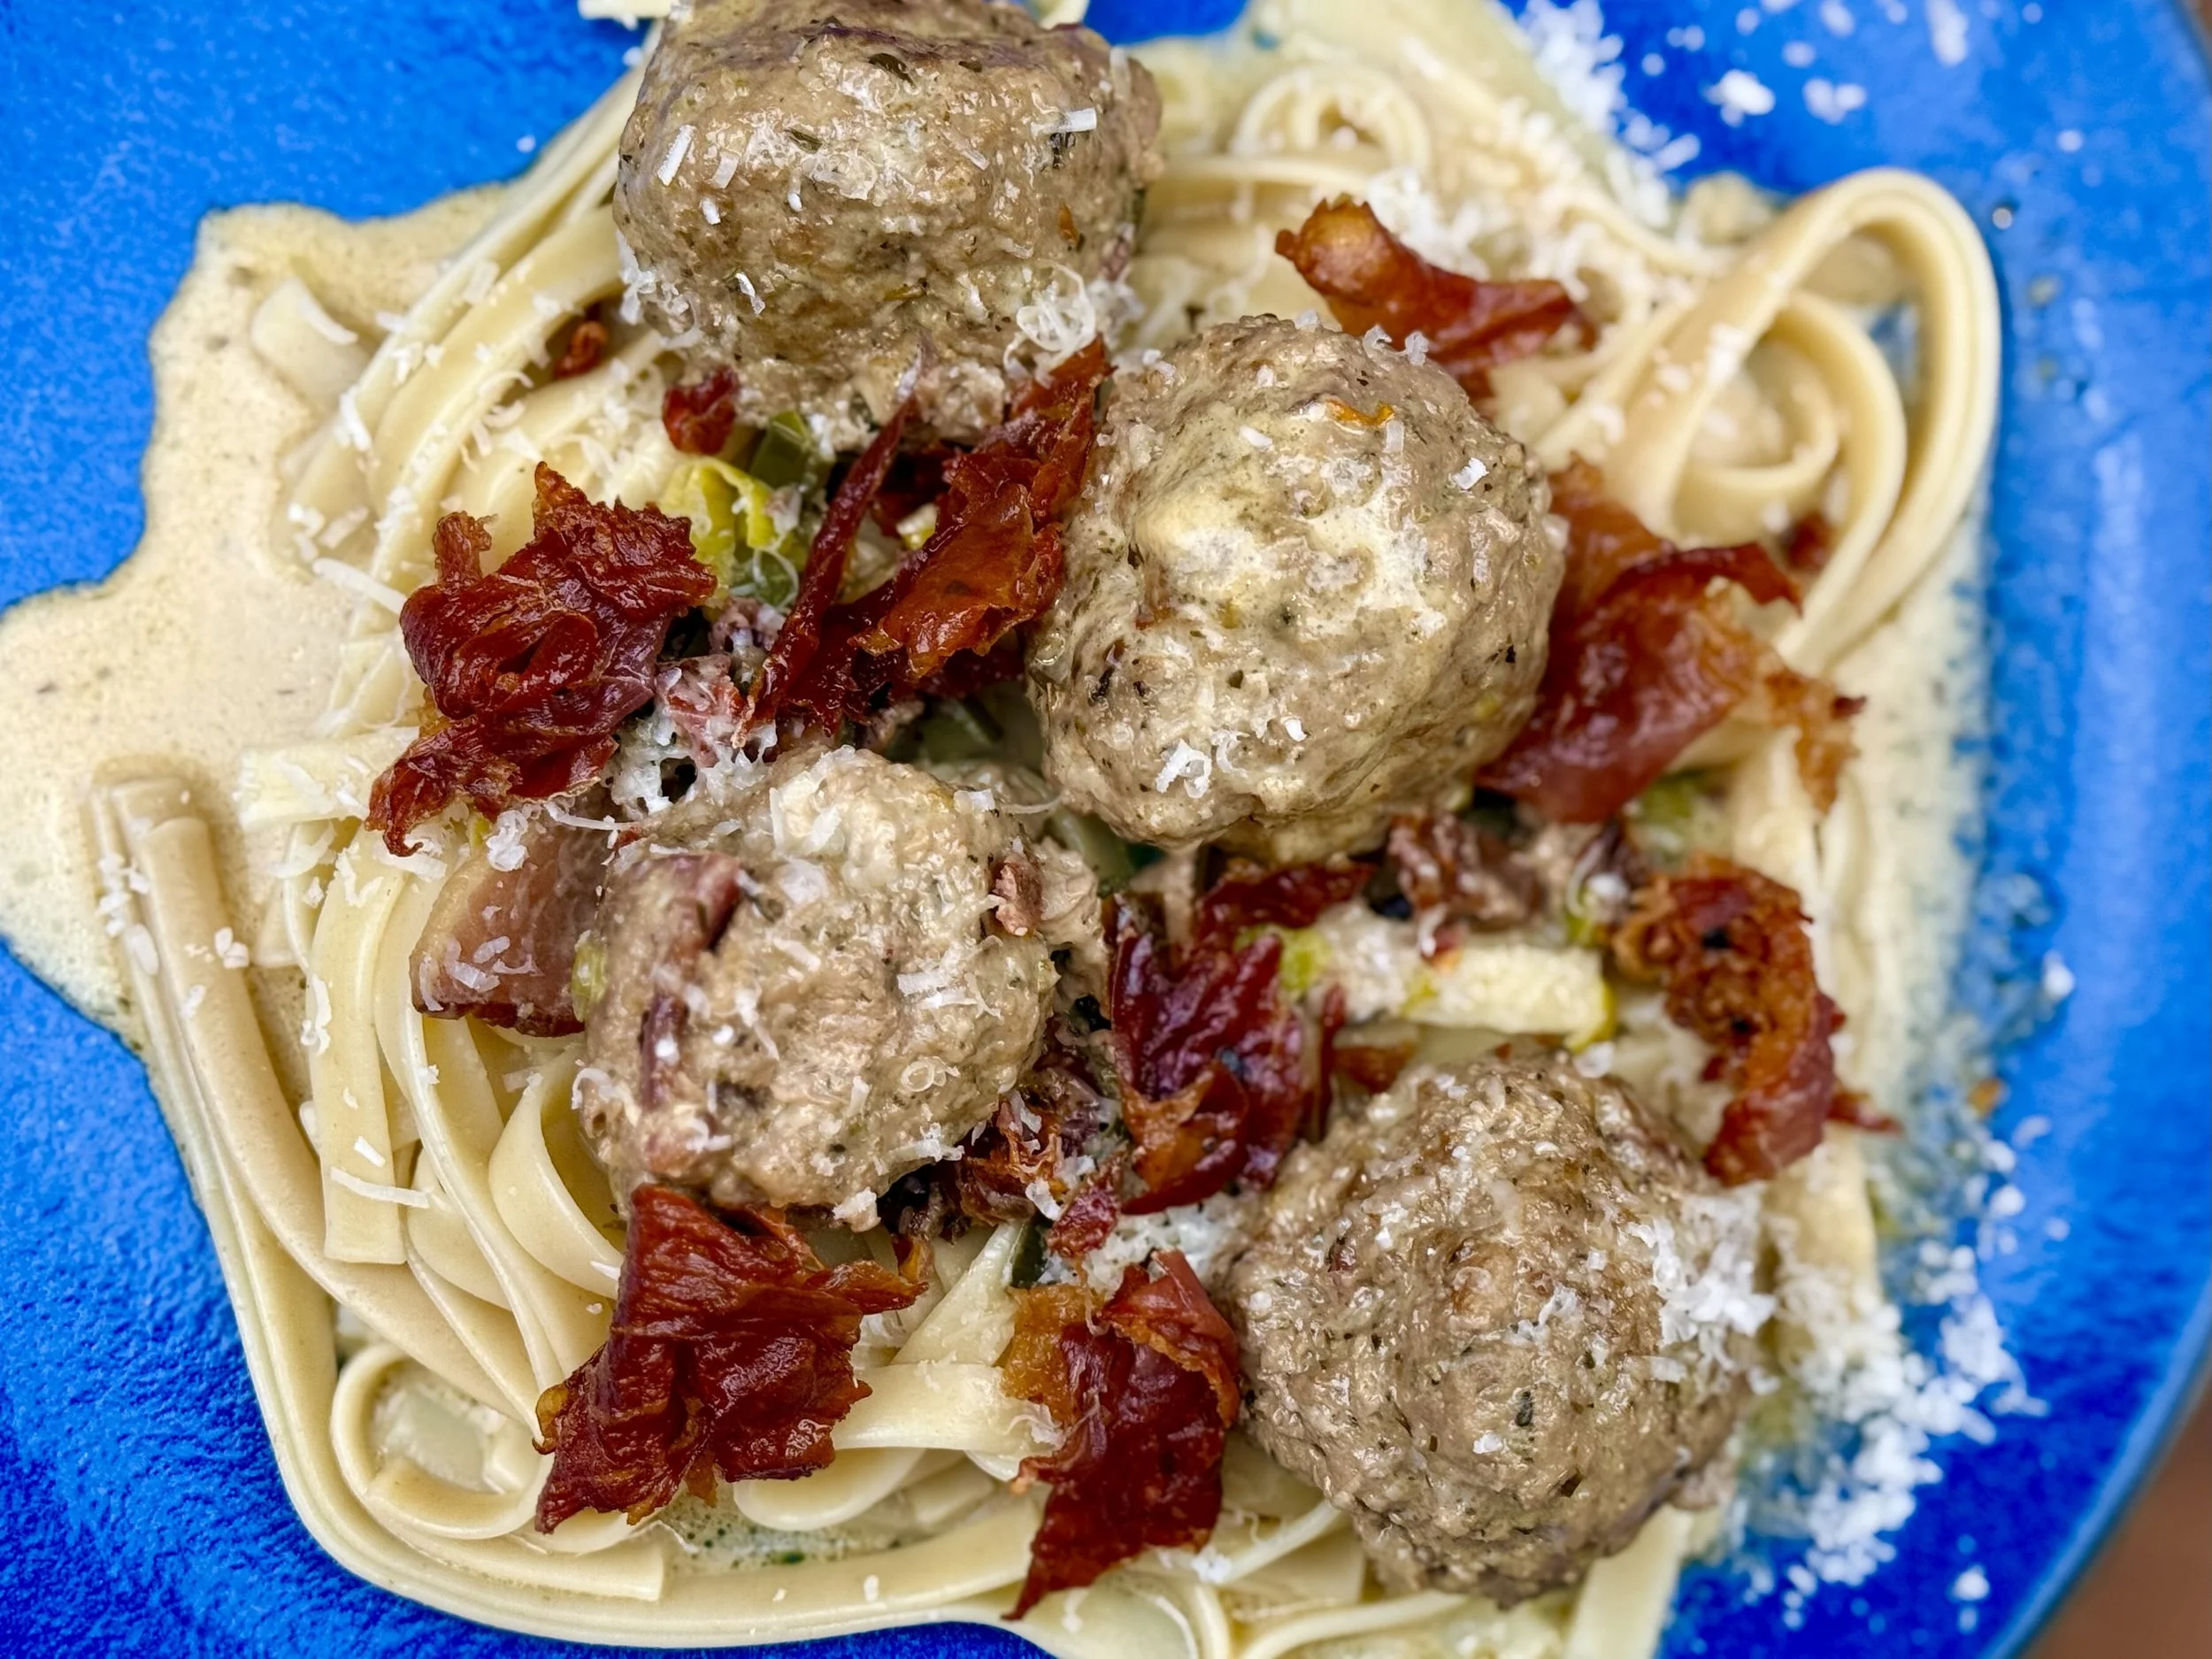
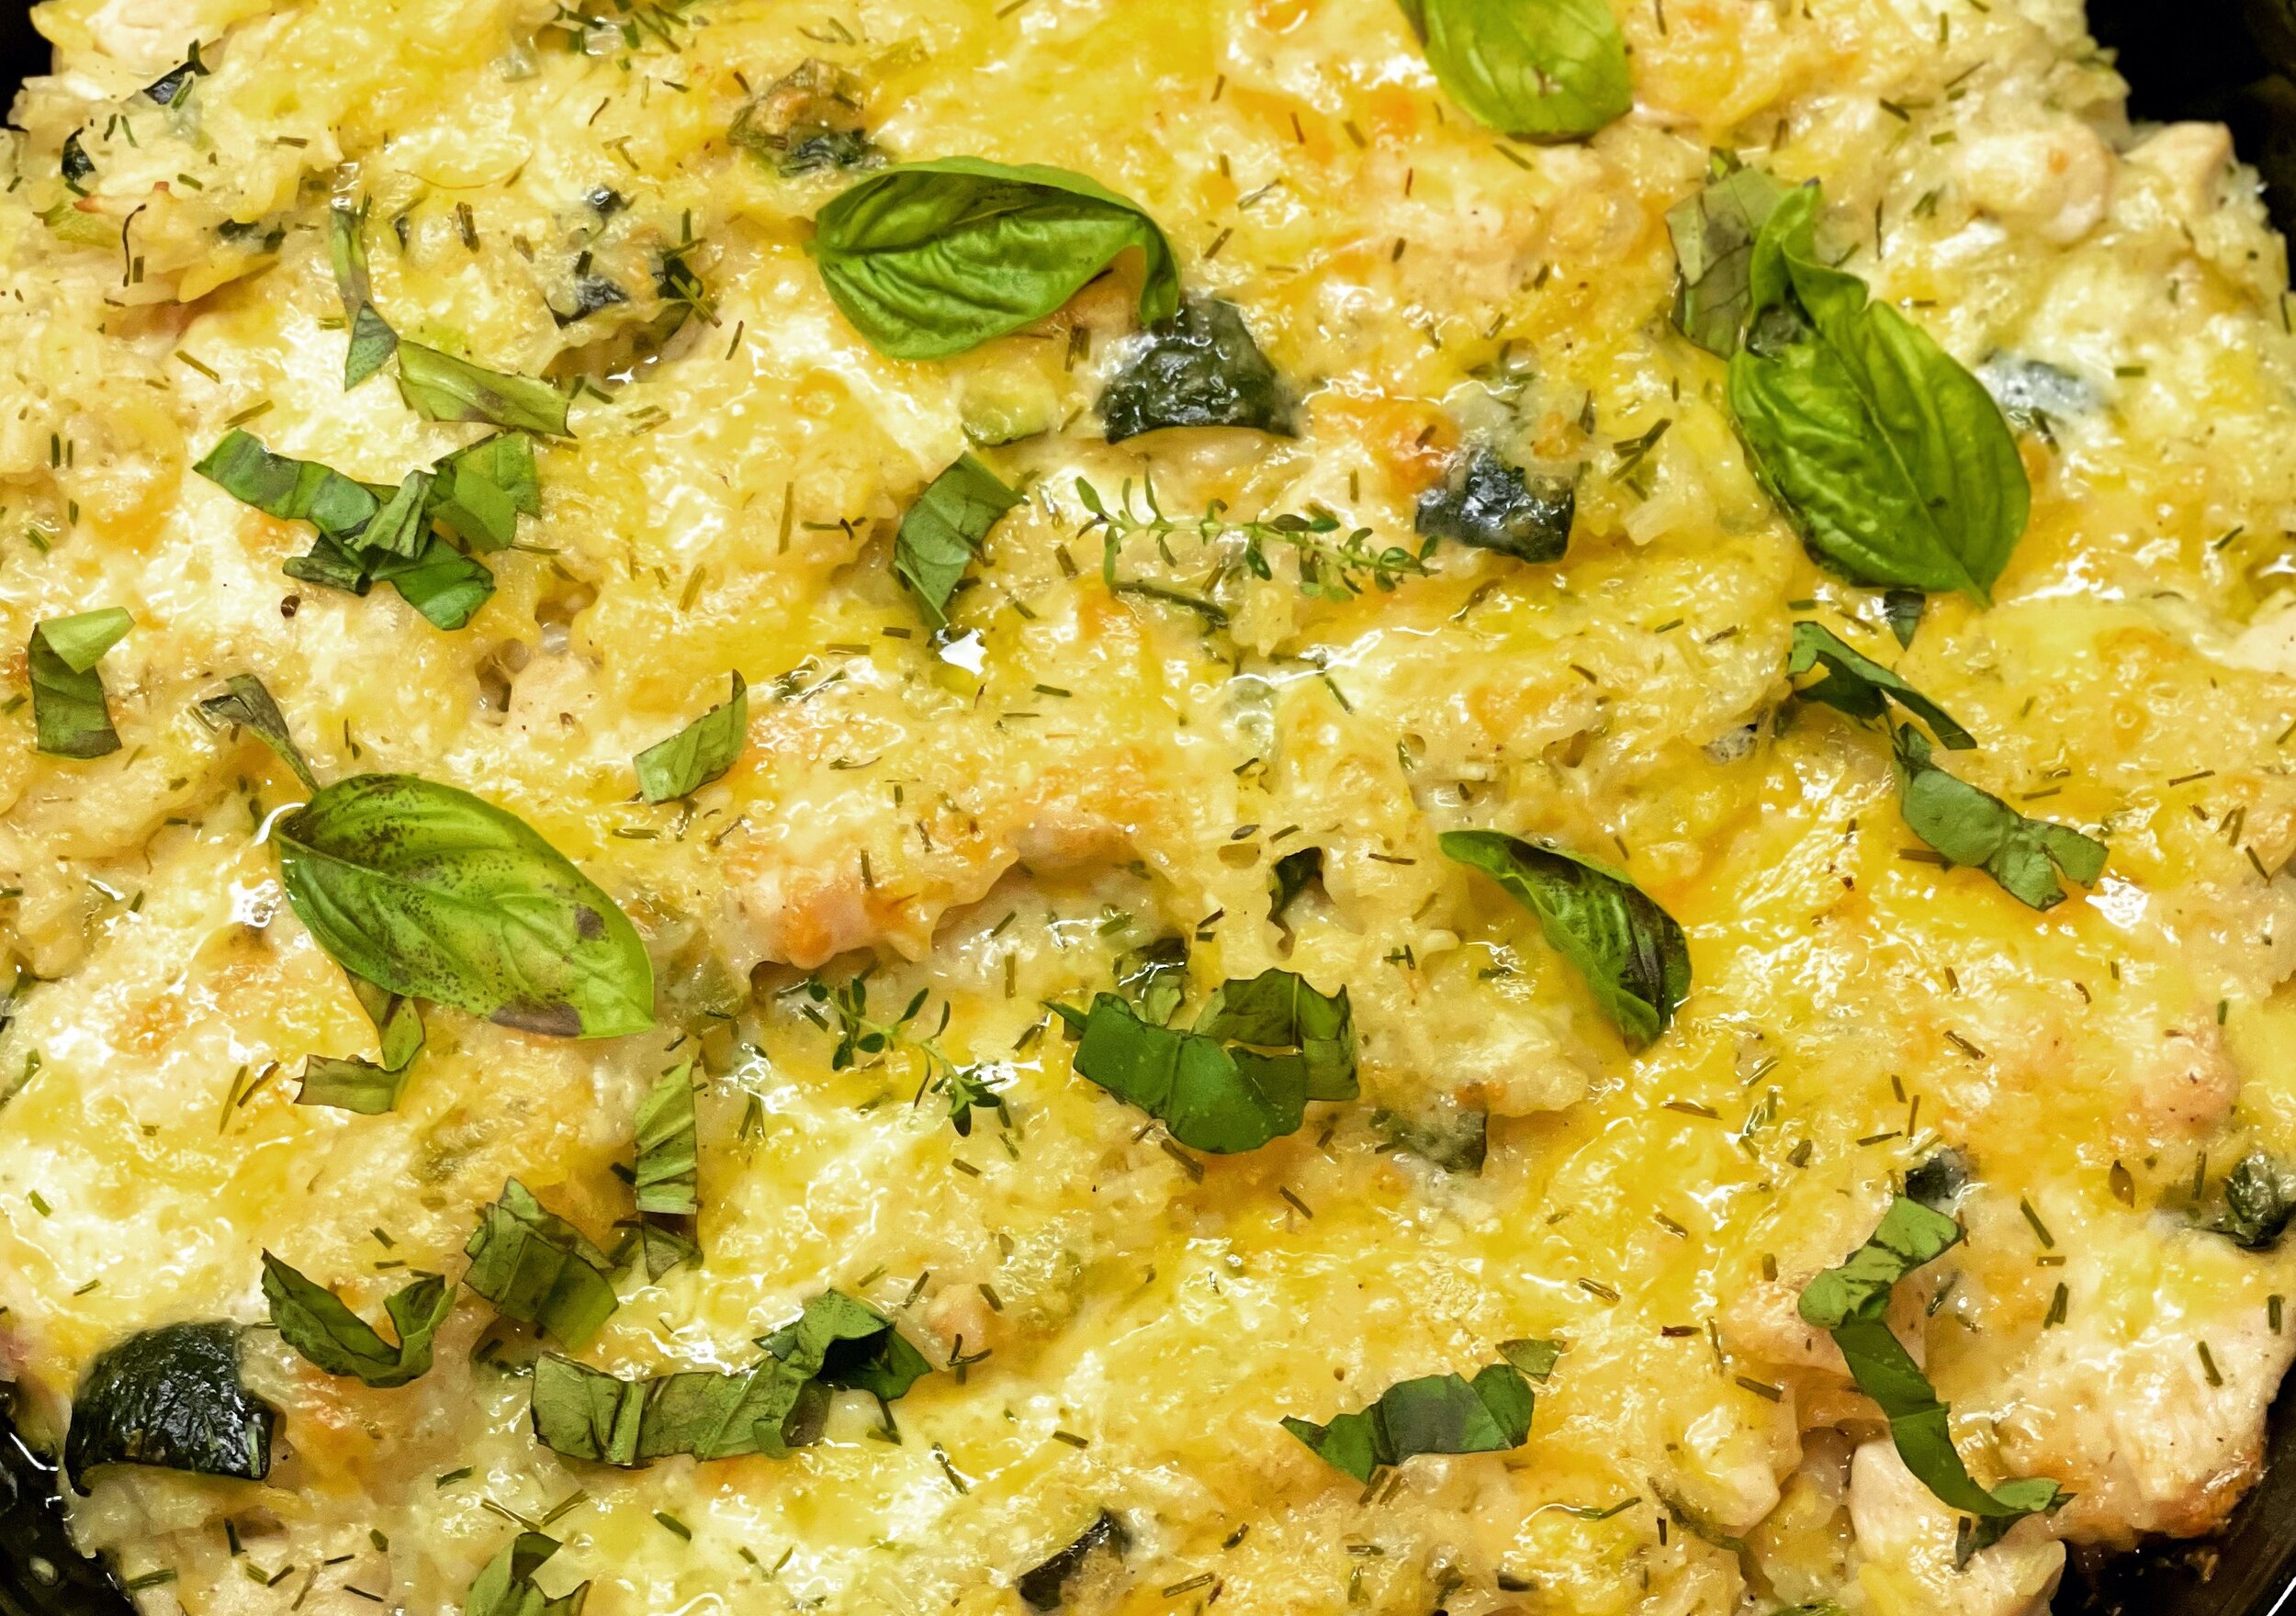
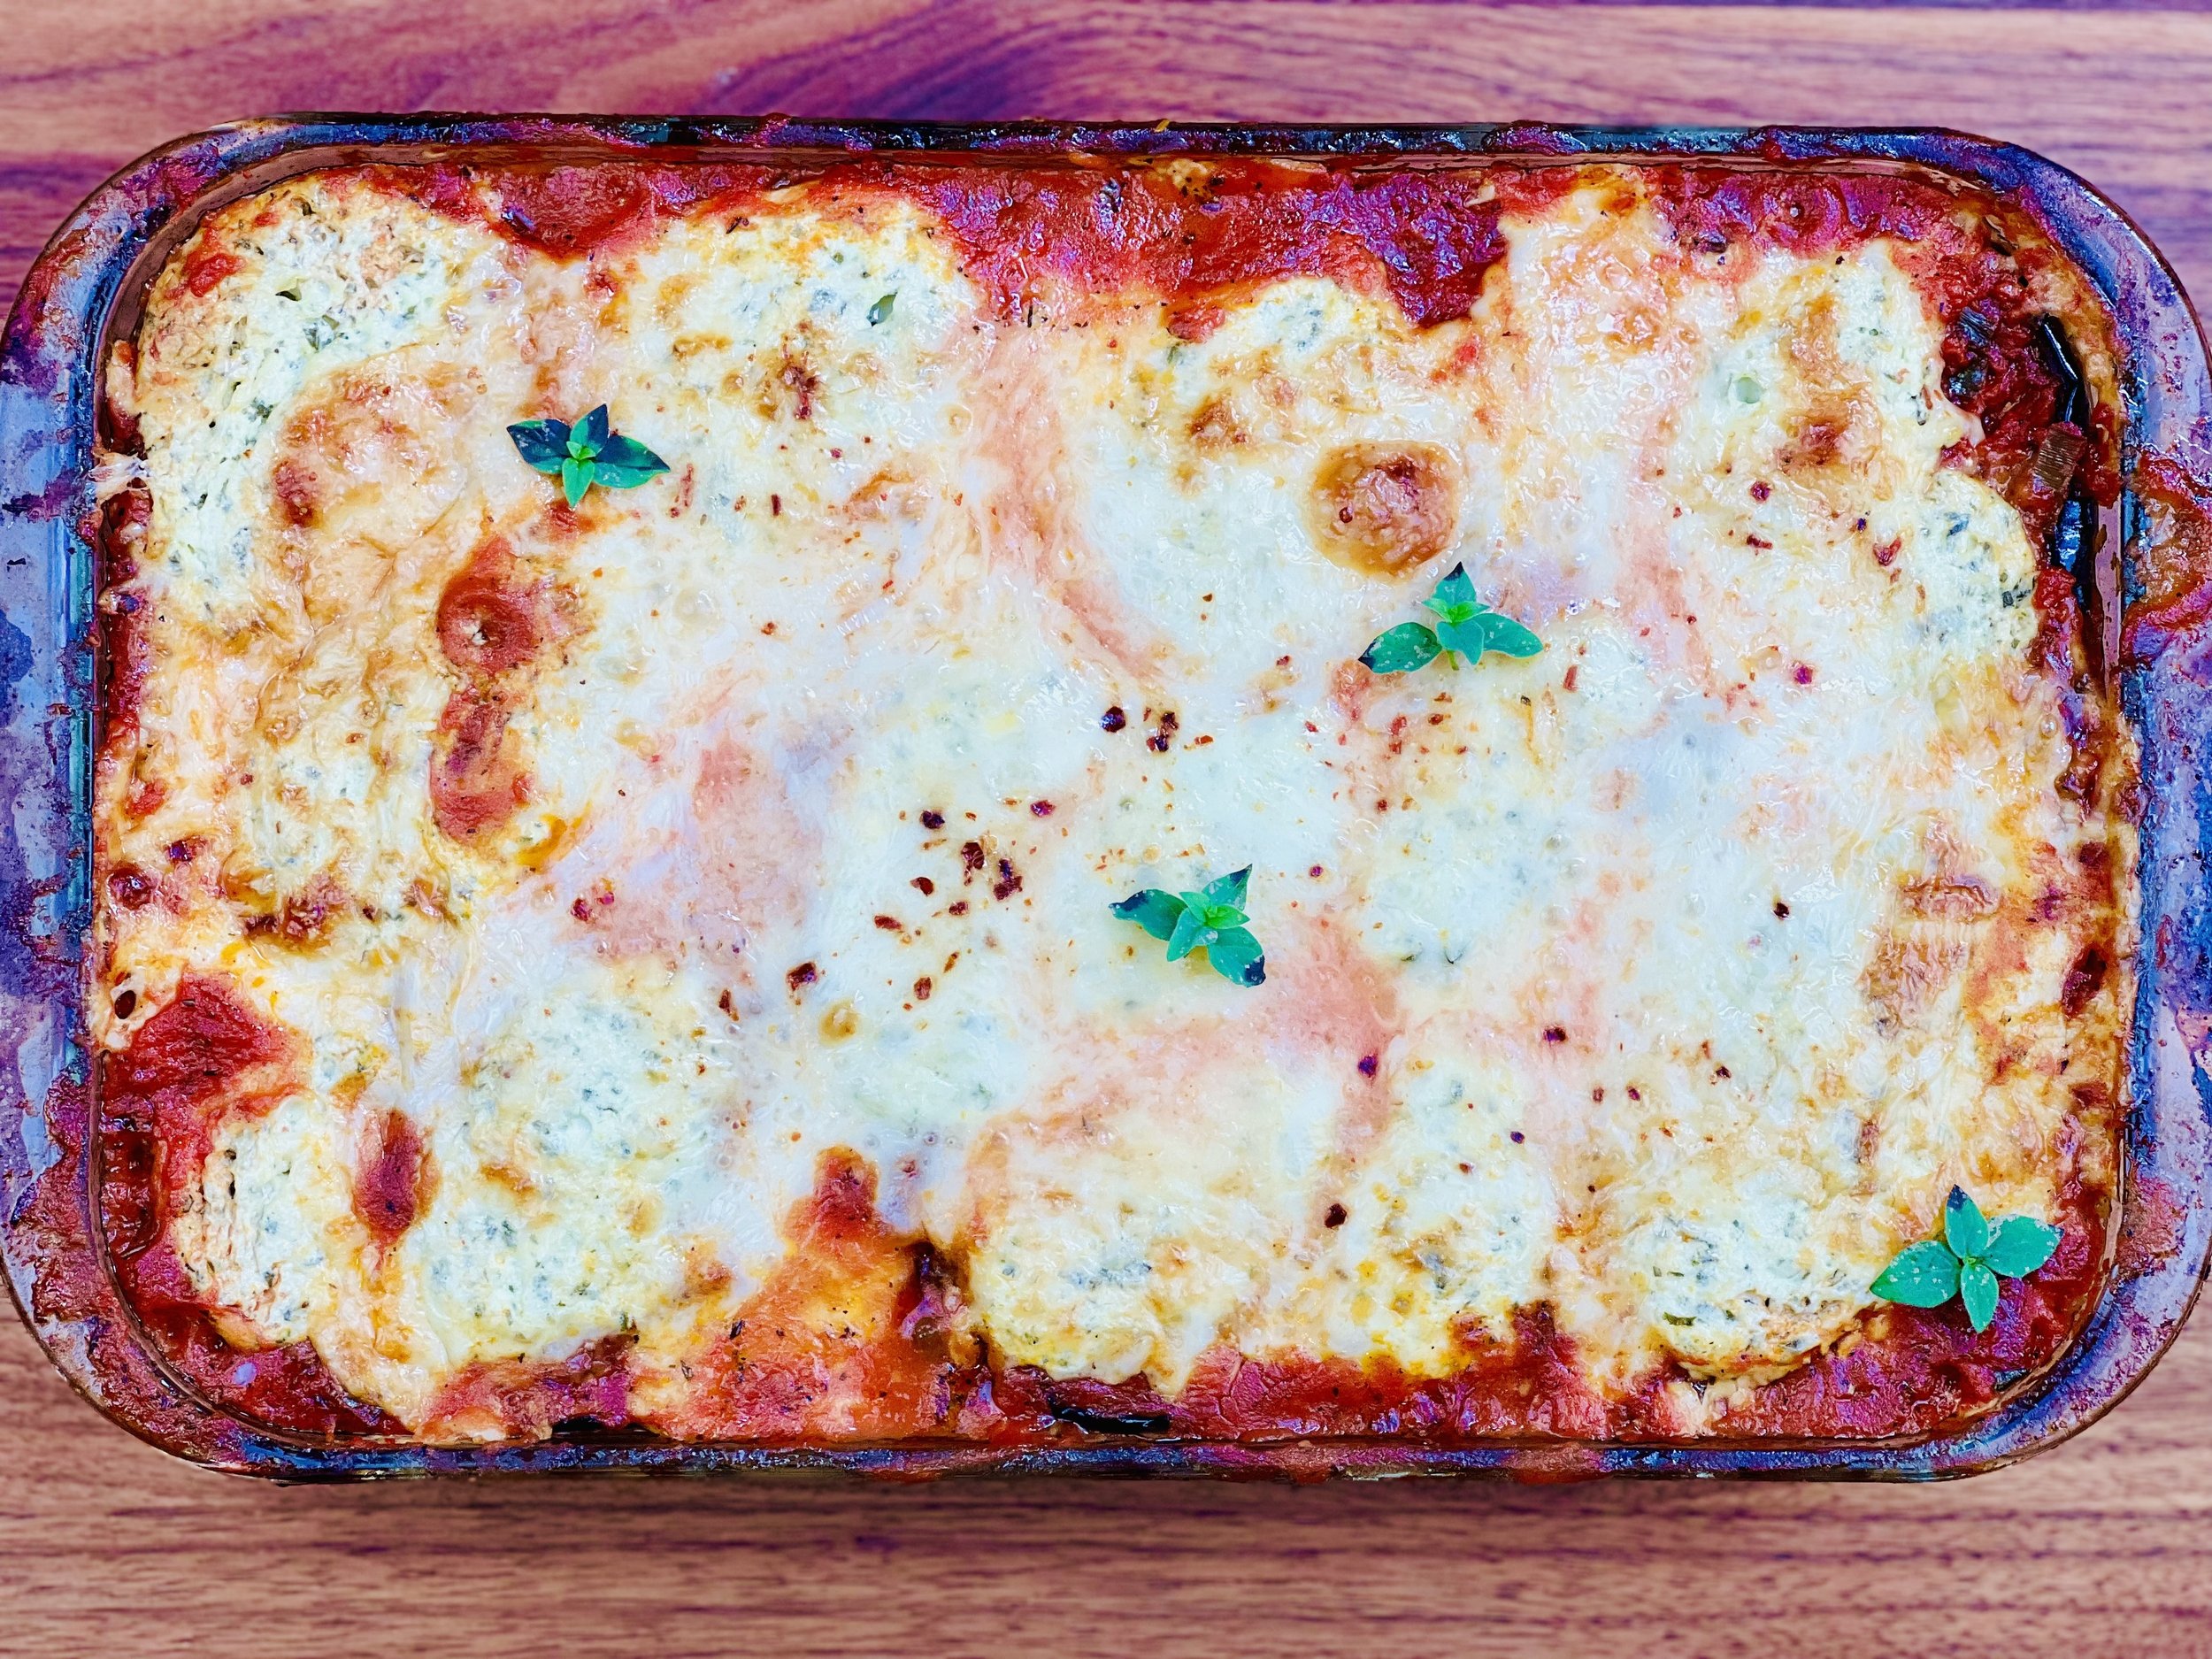
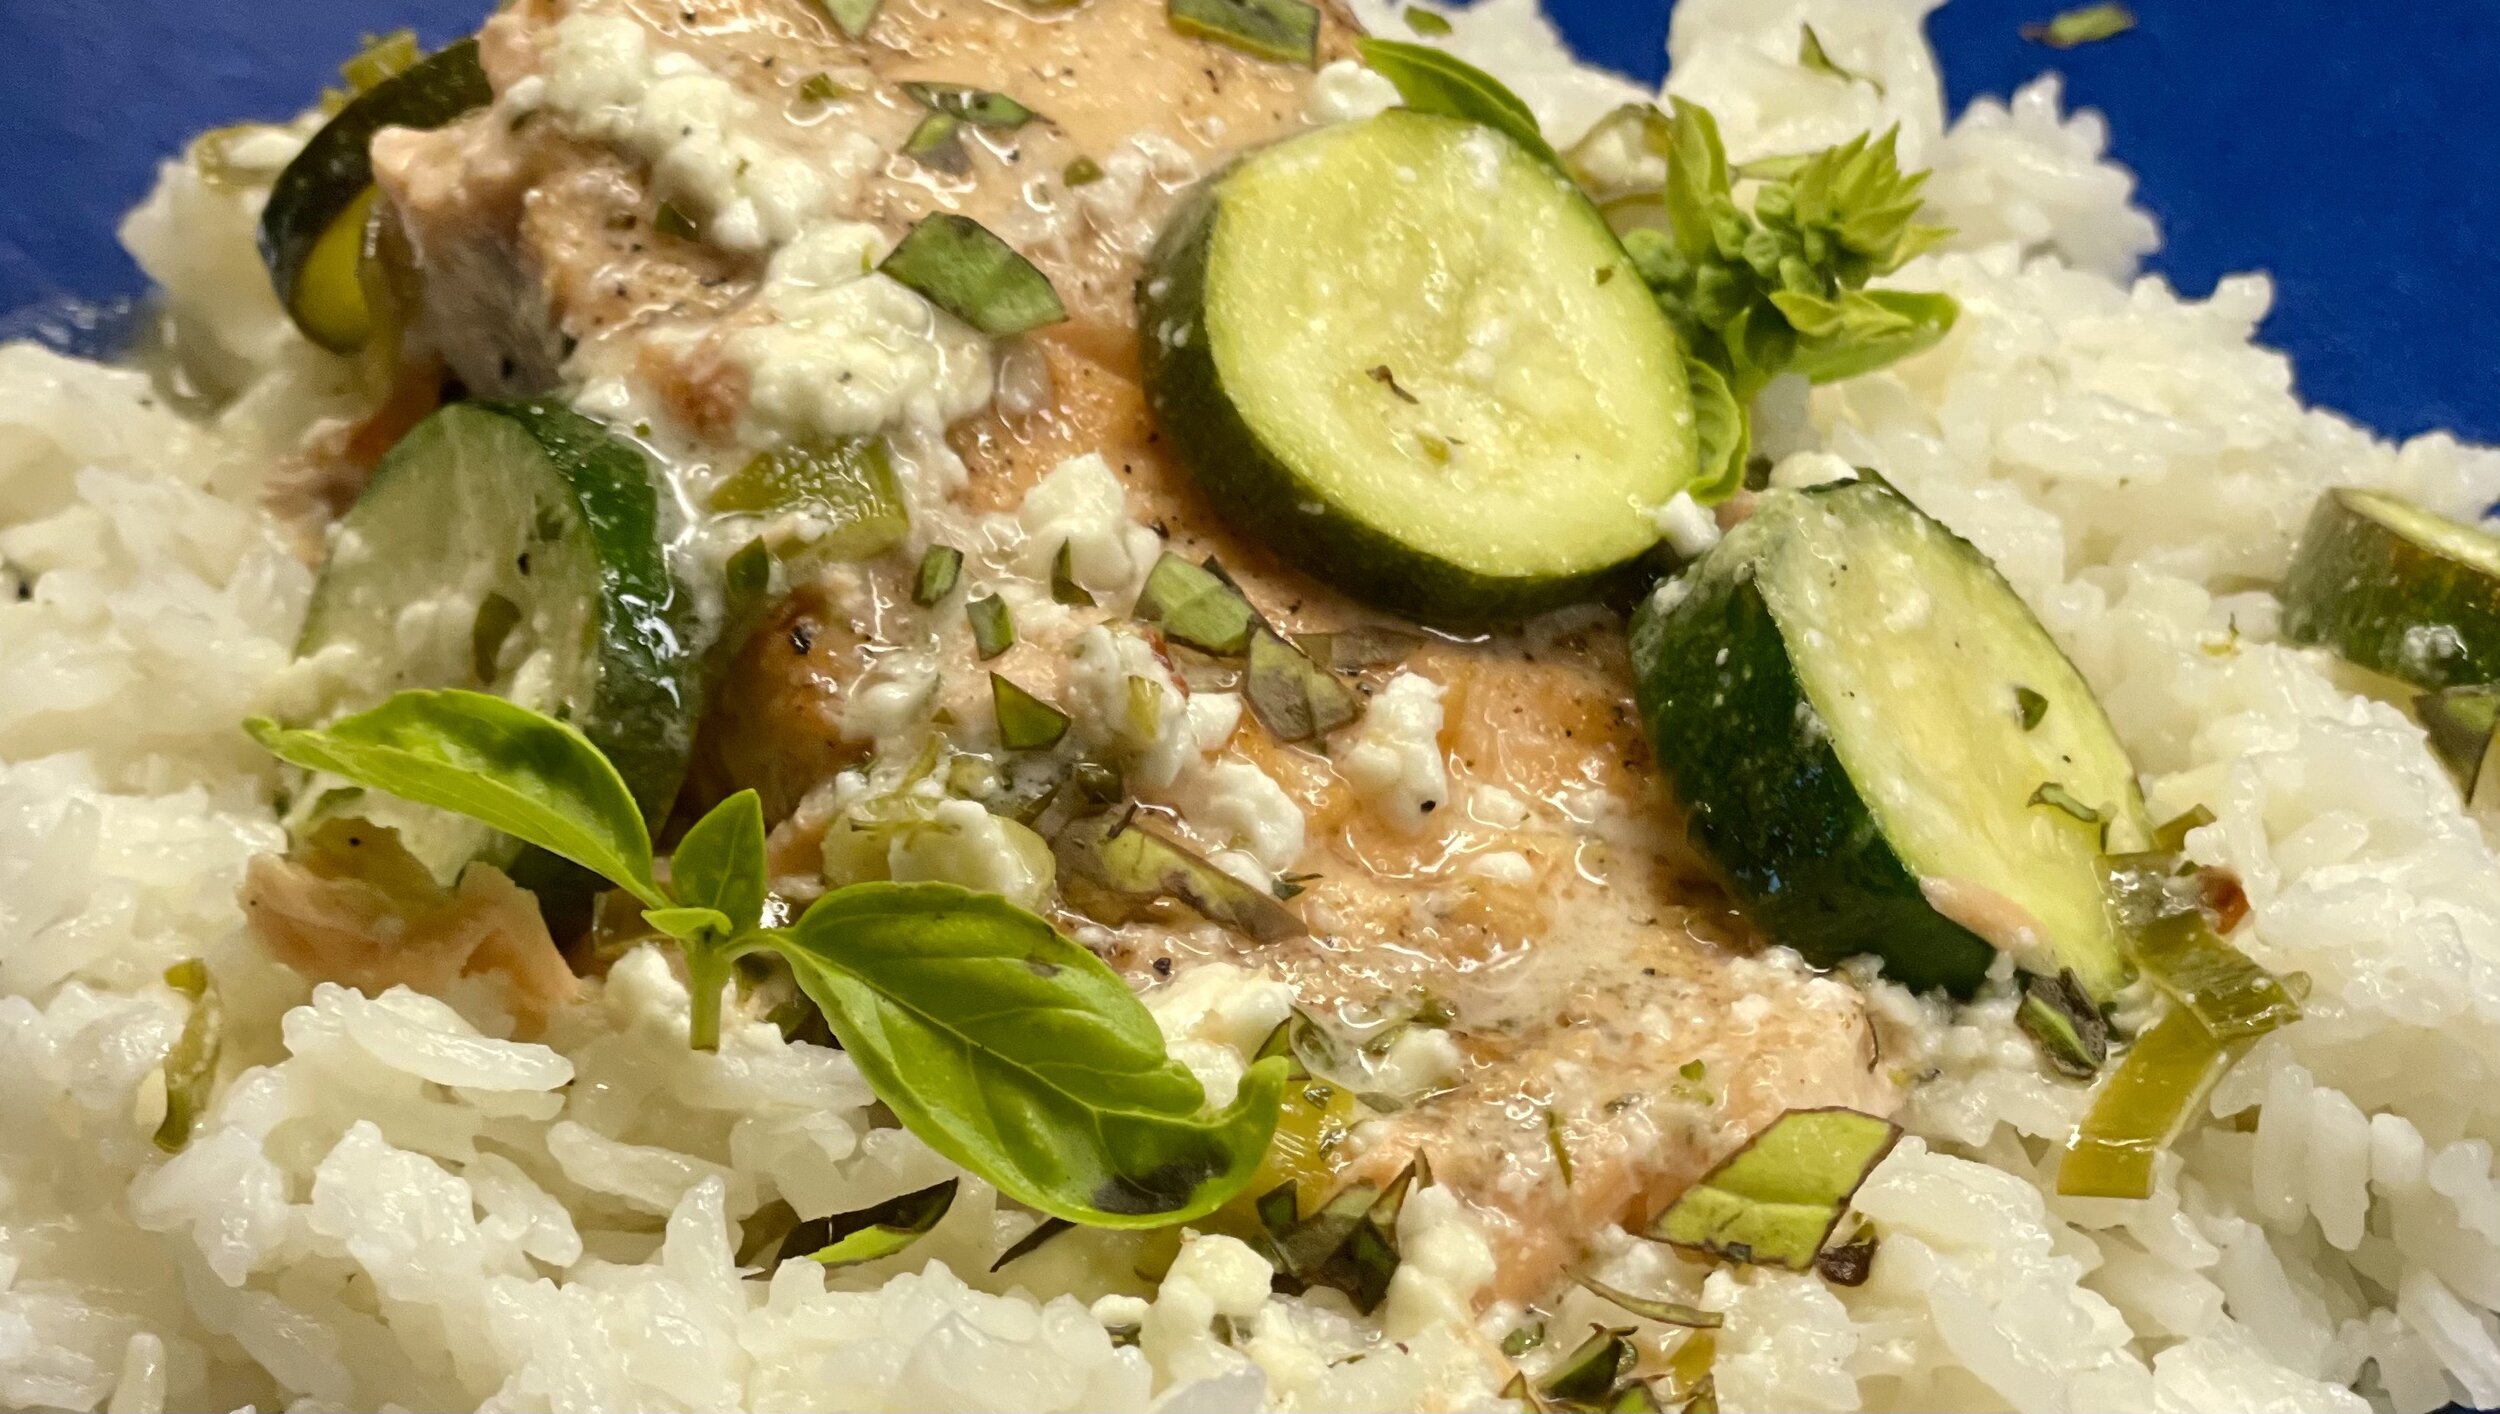
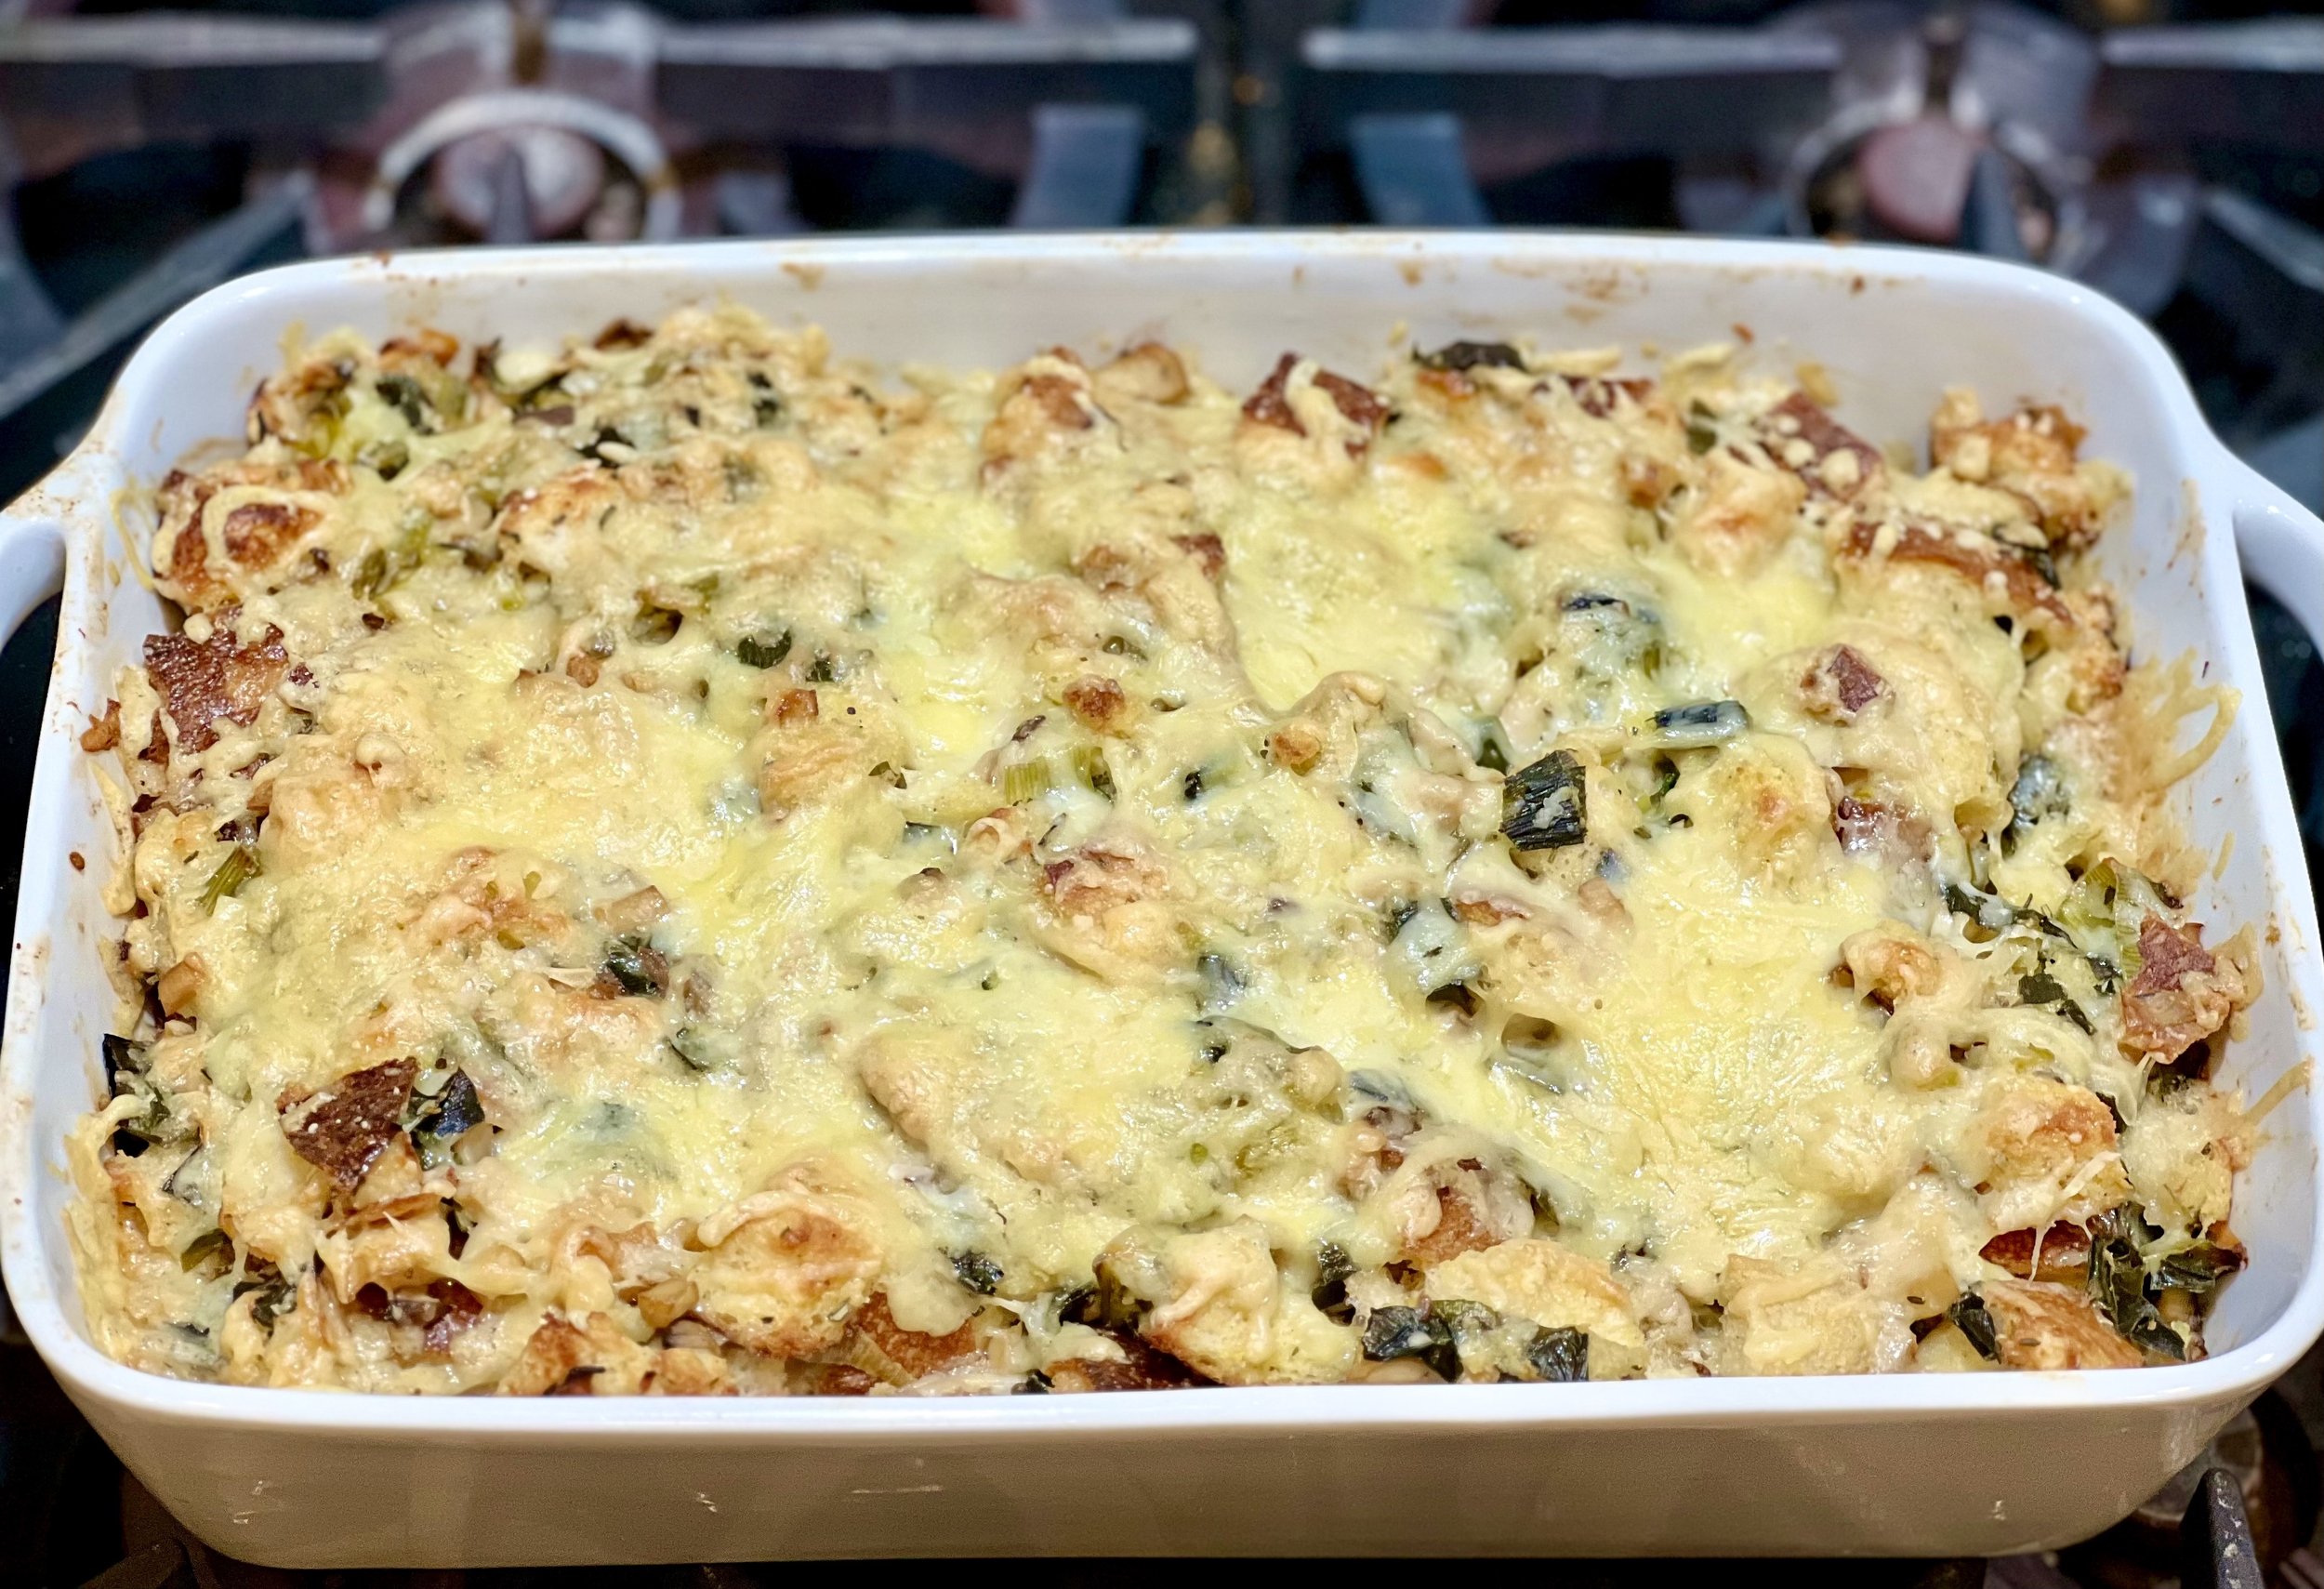
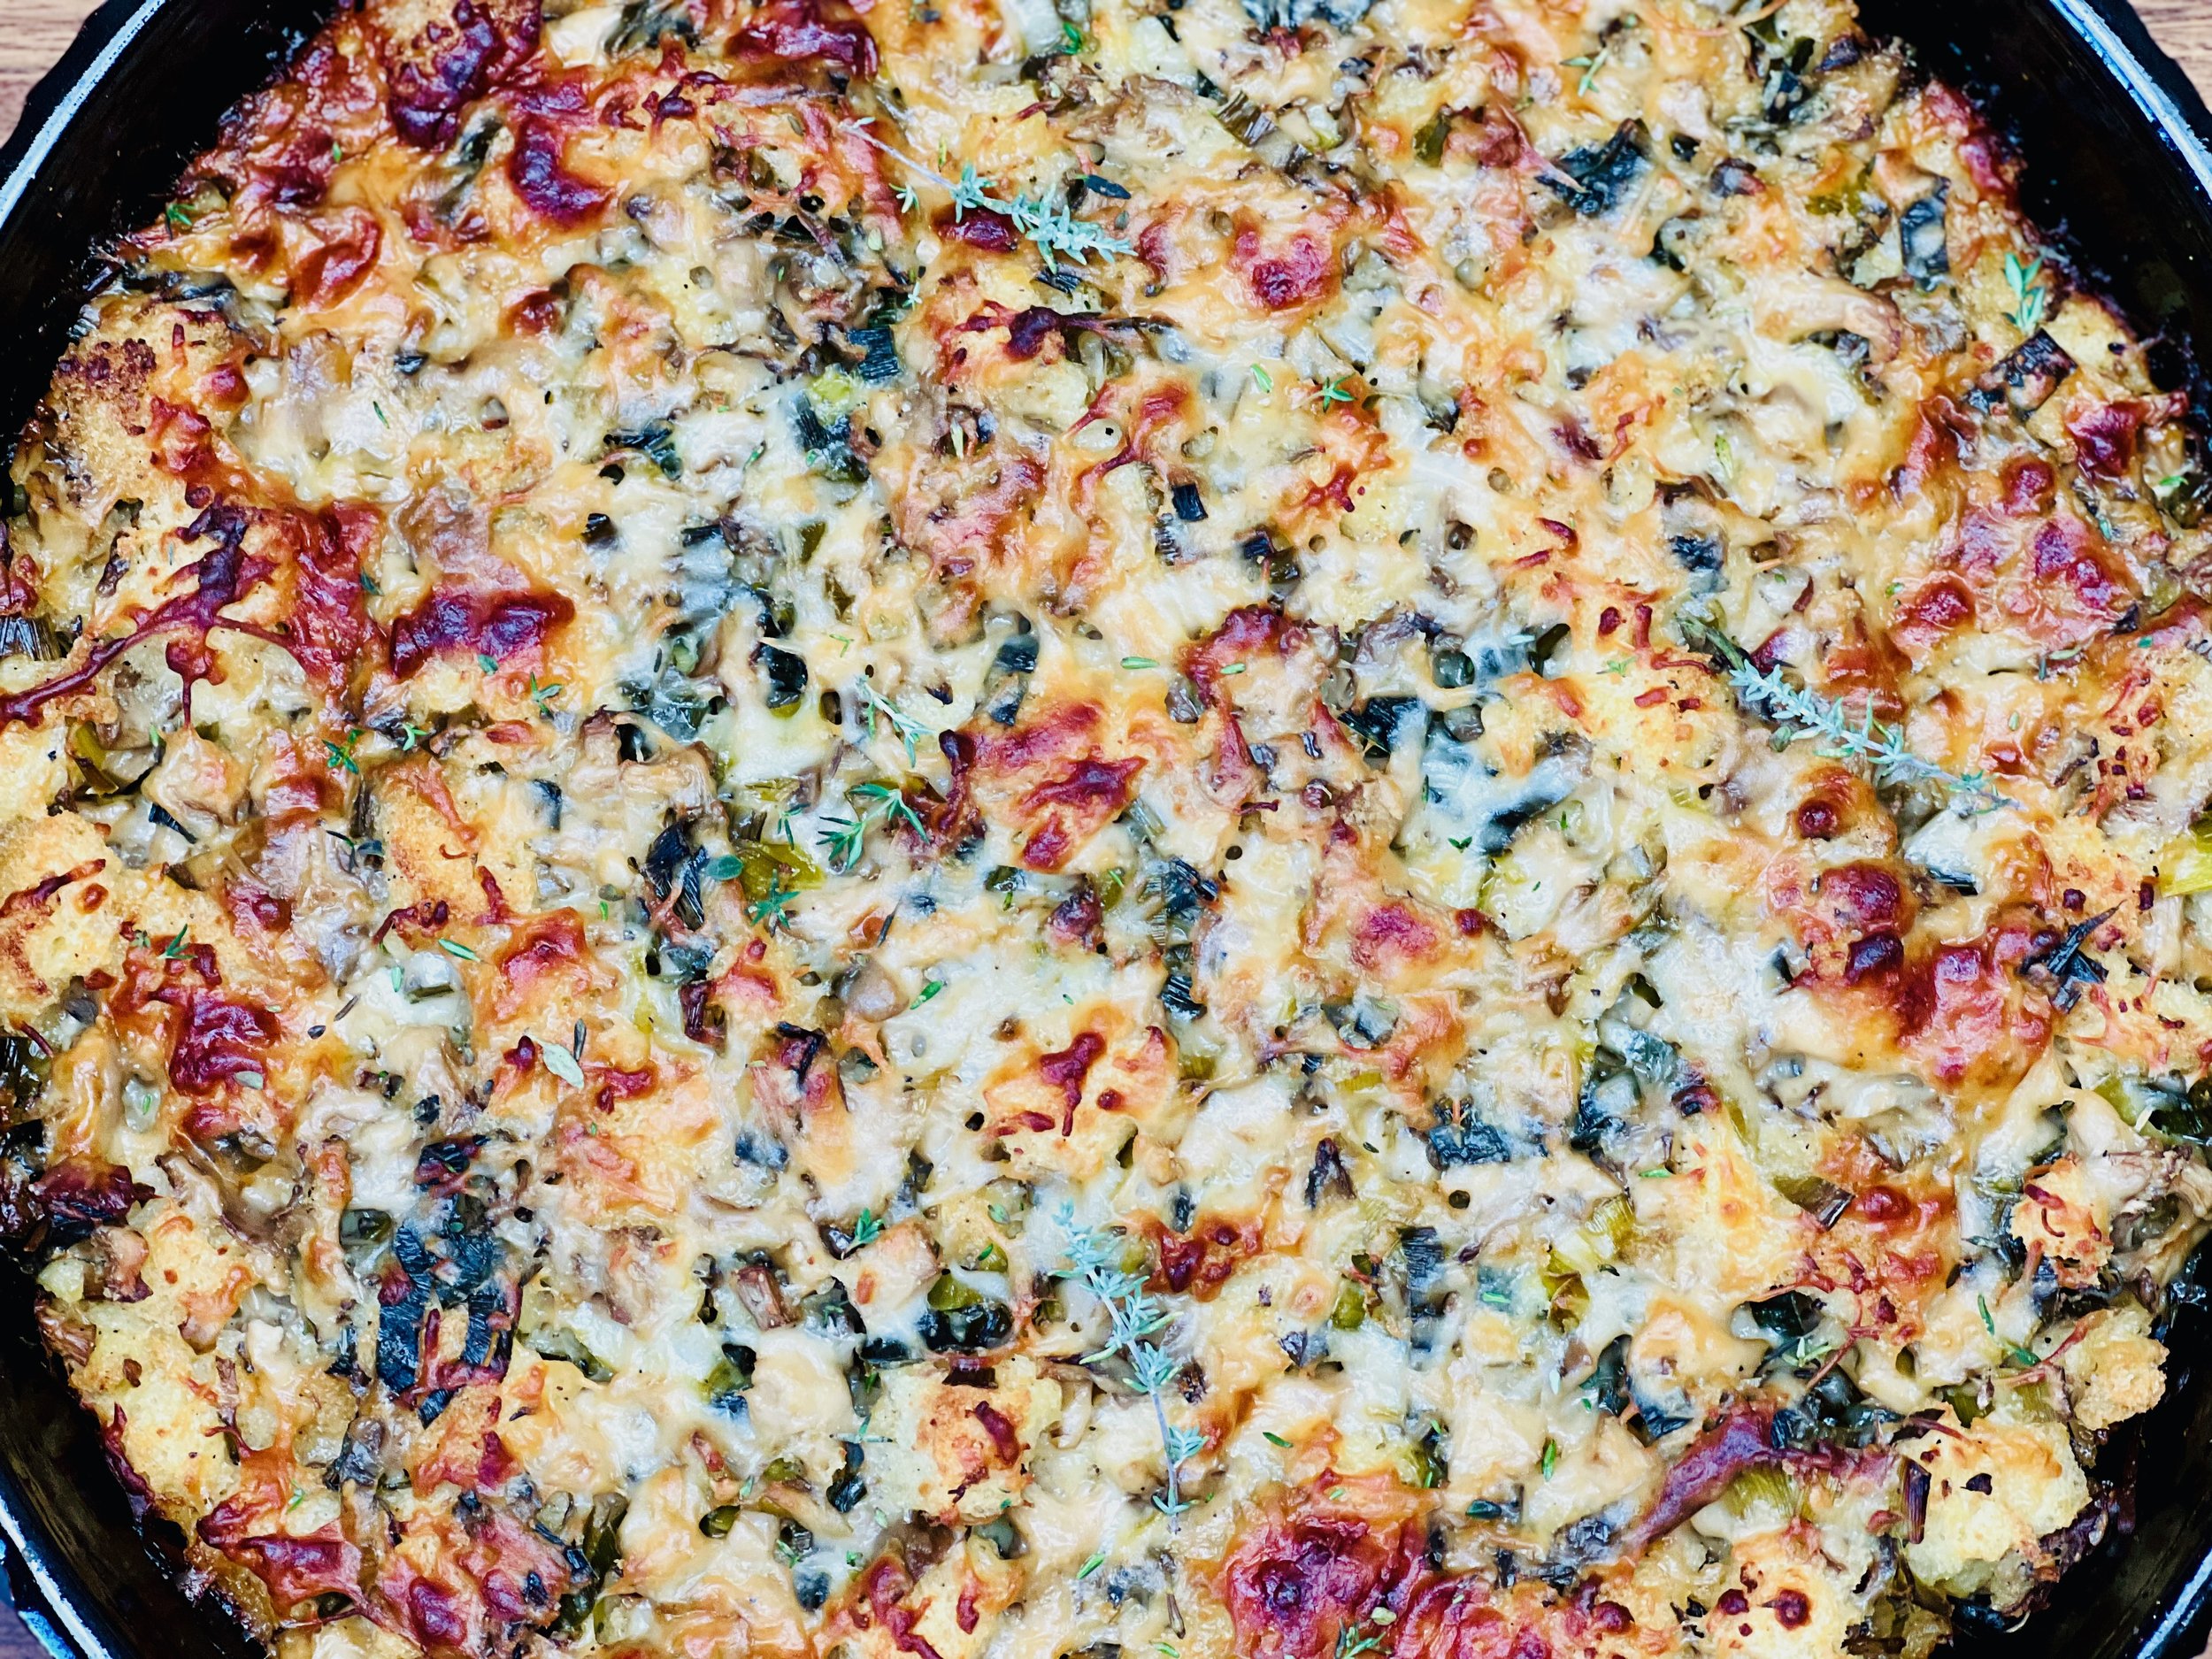
Chicken Zucchini Cheesy Rice Bake (low FODMAP)
15 Minutes prep • 40 Minutes cook • Low FODMAP • Gluten-Free • Serves 6 • Ok to make-ahead: Steps 1 - 5
15 Minutes prep • 40 Minutes cook • Low FODMAP • Gluten-Free • Serves 6 • Ok to make-ahead: Steps 1 - 5
This is a wonderful combination of cheesy rice, delicate zucchini, and fresh herbs. A great dish to make when you have some cheese leftover from your latest cheeseboard because you can blend in just about any cheese you like and it will be delicious.
Ingredients
2 tablespoons garlic-infused olive oil
3 small/medium zucchini, chopped
1 bunch green onions (green part only), chopped
1 pound boneless chicken breasts, cut into cubes
2 tablespoons salted butter
1 1/2 cups basmati or jasmine rice
1/2 cup dry gluten-free orzo pasta
2 tablespoons fresh thyme leaves
3 cups low FODMAP chicken broth (I like Gourmend Organic Chicken Broth, use code IBSGC15 for 15% discount)
3/4 cup shredded Havarti or cubed brie cheese (rind removed)
3/4 cup shredded sharp cheddar cheese, white cheddar, or other strong-flavored aged cheese
1 tablespoon chopped fresh chives
Fresh basil, for serving
Directions
(1) Cook the zucchini: Heat 1 tablespoon garlic-infused olive oil in a large frying pan over medium heat. When the oil shimmers, add the zucchini and season with salt and pepper. Cook until the zucchini is golden, 5-8 minutes. Remove the zucchini from the skillet and set it aside.
(2) Cook the chicken: To the same skillet, add the remaining tablespoon of garlic-infused olive oil and the green onions. Cook for about 2 minutes. Stir in the chicken and season with salt and pepper. Cook until the chicken is seared, 2-3 minutes.
(3) Cook the rest: Add the butter, rice, orzo, and thyme, and cook until golden and toasted, 2-3 minutes. Add the broth and bring it to a boil over high heat. Add the zucchini back to the skillet. Add a large pinch each of salt and pepper.
Bring to a boil, cover, and reduce heat to low. Cook, covered for 15-20 minutes until the liquid is absorbed and the rice is mostly cooked.
(4) Prep the oven: While the rice is cooking, preheat the oven to 425 degrees F.
(5) Bake the rice: Once the rice is cooked, stir in 1/2 of the cheese. Taste and add additional salt and pepper according to your taste. If needed, transfer the rice to an oven-safe casserole dish.
Make-ahead note: At this point, you can let the casserole cool, then cover and refrigerate for up to 2 days. To bake, remove from the fridge and let sit at room temp while the oven preheats. Finish as directed below.
(6) Finish: Scatter the remaining 1/4 cup of each cheese over the top of the casserole. Sprinkle on the chopped chives. Transfer to the oven and bake 10-15 minutes, until the cheese is melted. Switch the oven to broil and broil for 1-2 minutes until the cheese on top is becoming crispy.
(6) Plate and serve: Serve warm with fresh basil.
Eat and enjoy every bite because you can!
This post may contain affiliate links so you can easily purchase items listed on the page. In some cases, we have provided a special discount code for IBS Game Changers so be sure to use it when you purchase an item to get the discount that has been arranged just for you!
More Deliciously Low FODMAP™ main courses you might enjoy
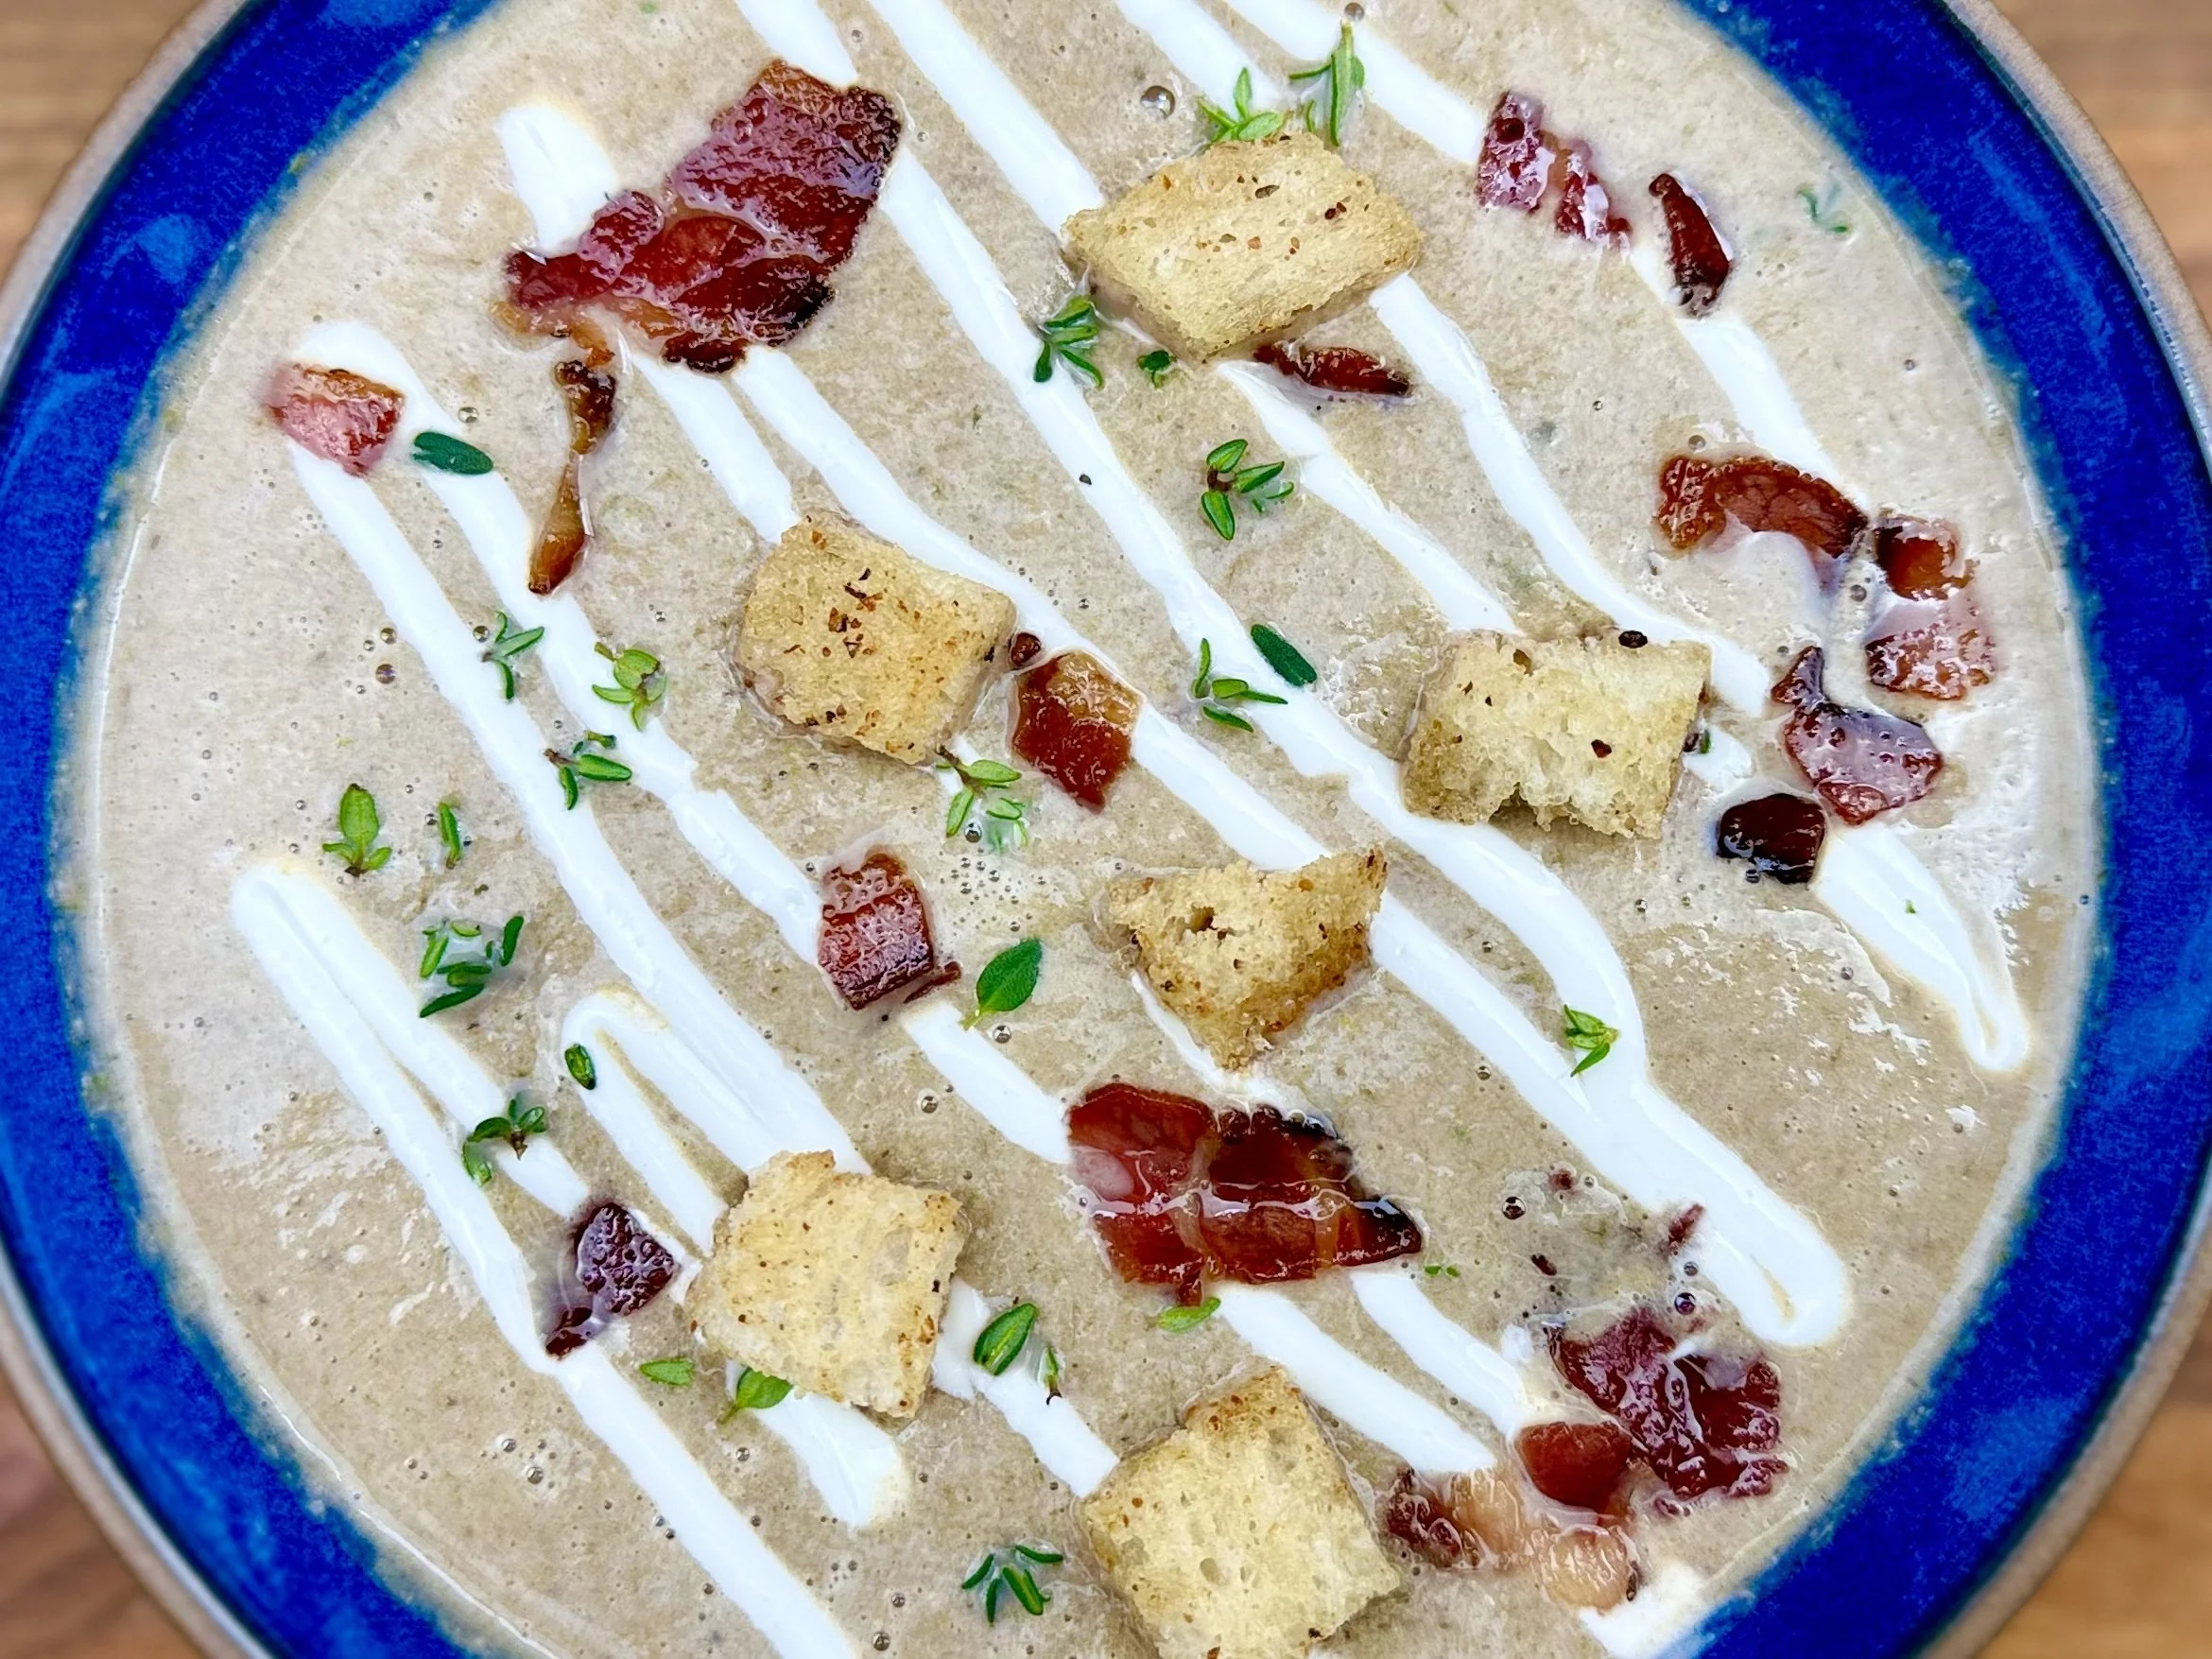
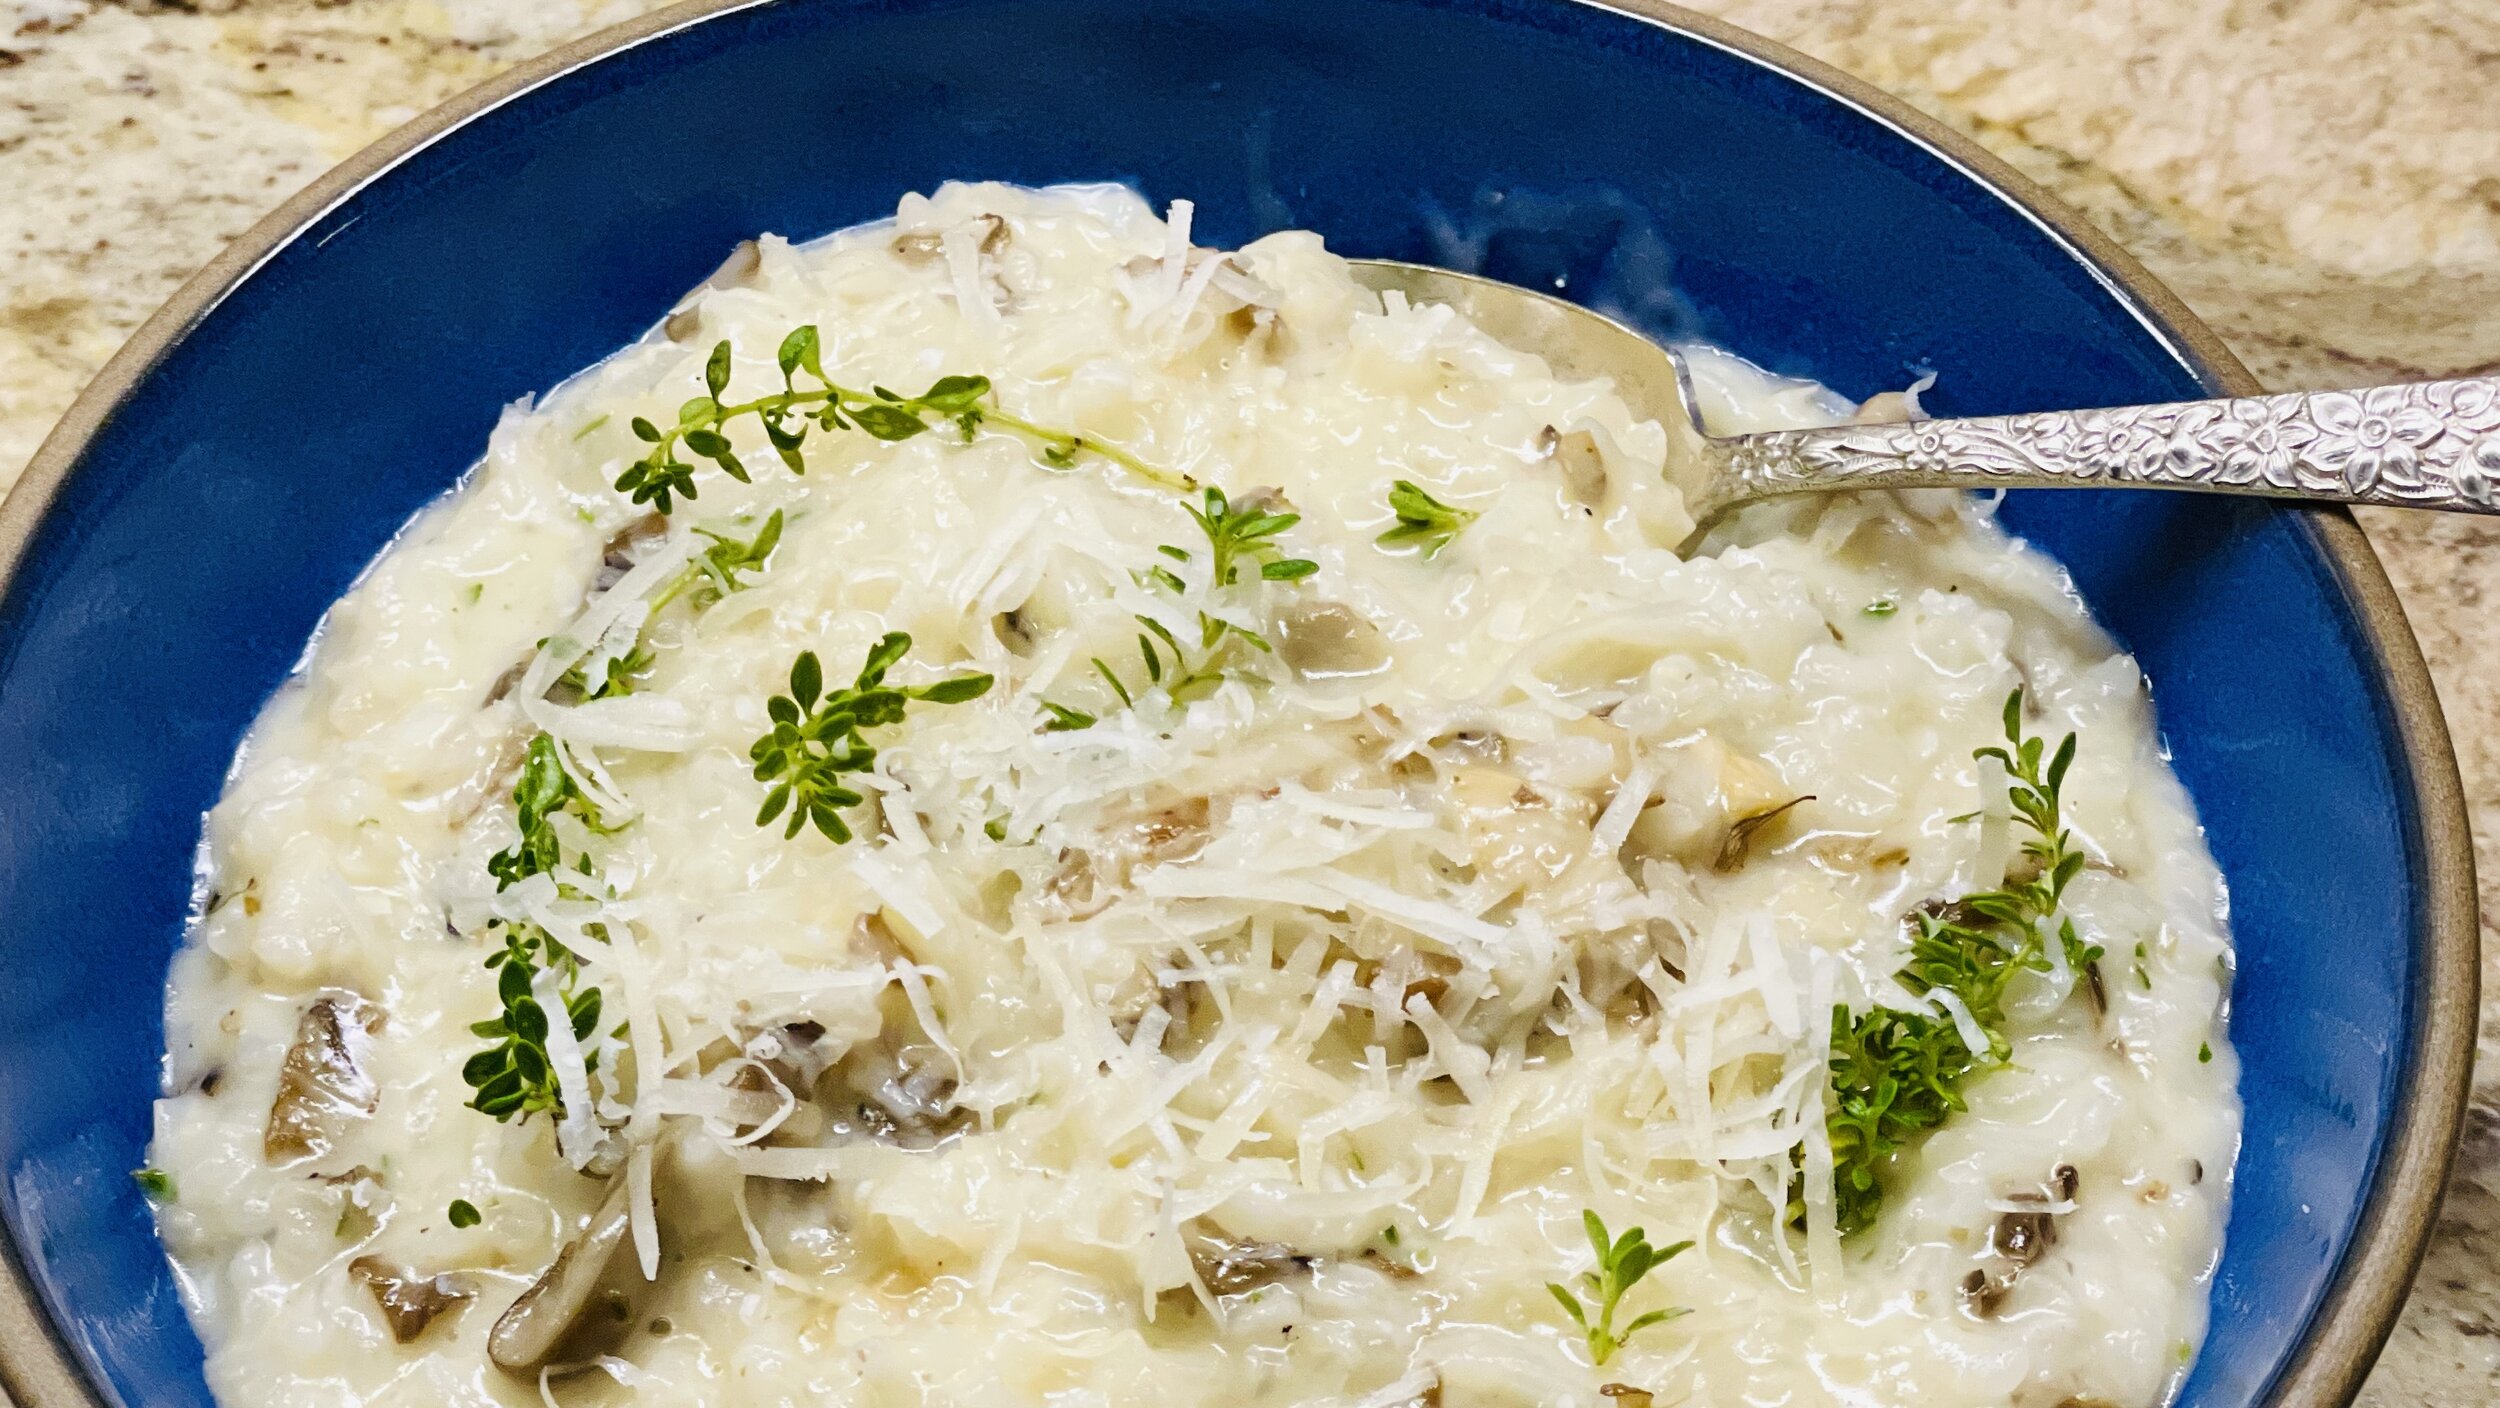
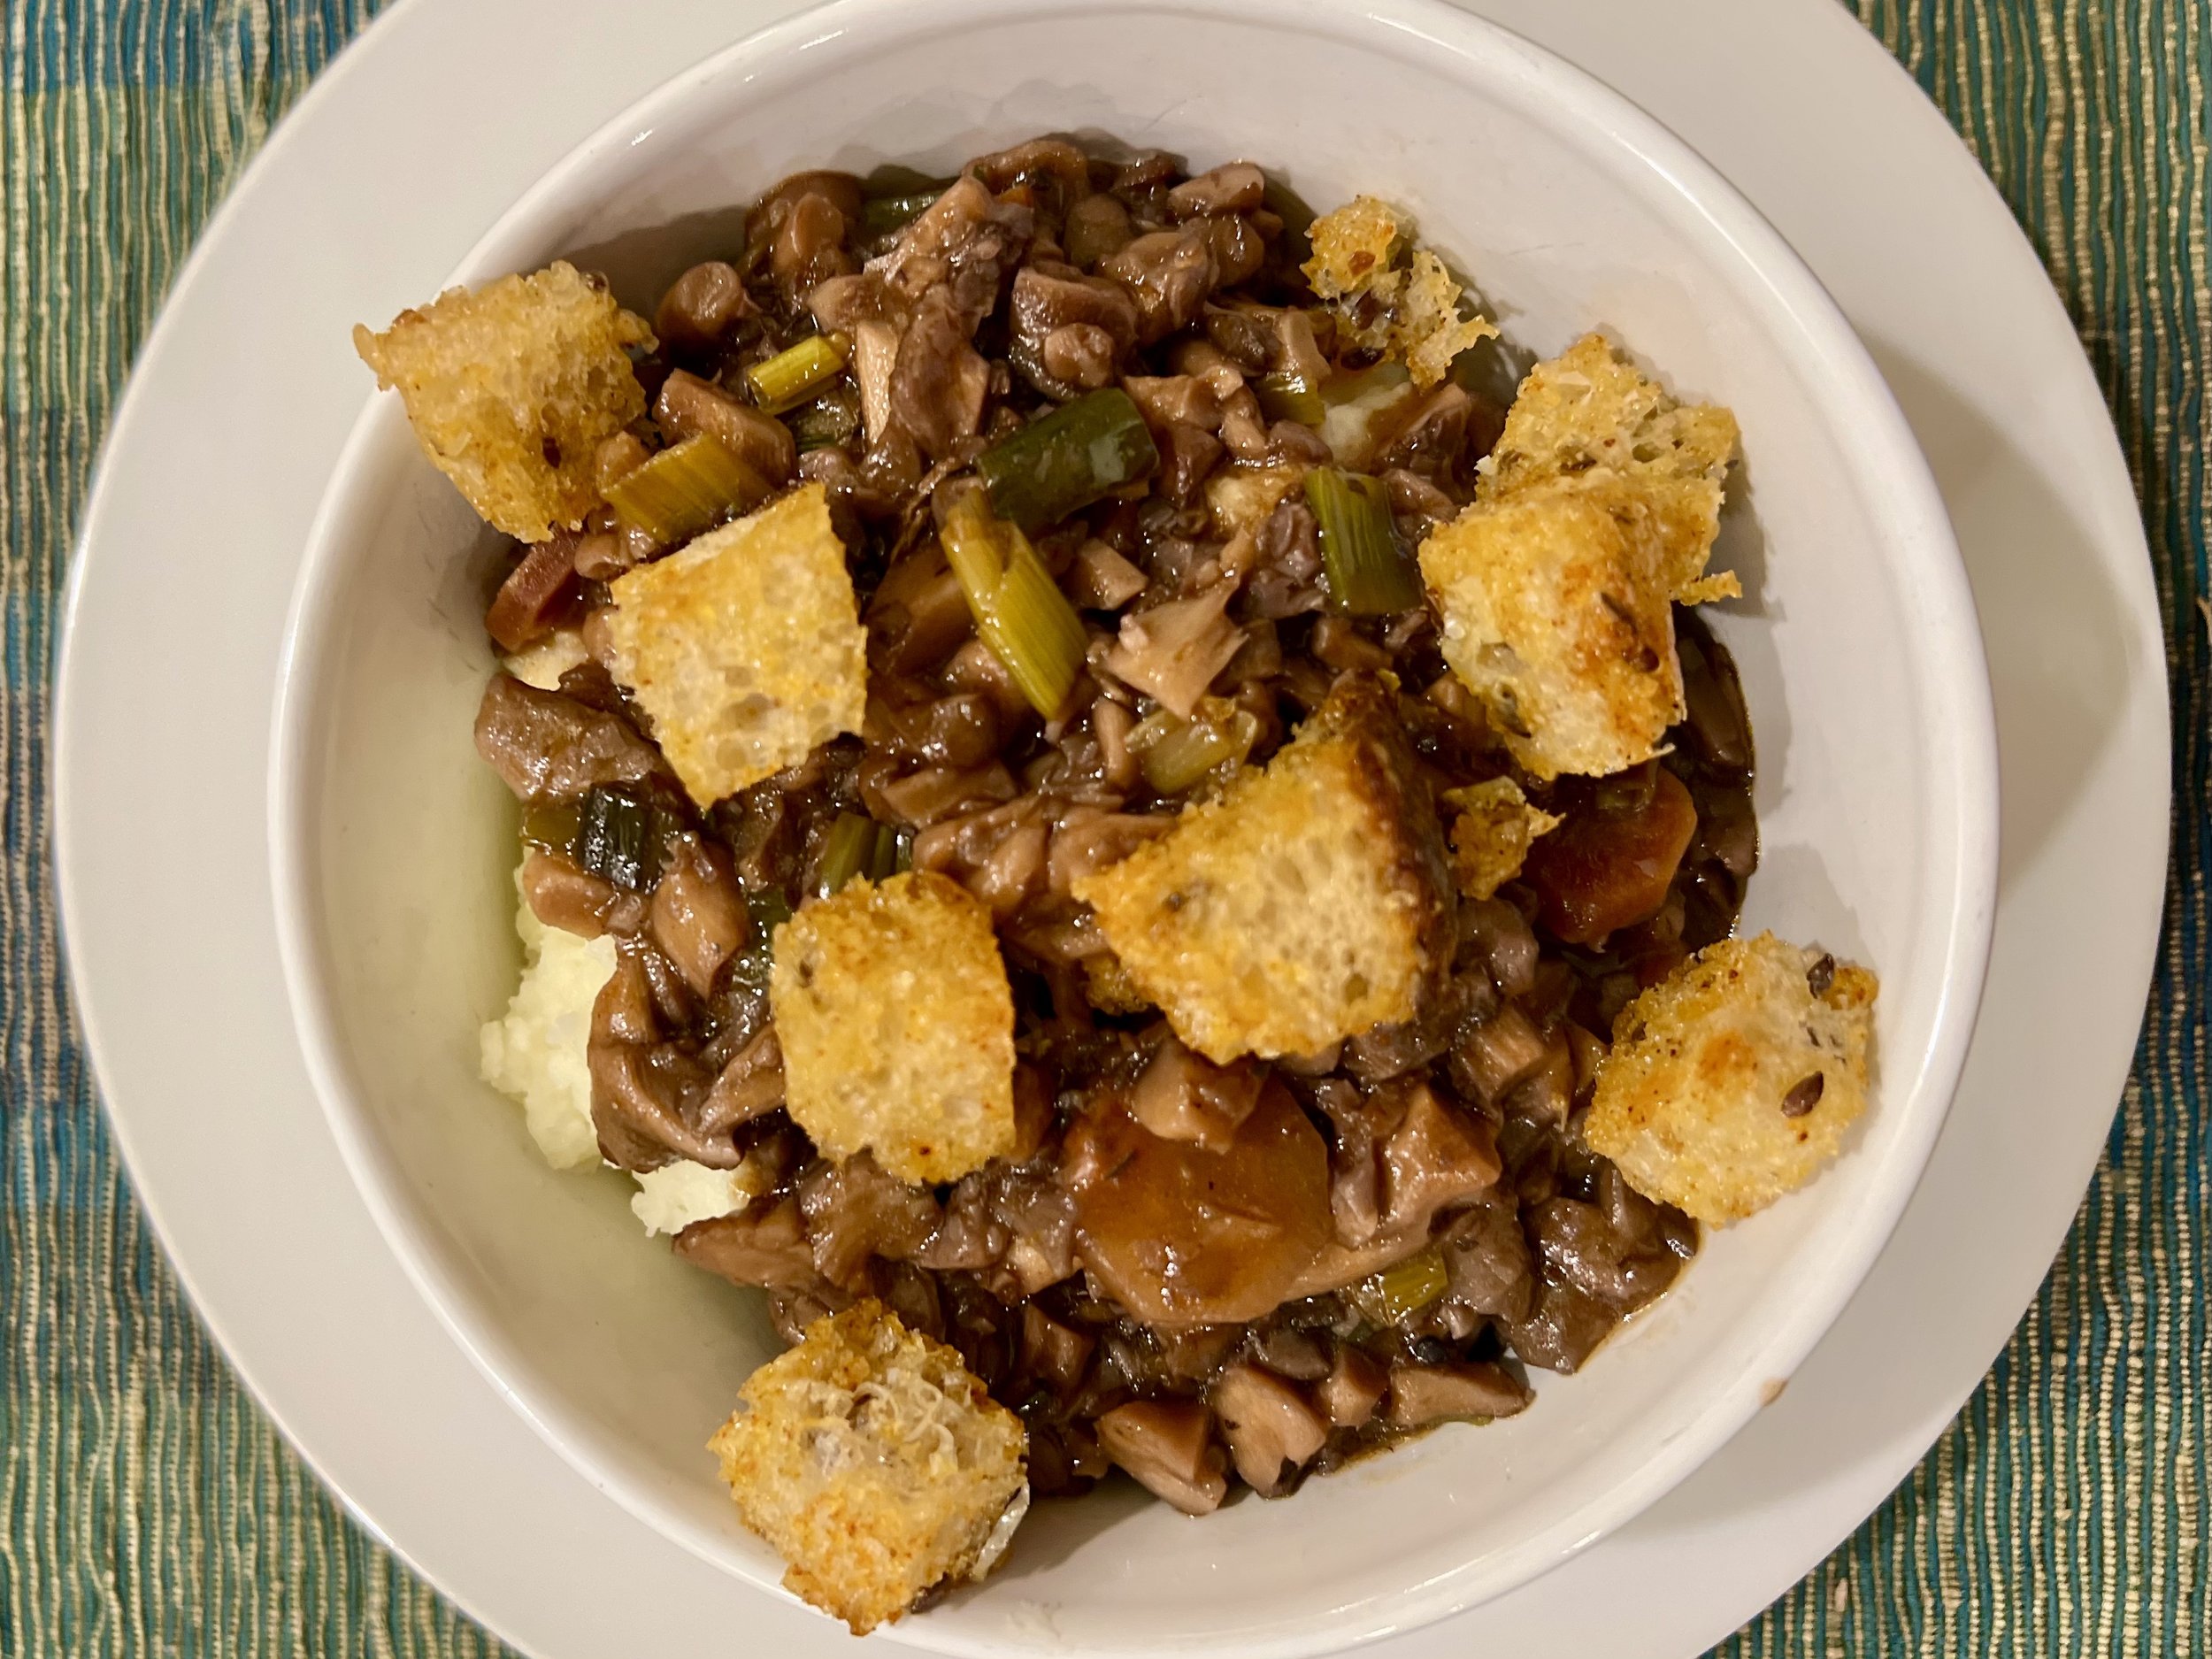
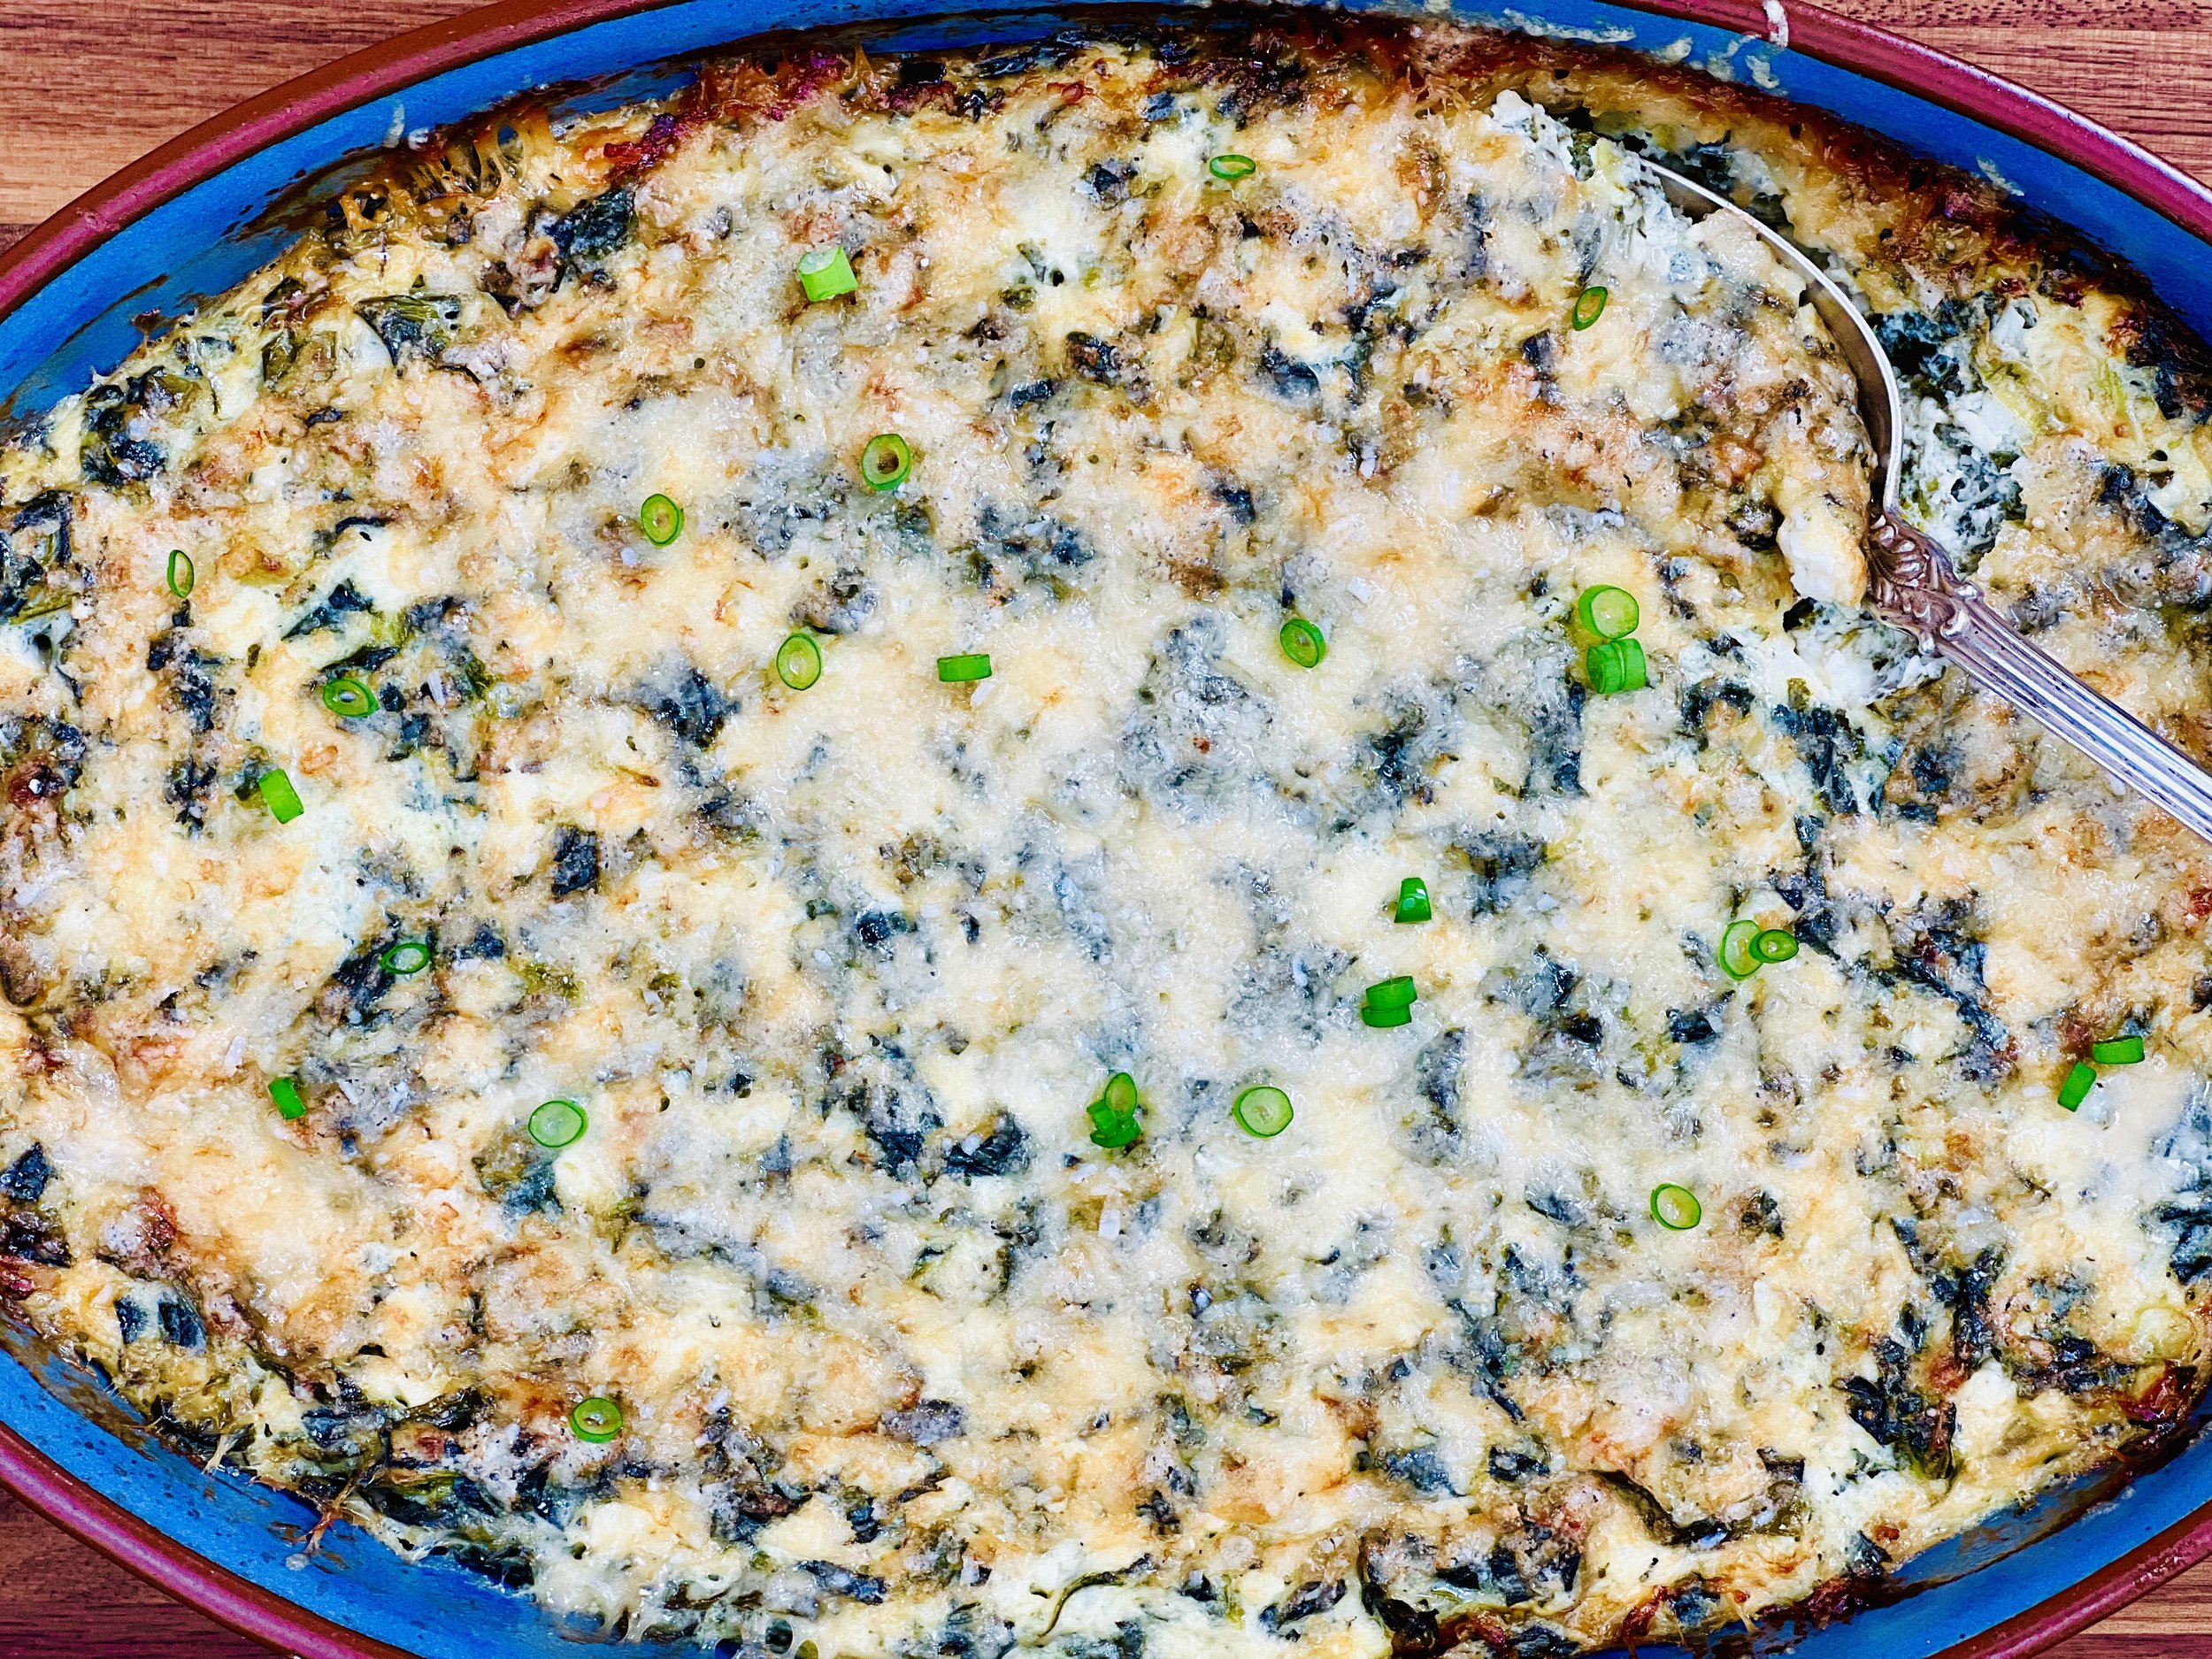
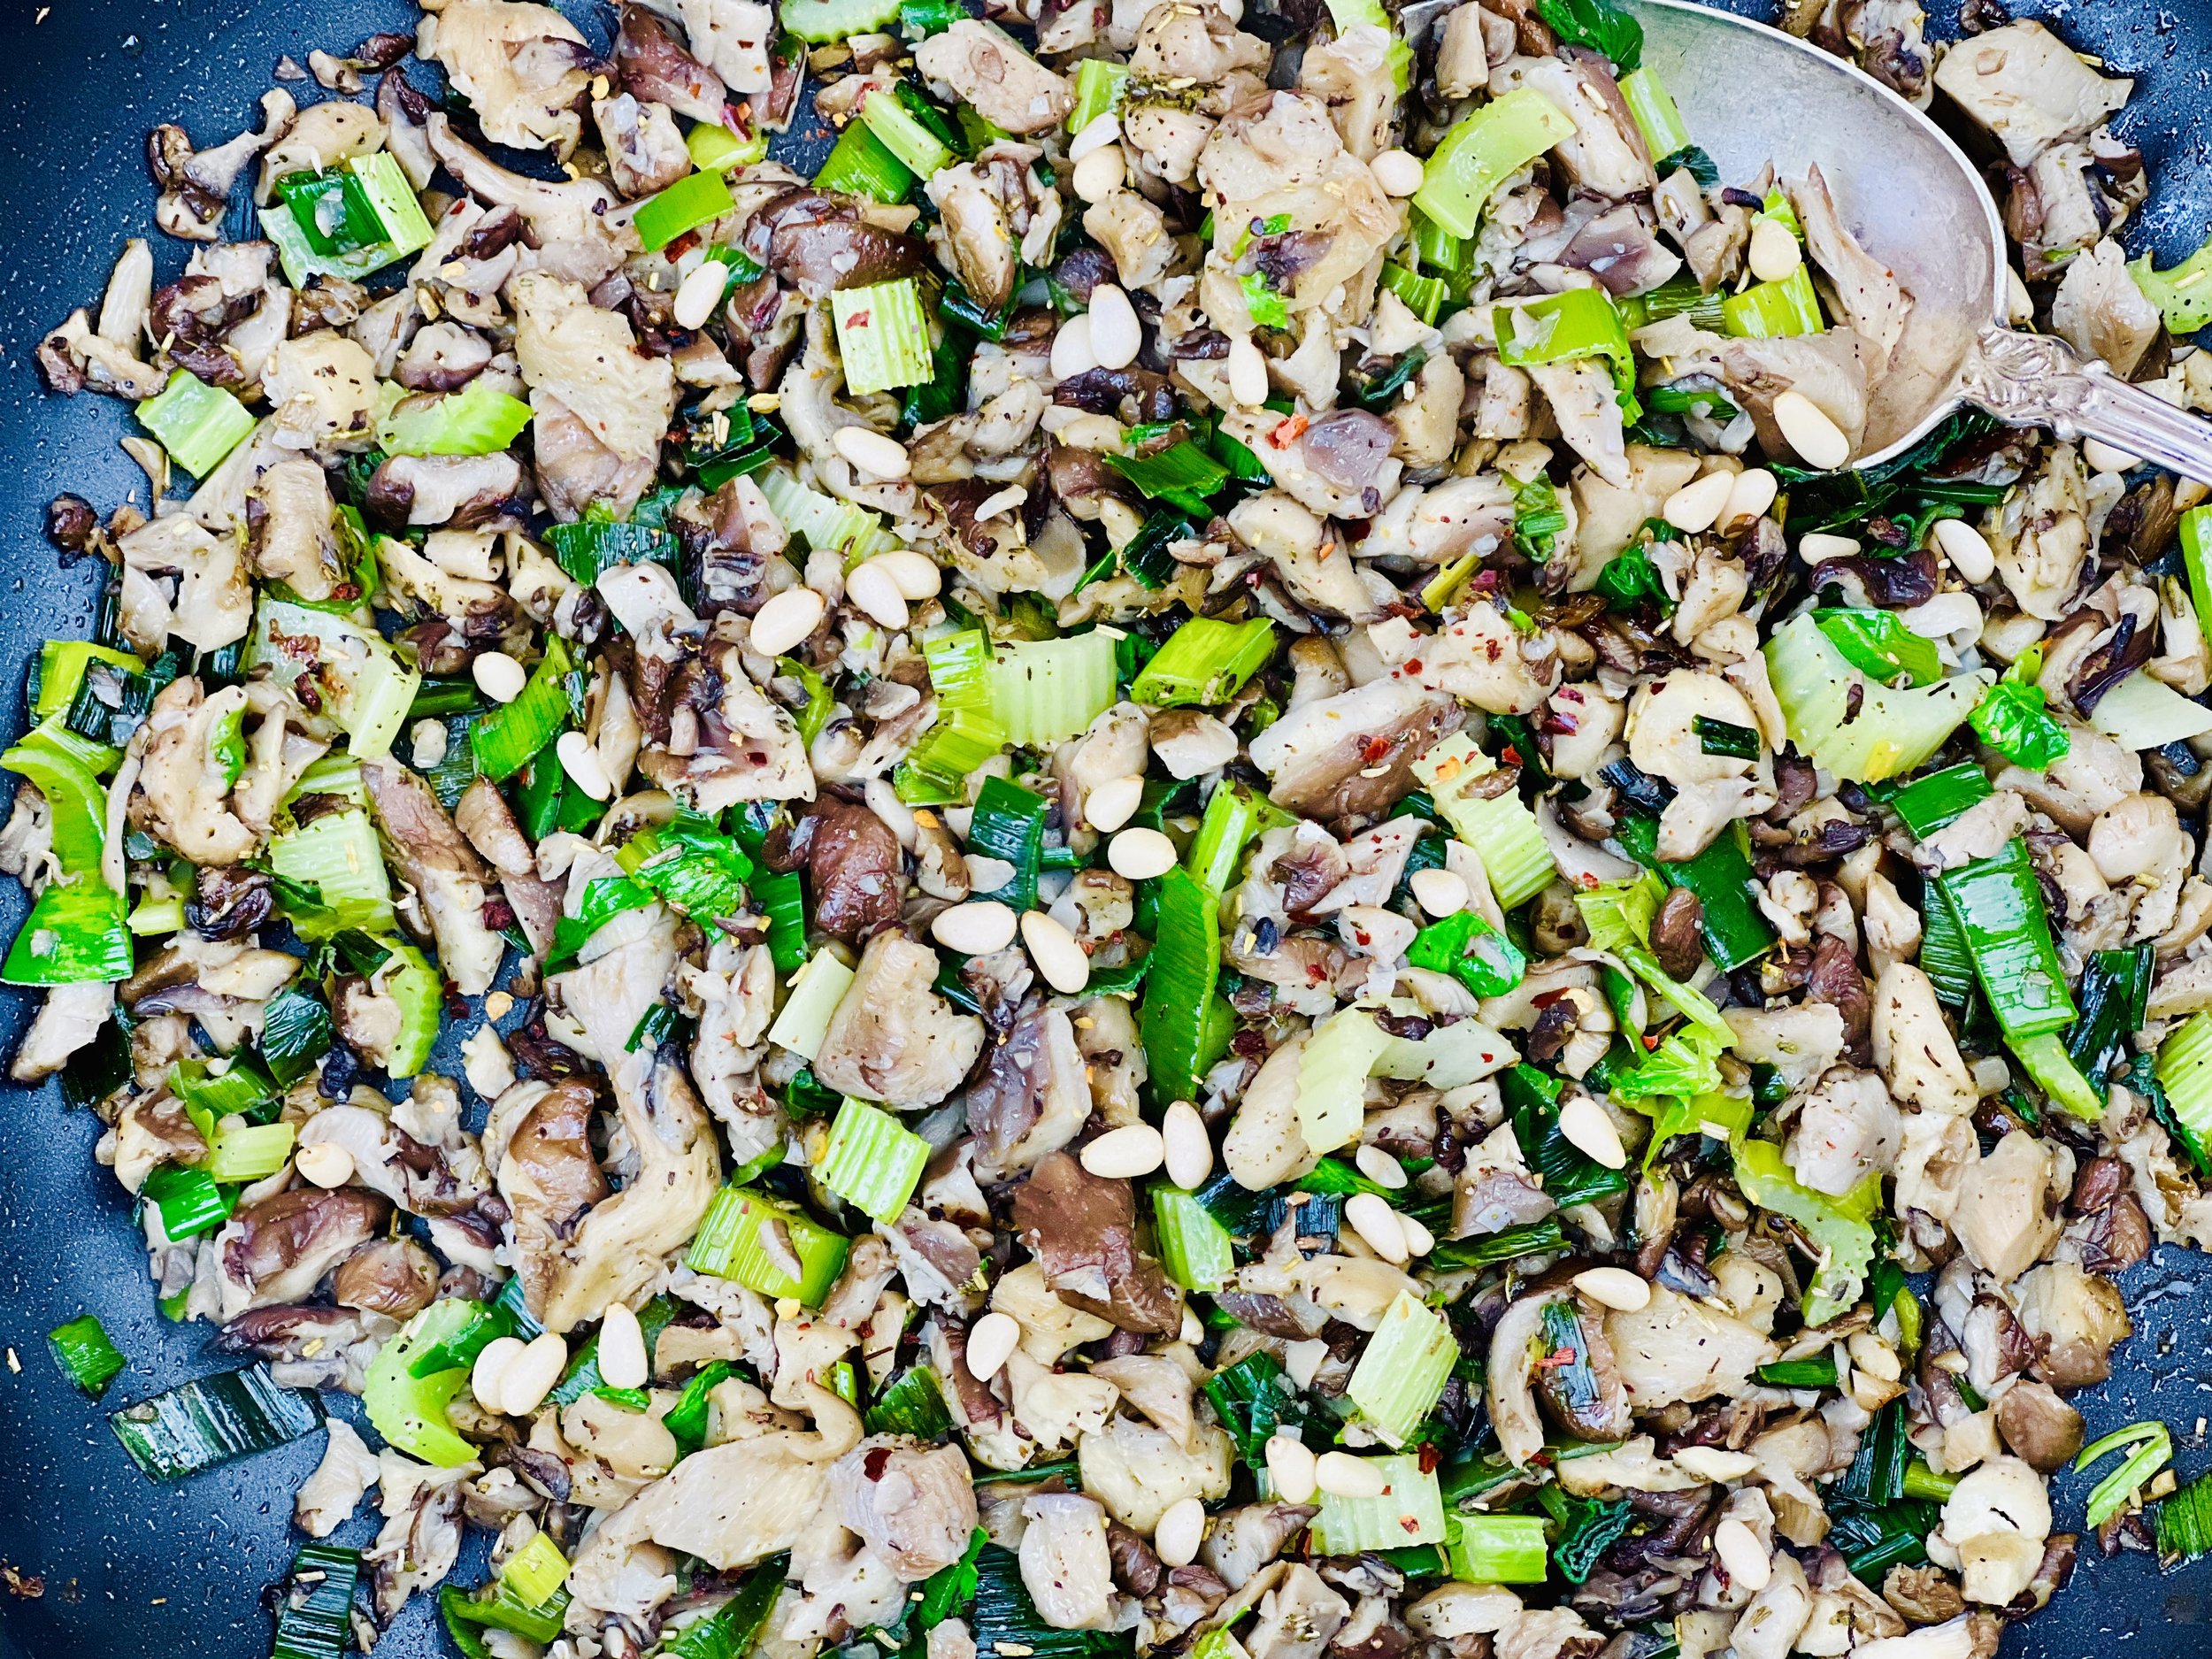
Creamy Mushroom and Brie Risotto (low FODMAP)
30 Minutes • Low FODMAP • Gluten-Free • Serves 6 • Ok to make-ahead: Steps 1 - 5
30 Minutes • Low FODMAP • Gluten-Free • Serves 6 • Ok to make-ahead: Steps 1 - 5
Risotto is already creamy, but when you add brie cheese to the mixture, it turns super creamy and delicious. This recipe is easy to make and doesn’t require tons of stirring to get the texture right. The mushrooms and thyme add a rich depth of flavor and it makes an excellent vegetarian main course (if made with veggie broth) or a delicious side dish.
Ingredients
5 cups low FODMAP chicken broth plus one additional cup if needed (I like Gourmend Organic Chicken Broth—use code IBSGC15 for 15% discount)
OR use low FODMAP veggie broth for a vegetarian version
4 tablespoons garlic-infused olive oil
2 tablespoons salted butter
2 cups arborio rice
1 cup dry white wine, such as Pinot Grigio or Sauvignon Blanc
1 teaspoon kosher salt
1 cup freshly grated parmesan cheese, plus more for serving
8 ounces brie, rind removed, and cubed
Juice of one lemon
2 tablespoons fresh thyme leaves, finely chopped
1 1/2 pounds oyster mushrooms, chopped
1 teaspoon dry thyme
Kosher salt and pepper to taste
Directions
(1) Heat the broth: In a saucepan or microwave-safe bowl, heat the chicken broth until steaming.
(2) Prepare the risotto: Heat 2 tablespoons garlic-infused olive oil and 2 tablespoons butter in a large pot or Dutch oven set over medium-high heat. Stir in the rice, cook until lightly golden and toasted, 2-3 minutes. Add the wine and 1 teaspoon salt, continue to cook for 3-4 minutes, or until the wine has absorbed into the rice. Slowly stir in 5 cups of the warmed broth and bring to a boil over high heat, cover, reduce the heat to low, and simmer for 15 minutes.
(3) Prepare the mushrooms: While the risotto cooks, slice the mushrooms and heat 1 tablespoon garlic-infused olive oil in a pot or deep skillet set over medium-high heat. Add 1 teaspoon dry thyme and cook for about 1 minute. Add the sliced mushrooms and season generously with salt and pepper. Cook until the mushrooms are starting to brown and crisp a bit then remove them from the heat.
(4) Adjust the risotto: After 15 minutes, stir in the remaining up to 1 cup broth (more or less to get the consistency you prefer), and the grated parmesan. Stir until thickened, about 2-3 minutes. Add the cubed brie, lemon juice, and fresh thyme. Stir to combine, then remove from the heat. If the risotto gets too thick, add additional warm broth to thin. It should be creamy, but with just a touch of liquid. Taste, and adjust seasoning with salt.
(5) Finish: Stir the mushrooms into the rice mixture. Taste and adjust seasoning if needed.
Make-ahead note: At this point, you may cover the risotto and keep it warm until ready to serve. When ready to serve add more heated broth to thin it a bit if it has thickened up too much.
(6) Plate and serve: Divide the risotto into bowls and top with additional parmesan cheese and fresh thyme leaves.
Pro Tip: To easily remove the rind from the brie, just freeze it. Then you can easily slice off the rind and cube the brie without it sticking all over your knife or your fingers.
Eat and enjoy every bite because you can!
This recipe contains affiliate links so you can easily purchase items listed on the page. This is for your information and convenience. If you purchase through this link, I may earn a commission but there is no additional cost to you. Please read my disclosure for more information.
More Deliciously Low FODMAP™ vegetarian recipes you might enjoy

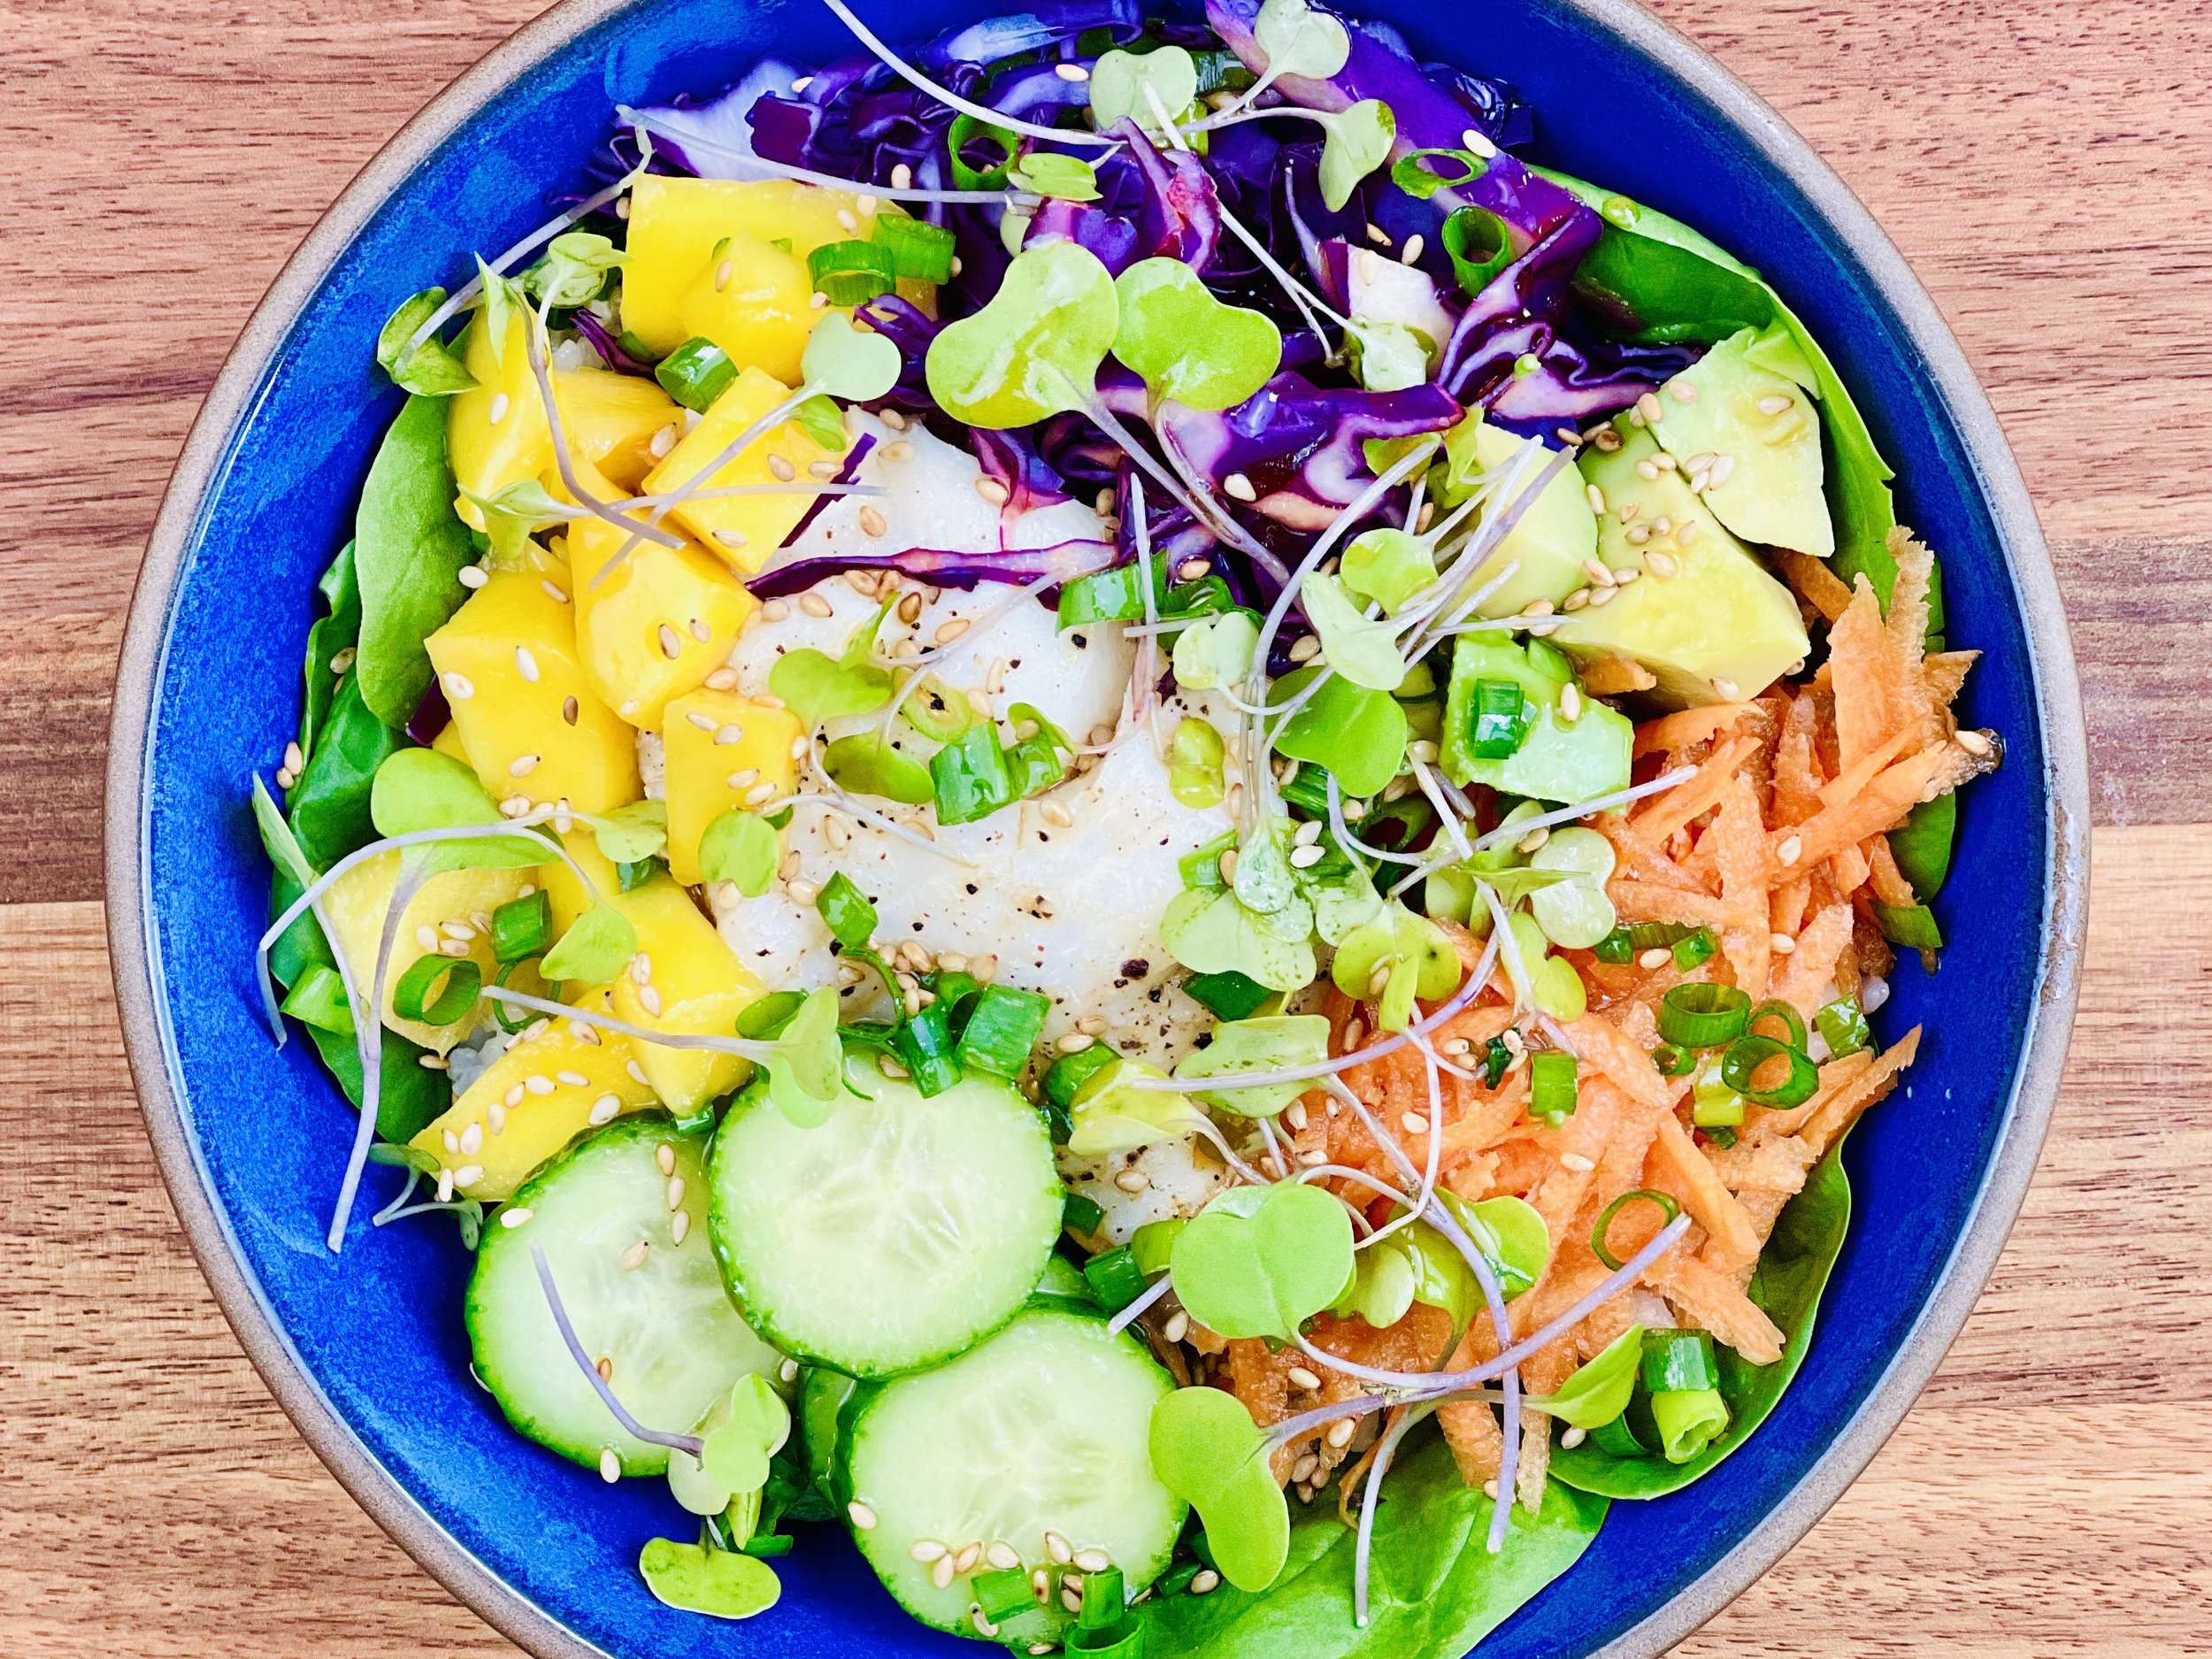
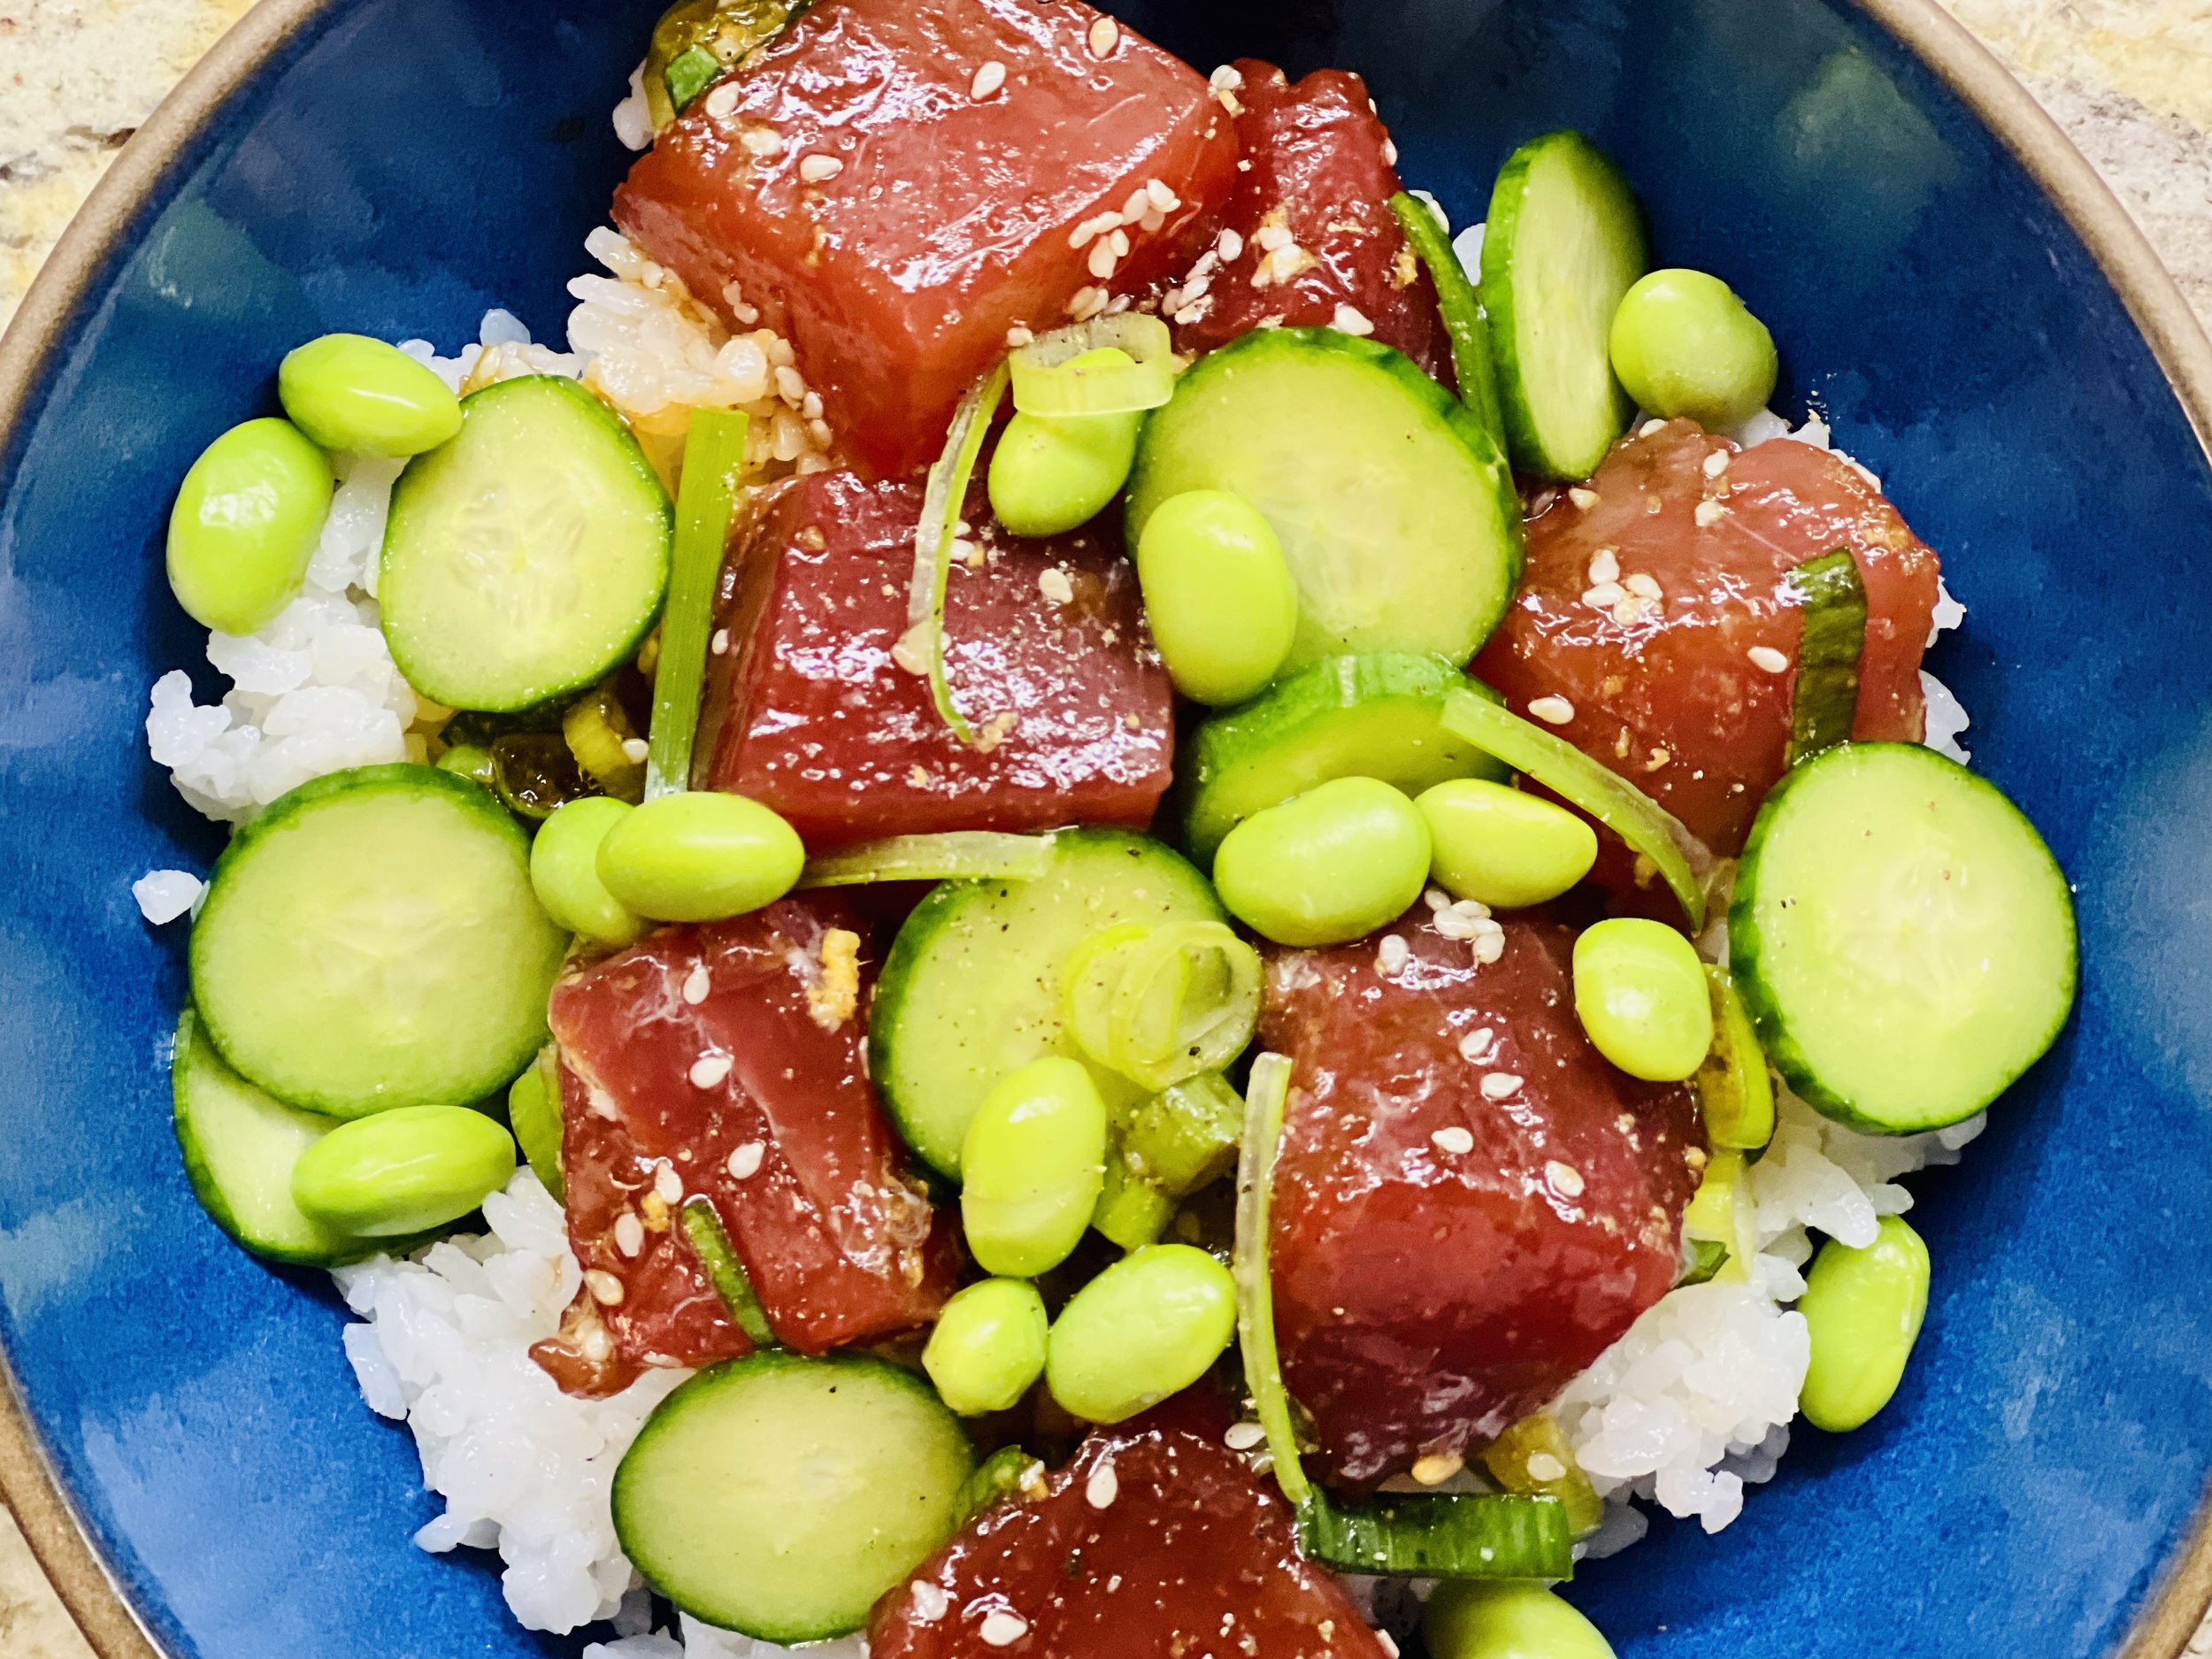
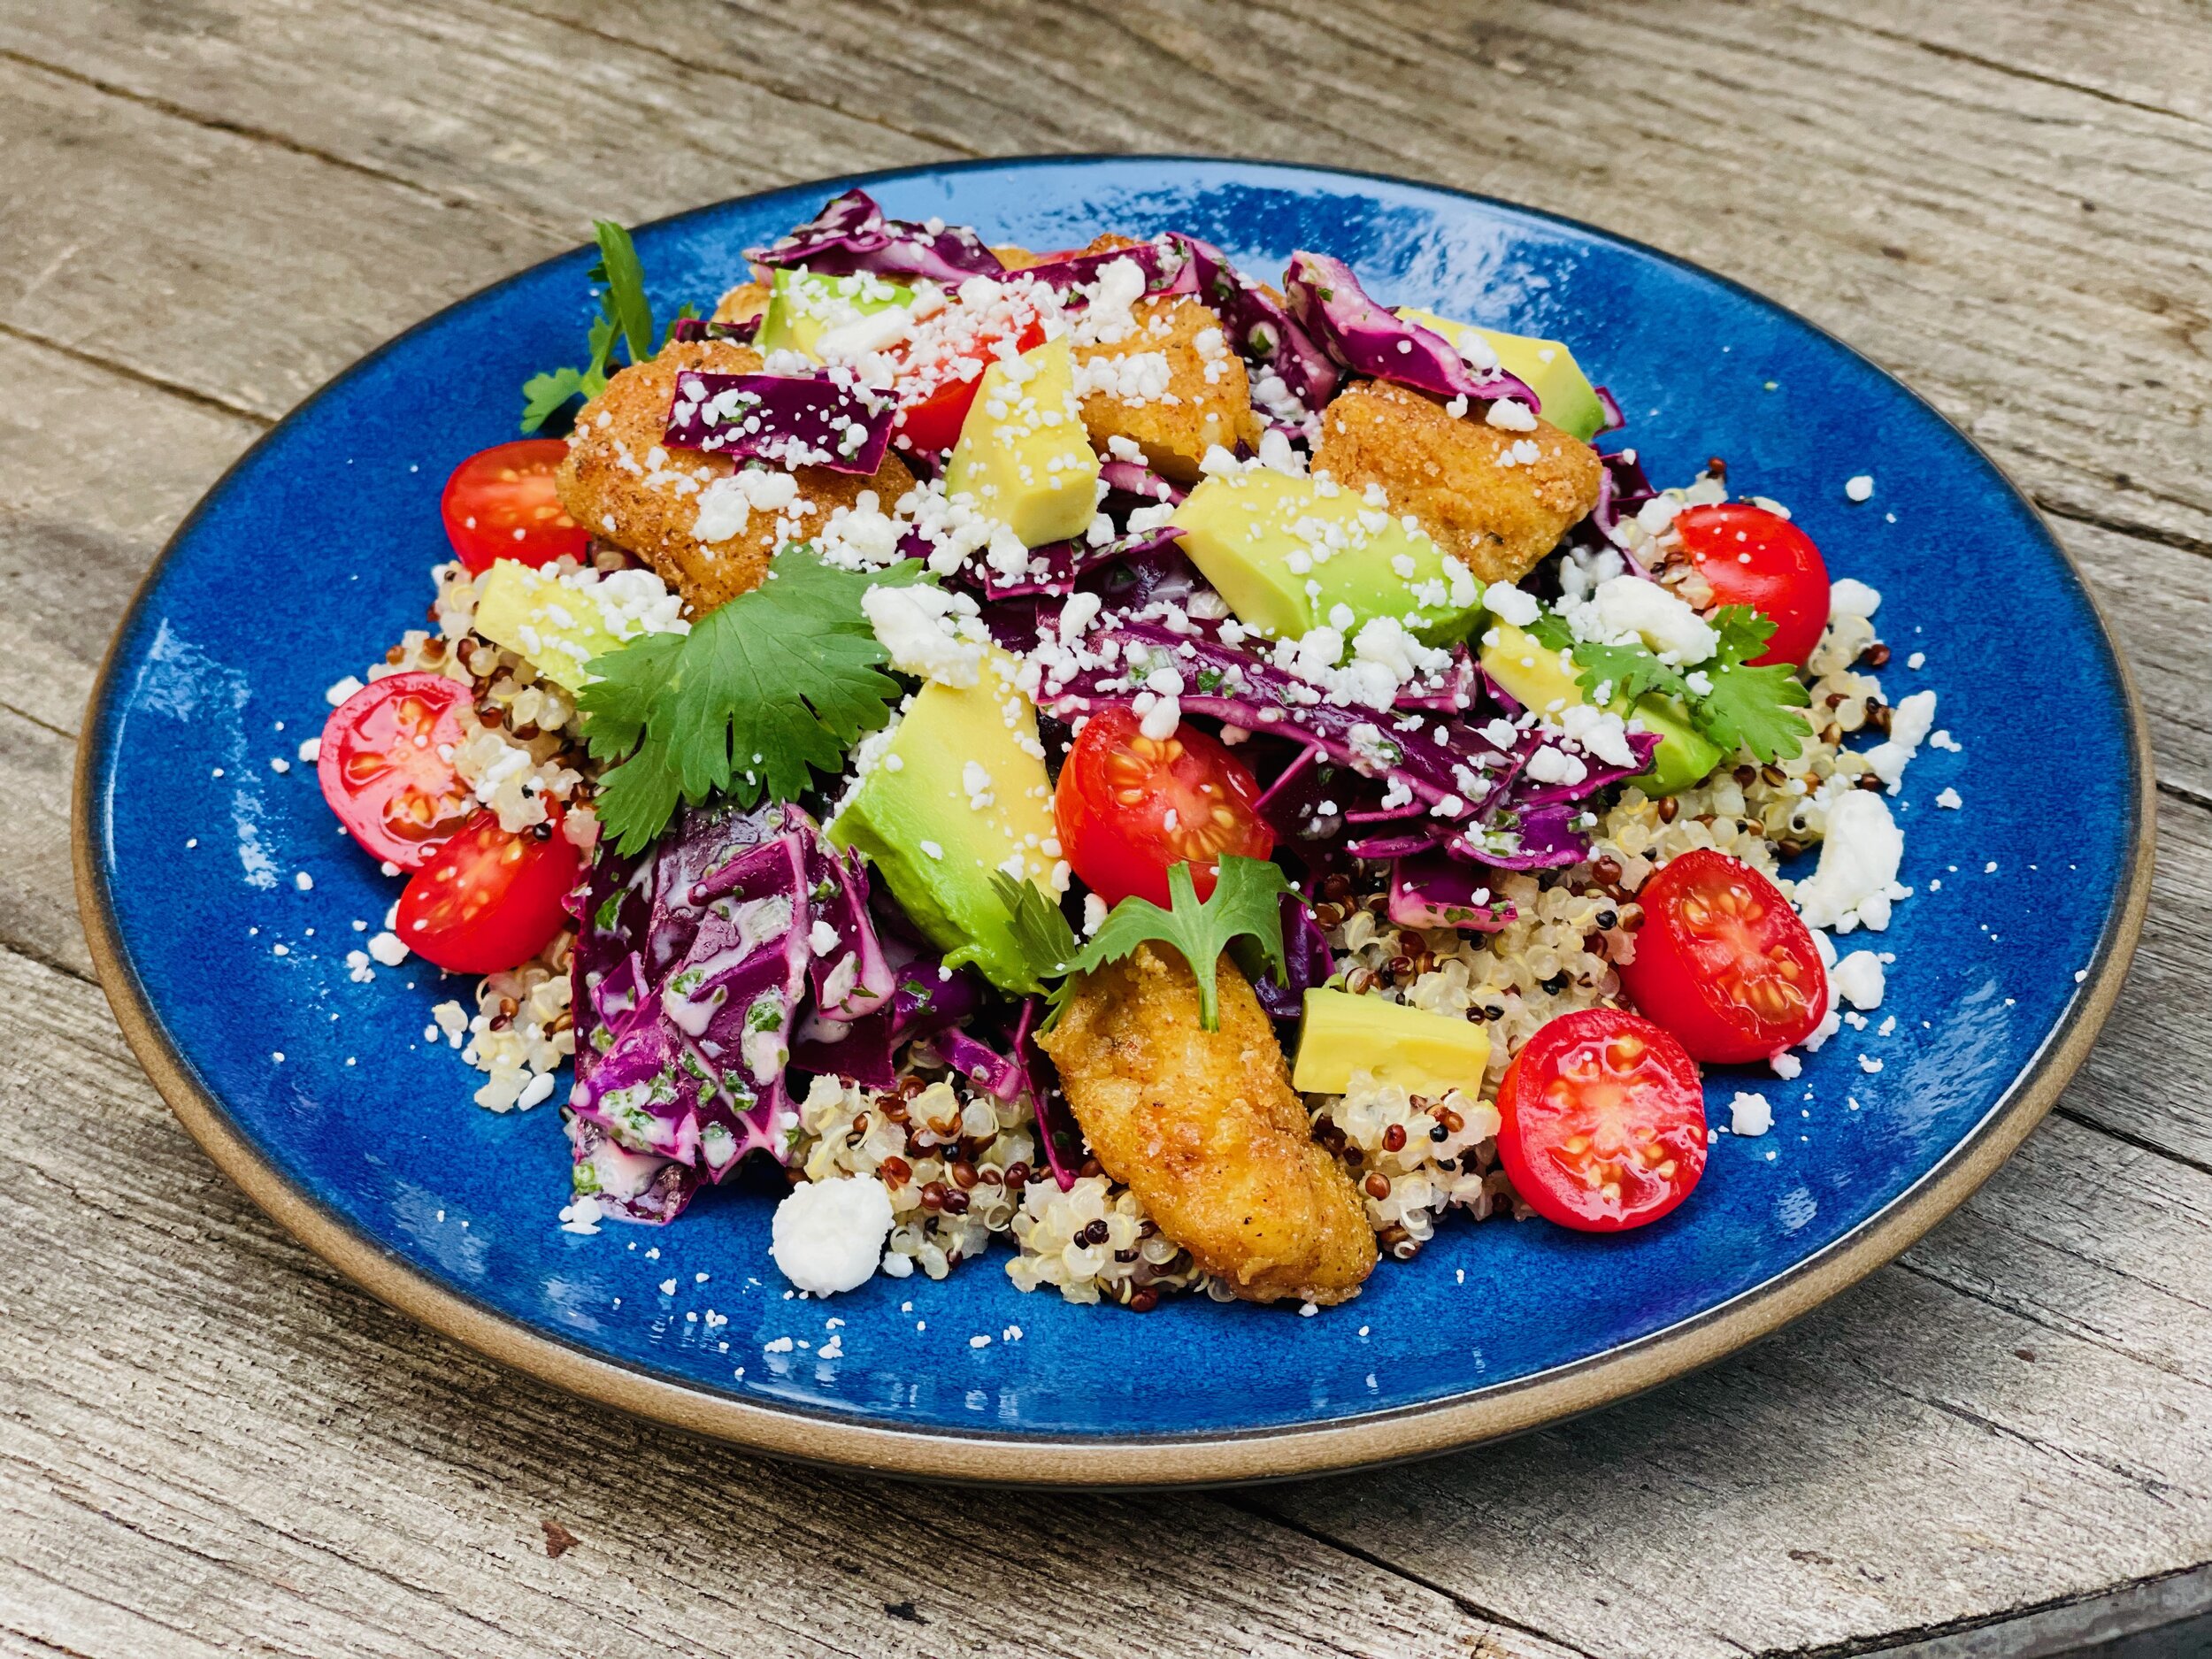
Fish Taco Quinoa Salad (low FODMAP)
45 Minutes • Low FODMAP • Gluten-Free • Serves 4 • Ok to make-ahead: Steps 1 - 4
45 Minutes • Low FODMAP • Gluten-Free • Serves 4 • Ok to make-ahead: Steps 1 - 4
This combination fish taco, quinoa, and cabbage salad is simply wonderful. The tangy herb dressing is perfect to bring it all together so you get all the flavor of fish tacos in a nice neat bowl! It’s easy to make and you can cook the fish on your grill or on the stove. It’s all-around a perfect summer supper.
This recipe is now available in our recipe club.
To keep the blog fresh and to make sure our complete recipe archive is easily accessible for you, I am publishing the recipe archive to my new Recipe Club. Membership in the club includes access to the complete archive of recipes with filters so it can become your virtual low FODMAP cookbook plus, I am creating and delivering one special NEW recipe every week ONLY for recipe club members. And, for my true fans, I’ll be sharing behind-the-scenes content, and updates on the progress of the new cookbook.
Your membership in the club helps me continue creating new, delicious, easy-to-make, low FODMAP recipes just for you.
As always, all recipes will emphasize simple ingredients, easy preparation, and delicious low FODMAP results. Recipes will be for everything from main courses, salads, soups, side dishes, appetizers, desserts, sauces, breakfast and lunch, and even mocktails and cocktails. Everything you need to prepare fantastic low FODMAP meals everyone will love.
Join the club. Become a Patron. Let’s keep making delicious Low FODMAP meals together.
The Deliciously Low FODMAP Recipe Club is ready for you!
Your membership in the club helps me continue creating new, delicious, easy-to-make, low FODMAP recipes just for you.
I’m beyond excited to announce my new Recipe Club for delicious Low FODMAP recipes. The club will allow me to keep the blog fresh and ensure our complete recipe archive is easily accessible to you. Membership in the club includes access to the complete archive of recipes with filters so it can become your virtual low FODMAP cookbook plus, I am creating and delivering one special NEW recipe every week that will ONLY be available for recipe club members. And, for my true fans, I’ll be sharing behind-the-scenes content, and updates on the progress of the new cookbook.
Your membership in the club helps me continue creating new, delicious, easy-to-make, low FODMAP recipes just for you.
As always, all recipes will emphasize simple ingredients, easy preparation, and delicious low FODMAP results. Recipes will be for everything from main courses, salads, soups, side dishes, appetizers, desserts, sauces, breakfast and lunch, and even mocktails and cocktails. Everything you need to plan and prepare fantastic low FODMAP meals everyone will love.
Join the club. Become a Patron. Let’s keep making delicious Low FODMAP meals together.

Thank you for your support.
I’m so thankful for the enthusiastic support I get from all of you. I couldn’t do it without you!
Join the club. Become a Patron.
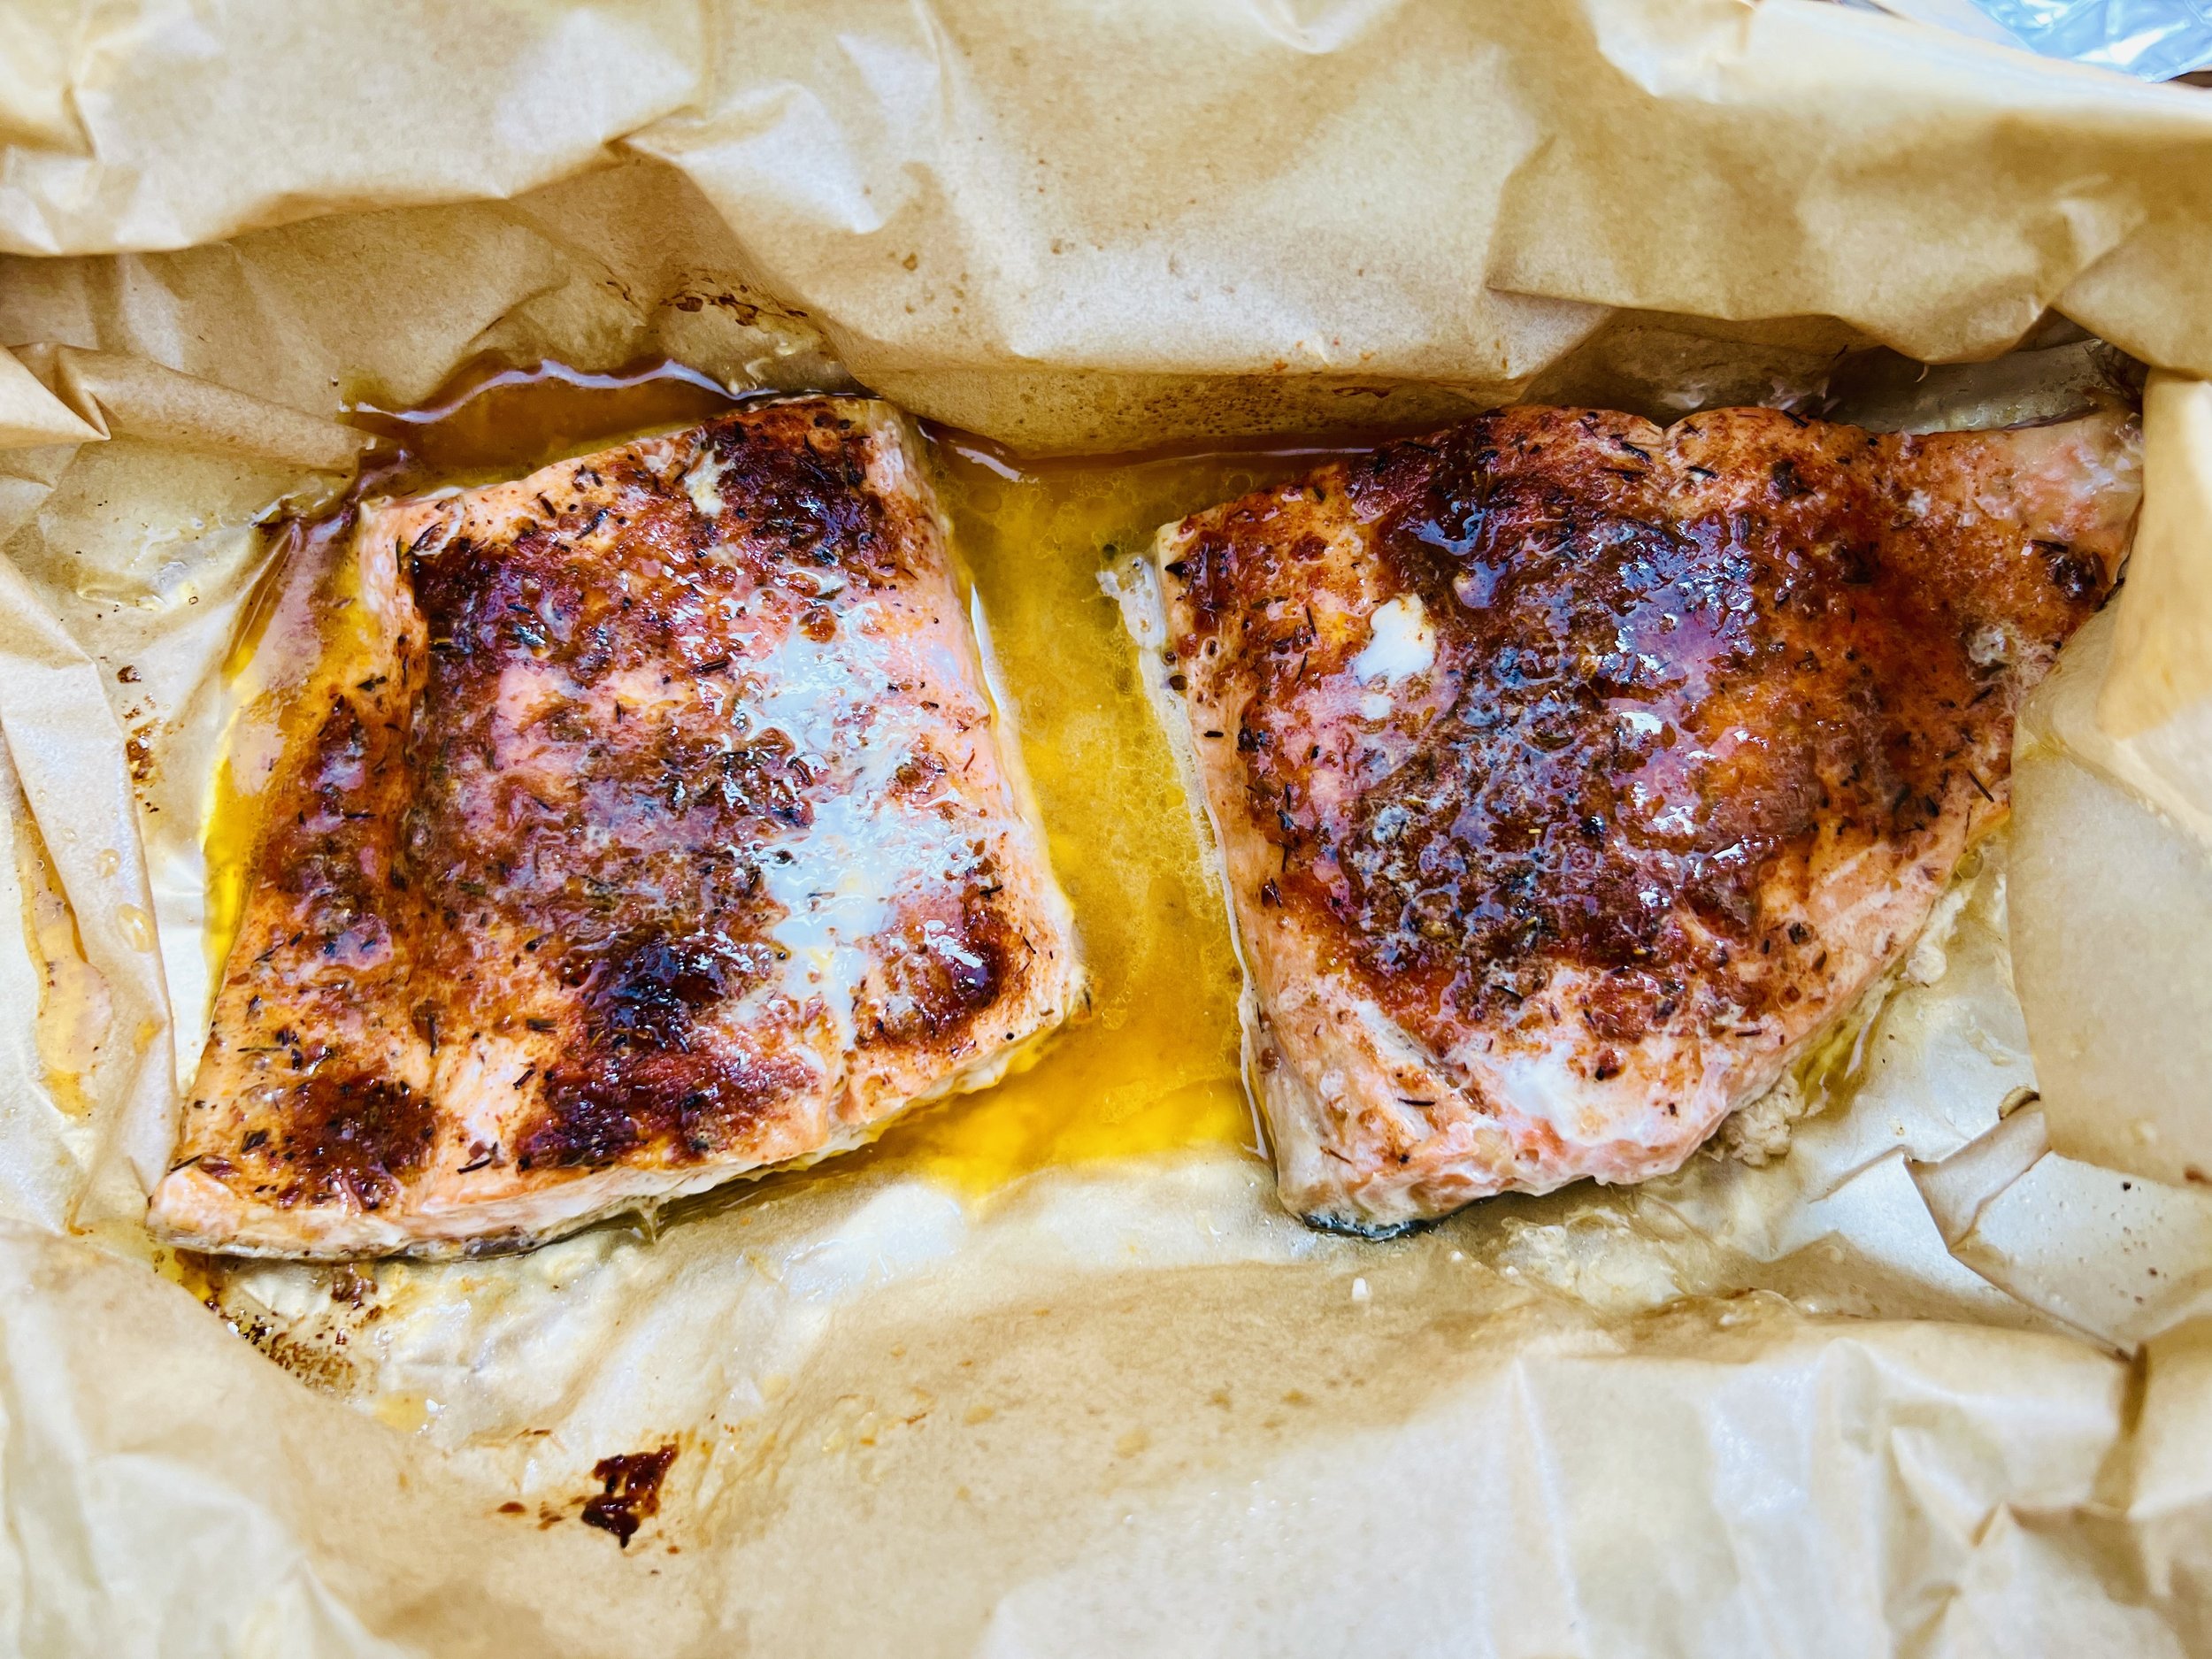
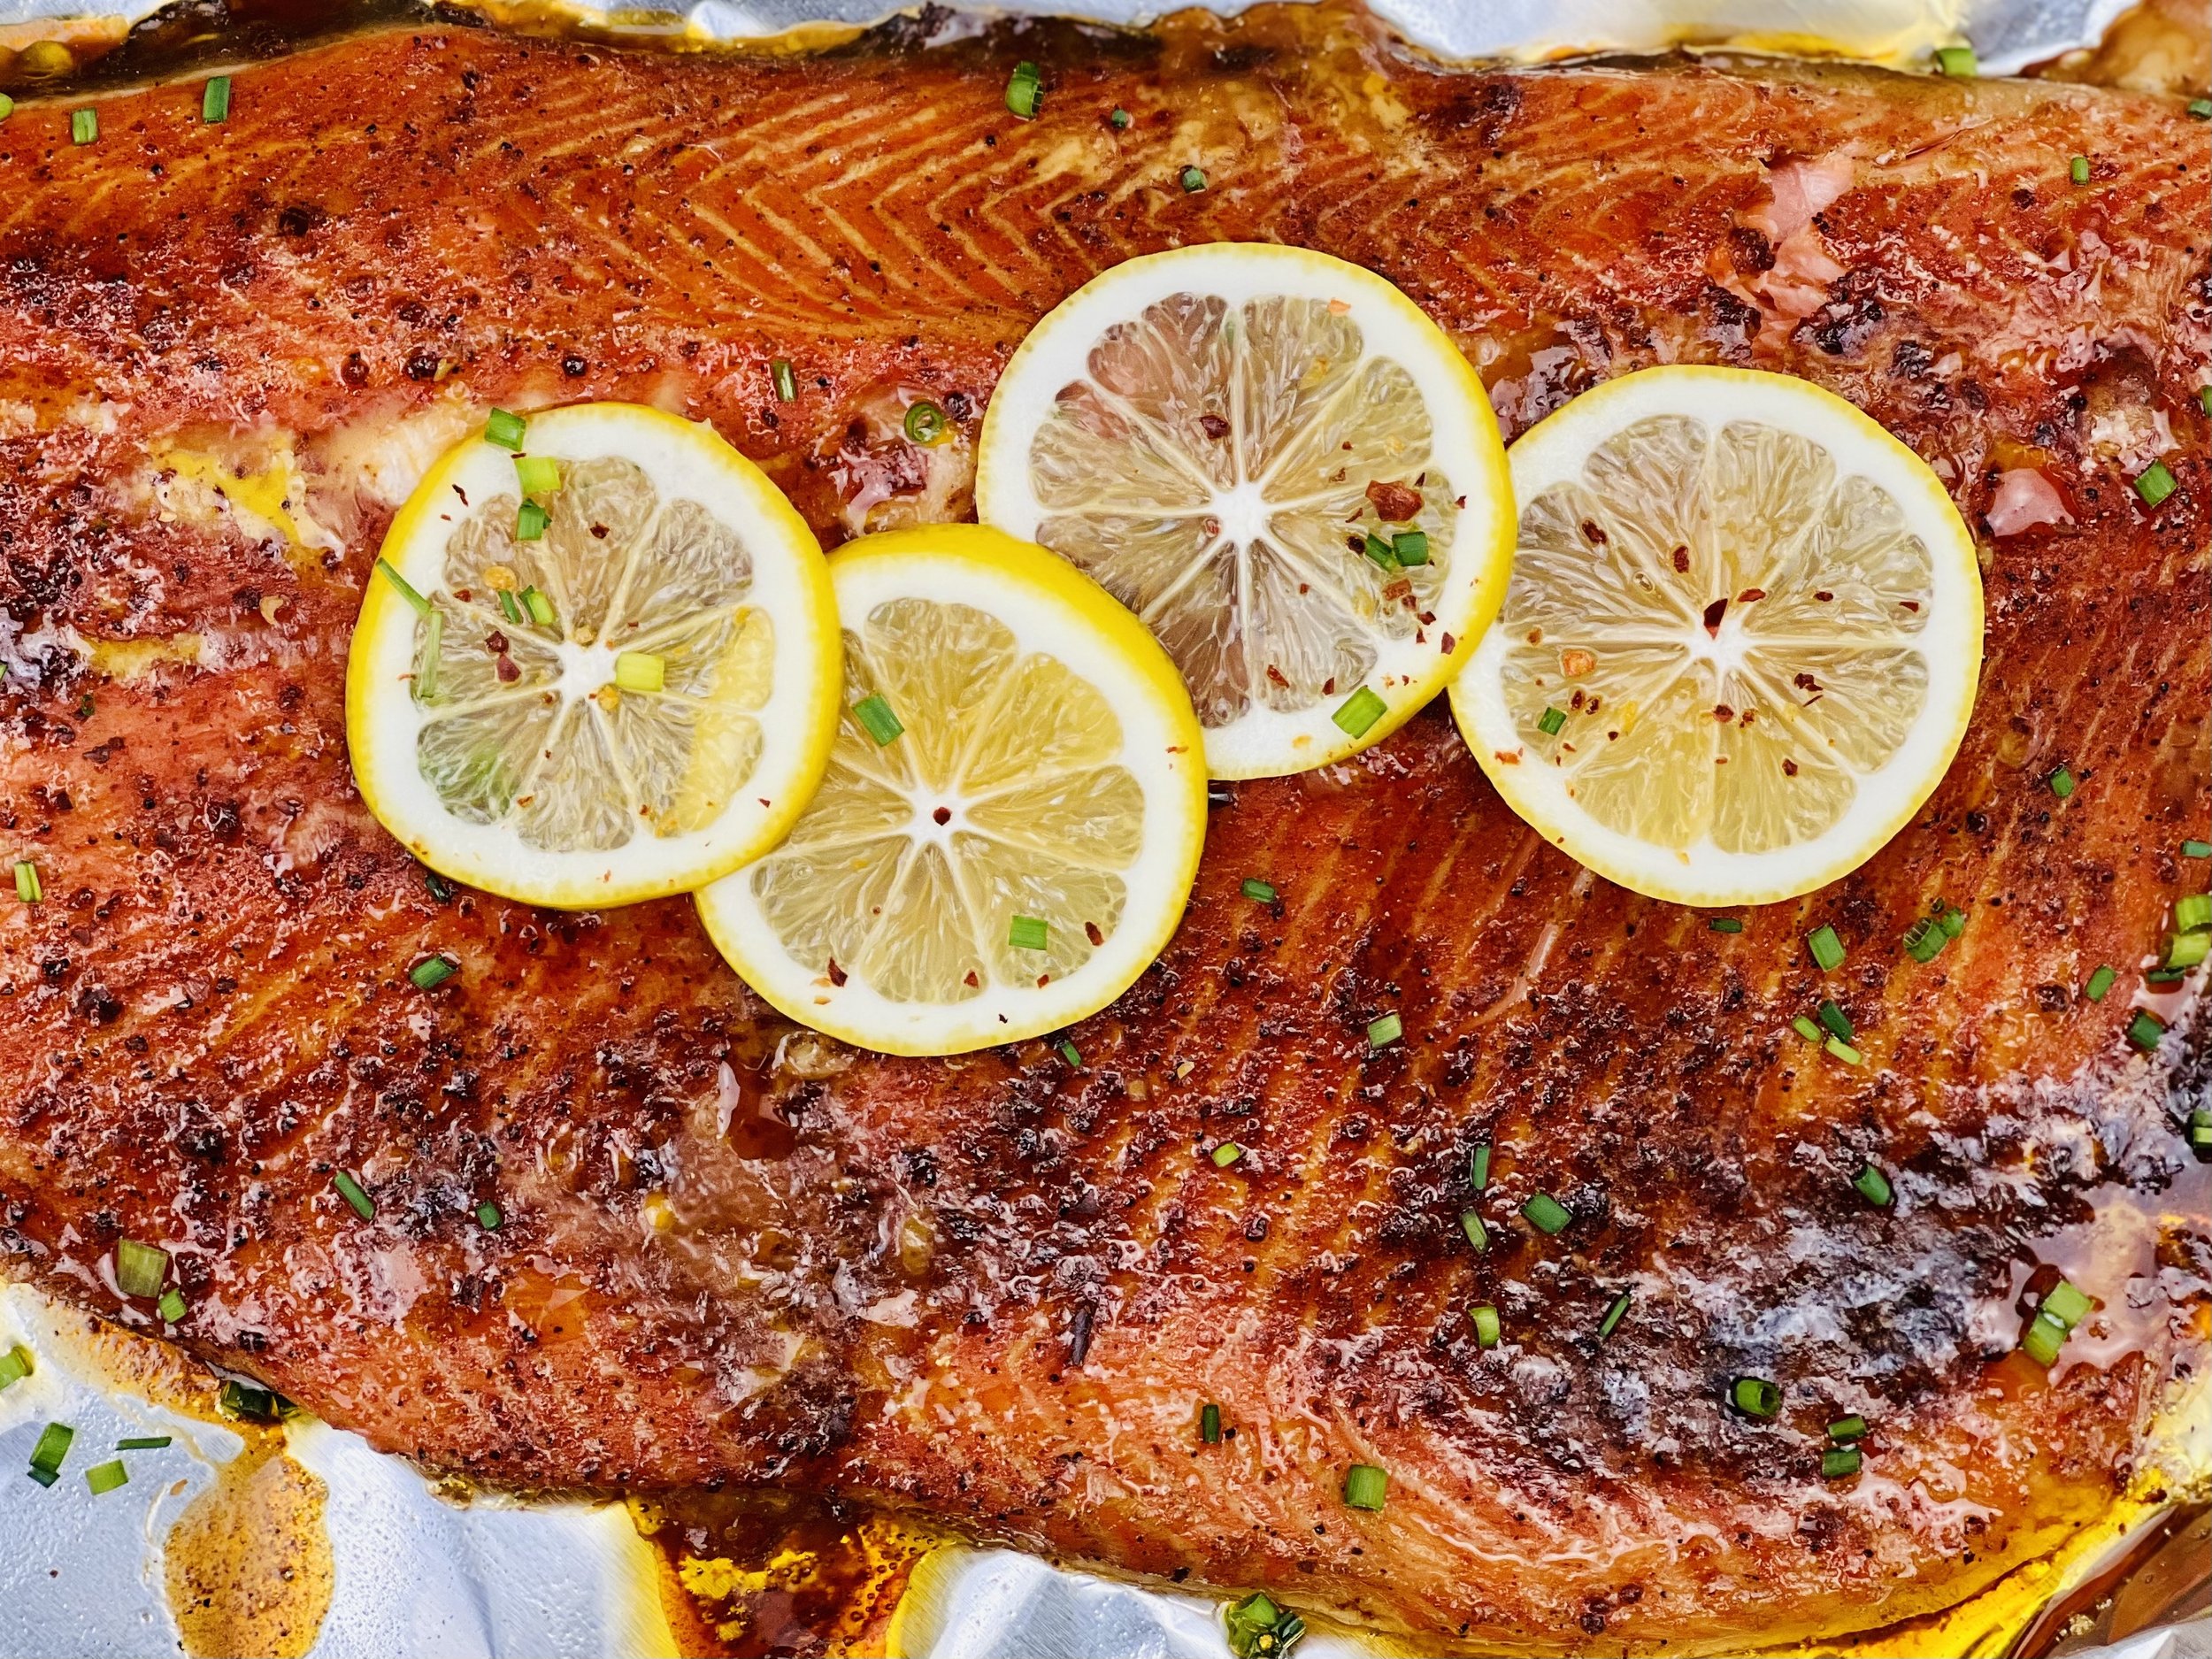
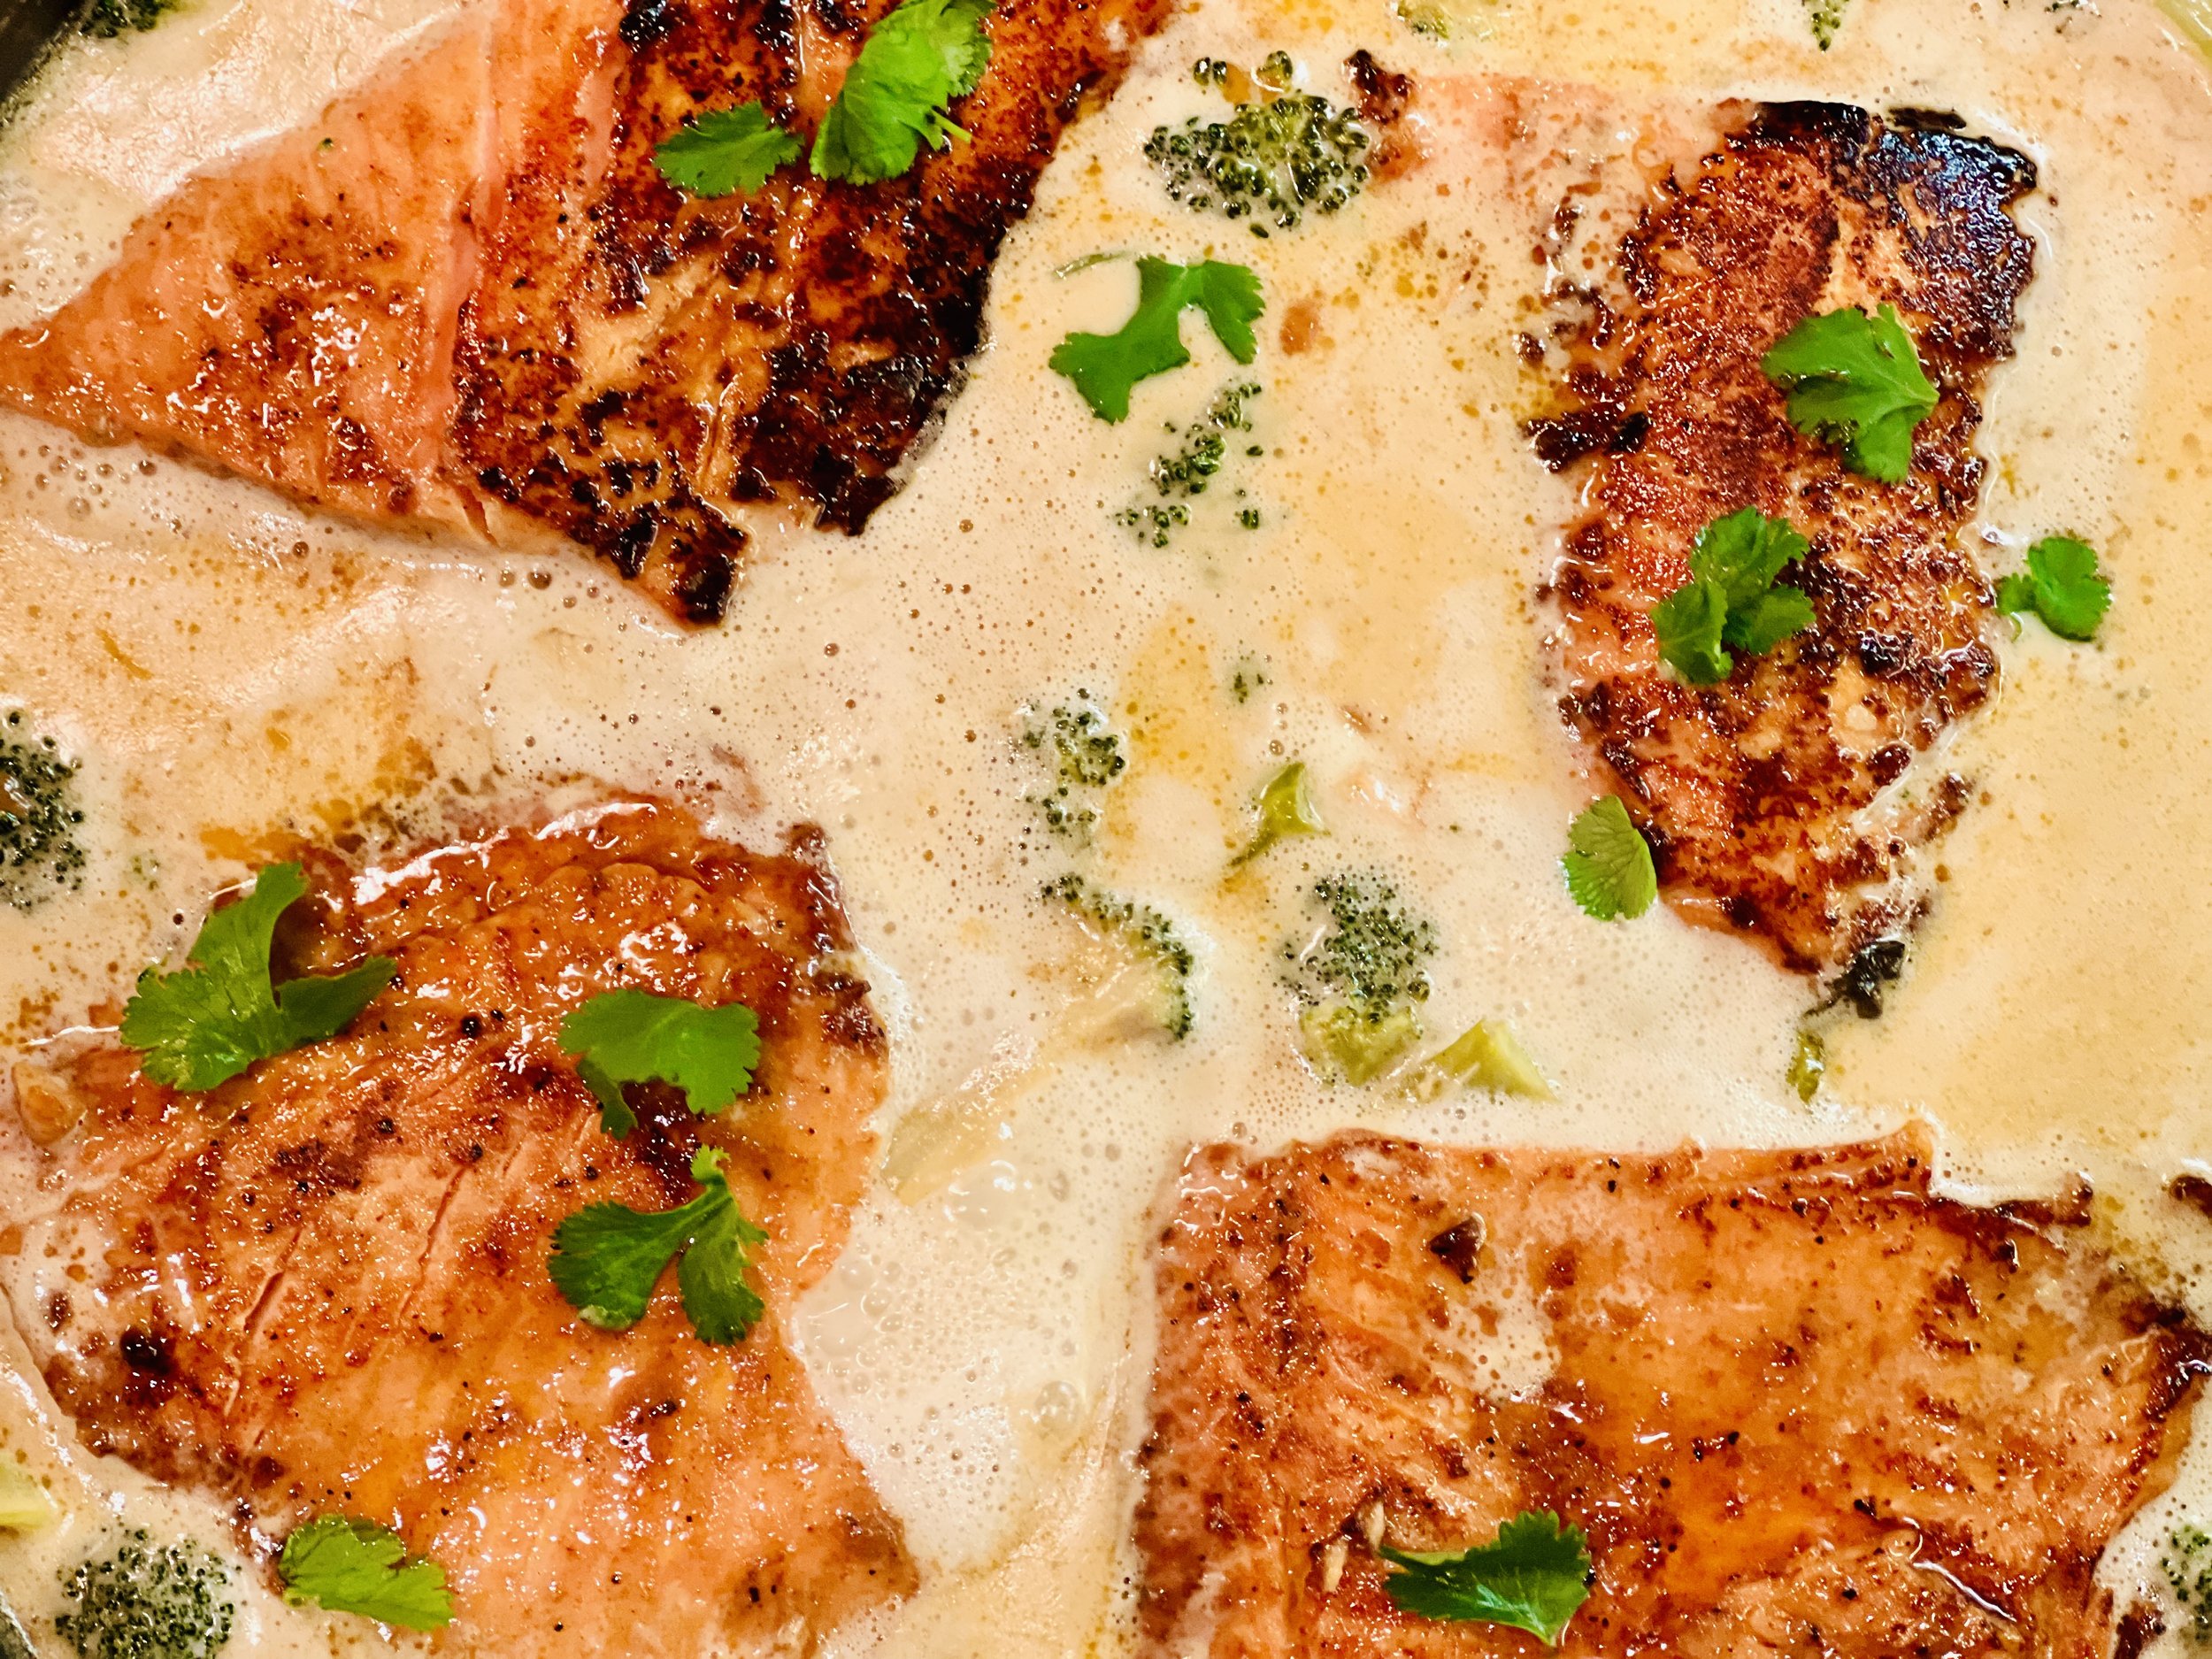
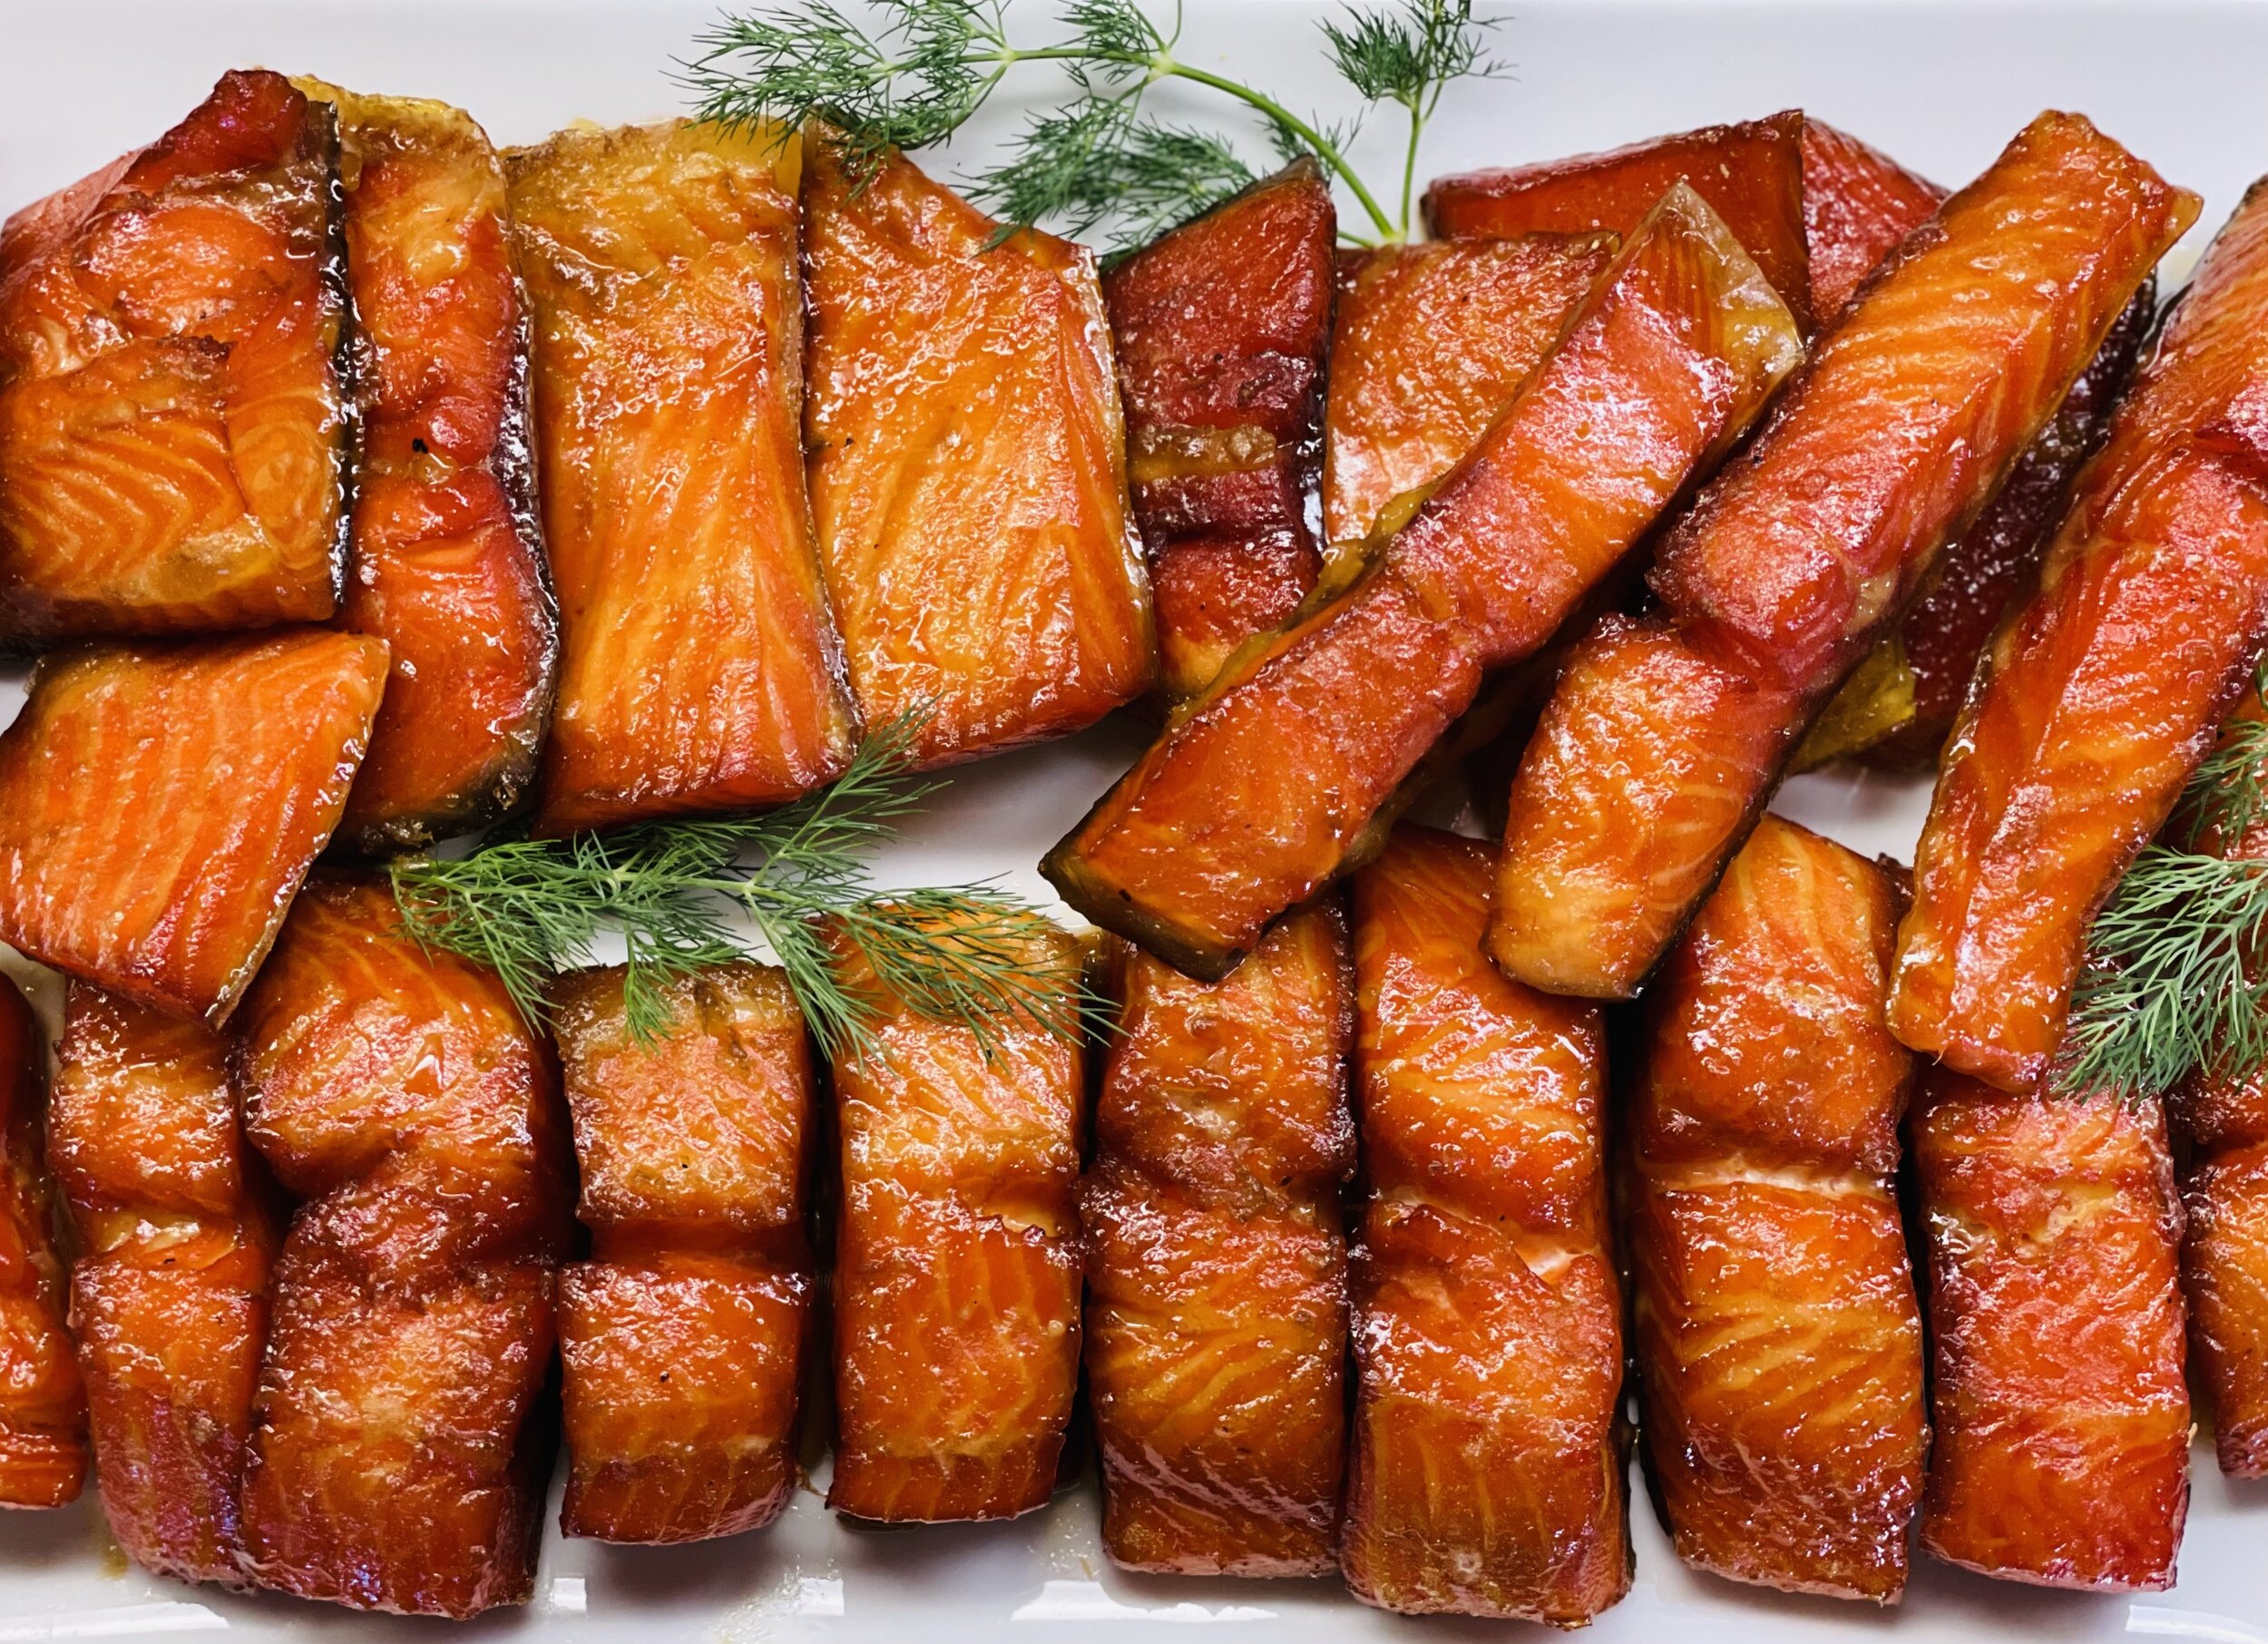
Smoked Salmon with Lemon Dill Cream (low FODMAP)
10 Minutes + overnight prep • 3 - 4 hours cook • Low FODMAP • Gluten-Free • Lactose-free • Serves 6 • Ok to make-ahead: Steps 1 - 7
10 Minutes + overnight prep • 3 - 4 hours cook • Low FODMAP • Gluten-Free • Lactose-free • Serves 6+ • Ok to make-ahead: Steps 1 - 7
Smoked salmon prepared in this way is not only delicious, it gets a wonderful color and sheen so it’s a beautiful centerpiece for any table. Even if you're not a huge salmon fan, I encourage you to try this recipe. You might just discover you love it and you will surely get rave reviews. This will serve 6 or more as a hearty main course. You can also prepare it ahead and serve it as the main event in our Salmon Salad with Balsamic Mustard Vinaigrette.
Ingredients: Brine and Salmon
1 cup whisky or gin (I prefer whisky and I used Jameson double-casked)
1 cup water
1 cup dark brown sugar plus more for sprinkling on the salmon before cooking
1/2 cup Kosher salt
1 cup maple syrup
1 tablespoon fresh ground black pepper
3 pounds of skin-on salmon (Steelhead preferred)
Additional maple syrup for basting during cooking
Ingredients: Lemon Dill Cream
3/4 cup lactose-free sour cream
2 teaspoons Dijon mustard
1 teaspoon Smoke N Sanity Essence of Garlic Salt (use code IBSGC10 for a 10% discount)
OR 1 teaspoon Kosher salt
2 1/2 tablespoons fresh dill, finely chopped
1/2 teaspoon granulated sugar
Zest of 1 lemon
Juice or 1/2 - 1 lemon (add half, taste and add more if needed)
1 tablespoon garlic-infused olive oil, if needed, to thin the sauce
Additional Kosher salt to your taste
Directions
(1) Prepare the brine: In a saucepan, combine the brine ingredients and heat over medium heat, stirring frequently, until the salt and sugar have dissolved. Do not boil. Remove from the heat and let cool.
(2) Brine the salmon: Meanwhile, cut the salmon into pieces of approximately equal size (about 2 - 4 ounces each). Put the salmon pieces into the cooled brine submerging the fish as much as possible. Cover and refrigerate for 8 hours or overnight.
(3) Prepare the salmon: Once the salmon has been brined, pour the brine off, rinse the salmon, and pat dry. Then lay the salmon on a rimmed baking sheet and sprinkle with brown sugar. Let sit for an hour.
(4) Prepare the smoker: When ready to cook, place a piece of heavy-duty foil directly on the smoker grate, set your smoker to 180 degrees F, and preheat, lid closed for 15 minutes.
(5) Cook the salmon: Transfer the salmon to the foil on the smoker grill grate. Close the lid and smoke the salmon for 3 to 4 hours or until cooked through (the interior of the fish will be flaky and opaque). For best results, brush the salmon every hour or so with maple syrup during cooking.
(6) Prepare the lemon dill cream: Combine all ingredients except the garlic-infused olive oil in a small bowl and stir well to combine. If needed, add a bit of garlic-infused olive oil to thin the cream. Taste and add additional salt as needed to your taste. Chill until ready to serve.
(7) Finish: When cooked, remove salmon to a platter and garnish with fresh dill. If not serving right away, hold the garnish and cover with a layer of parchment and then a layer of foil to keep warm or to refrigerate until ready to serve.
Make-ahead note: This recipe calls for overnight brining and it smokes for 3 – 4 hours all of which can be done ahead. The salmon is delicious right away or served chilled so you can do all of this ahead of time.
(8) Plate and serve: Serve hot or chilled with lemon dill cream alongside.
Eat and enjoy every bite because you can!
This post may contain affiliate links so you can easily purchase items listed on the page. In some cases, we have provided a special discount code for IBS Game Changers so be sure to use it when you purchase an item to get the discount that has been arranged just for you!
More Deliciously Low FODMAP™ seafood recipes you might enjoy


NEW Classic Lemon Meringue Pie (low FODMAP)
30 Minutes prep • 4 hours (or overnight) chill • Low FODMAP • Gluten-Free • Serves 8 • Ok to make-ahead: Steps 1 - 9
30 Minutes prep • 4 hours (or overnight) chill • Low FODMAP • Gluten-Free • Serves 8 • Ok to make-ahead: Steps 1 - 9
My grandma Katherine made AMAZING pies and she always said your lemon pie should be tart enough to “make your eyebrows sweat.” This new version of a classic recipe is just the right combination of tart and sweet, with a creamy Swiss meringue topping a smooth and lemony filling all piled high in our Perfect Buttery Pate Brise pie crust. Sound divine? It is!

Ingredients: Pie
1 pre-baked 9-inch Perfect Buttery Pate Brise pie crust
1 1/2 cups water
1 1/2 cups granulated sugar
Juice and grated rind of two lemons (preferably Meyer)
3 tablespoons corn starch
1/4 cup granulated sugar
3 large or 4 medium egg yolks
Ingredients: Swiss Meringue
3 large or 4 medium egg whites
3/4 cup granulated sugar
1/2 teaspoon vanilla extract
1/4 teaspoon salt
Directions
(1) Make the pie crust: You may make our Perfect Buttery Pate Brise pie crust or purchase a gluten-free butter pie crust that is ready-made and pre-bake the crust in a 350 degree F oven for about 10-12 minutes until crust starts to brown lightly. Remove from oven and set aside.
(2) Prepare the filling: Put the water, sugar, lemon zest, and juice in a saucepan and bring to a boil then reduce heat to medium.
Combine cornstarch and 1/4 cup sugar in a small bowl.
Combine egg yolks with 1 tablespoon of water and blend in with the cornstarch and sugar mixture.
(3) Cook the filling: Add the cornstarch and egg yolk mixture slowly into the hot sugar water while stirring constantly over medium heat. Continue cooking and stirring over medium heat until the lemon filling thickens.
(4) Cool the filling: Remove the pan from heat and pour the filling into the prepared pie shell and cover the filling with a piece of parchment or waxed paper. (This helps the meringue stick to the filling.) Put it in the refrigerator and let it cool while you prepare the Swiss meringue.
Make-ahead note: Because it needs time to chill, this pie does well when you make it many hours ahead or even the day before you want to serve it. You can make it through step 4 and chill overnight or you can make the entire pie and chill it.
(5) Prepare the Swiss meringue: Whisk the egg whites and sugar together in the bowl of a stand mixer.
(6) Cook the meringue: Bring a saucepan with a few inches of water to a simmer. Set the mixer bowl over the simmering water, making sure the water does not touch the bottom of the bowl.
Continuously, but gently, stir the mixture until the egg whites are very warm to the touch and the sugar has completely dissolved (about 4 minutes). Test by dipping a finger into the mixture and rubbing it between your fingers—the mixture should not feel grainy or gritty at all and should be very warm to the touch.
(7) Preheat your broiler.
(8) Whip the meringue: While the broiler is heating, whip the egg whites on medium-high until stiff peaks form. Add in the salt and vanilla extract and whip to combine well.
(9) Finish: Remove the parchment or waxed paper from the surface of the pie filling then spread the meringue on top of the filling and make decorative piques with your spreading knife. Make sure to spread the meringue all the way to the crust.
Put the pie under the broiler and cook for 20 to 60 seconds, or until the meringue is golden brown with some deeply caramelized spots. Watch it while it cooks so it doesn’t get overly brown!
Remove the pie from the oven and cool completely in the refrigerator before slicing and serving.
(10) Serve: Garnish with a sprinkling of grated lemon peel if you like.
This pie is wonderful served the day that it’s made but if you have any pie left keep it in an airtight container in the fridge. It will still be delicious the next day.
Eat and enjoy every bite because you can!
This post may contain affiliate links so you can easily purchase items listed on the page. In some cases, we have provided a special discount code for IBS Game Changers so be sure to use it when you purchase an item to get the discount that has been arranged just for you!
More Deliciously Low FODMAP™ desserts you might enjoy
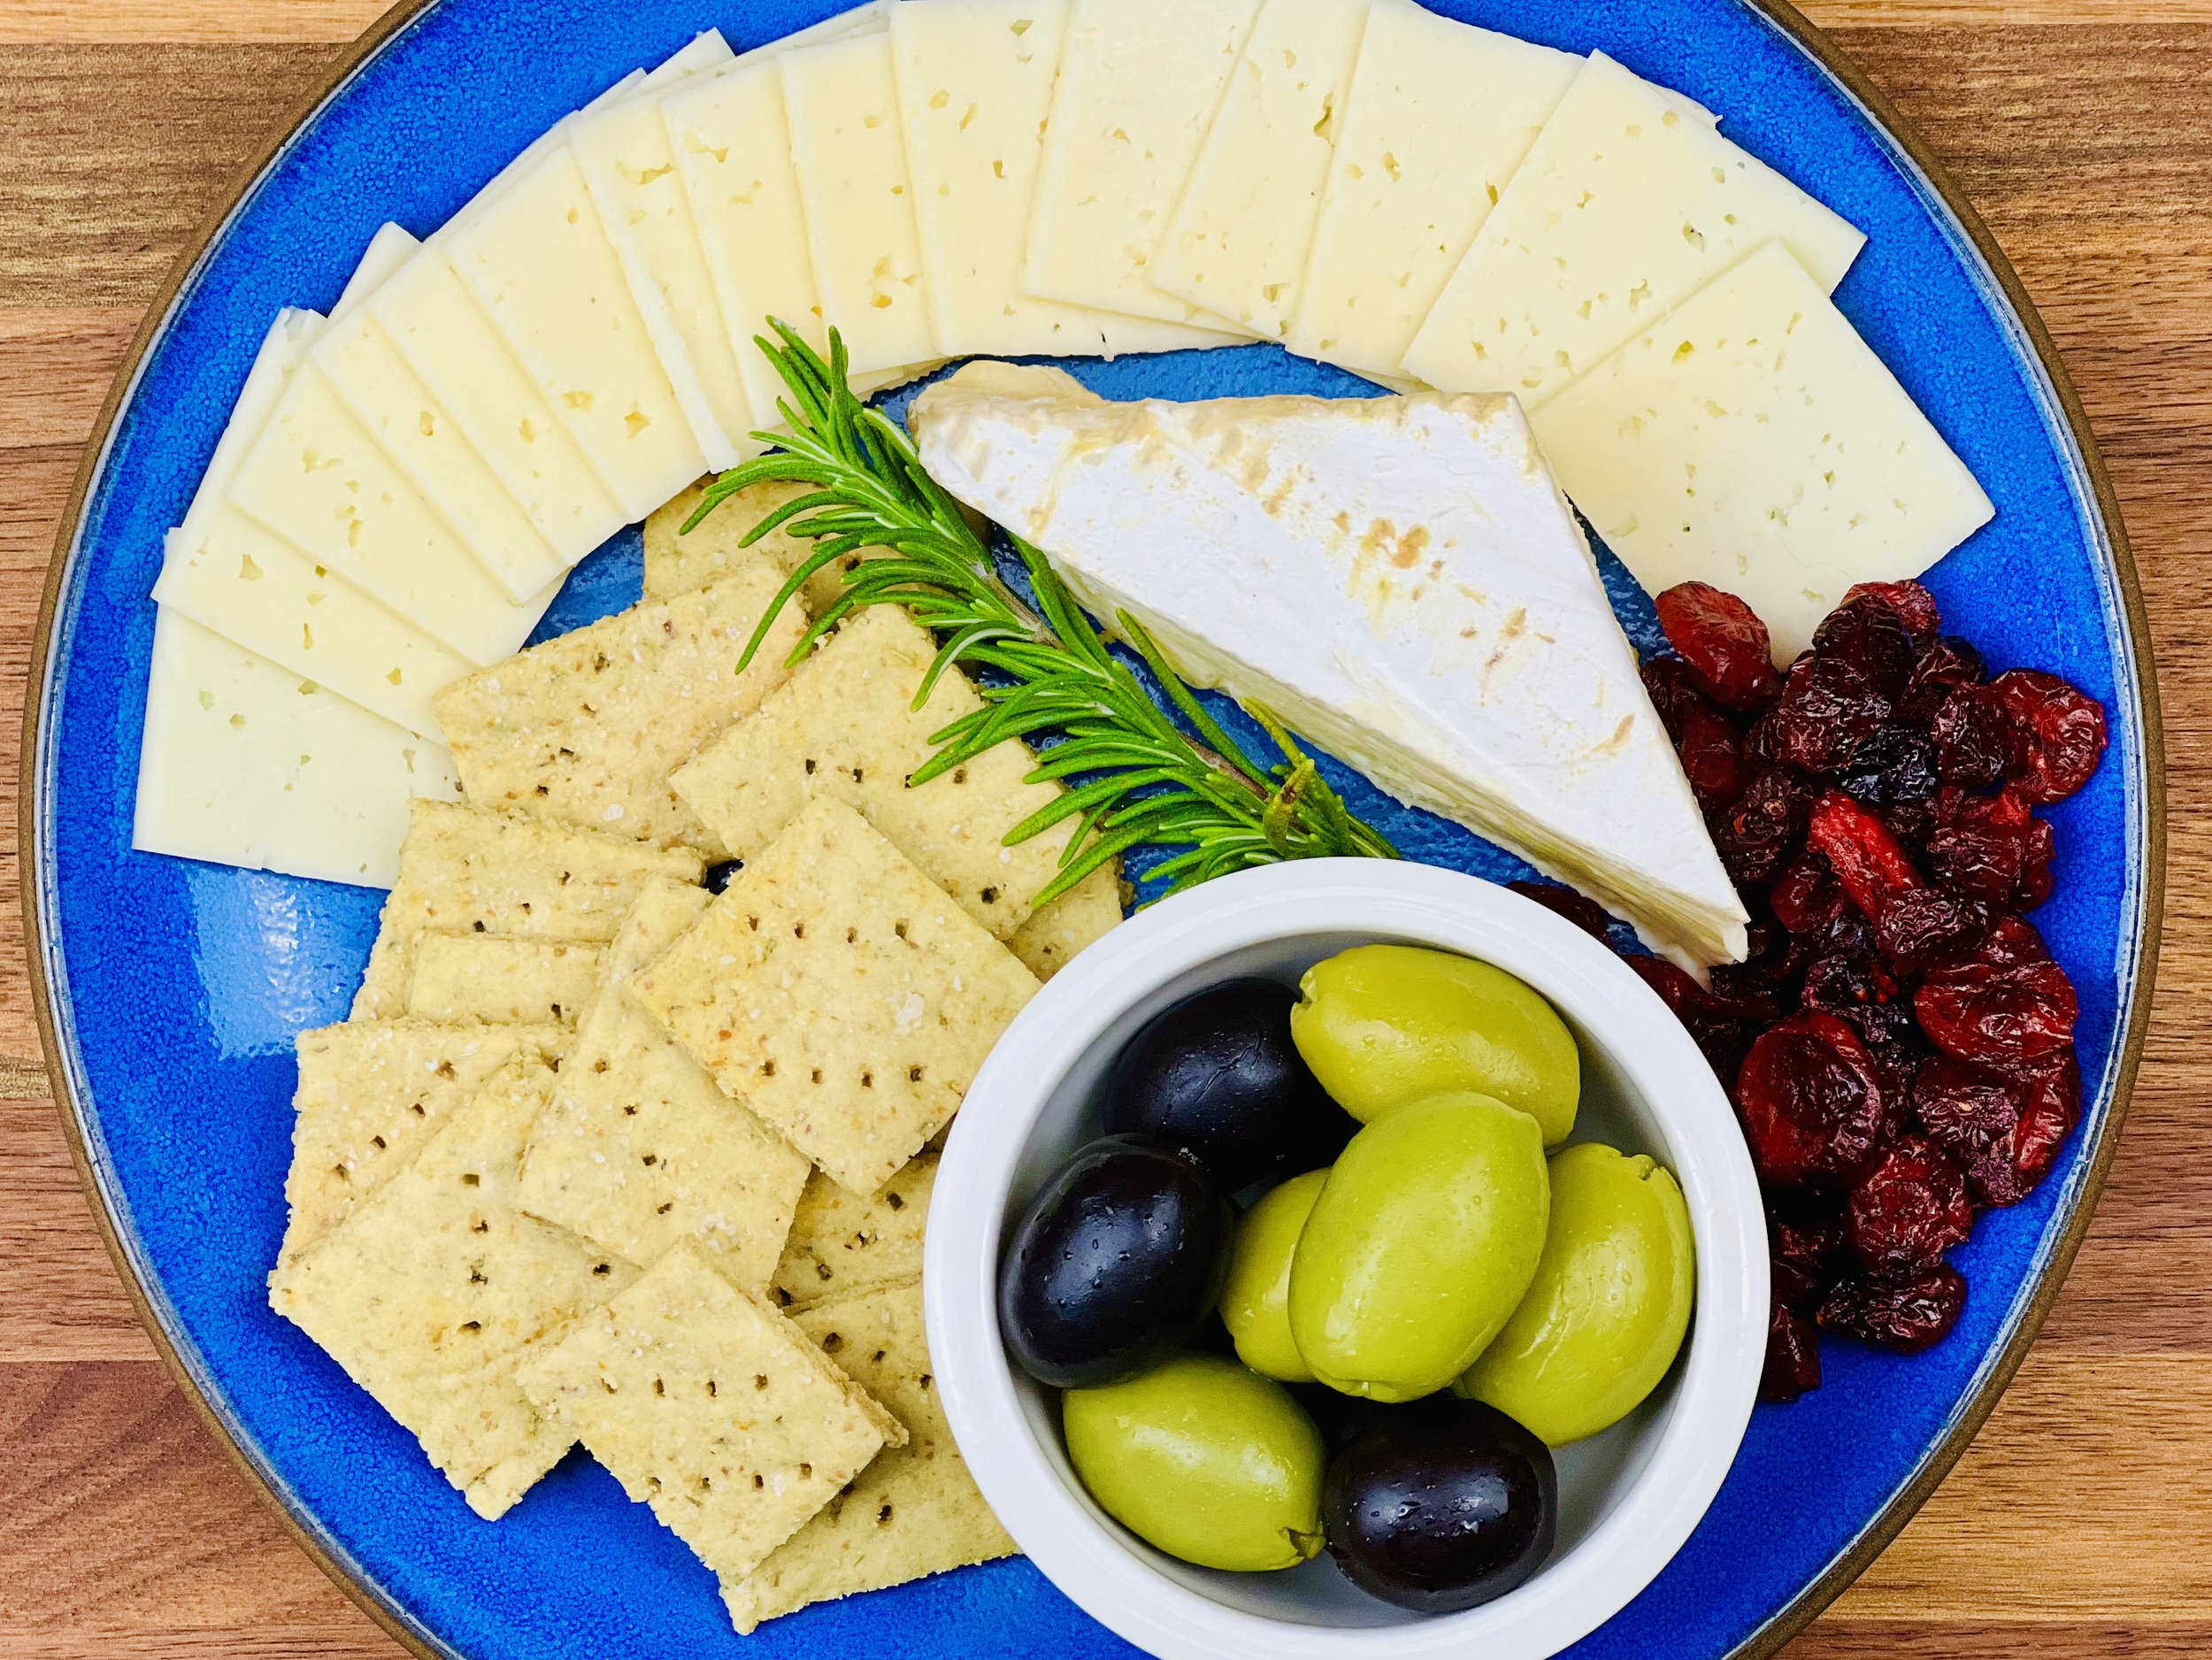
Artisan Cheeseboard (low FODMAP)
30 - 60 Minutes prep • 10 - 15 Minutes cook • Low FODMAP • Gluten-Free • Vegetarian • Serves 1 - many • Ok to make-ahead: Steps 1 - 4
20 Minutes prep • Low FODMAP • Gluten-Free • Vegetarian • Serves 1 to many • Ok to make ahead: Steps 1-4
Having hors d’oeuvres can be tricky when you have IBS because so many appetizers have mystery ingredients that you can’t be sure you can tolerate. A cheeseboard is a perfectly beautiful and appetizing way to display your hors d’oeuvres in such a way that your guests can choose what suits them to eat. Combine different cheeses in different textures and sizes. Add a variety of olives, nuts, gluten-free crackers, and grapes. Display with some herbs and you’ve got a beautiful edible centerpiece for your appetizer table. And it’s one you what everyone can enjoy. Can’t get delicious cheese where you live? Check out Rogue Valley Creamery and their cheese club. This West Coast cheesemaker is amazing and their cheeses are simply to die for.
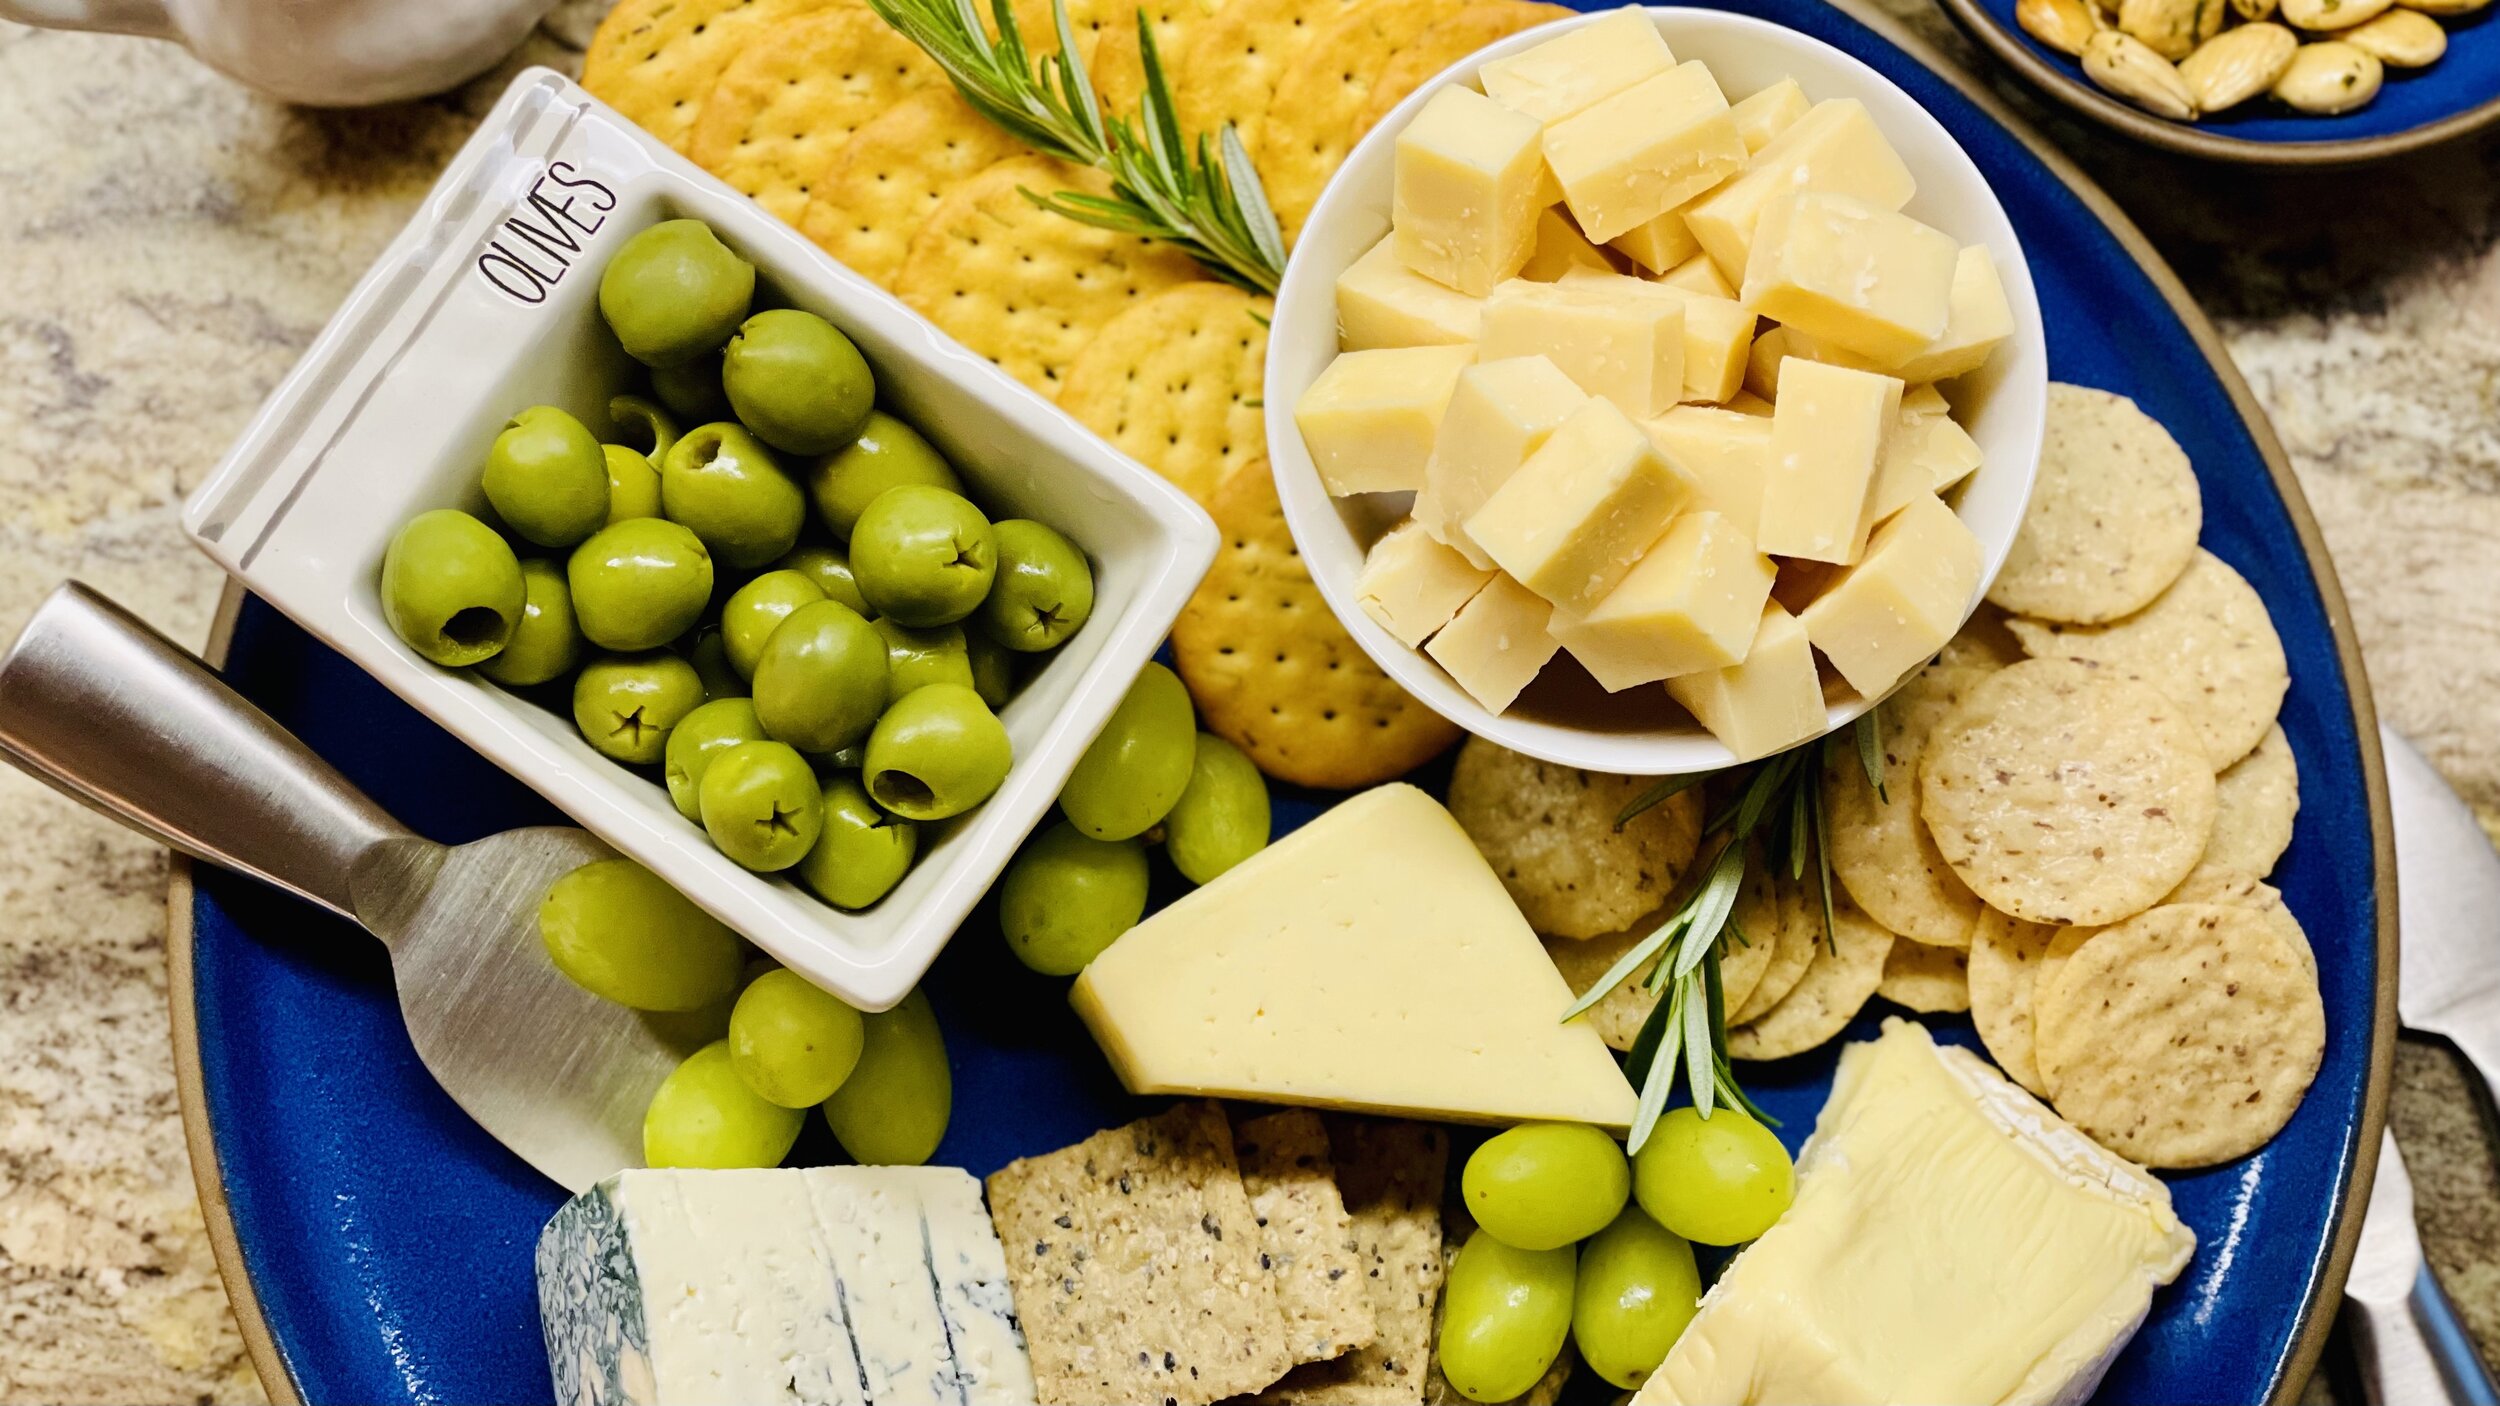
Ingredients
A variety of low lactose cheeses such as cheddar, brie, Havarti, blue cheese, gruyere, swiss cheese, etc.
A variety of olives such as classic black olives, Kalamata, Castelvetrano, Picholine, etc. Just make sure they are not combined with garlic or onions or other high FODMAP ingredients.
A variety of gluten-free crackers such as Blue Diamond Almond Nut Thins, Artisan Nut Thins with Flax, etc.
Some homemade low FODMAP crackers such as our Squarefish Cheesy Cracker Crisps
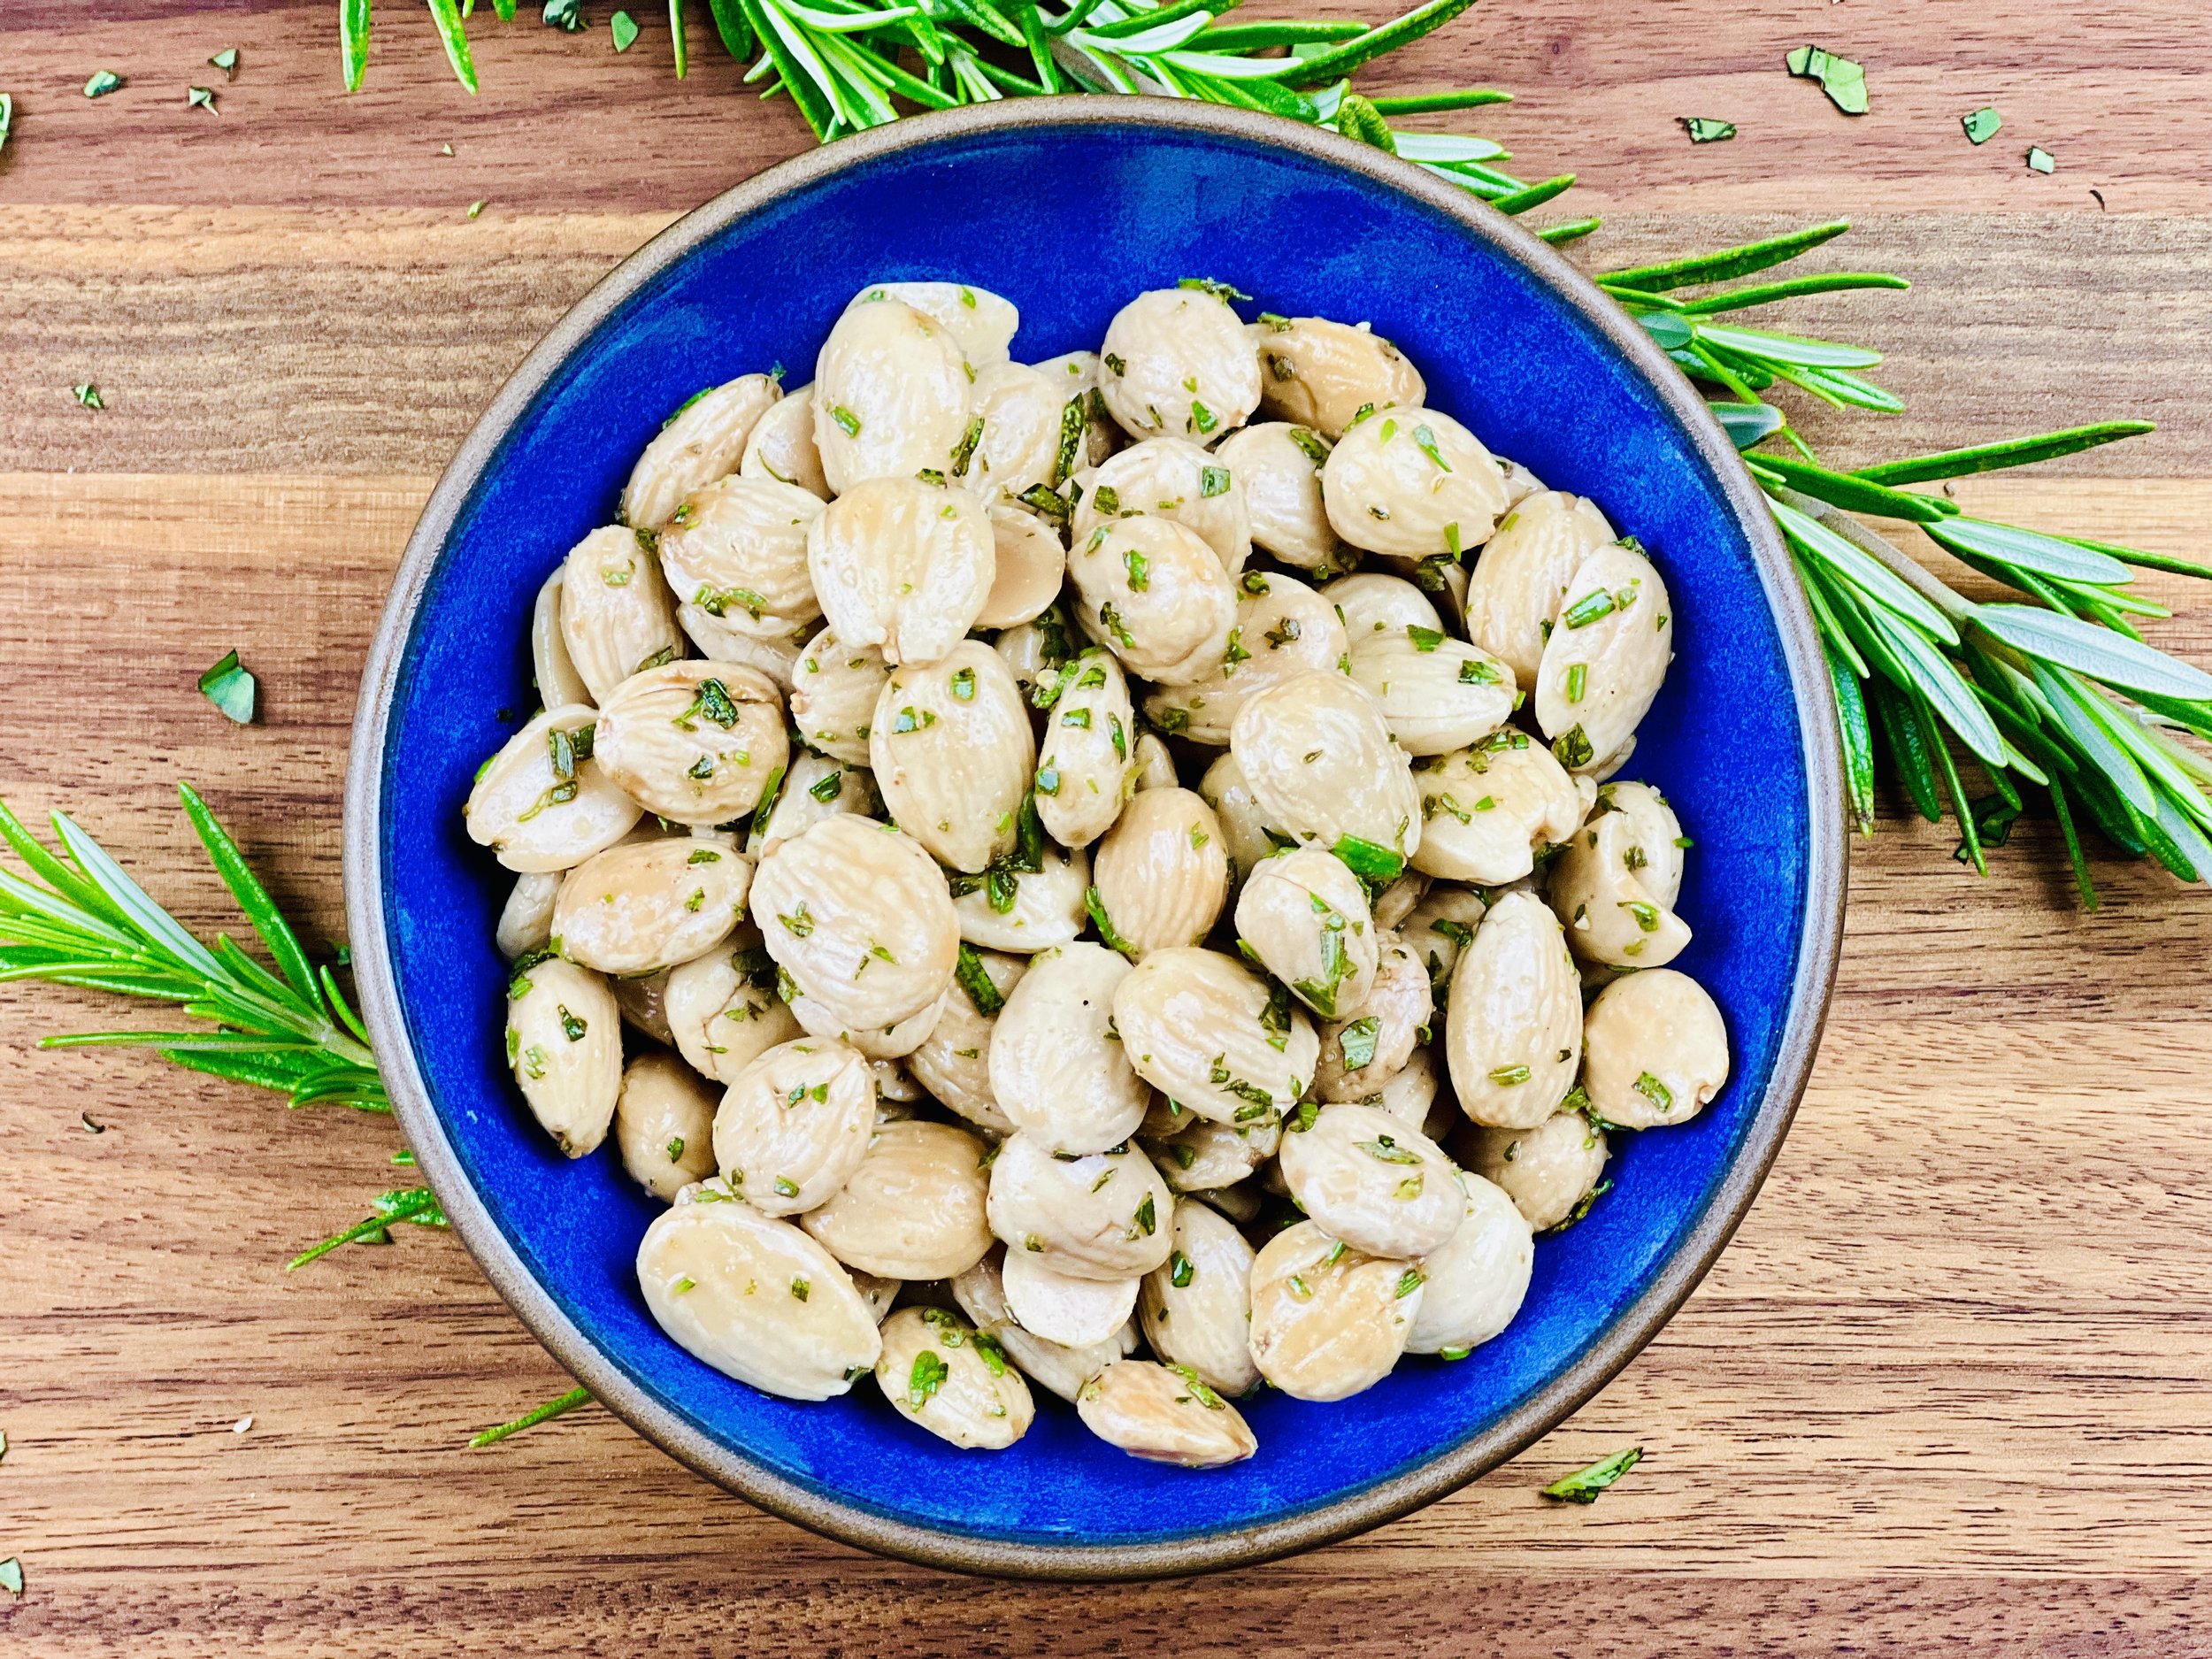
Marcona almonds sauteed with fresh rosemary or other interesting nuts
Candied pecans or walnuts
Grapes and rosemary sprigs for serving
Directions
(1) Prepare your cheese: See make-ahead note but if you’re cubing any of your cheeses, do that while the cheese is cold as it’s easier to cut that way. Add olives, crackers, nuts, grapes, and garnish closer to your serving time to ensure they have their best flavor and crunch.)
(2) Prepare your nuts: Want to add a touch of sweetness to your cheeseboard? Serve with our delicious Spiced Candied Pecans.
Serving rosemary Marcona almonds? Marcona almonds are a bit sweeter than traditional almonds and they are delightful with some fresh rosemary.
Here’s how I prepare rosemary Marcona almonds: Put a bit of olive oil in a frying pan. When the oil is hot, add a tablespoon of finely chopped rosemary and saute for about 30 seconds. Add the nuts and saute for another minute. Remove from the heat. Taste, add some Kosher salt if needed, toss, and serve.
Low FODMAP servings of some nuts are:
32 peanuts
20 macadamia nuts
10 pecan halves
10 walnut halves
10 almonds
(3) Prepare your crackers: Want to add a delicious and fun cracker to your display? Make our Squarefish Cheesy Cracker Crisps.
(4) Prepare your other ingredients: Cut grapes into small bunches that can be picked up and eaten. Cut some fresh herbs for garnish.
Make-ahead note: Marcona almonds, candied pecans, and Squarefish can be made up to a day ahead. All cheese should be served at room temperature for the best flavor so lay your cheeses out on your tray, loosely cover, and let sit at room temperature for an hour or two (depending on how warm it is) before your guests arrive.
(5) Finish: Add olives, crackers, nuts, grapes, and garnish to your tray
(6) Serve: Provide cheese knives, small spoons, cocktail napkins, toothpicks (and a place to discard used toothpicks), small plates, a small pitcher of maple syrup for anyone wanting a drizzle of sweetness on their cheese, and display.
Eat and enjoy every bite because you can!
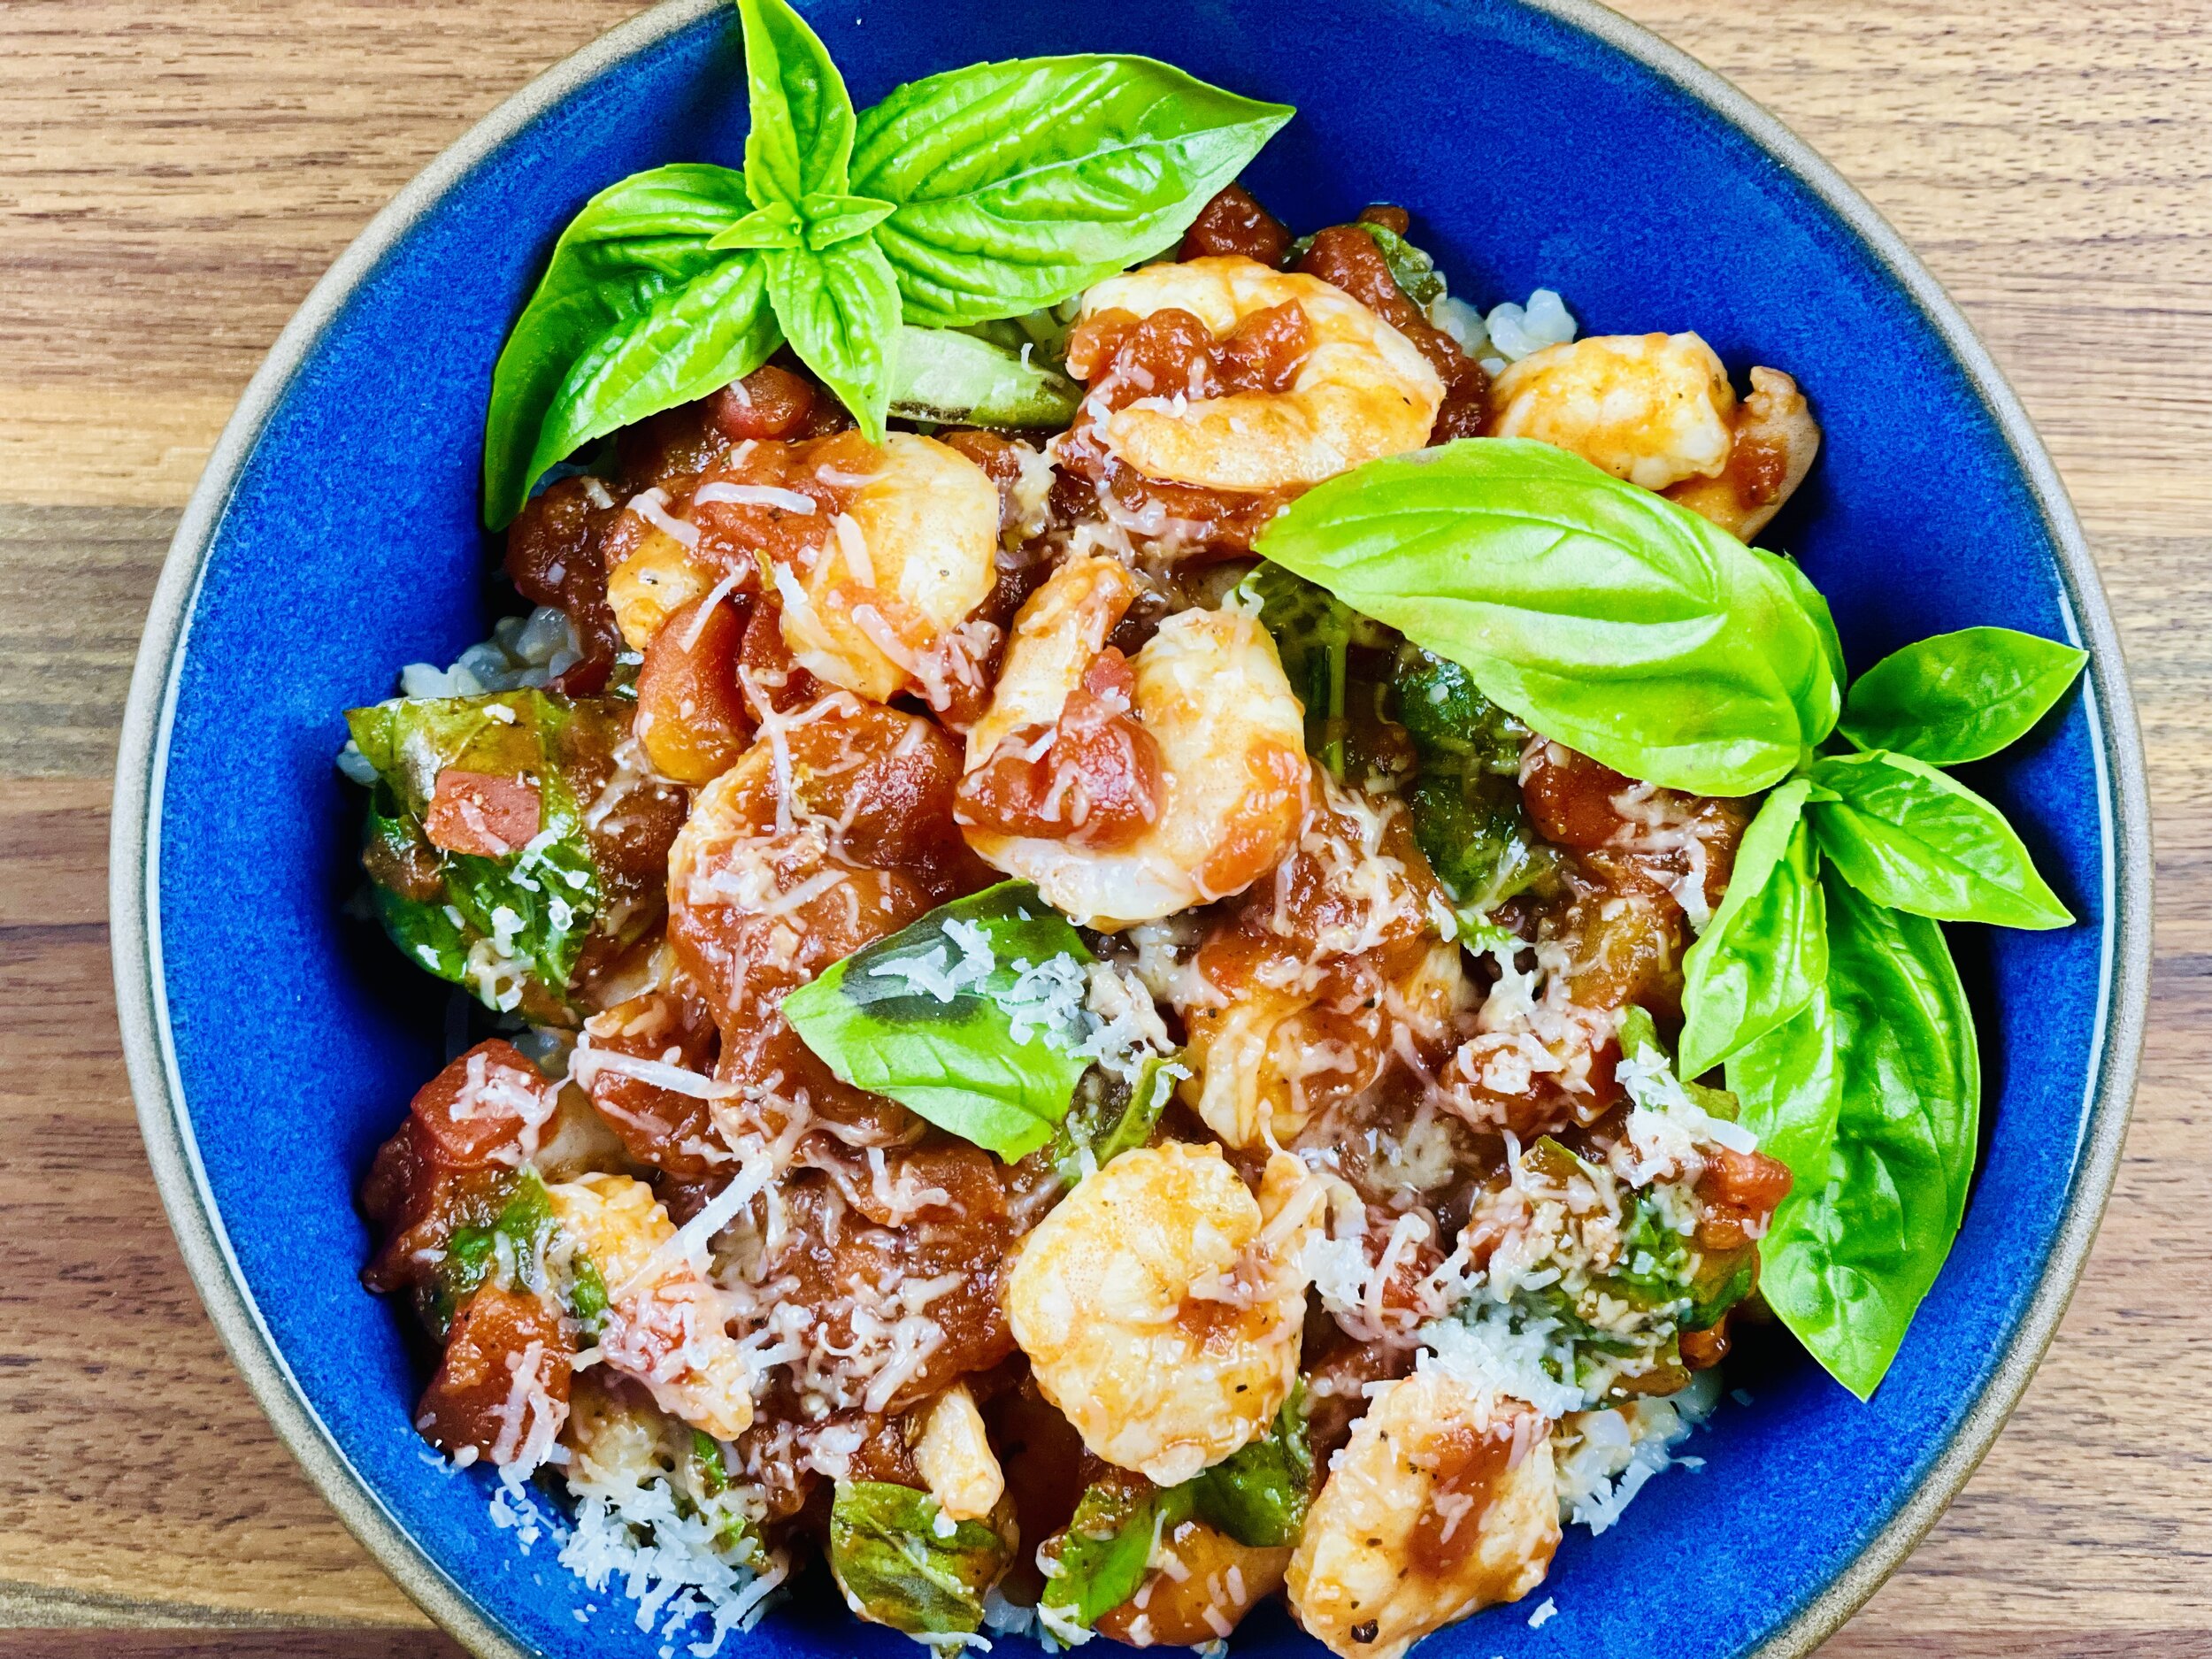
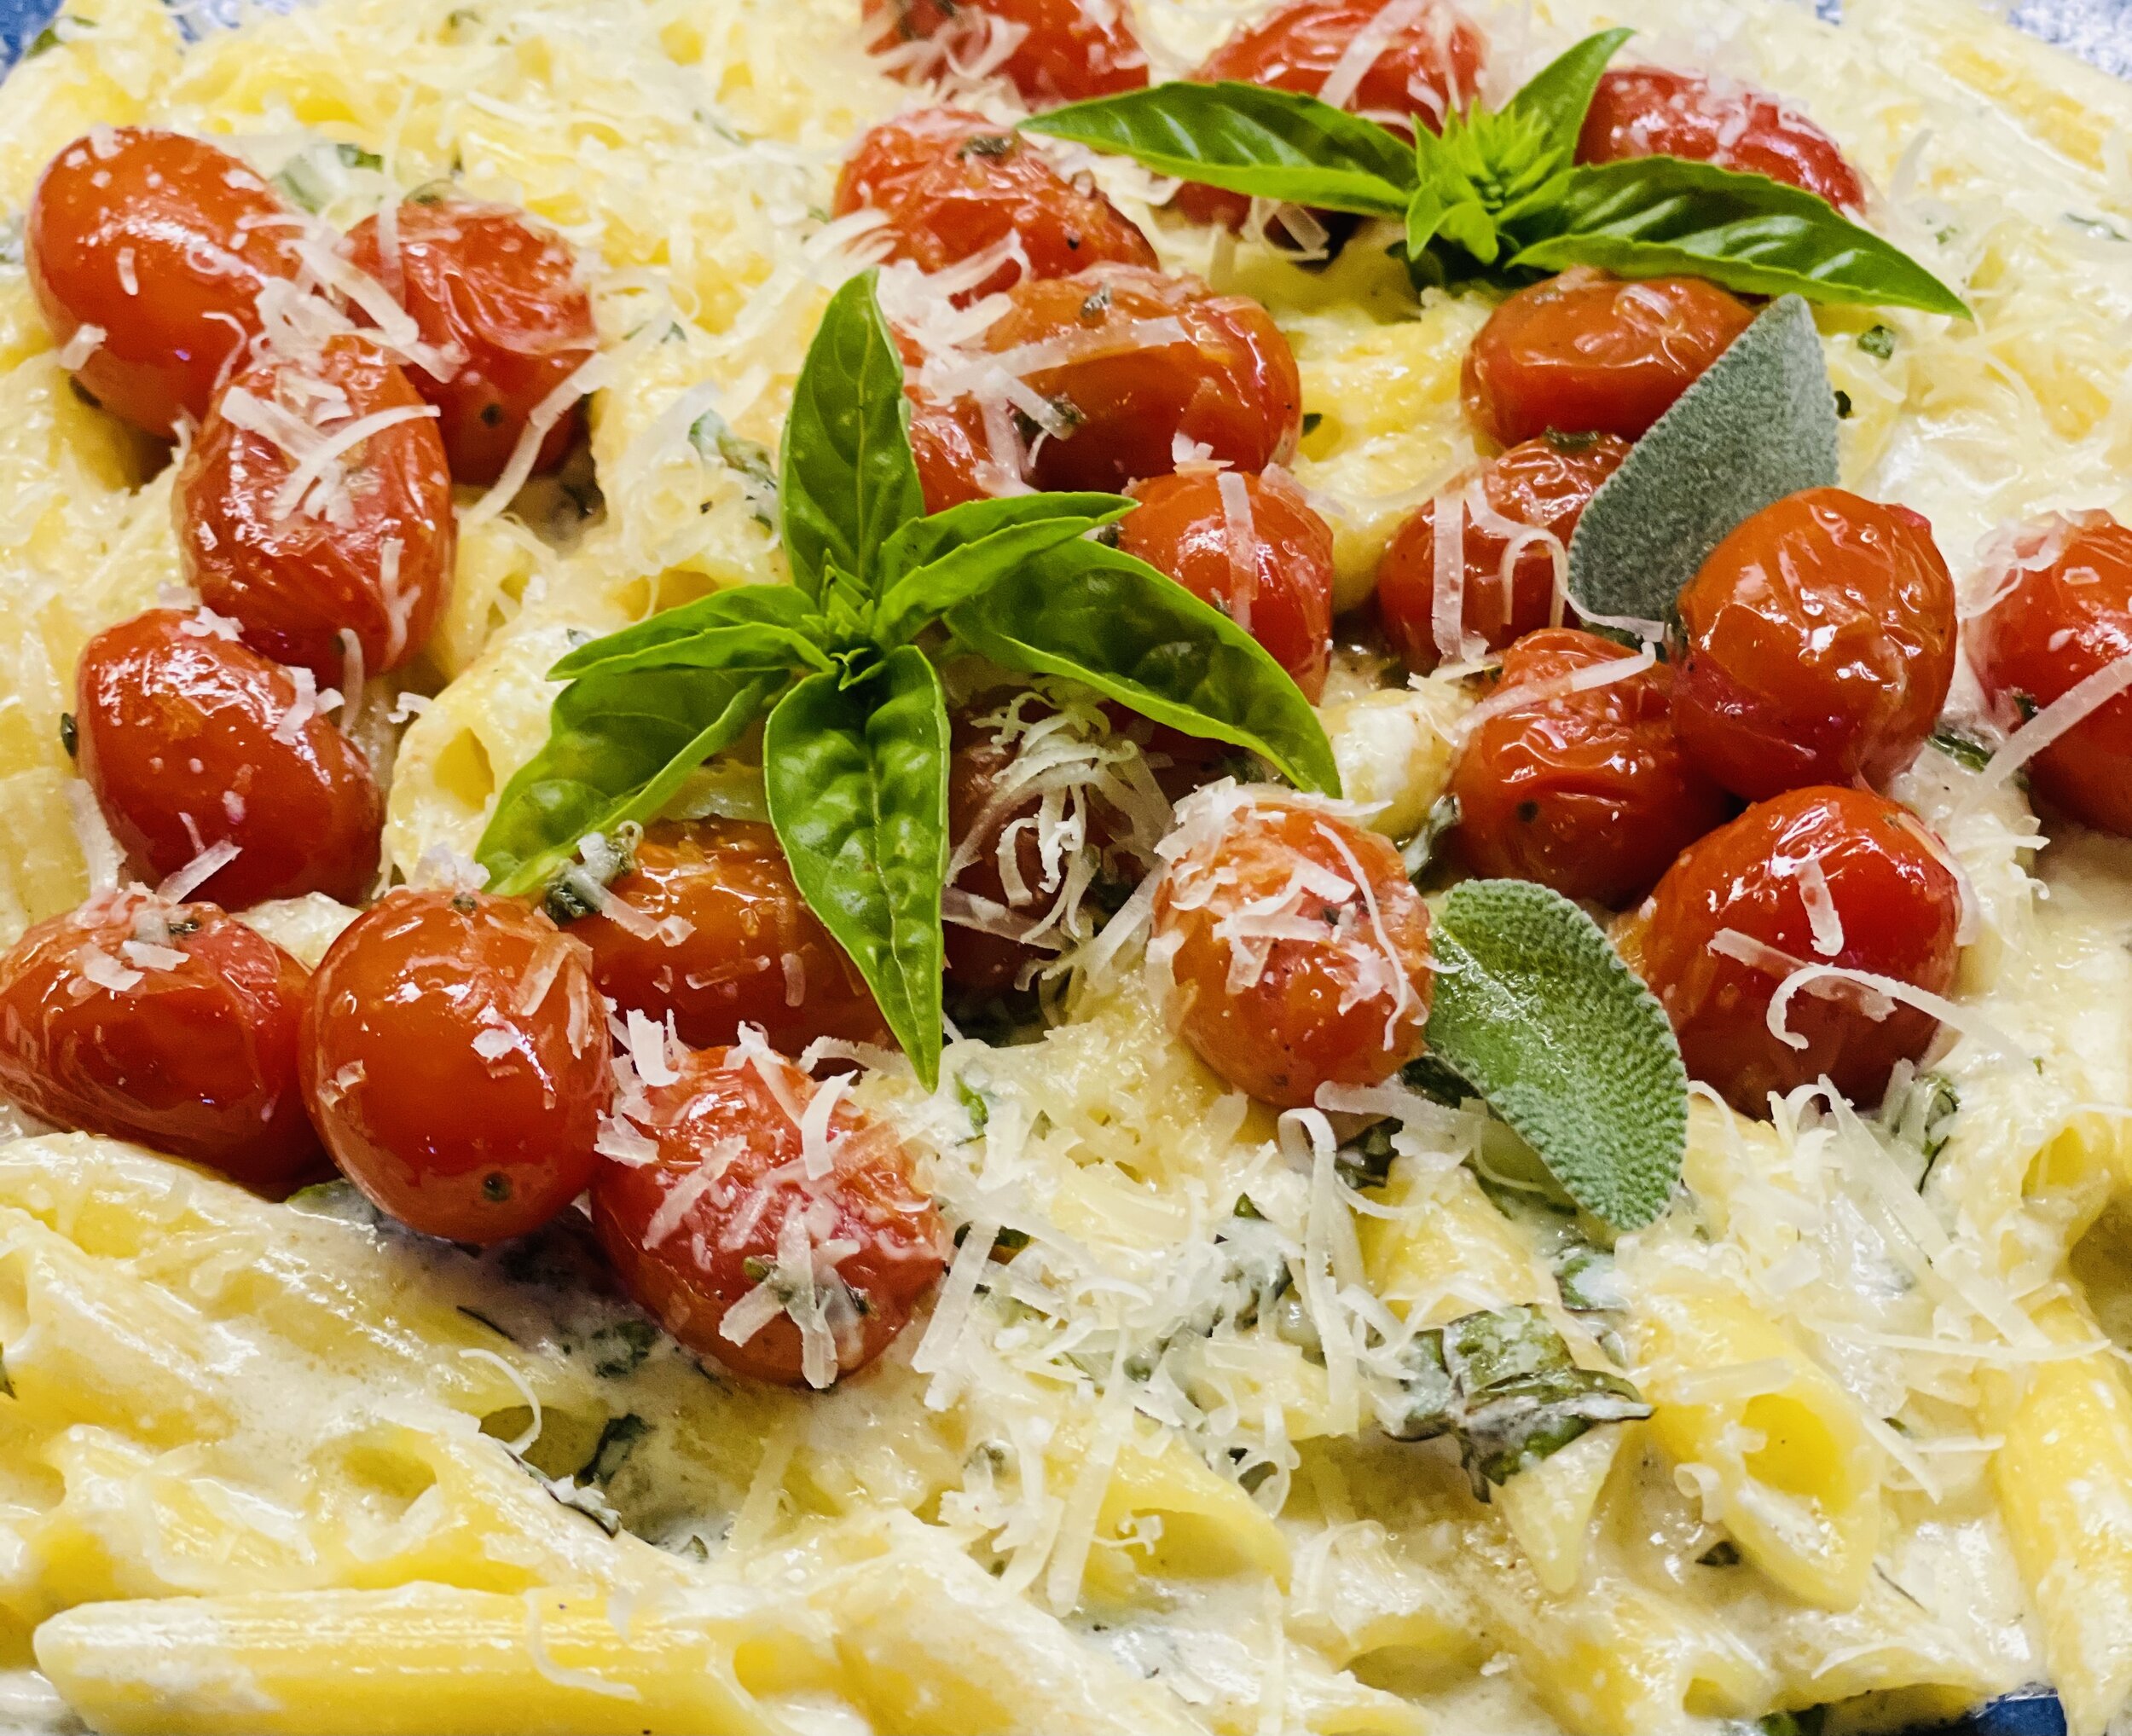
Penne Alfredo with Roasted Cherry Tomatoes (low FODMAP)
30 Minutes • Low FODMAP • Gluten-Free • Vegetarian • Serves 4 • Ok to make-ahead: Steps 1 - 3
30 Minutes • Low FODMAP • Gluten-Free • Vegetarian • Serves 4 • Ok to make-ahead: Steps 1 - 3
Creamy Alfredo sauce loaded with fresh herbs makes a perfect base for tart/sweet cherry tomatoes that have been roasted just to bursting perfection. This dish is comforting, beautiful to look at, and it’s easy and quick to make. Best served right away, you can prepare the pasta and roast the tomatoes ahead of time to bring it all together in a snap when you’re ready.
Ingredients
1 pound gluten-free penne pasta (I like Delallo Gluten-Free Penne Rigate)
2 tablespoons garlic-infused olive oil
2 cups small cherry tomatoes (the more flavorful the better)
2 tablespoons fresh sage, chopped
1 pinch red pepper flakes
1 pinch each kosher salt and black pepper
4 tablespoons salted butter
1 tablespoon freshly chopped oregano
2 cups lactose-free whole milk
1/2 cup heavy cream* or lactose-free cream or half and half
2 ounces lactose-free cream cheese
1 1/2 cups grated Parmesan, plus more for serving
1 cup fresh basil, chopped
Directions
(1) Prepare the pasta: Bring a large pot of salted water to a boil. Cook the pasta according to package directions until al dente. Drain and set aside.
(2) Cook the cherry tomatoes: Meanwhile, heat a large skillet over medium heat. Add the olive oil, tomatoes, 1 tablespoon sage, and a pinch each of red pepper flakes, salt, and pepper. Cook until the tomatoes just begin to burst, about 8 minutes. Remove from the skillet to a plate.
(3) Prepare the sauce: In the same skillet, melt the butter over medium heat, cooking until the butter begins to brown, about 3-4 minutes.
Make-ahead note: This dish is best prepared completely and served right away, but if you prefer, at this point, you can set the pasta, roasted cherry tomatoes, and melted butter and cream aside until you’re ready to prepare the final dish.
(4) Finish the sauce: Reduce the heat to low, add the oregano, 1 tablespoon sage, and a pinch of crushed red pepper. Cook 1 minute, then pour in the milk and cream. Add the cream cheese. Whisk until smooth. Bring the sauce to a gentle simmer and cook 5-8 minutes, until thickened slightly. Stir in the parmesan. Season with salt and pepper.
(5) Finish: Add the pasta and basil and cook for another 3-5 minutes as the sauce thickens, then remove from the heat.
(6) Plate and serve: Divide the penne between plates and top with tomatoes and freshly grated parmesan. Serve with some crusty sourdough bread alongside to soak up the extra sauce.
Eat and enjoy every bite because you can!
This post may contain affiliate links so you can easily purchase items listed on the page. In some cases, we have provided a special discount code for IBS Game Changers so be sure to use it when you purchase an item to get the discount that has been arranged just for you!
*Heavy cream contains almost no lactose. Using small amounts of heavy cream should be tolerable for most people who are lactose intolerant.
More Deliciously Low FODMAP™ vegetarian dishes you might enjoy
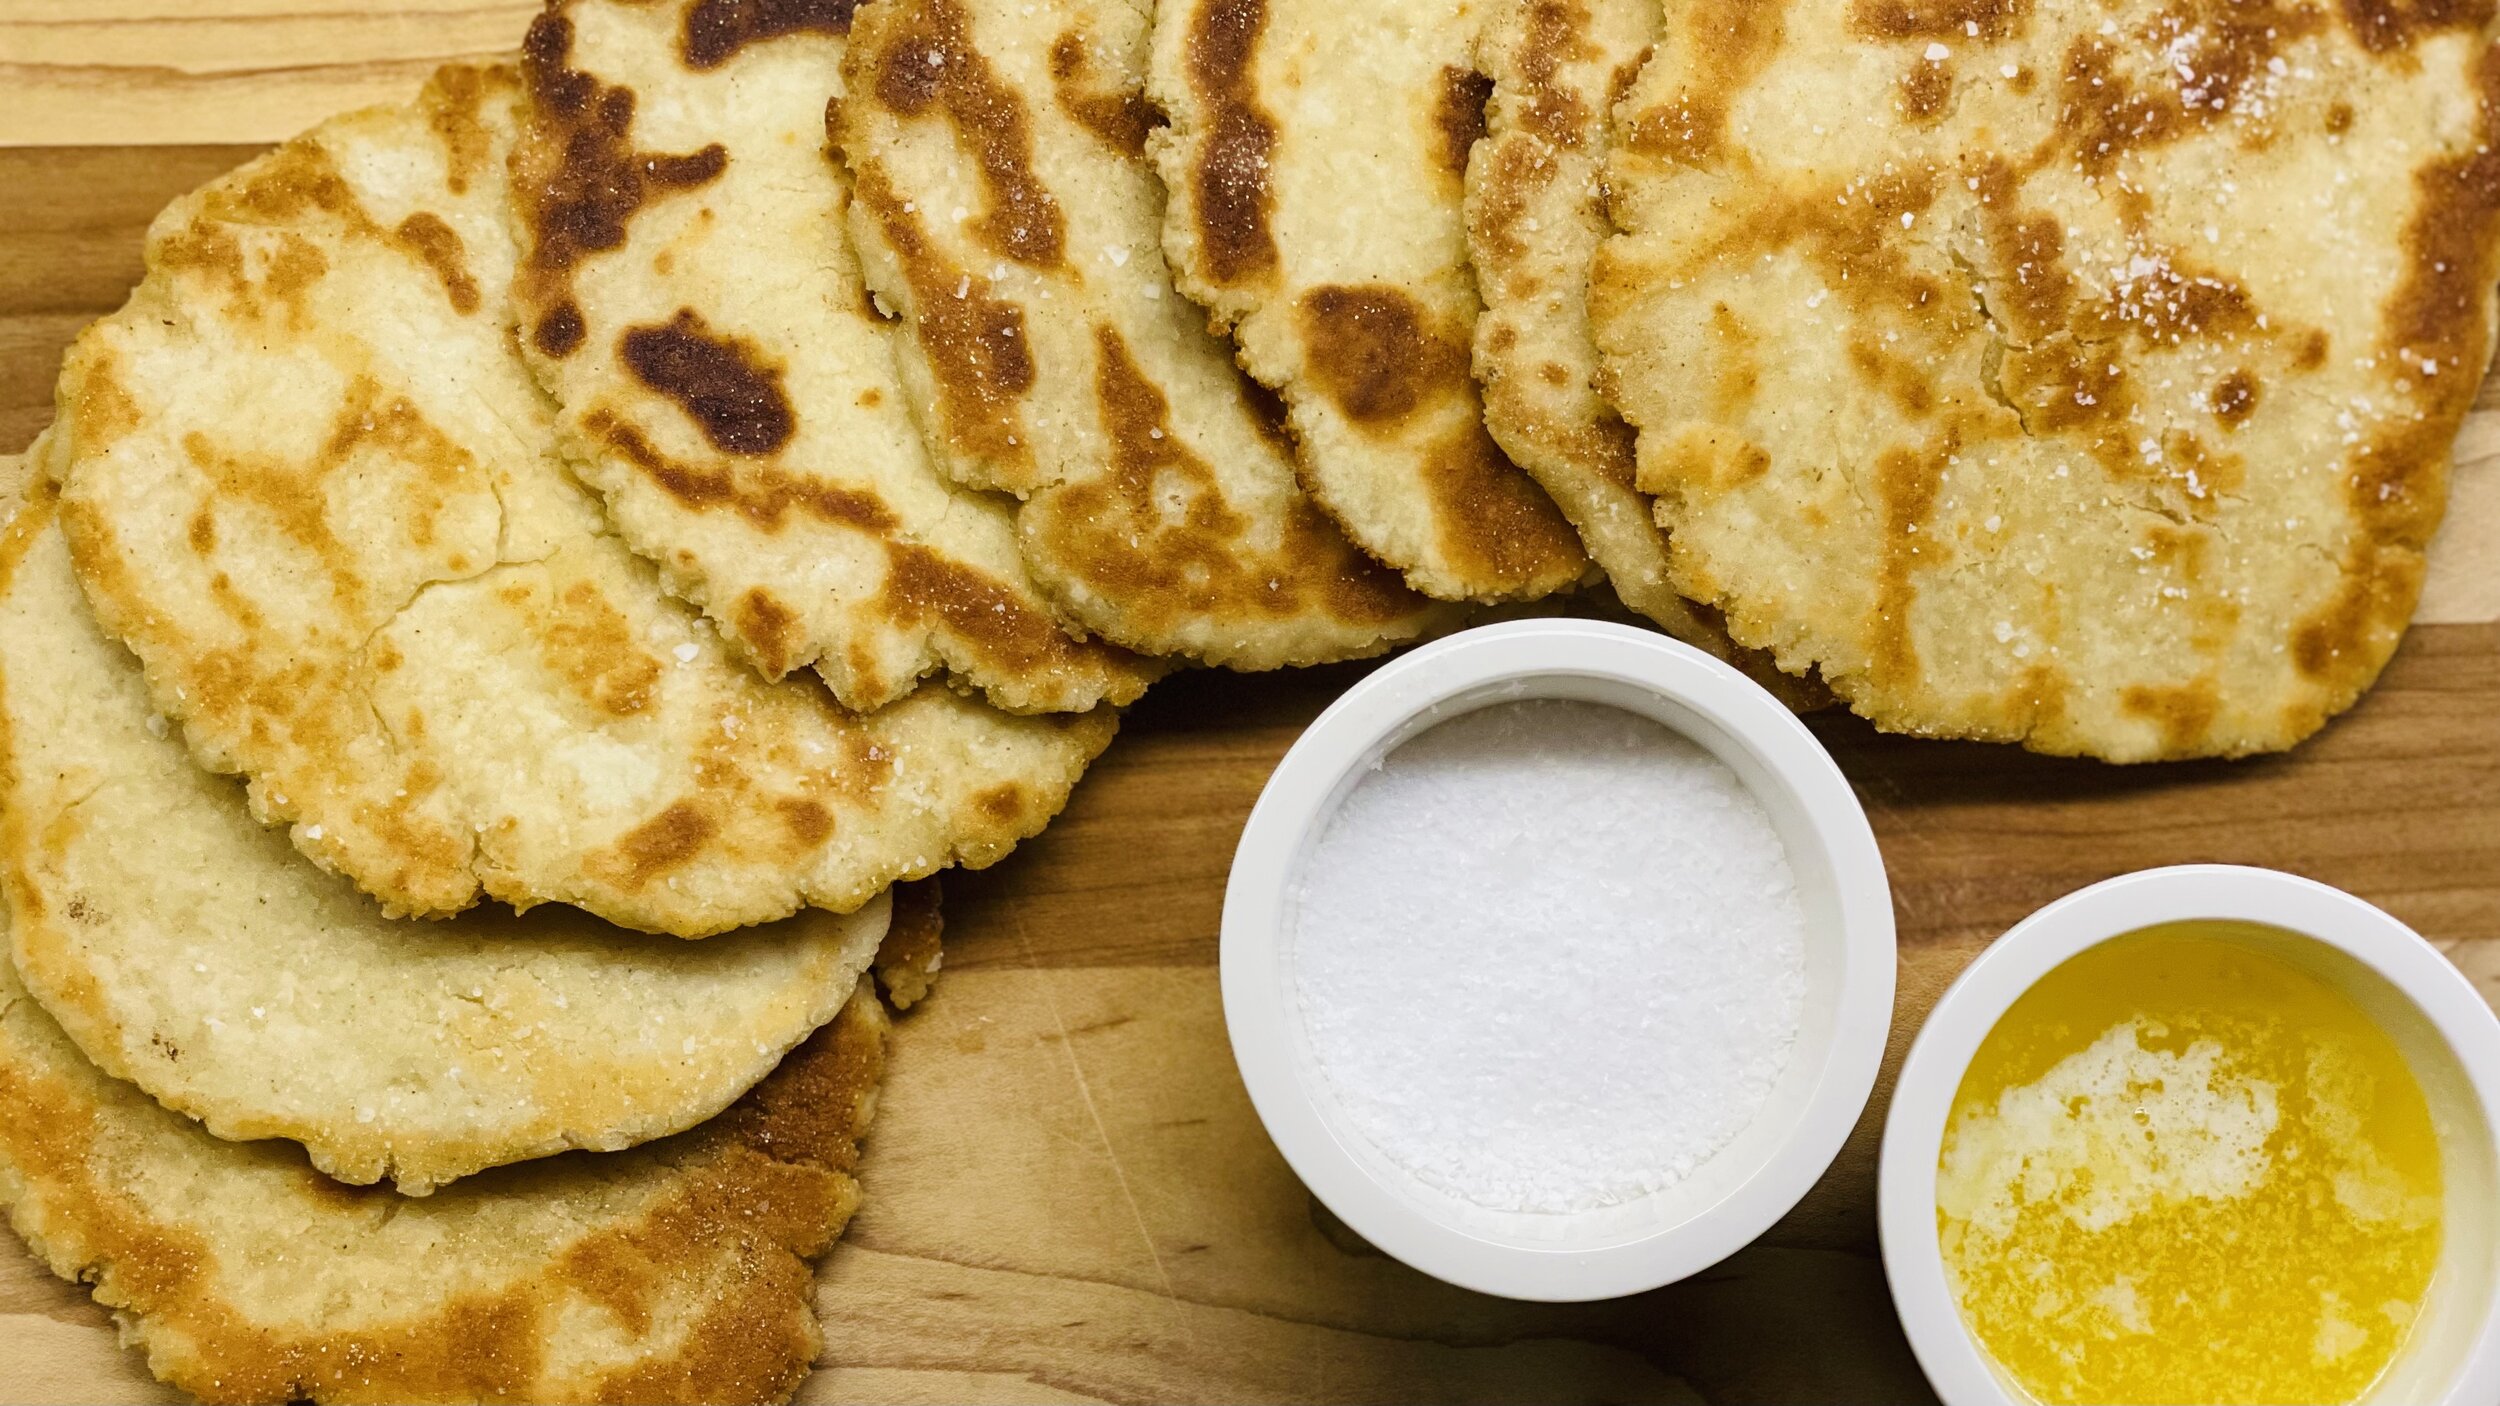
Salted Butter Naan (low FODMAP)
50 Minutes • Low FODMAP • Gluten-Free • Serves 4 • Ok to make-ahead: Steps 1 - 3
50 Minutes • Low FODMAP • Gluten-Free • Serves 4 • Ok to make-ahead: Steps 1 - 3
This buttery naan is perfect with our chicken with yellow curry and summer vegetables or our sweet potato curry and rice bowl. The butter and salt lend a wonderful flavor on their own that goes great with the curry dishes but you can also use herb- or garlic-infused olive oil to cook and serve with the naan if you prefer.
Ingredients
2 3/4 cups gluten-free flour (I used Bob’s Red Mill One for One)
1/2 teaspoon cream of tartar
2 tablespoons granulated sugar
1 package rapid-rise yeast
1/3 cup lactose-free yogurt (at room temperature)
1/2 cup melted butter
3/4 cup warm water (105 - 110 degrees F)
1/2 teaspoon Kosher salt plus more for serving
Oil or more butter for frying
Directions
(1) Prepare the dry ingredients: In a medium bowl, or the bowl of your stand mixer, combine the flour, cream of tartar, salt, and sugar and whisk well to combine. Add the yeast and whisk it in with the other dry ingredients.
(2) Add the wet ingredients: Add the yogurt, melted butter, and water, to the bowl of your stand mixer with the dry ingredients. Using the paddle attachment, mix on medium speed for about 3 minutes. The dough will be a little bit sticky.
(3) Set the dough to rise: Scrape the dough out of the bowl and press it into a ball. Put it in a ceramic bowl that has been lightly oiled so it can rise freely. Cover the bowl with a damp tea towel and put it in a warm place for the dough to rise until about doubled in volume (this takes about 40 minutes depending on the temperature of the room.)
Make-ahead note: At this point, you may put the dough in the refrigerator to slow the rise and take it out again when you are ready to cook the naan.
(4) Shape the naan: Once the dough has finished rising, turn it out onto a lightly floured surface and sprinkle lightly with more gluten-free flour. Divide the dough into 8 pieces. Working with one piece of dough at a time, lightly flour it and roll it into a round or oval shape bout 3/8 inch thick.
(5) Cook the naan: Heat a medium frying pan over medium-high heat. If you are using butter for frying, brush one side of the flattened dough with melted butter. Place the buttered side down in your heated skillet. While it is frying on the first side brush the second side with butter or oil. Cook the first side until large blisters begin to form (about 30 seconds) then flip it to the other side, sprinkle it with Kosher salt, and cook for another 30 seconds until the blisters form on the underside.
(6) Finish: Remove to a paper towel or tea towel, and cover the dough to retain heat and moisture. Repeat with the remaining pieces of dough until you’ve cooked all eight pieces.
(7) Plate and serve: Stack the pieces of naan one on top of another, keeping them covered and in a warm oven until ready to serve. Serve warm with additional melted butter and salt alongside your favorite curry or soup.
Eat and enjoy every bite because you can!
This post may contain affiliate links so you can easily purchase items listed on the page. In some cases, we have provided a special discount code for IBS Game Changers so be sure to use it when you purchase an item to get the discount that has been arranged just for you!
More Deliciously Low FODMAP™ side dishes you might enjoy


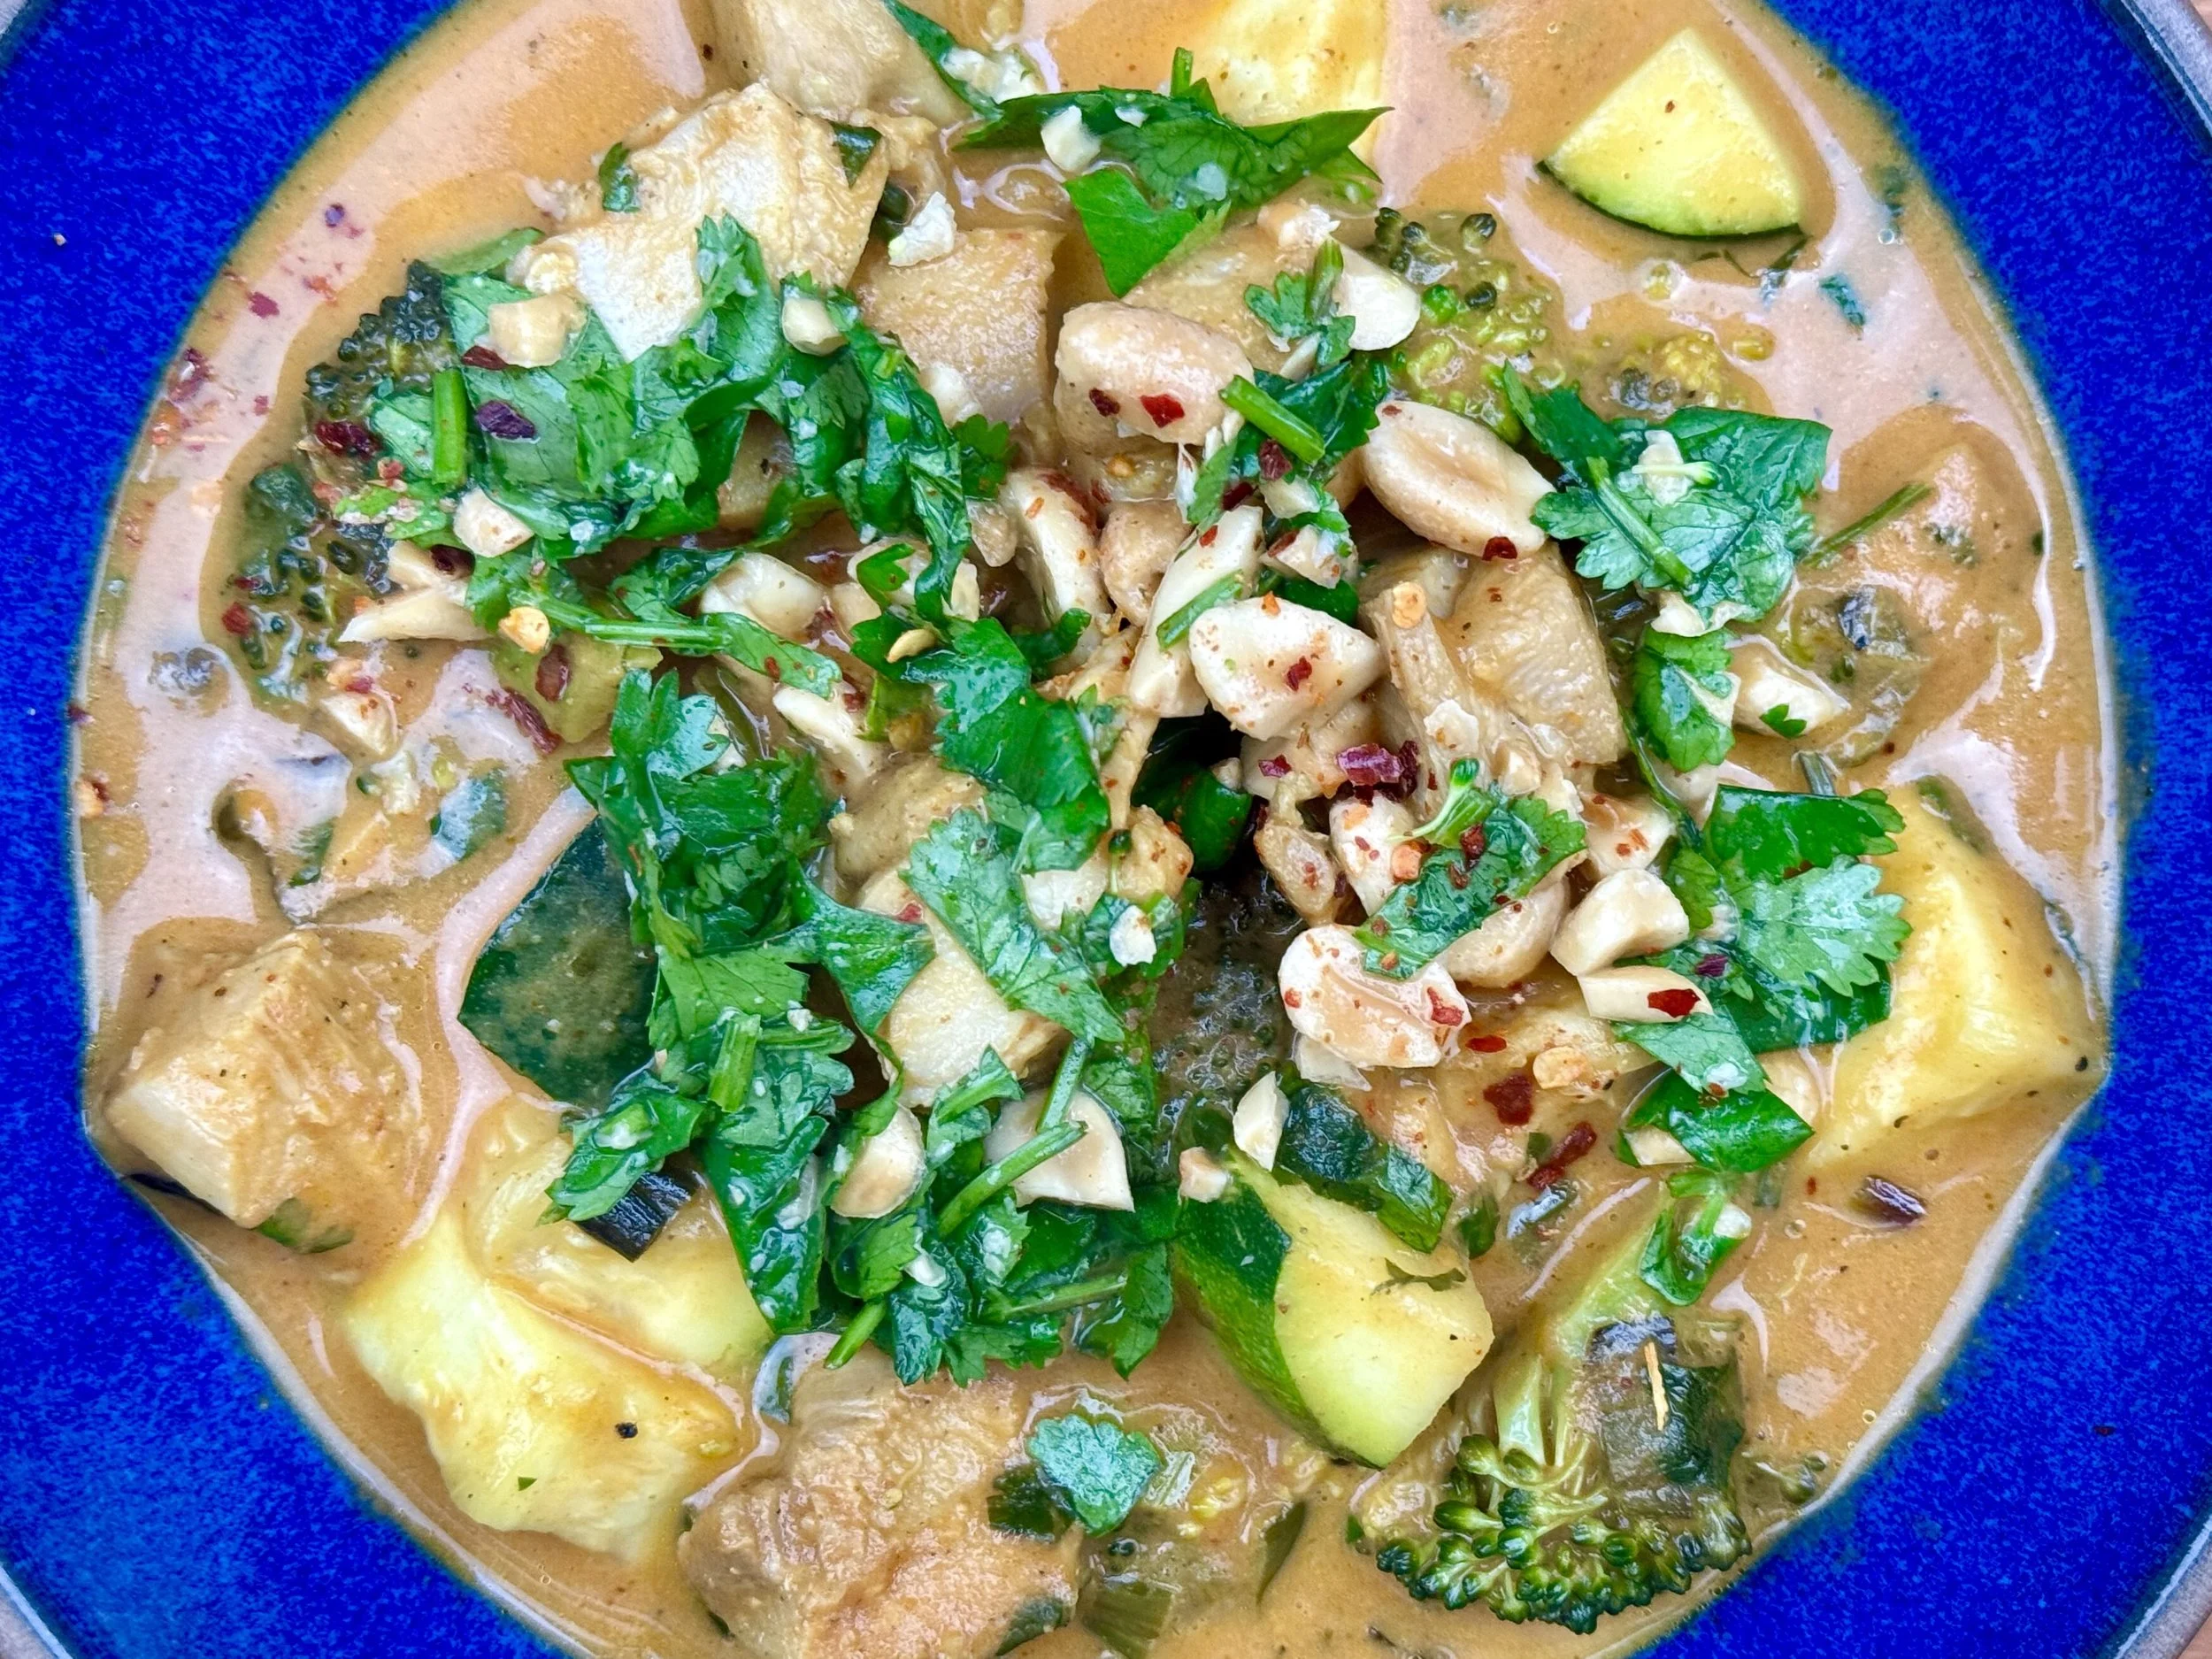
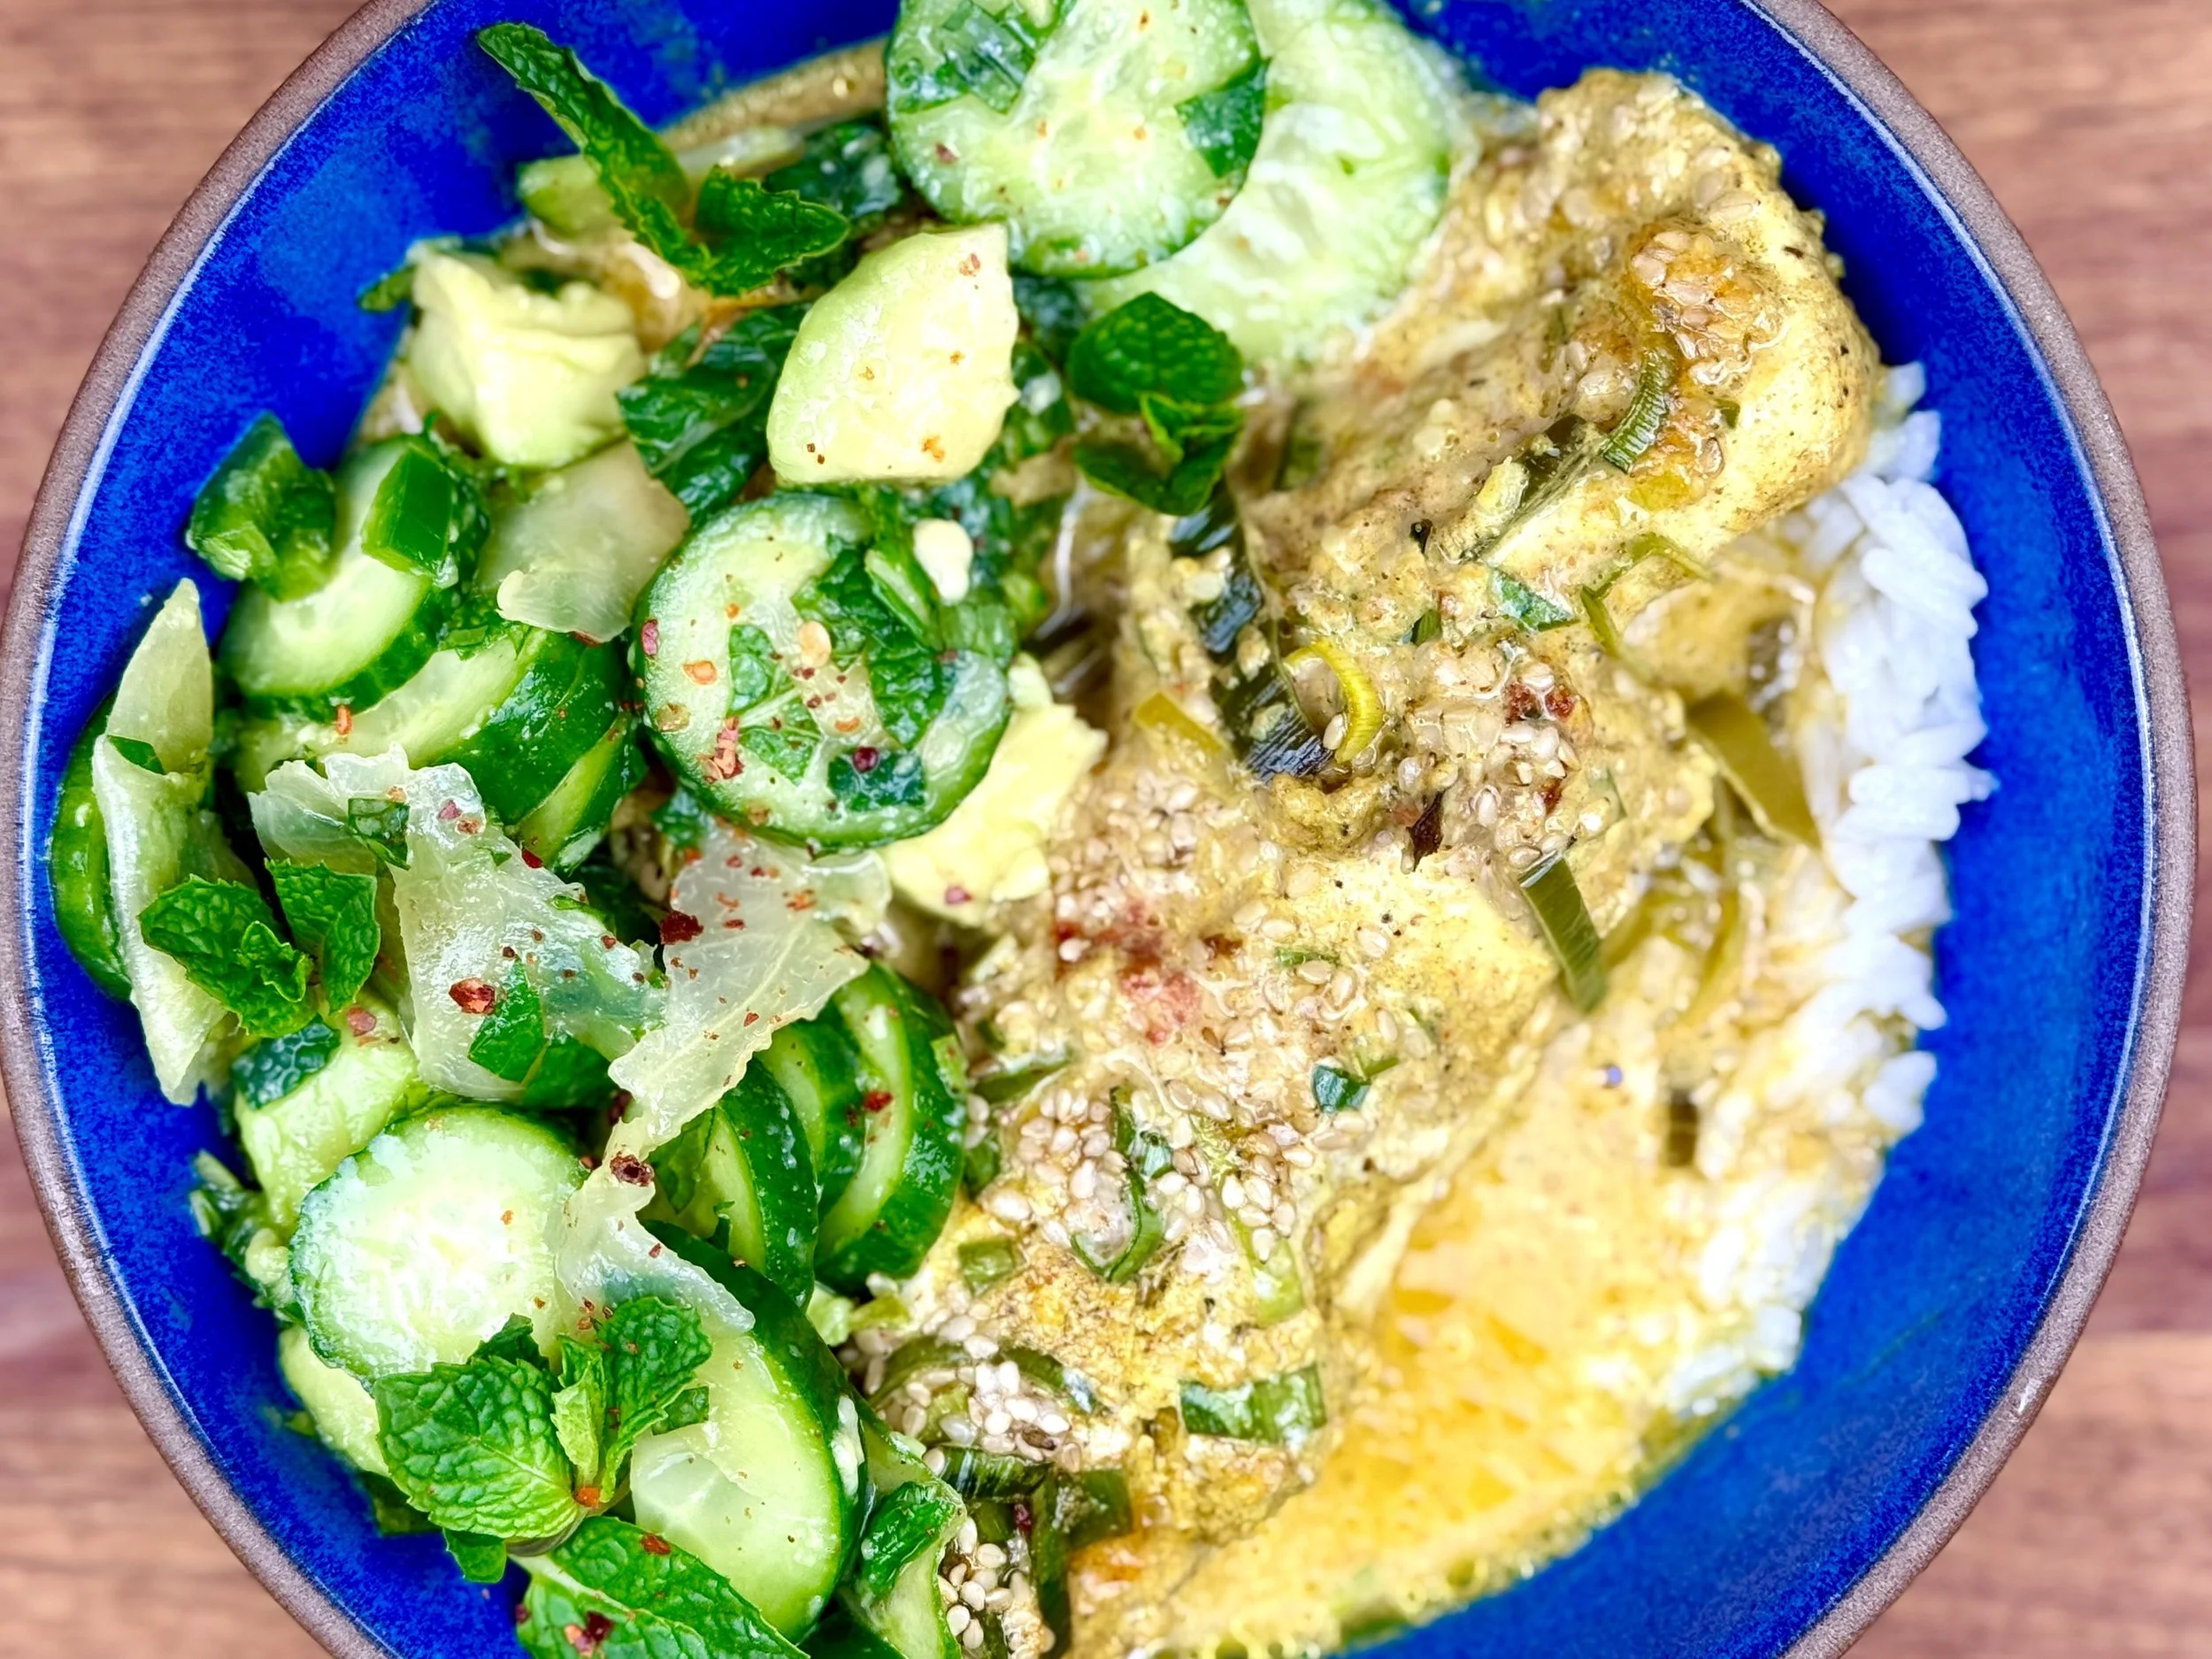
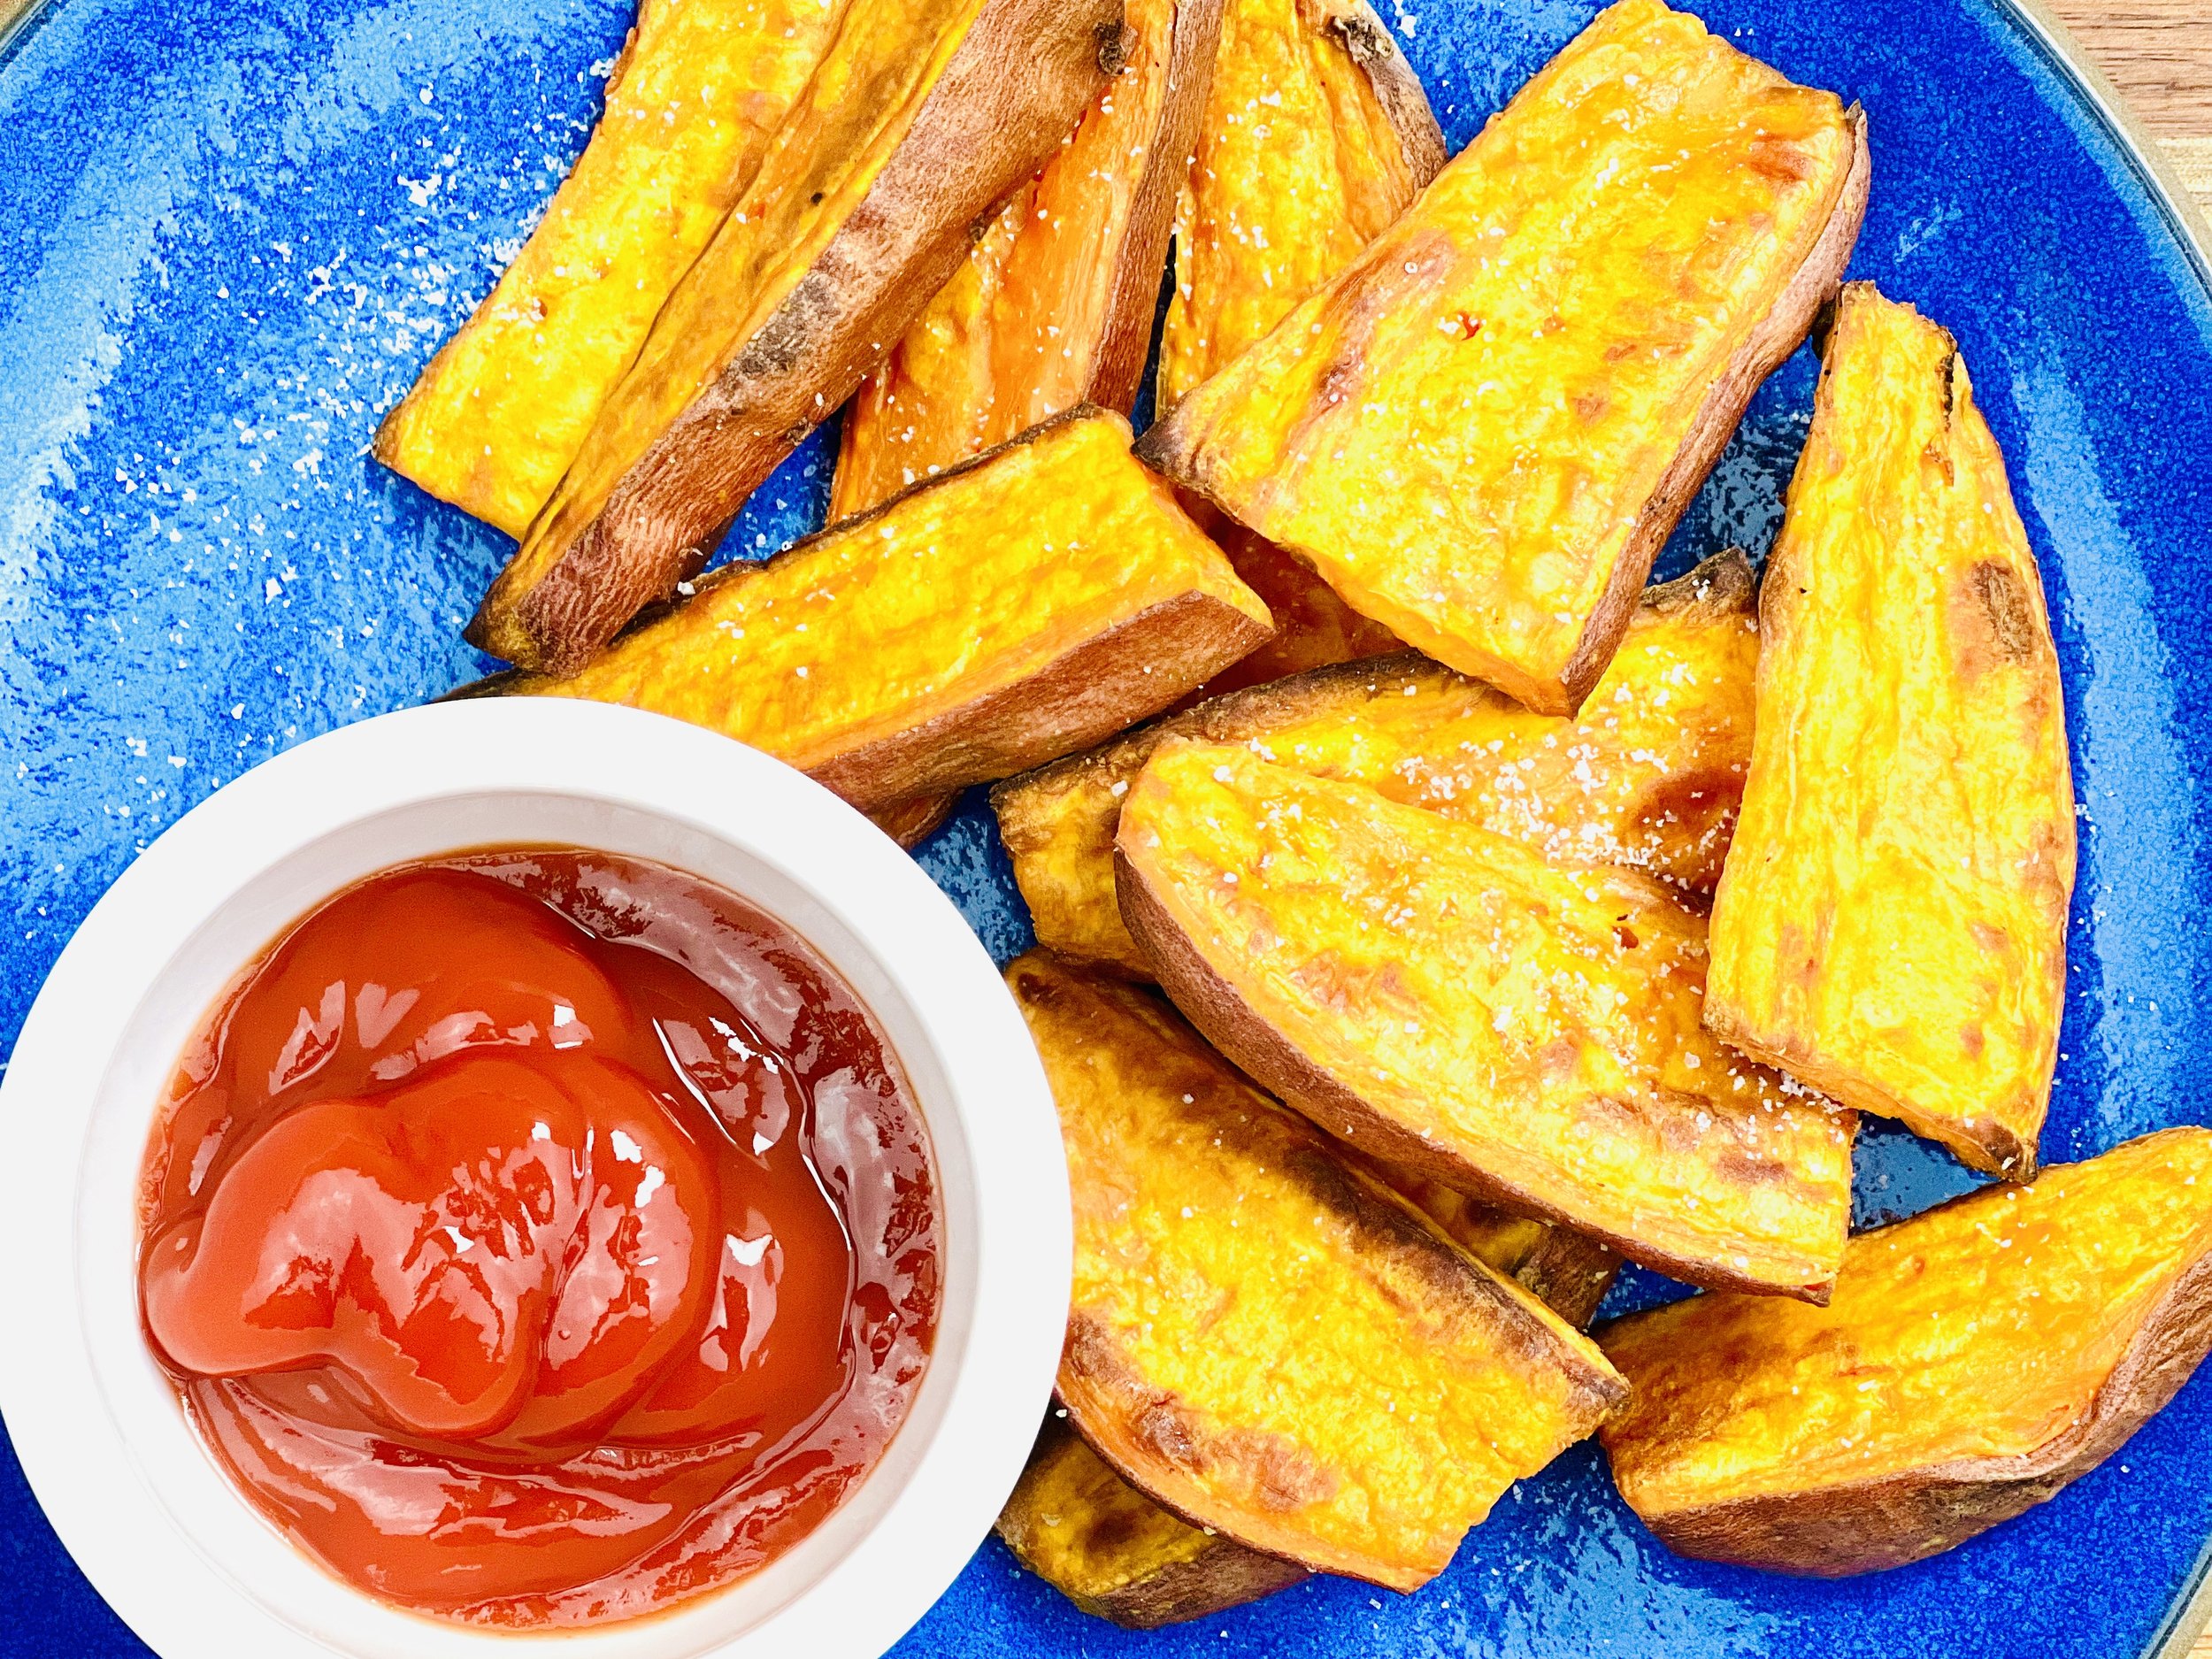
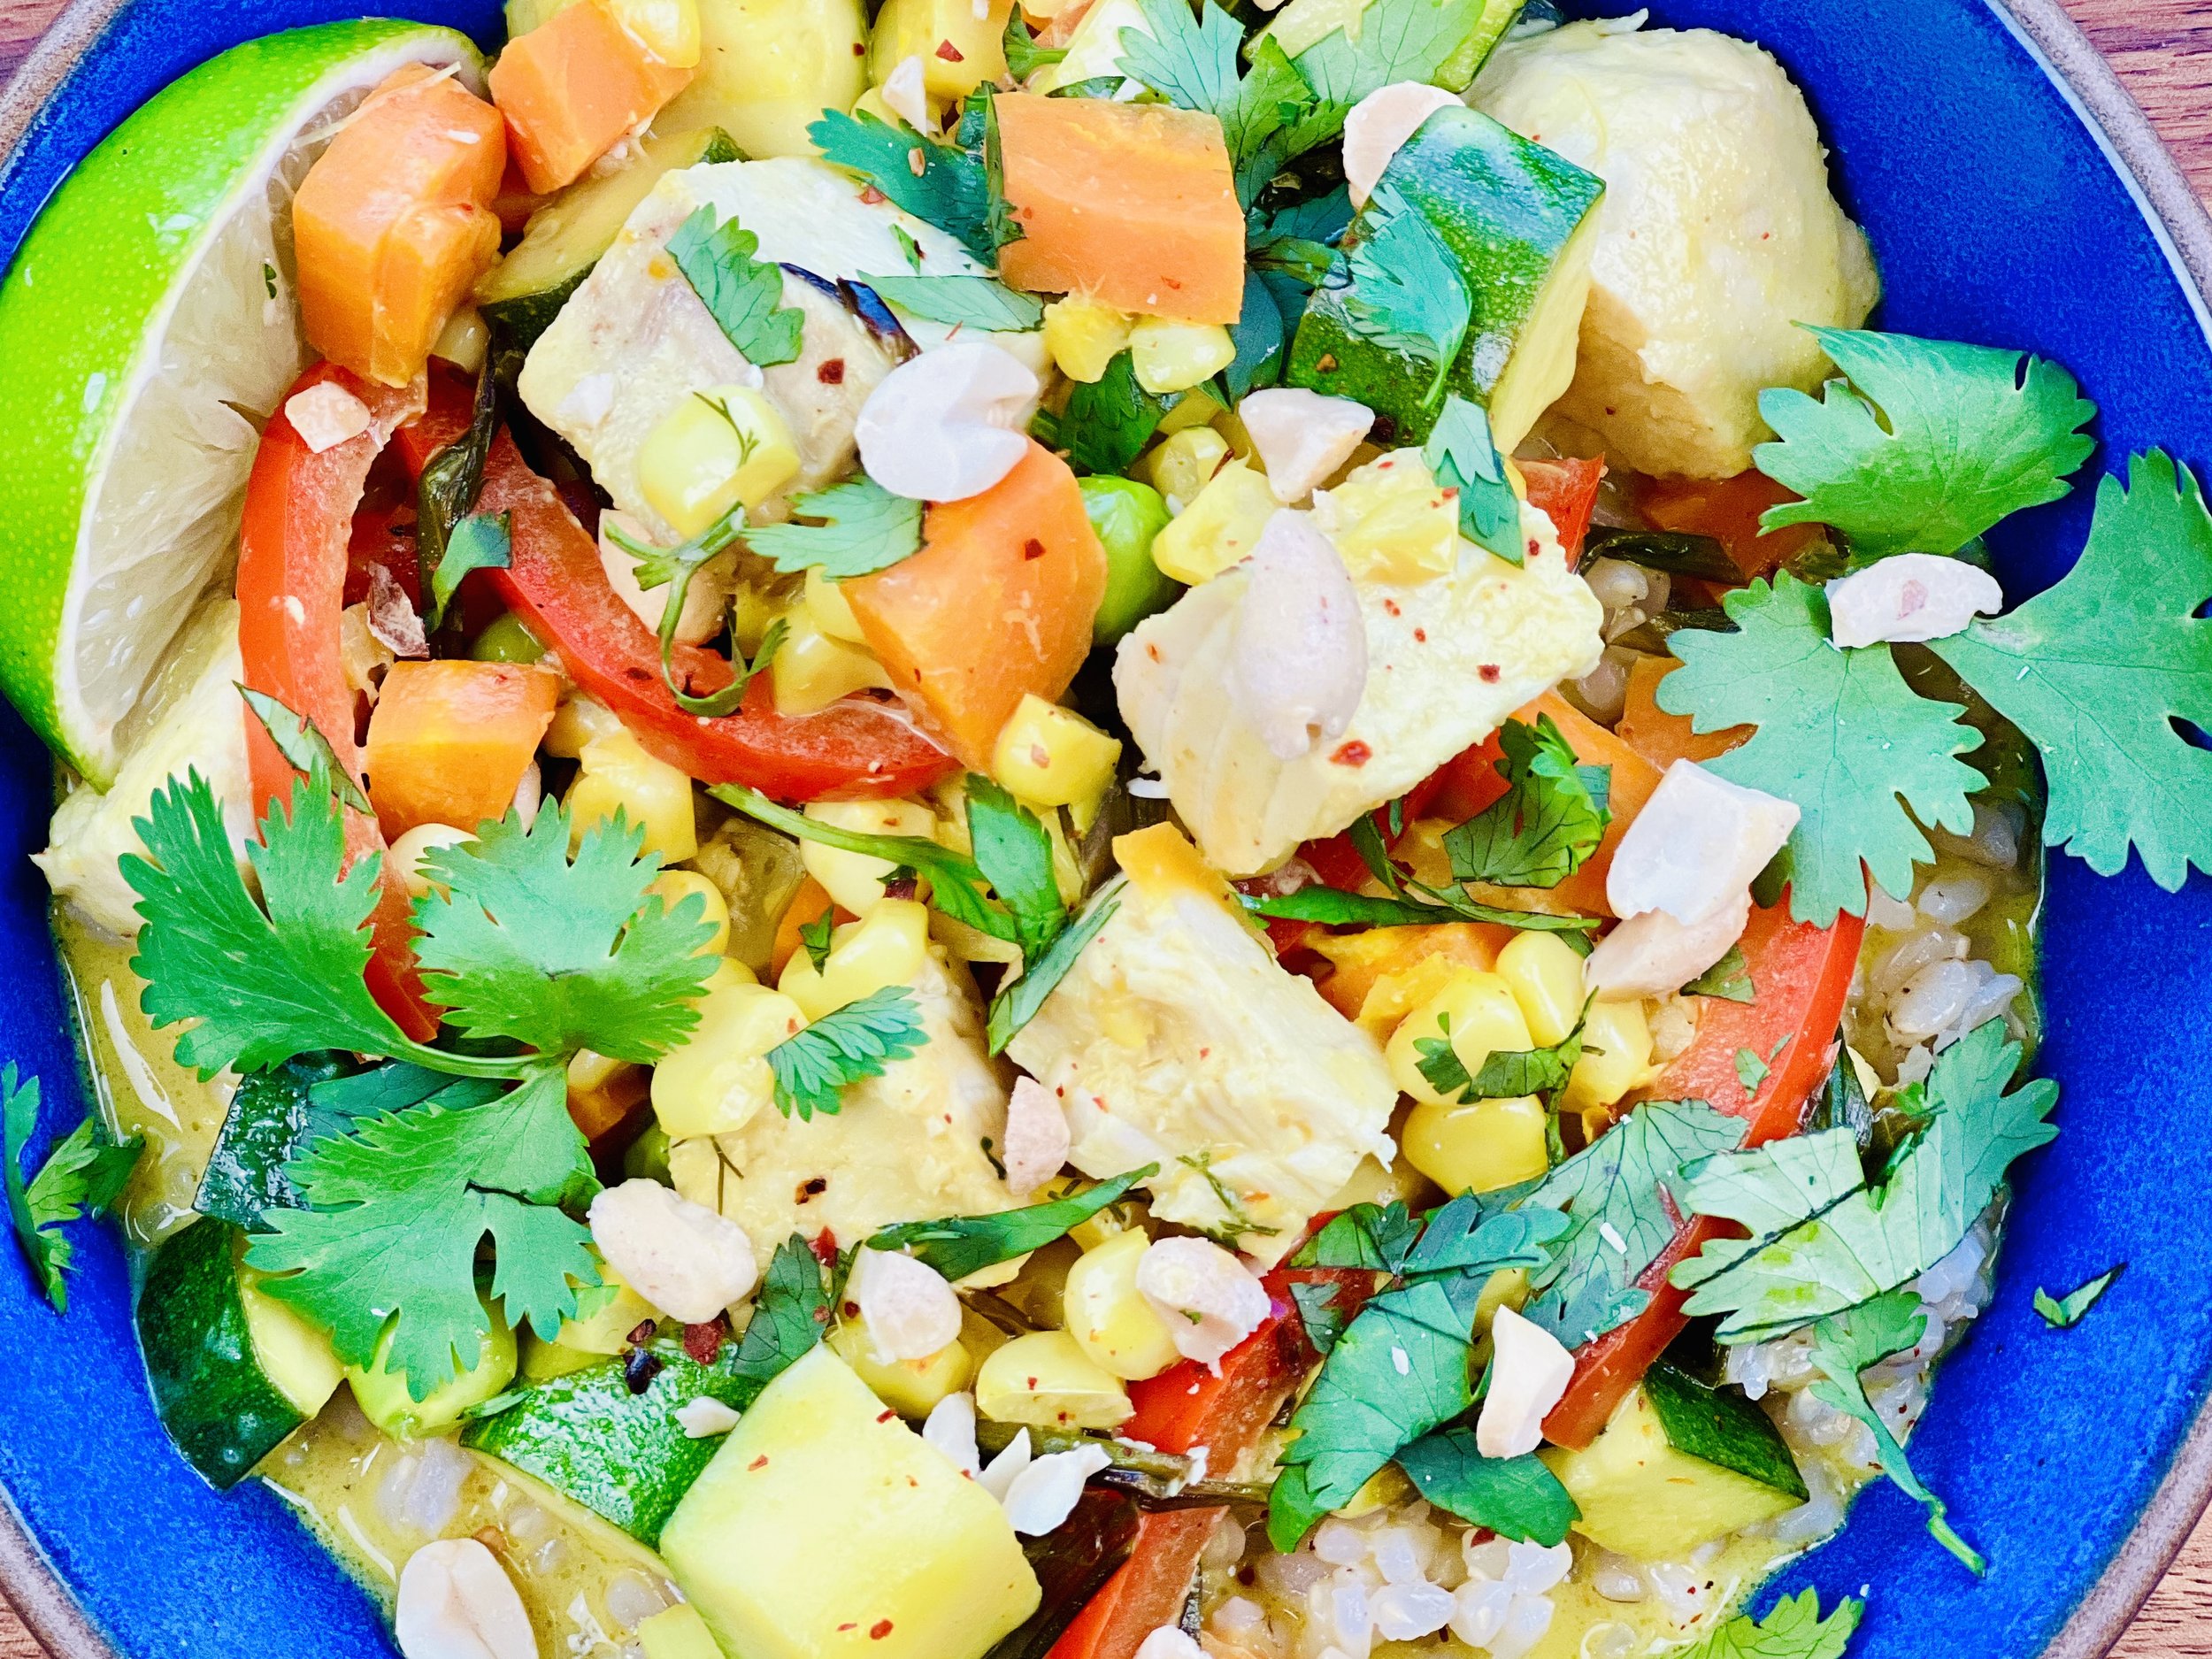
Chicken with Yellow Curry and Summer Vegetables (low FODMAP)
30 Minutes • Low FODMAP • Gluten-Free • Lactose-free • Serves 4 • Ok to make-ahead: Steps 1 - 3
30 Minutes • Low FODMAP • Gluten-Free • Lactose-free • Serves 4 • Ok to make-ahead: Steps 1 - 3
Curried dishes can be rich and heavy but this one combines crisp corn, summer squash, and fresh herbs to make the dish light and flavorful. Cooked in coconut milk, the sauce is creamy and delicious and a wonderful complement to the summer vegetables. Served over rice in a bowl, this dish has all the components of a perfect meal. No need to add a thing. But if you want to add a nice side, you can pair this with our Salted Butter Naan.

Ingredients
1 pound boneless skinless chicken thighs or breasts, cut into bite-size pieces
1 1/2 tablespoons yellow curry powder
1 teaspoon ground turmeric
1/8-1/4 teaspoon cayenne pepper using more or less to your taste
1/2 teaspoon Smoke N Sanity Essence of Garlic Salt (use code IBSGC10 for 10% discount)
3 tablespoons sesame oil or extra virgin olive oil
2 zucchini or summer squash, diced
2 ears sweet corn kernels, removed from the cob before cooking
1 bunch green onions (green part only), chopped
1-inch fresh ginger, grated
1 pinch crushed red pepper flakes
1 can (14 ounces) full fat coconut milk
Juice and zest from one lemon
1/4 cup fresh cilantro, chopped
1/4 cup fresh basil, chopped
1 cup basmati rice, cooked in 1 ½ cups chicken broth with a tablespoon of toasted sesame oil
Toasted sesame seeds for serving
Directions
(1) Cook the grain: Cook the rice according to package instructions cooking in low FODMAP chicken broth (I like Gourmend Foods Organic Chicken Broth - Use code IBSGC15 for 15% discount) and add 1 tablespoon of toasted sesame oil in place of butter (optional)
(2) Prep the chicken: Cut the chicken into bite-size pieces. Put it in a bowl and stir with the curry powder, turmeric, cayenne, one tablespoon oil, and essence of garlic salt. Set aside while you prepare the vegetables.
(3) Prep the veggies: Chop the vegetables and herbs, grate the ginger, and remove the corn from the cob. Set all aside in a bowl.
Make-ahead note: At this point, you may cover the rice and put the chicken and prepared vegetables in the fridge until you’re ready to cook the chicken.
(4) Cook the chicken: Heat the remaining 2 tablespoons of oil in a large skillet over medium heat. When the oil shimmers, add the chicken and brown all over, about 2 - 3 minutes.
(5) Add the zucchini, corn, green onions, and ginger. Season with crushed red pepper flakes, salt, and pepper. Cook the chicken and veggies for another 5 minutes or until they just begin to soften.
(6) Stir in the coconut milk and about 1/3 cup water and bring the mixture to a simmer over medium heat, cook 5 minutes or until the sauce thickens slightly.
(7) Finish: Remove from the heat and stir in the lemon juice and zest, cilantro, and basil. After adding the lemon juice, taste and add a bit more salt if you think it needs it.
(8) Plate and serve: Divide the rice among bowls and spoon the curry and sauce over the top with toasted sesame seeds and more chopped fresh herbs if you like.
Eat and enjoy every bite because you can!
This post may contain affiliate links so you can easily purchase items listed on the page. In some cases, we have provided a special discount code for IBS Game Changers so be sure to use it when you purchase an item to get the discount that has been arranged just for you!
More Deliciously Low FODMAP™ main course recipes you might enjoy
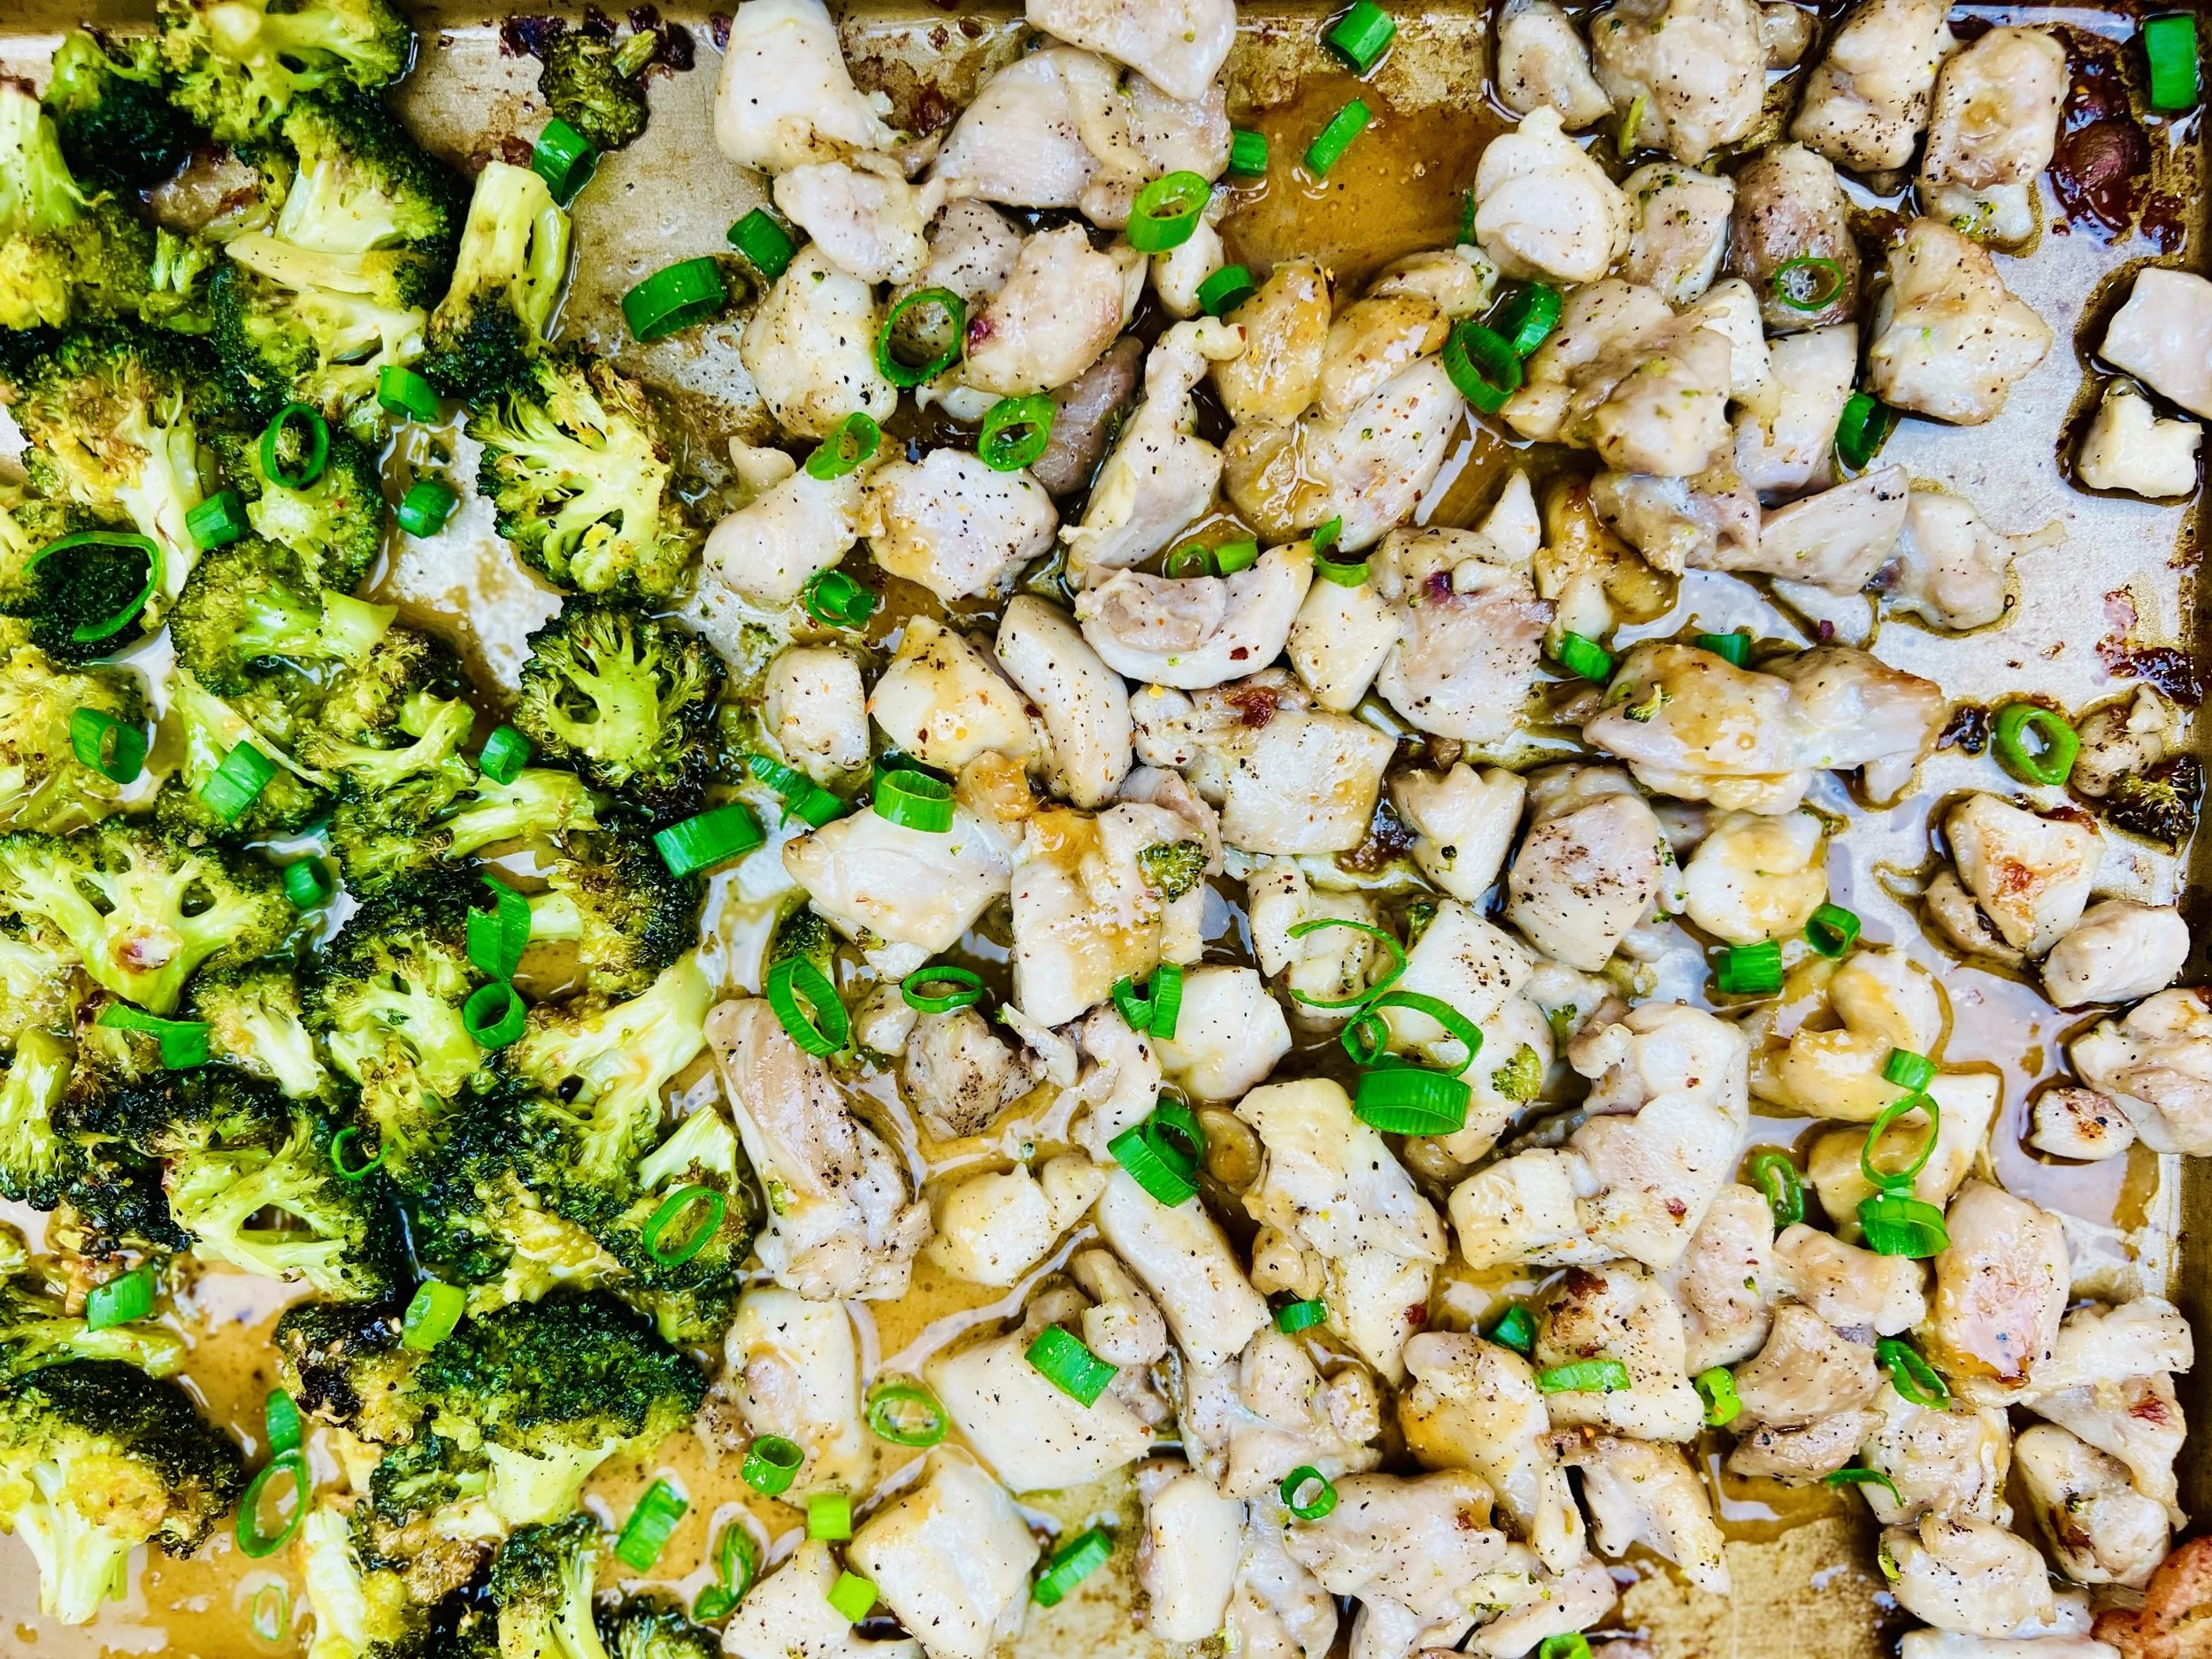
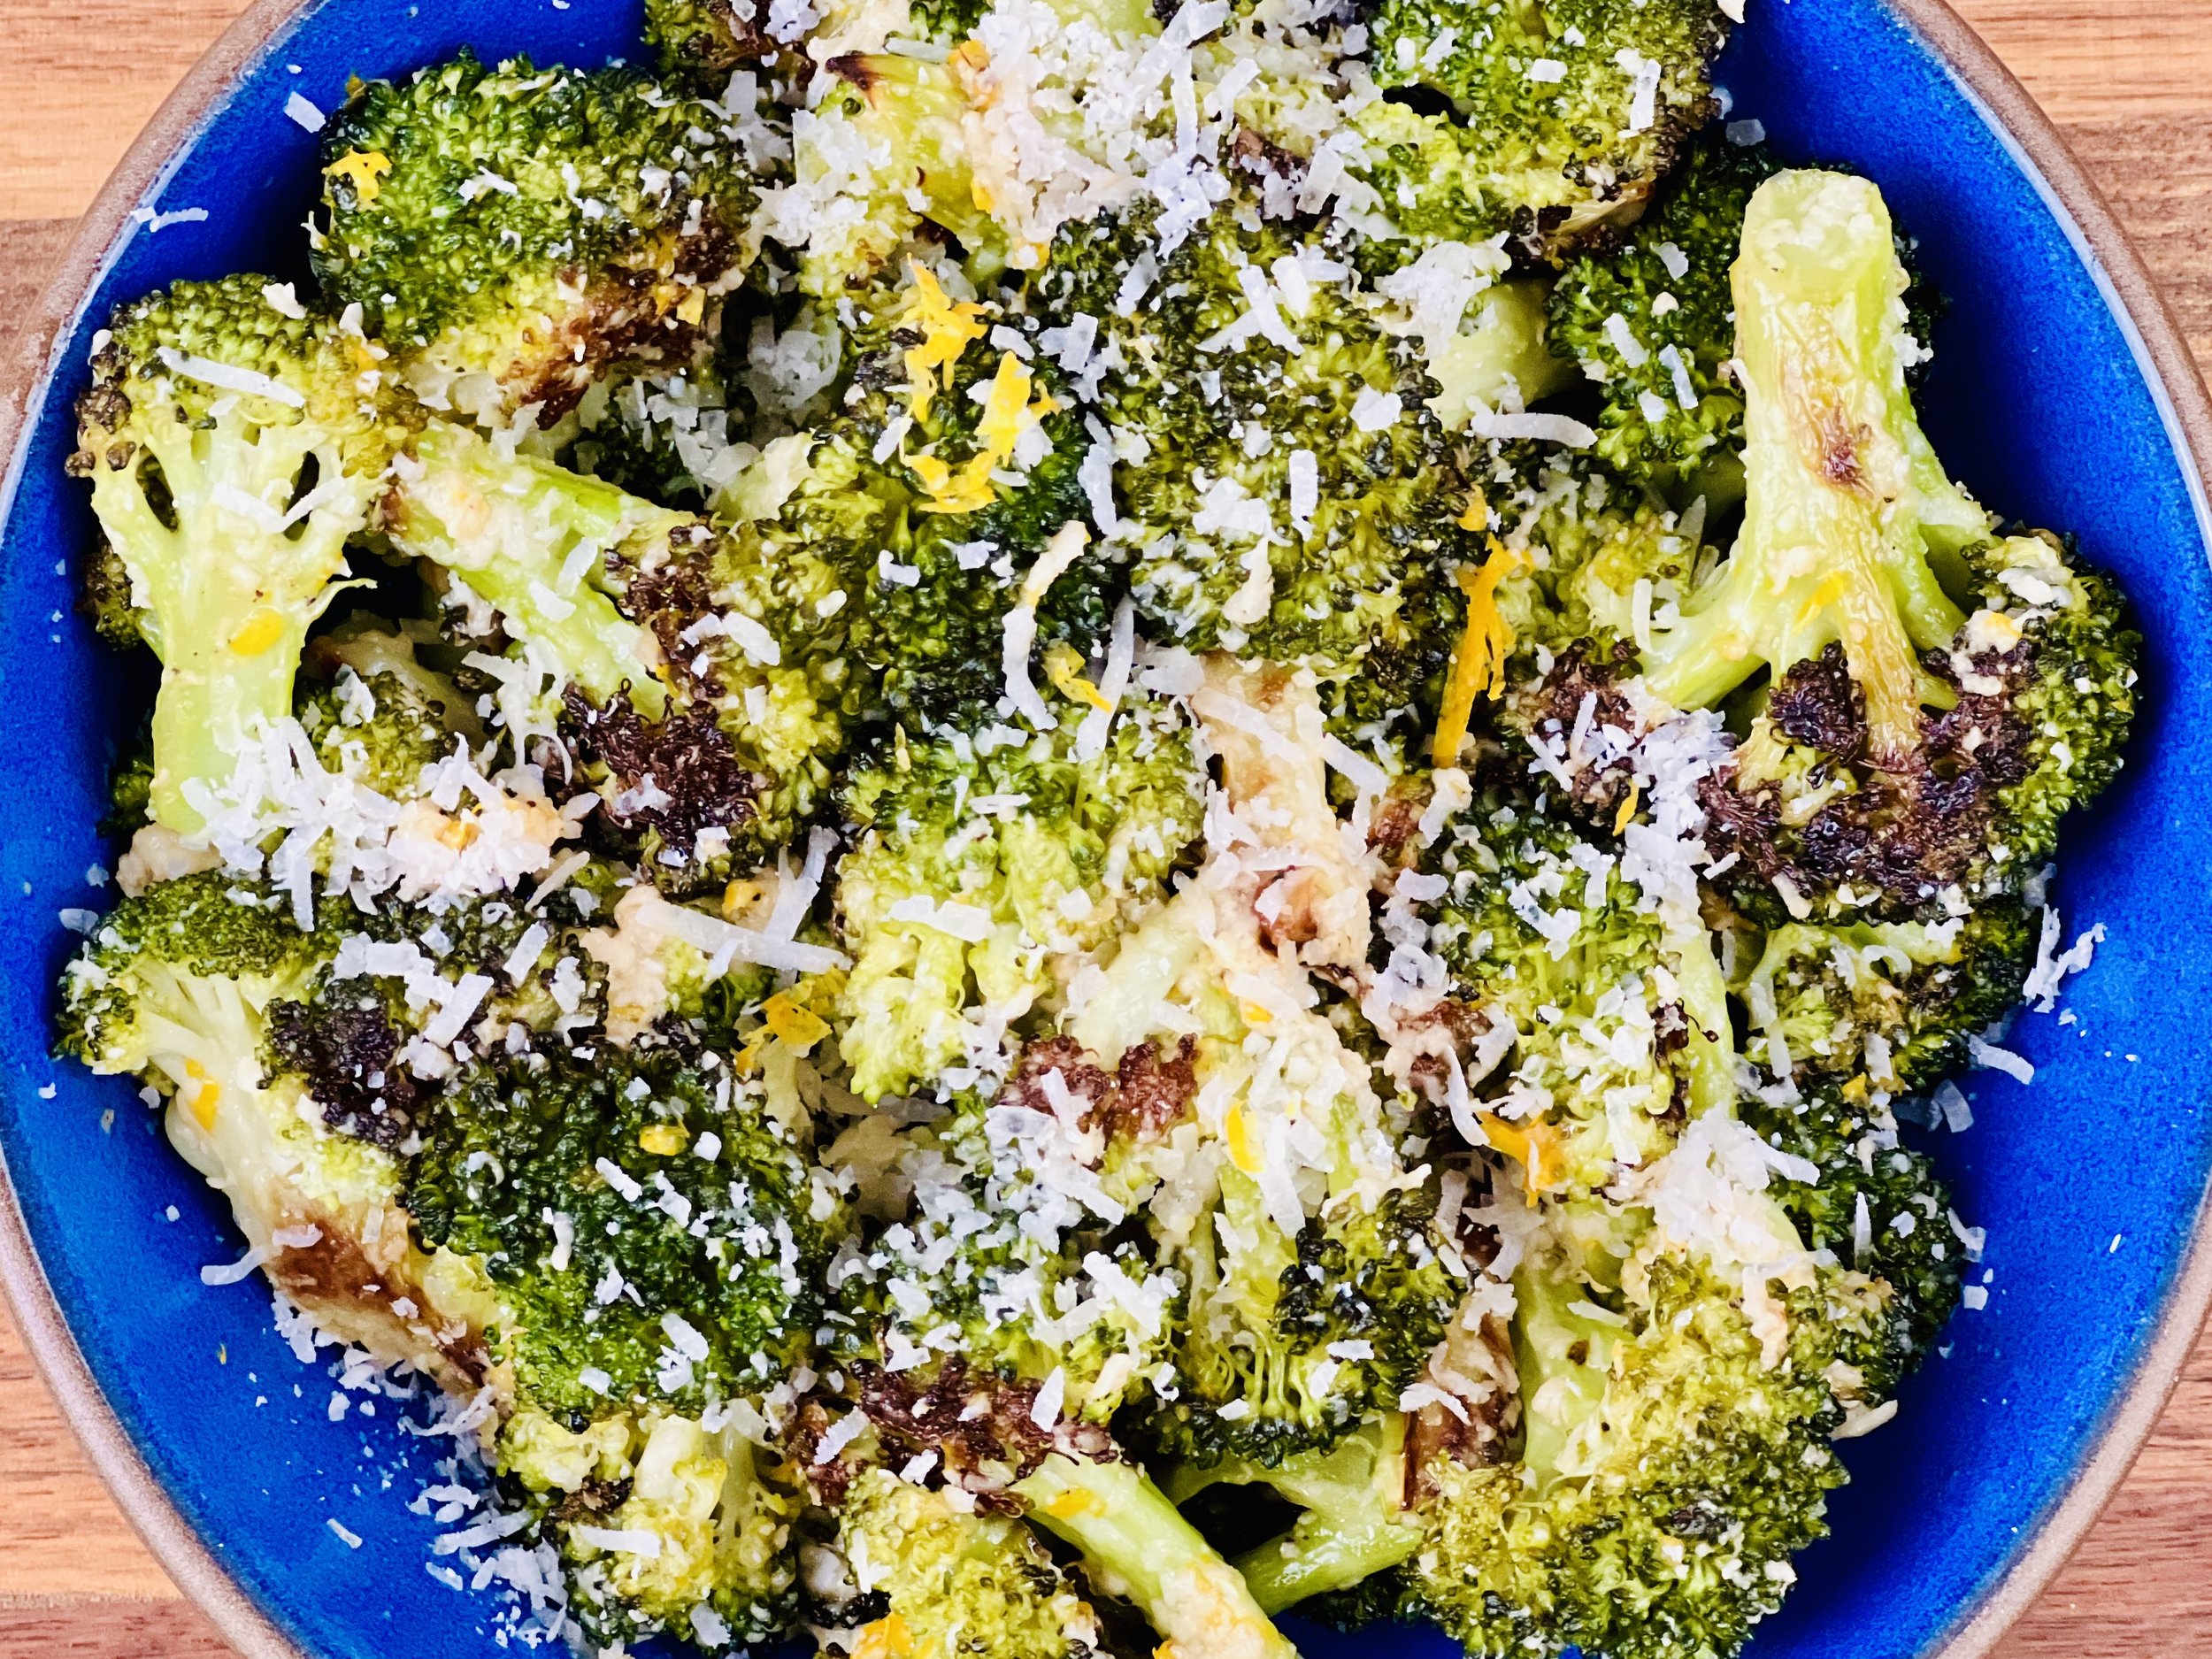
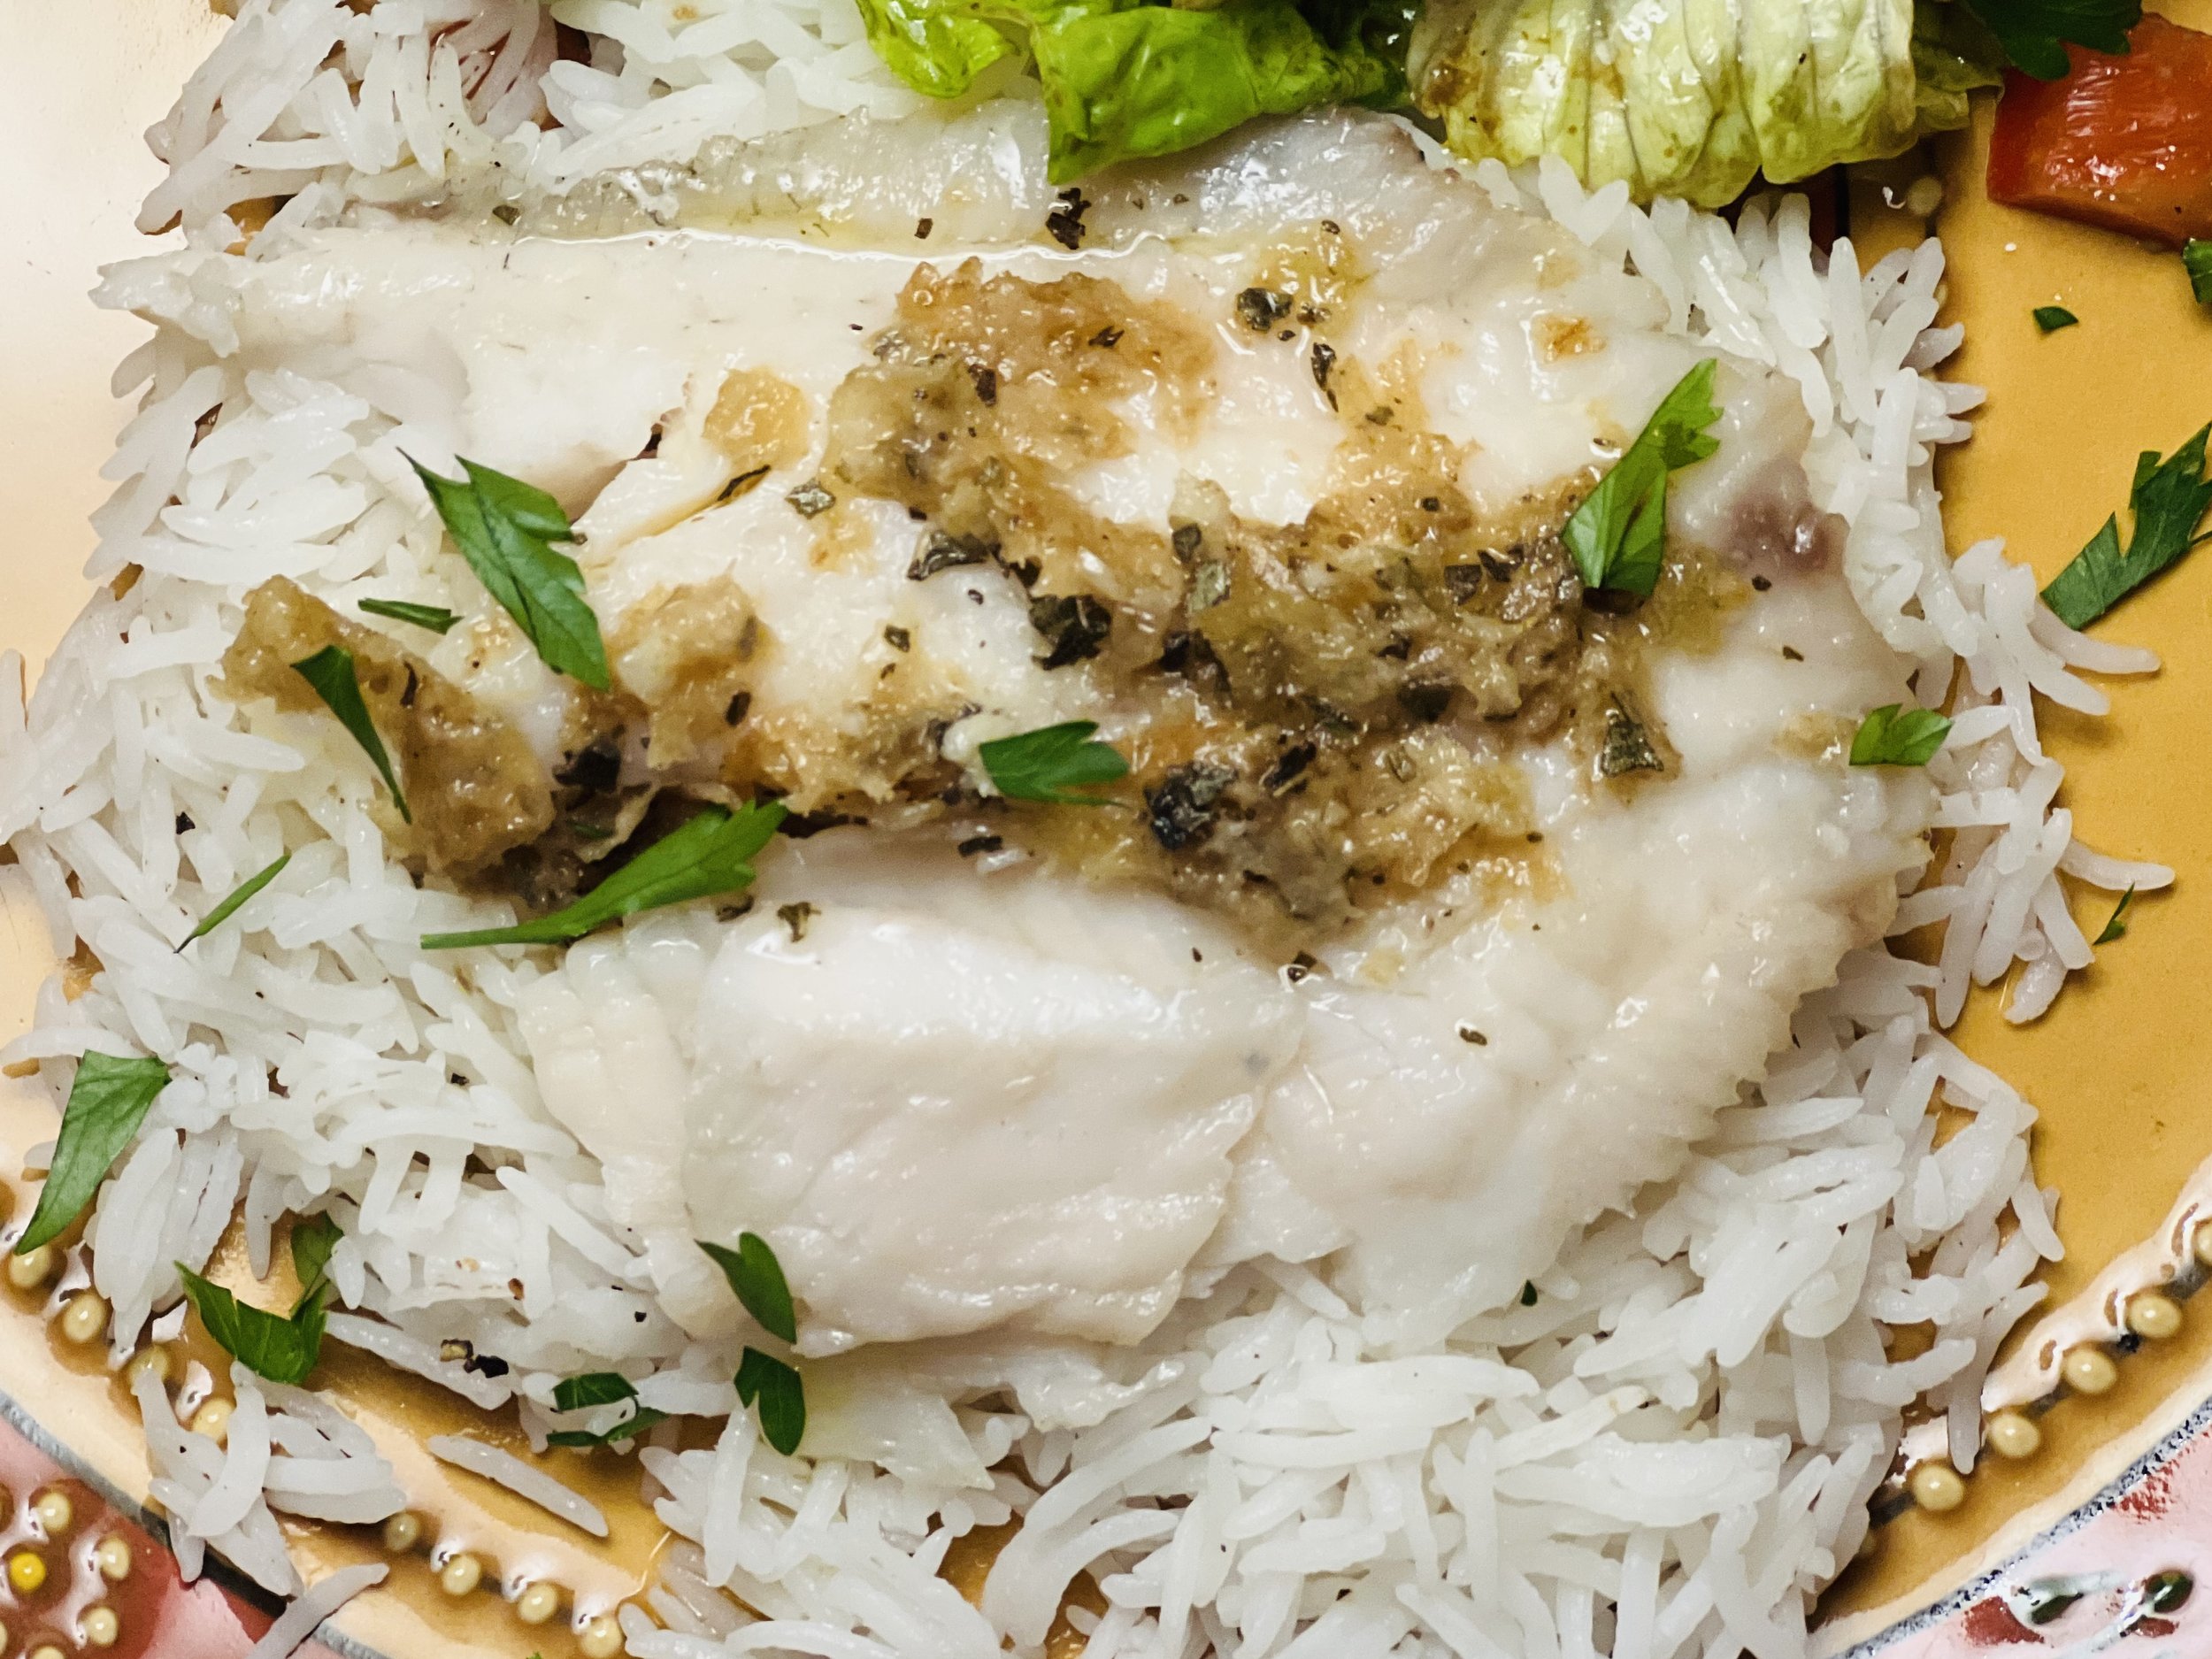
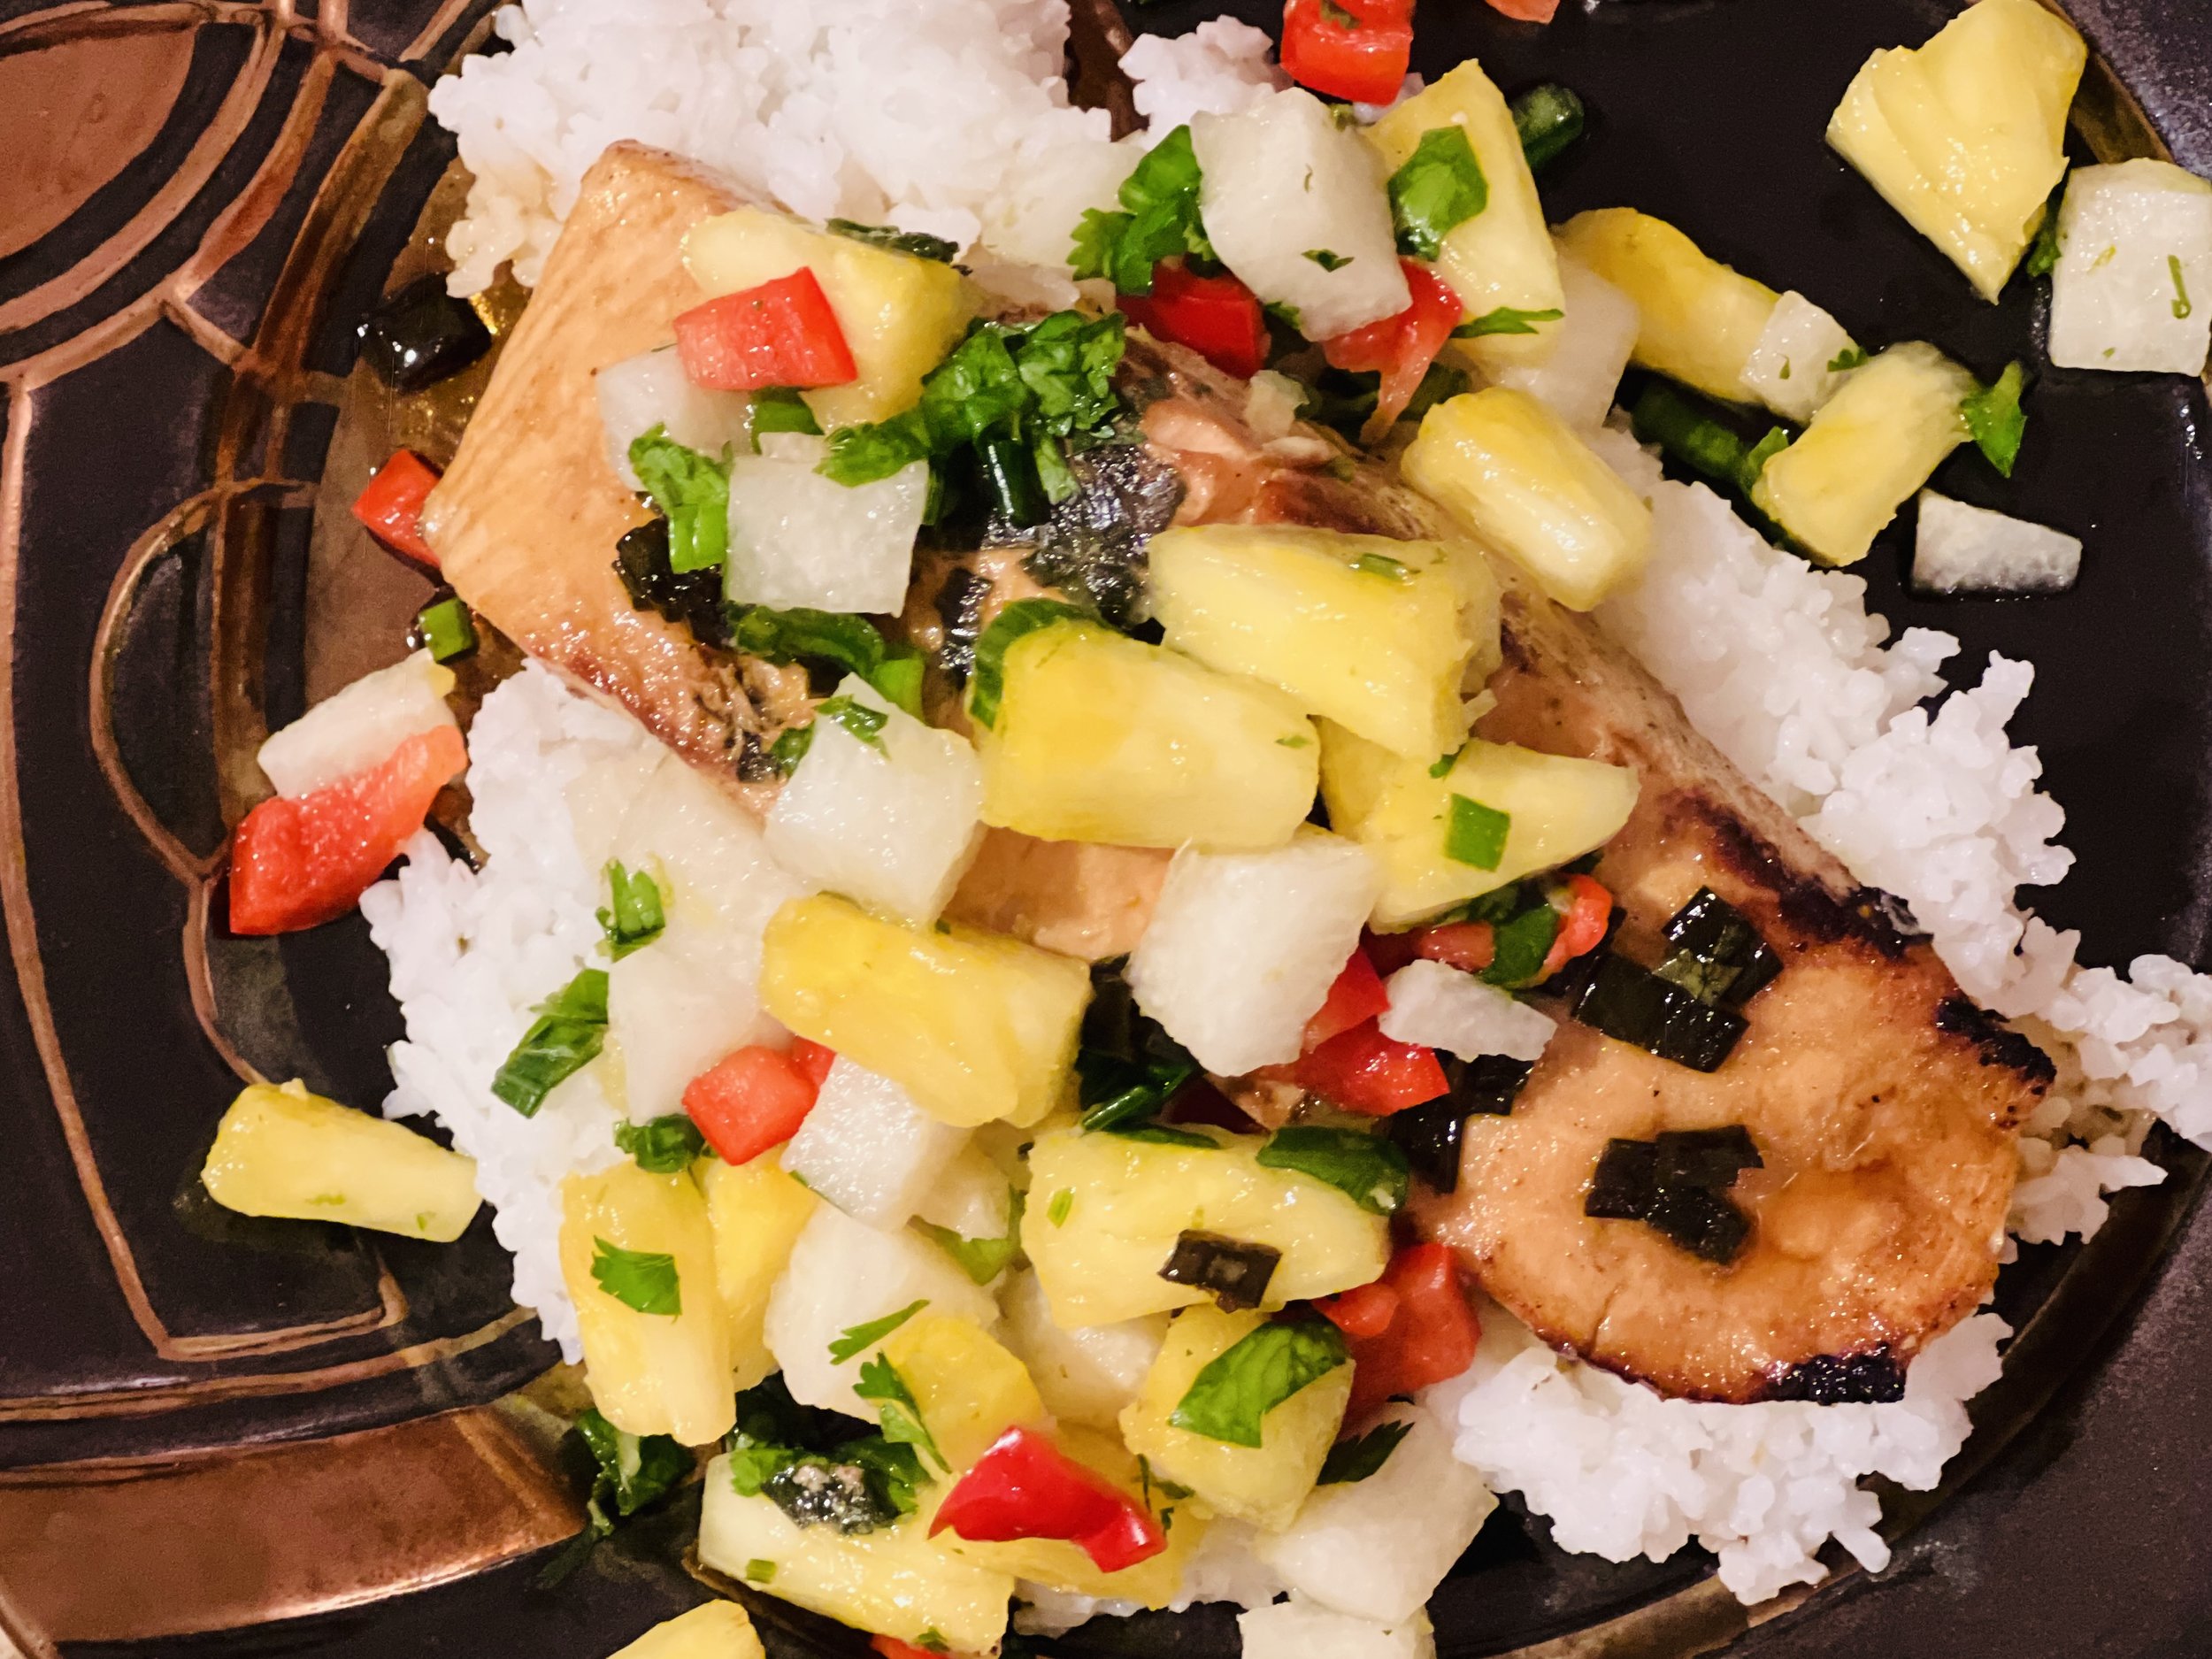
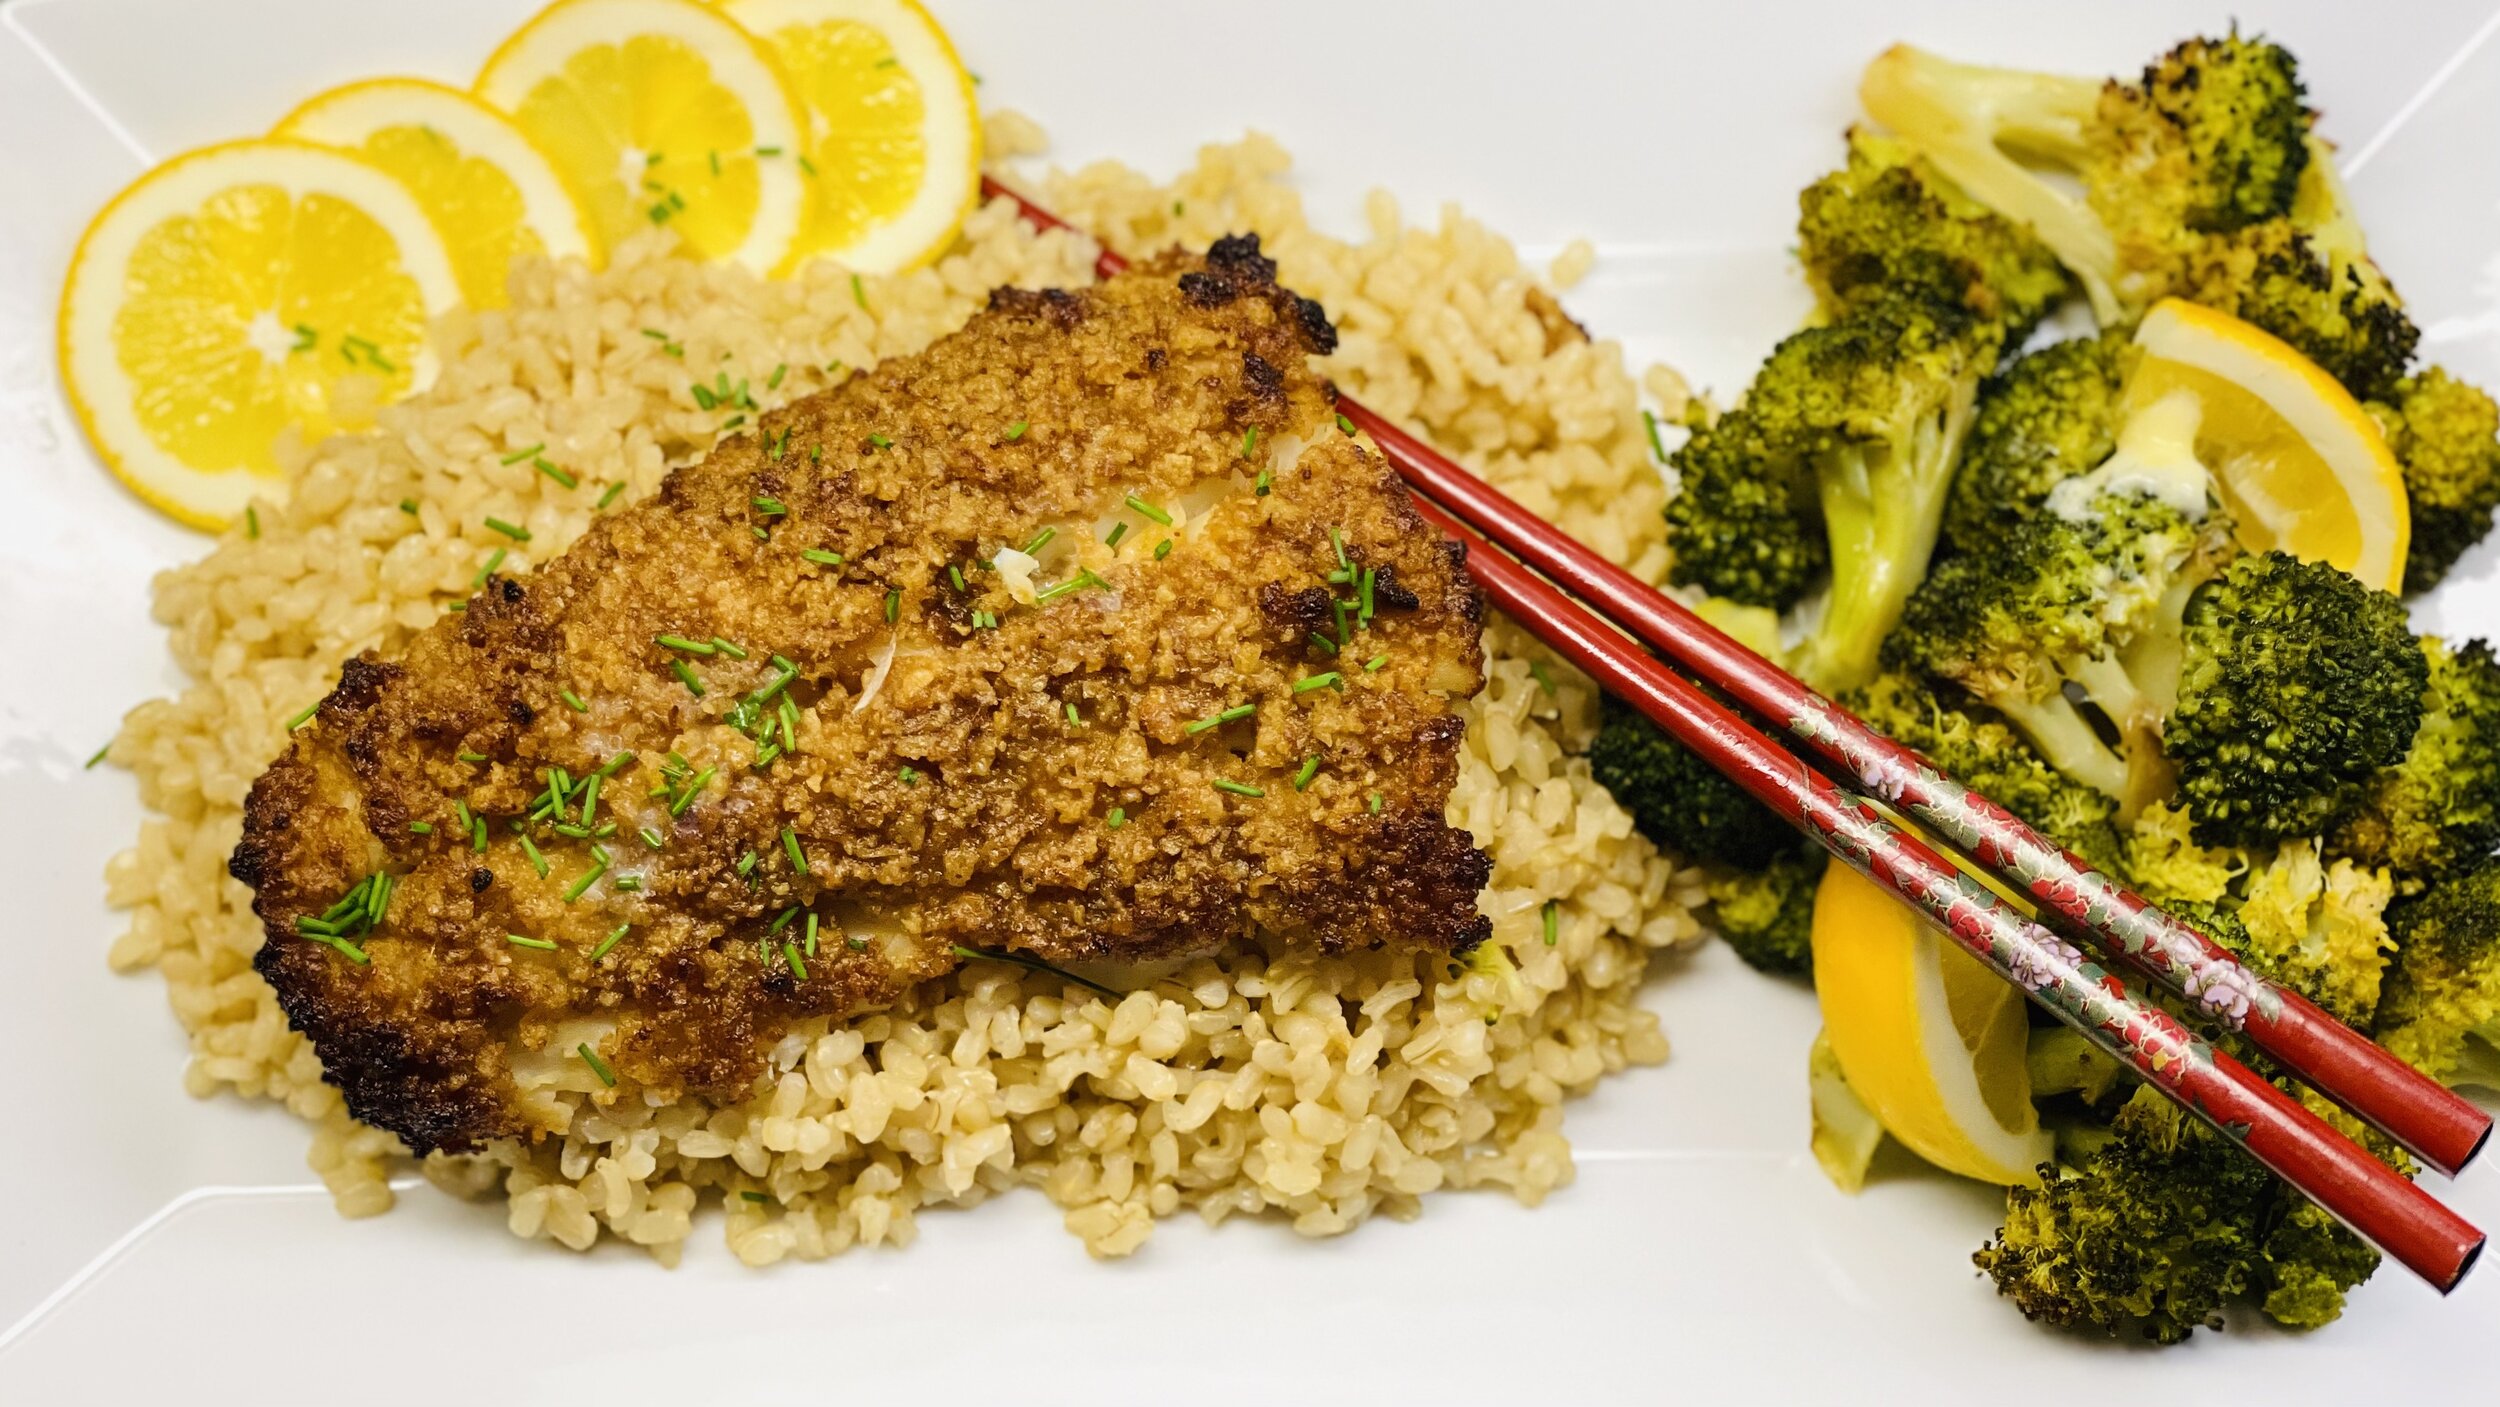
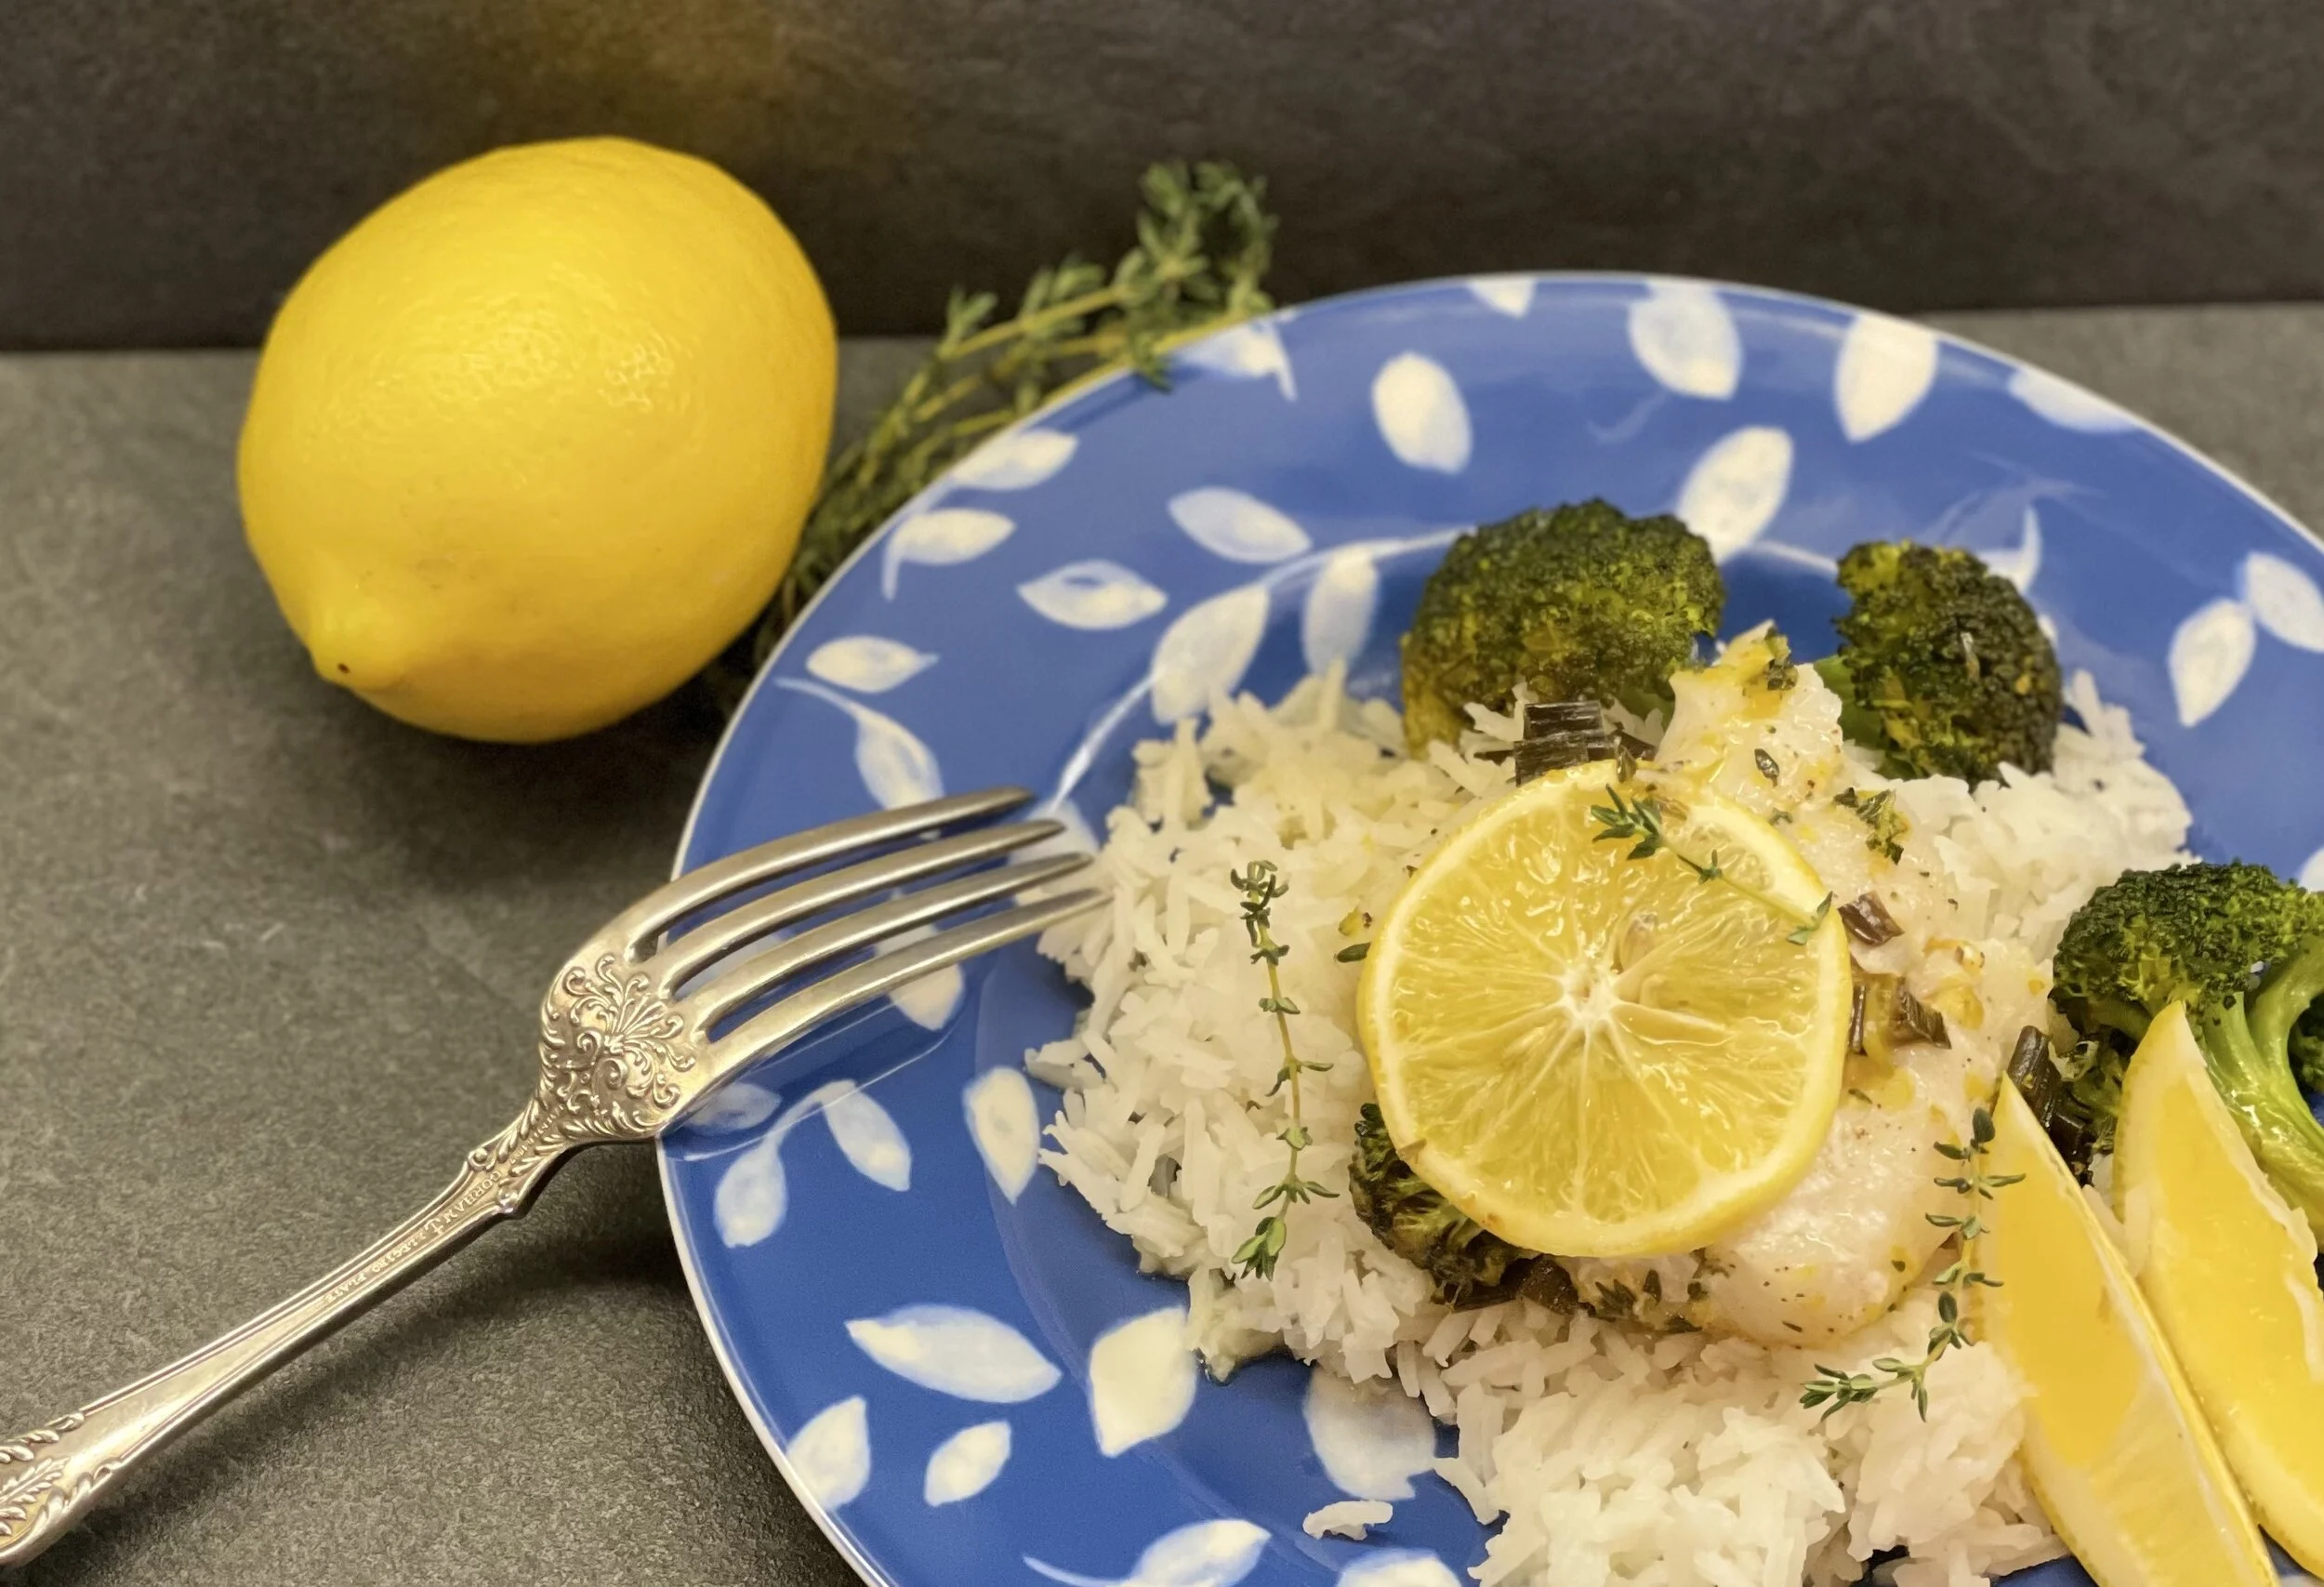
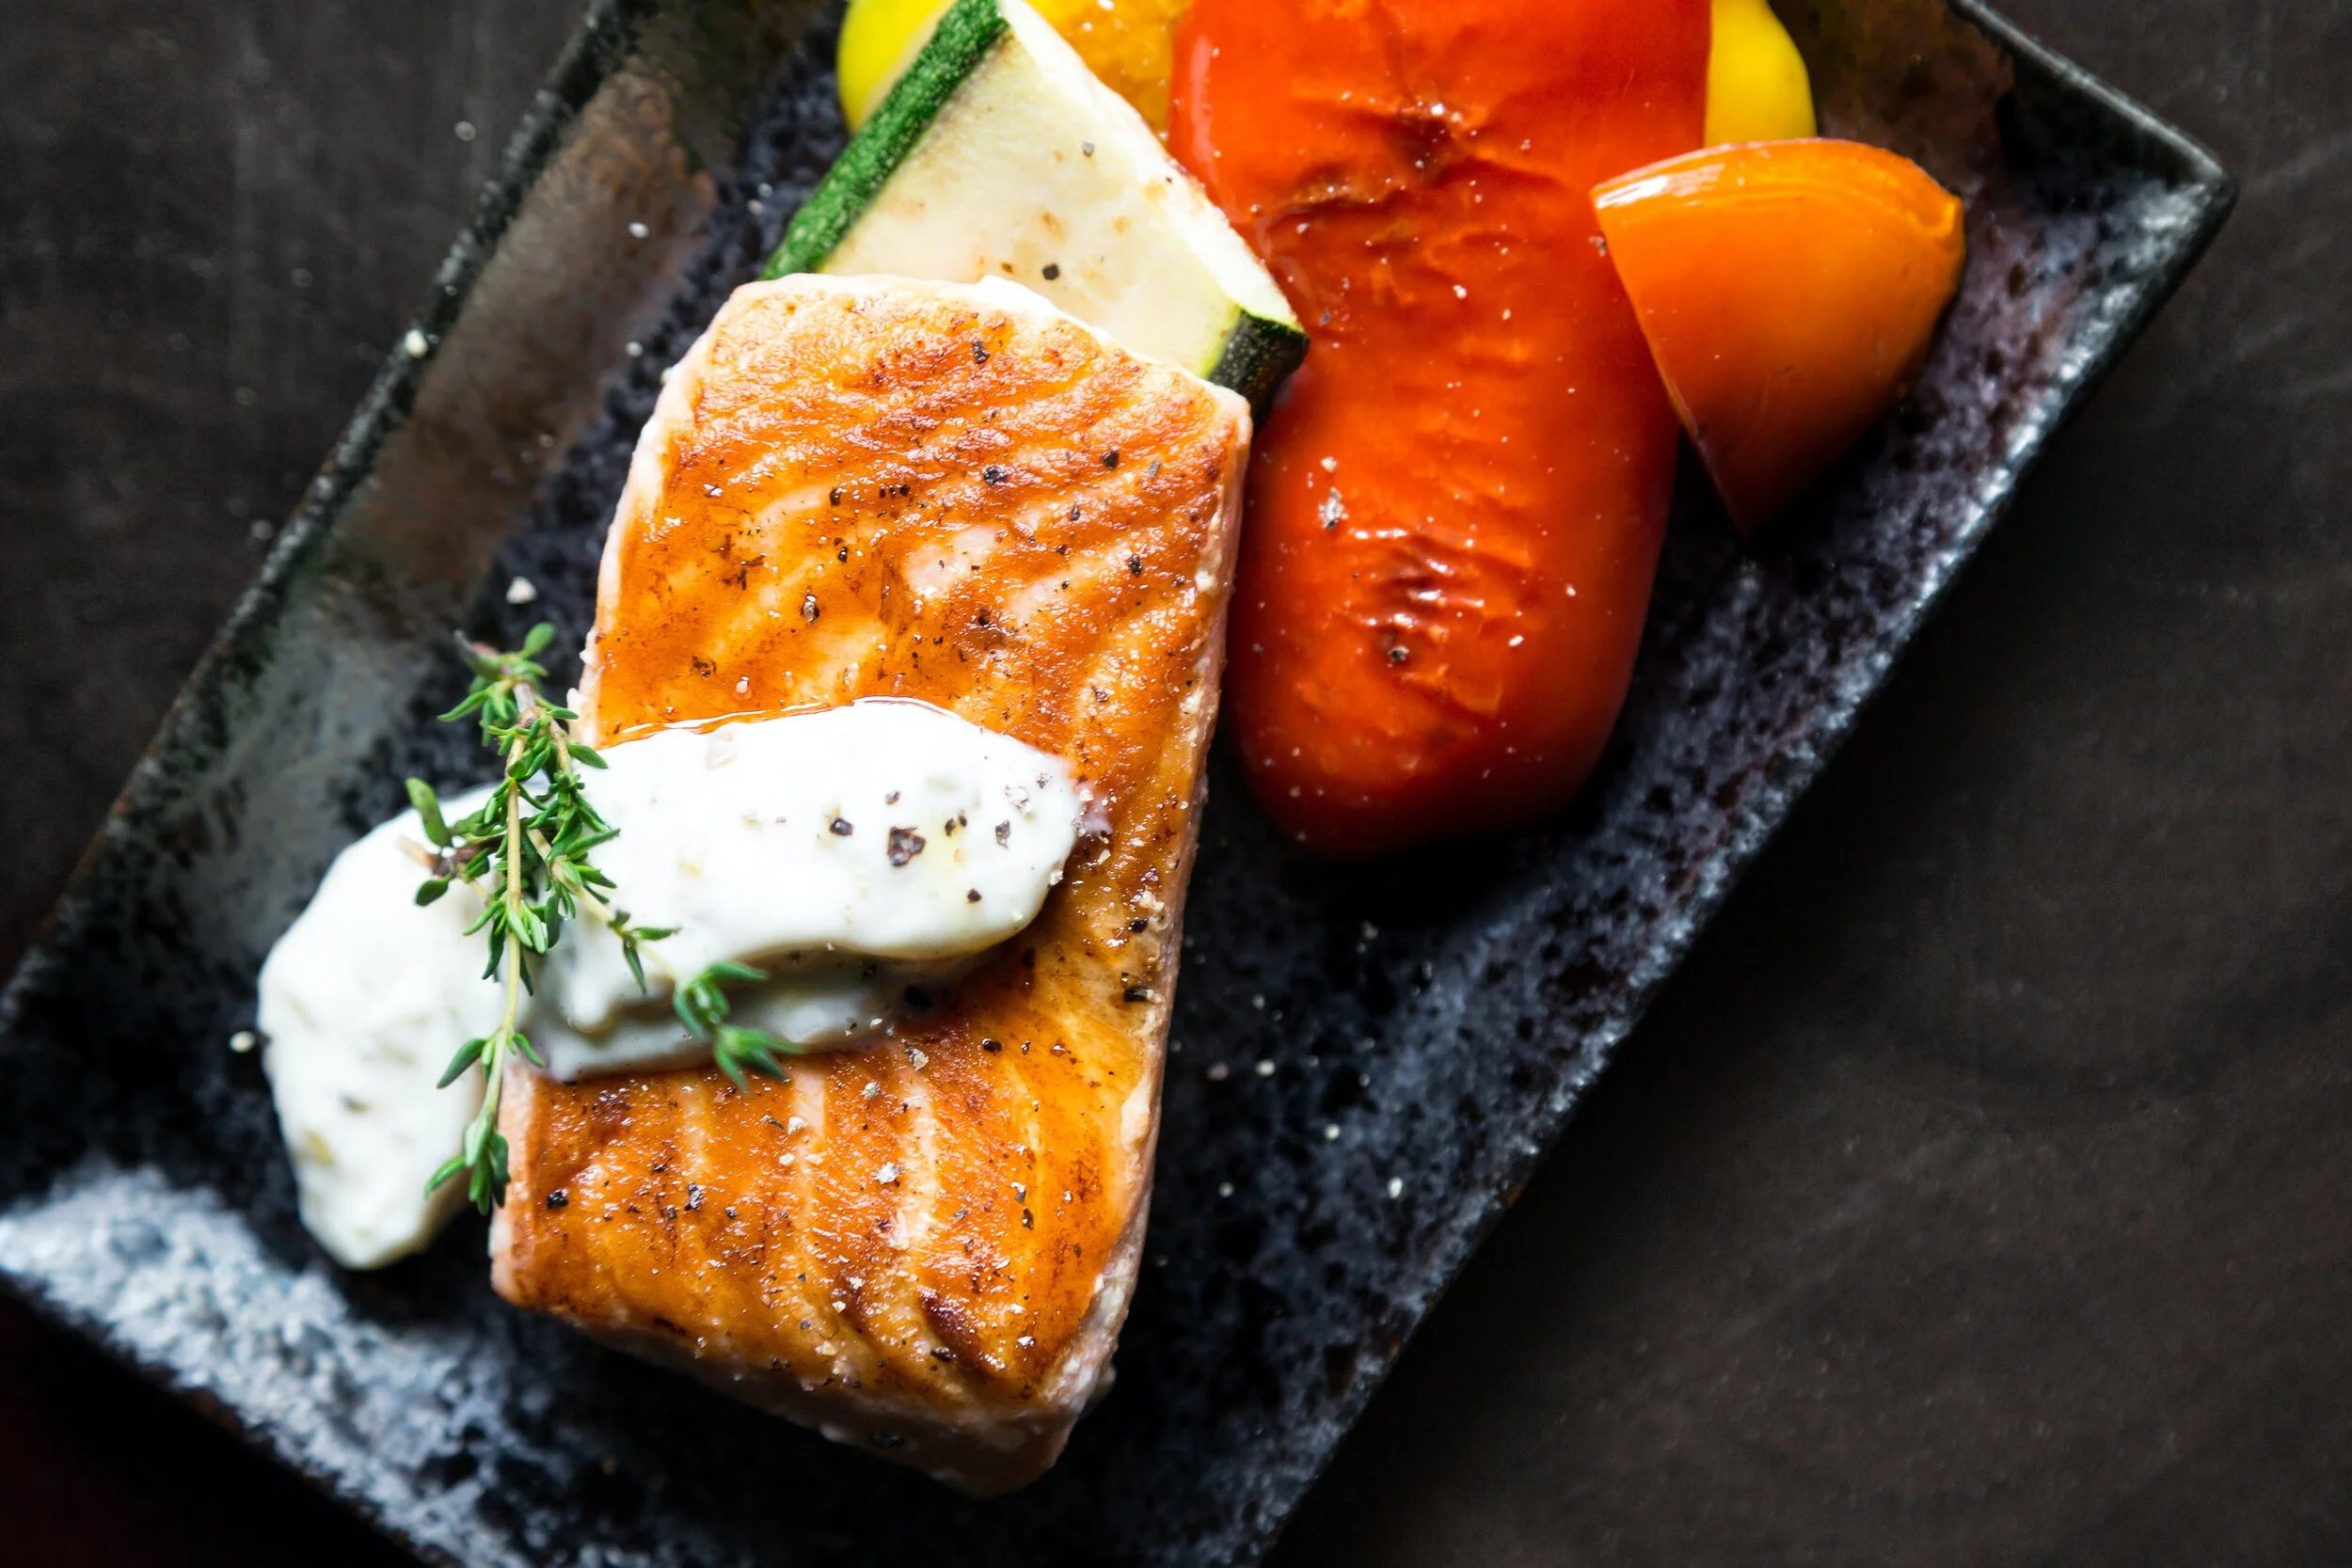
Panko-Crusted Halibut with Sweet Ginger Butter (low FODMAP)
50 Minutes • Low FODMAP • Gluten-Free • Serves 4 • Ok to make-ahead: Steps 1 - 3
50 Minutes • Low FODMAP • Gluten-Free • Serves 4 • Ok to make-ahead: Steps 1 - 3
Halibut is a delicately flavored fish so the miso, ginger, and panko give it a robust flavor and crunch. The brown rice and charred broccoli are ideal pairings with this fish for flavor, texture, and color. This recipe is perfect for outdoor cooking and makes for easy clean-up too. You can, of course, cook it in the oven if you prefer.
Ingredients
1 1/2 cups short-grain brown rice (you may substitute white rice if you prefer)
1 tablespoon salted butter
2 teaspoons peeled, grated ginger
1 tablespoon brown sugar
2 tablespoons unsalted butter, at room temperature
4 teaspoons brown rice miso
3 tablespoons garlic-infused olive oil
1 tablespoon canola oil
1/2 cup gluten-free panko bread crumbs
4 (6-ounce) skinless halibut fillets
1 pound broccoli, florets only, cut into bite-size pieces
1 tablespoon lemon juice
Directions
(1) Pre-heat oven or grill to 375 degrees F.
(2) In a medium saucepan, combine rice, salt, salted butter, and 2 1/4 cups water or stock and bring to a boil. Cover and simmer gently over low heat until the liquid is absorbed, about 45 minutes. Turn off the heat and let stand (covered) for 5 minutes. Fluff with a fork.
(3) In a small bowl, combine ginger, brown sugar, unsalted butter, 2 teaspoons of miso, and 1 tablespoon of garlic-infused olive oil. Mix well, then (if you’re ready to prepare your fish) gently fold in the panko crumbs.
Make-ahead note: At this point, you may put your ginger butter and cooked rice aside until you’re ready to make your fish.
(4) Rub the halibut with 1 tablespoon of canola oil and lightly season with salt and pepper.
(5) Divide the sweet ginger butter and panko mixture equally and sprinkle in an even layer on top of each fillet, pressing gently to adhere.
(6) Place halibut on foil that’s placed directly on your grill grate or on a rimmed baking sheet lined with parchment or foil in your oven. Roast until the top is golden and fish is cooked to an internal temp of 145 degrees, about 12 to 14 minutes.
(7) In a large bowl, toss the remaining 2 tablespoons of garlic-infused olive oil with the broccoli, season with salt and pepper, and spread out on a second rimmed baking sheet. Put in the oven or grill with the fish, stirring once or twice as it cooks, until crisp-tender and charred, about 5 minutes. Stir in lemon juice and keep warm until ready to serve.
(8) To serve, plate with a scoop of the rice and the halibut over the top with the charred broccoli alongside.
Eat and enjoy every bite because you can!
This post may contain affiliate links so you can easily purchase items listed on the page. In some cases, we have provided a special discount code for IBS Game Changers so be sure to use it when you purchase an item to get the discount that has been arranged just for you!
More Deliciously Low FODMAP™ seafood recipes you might enjoy
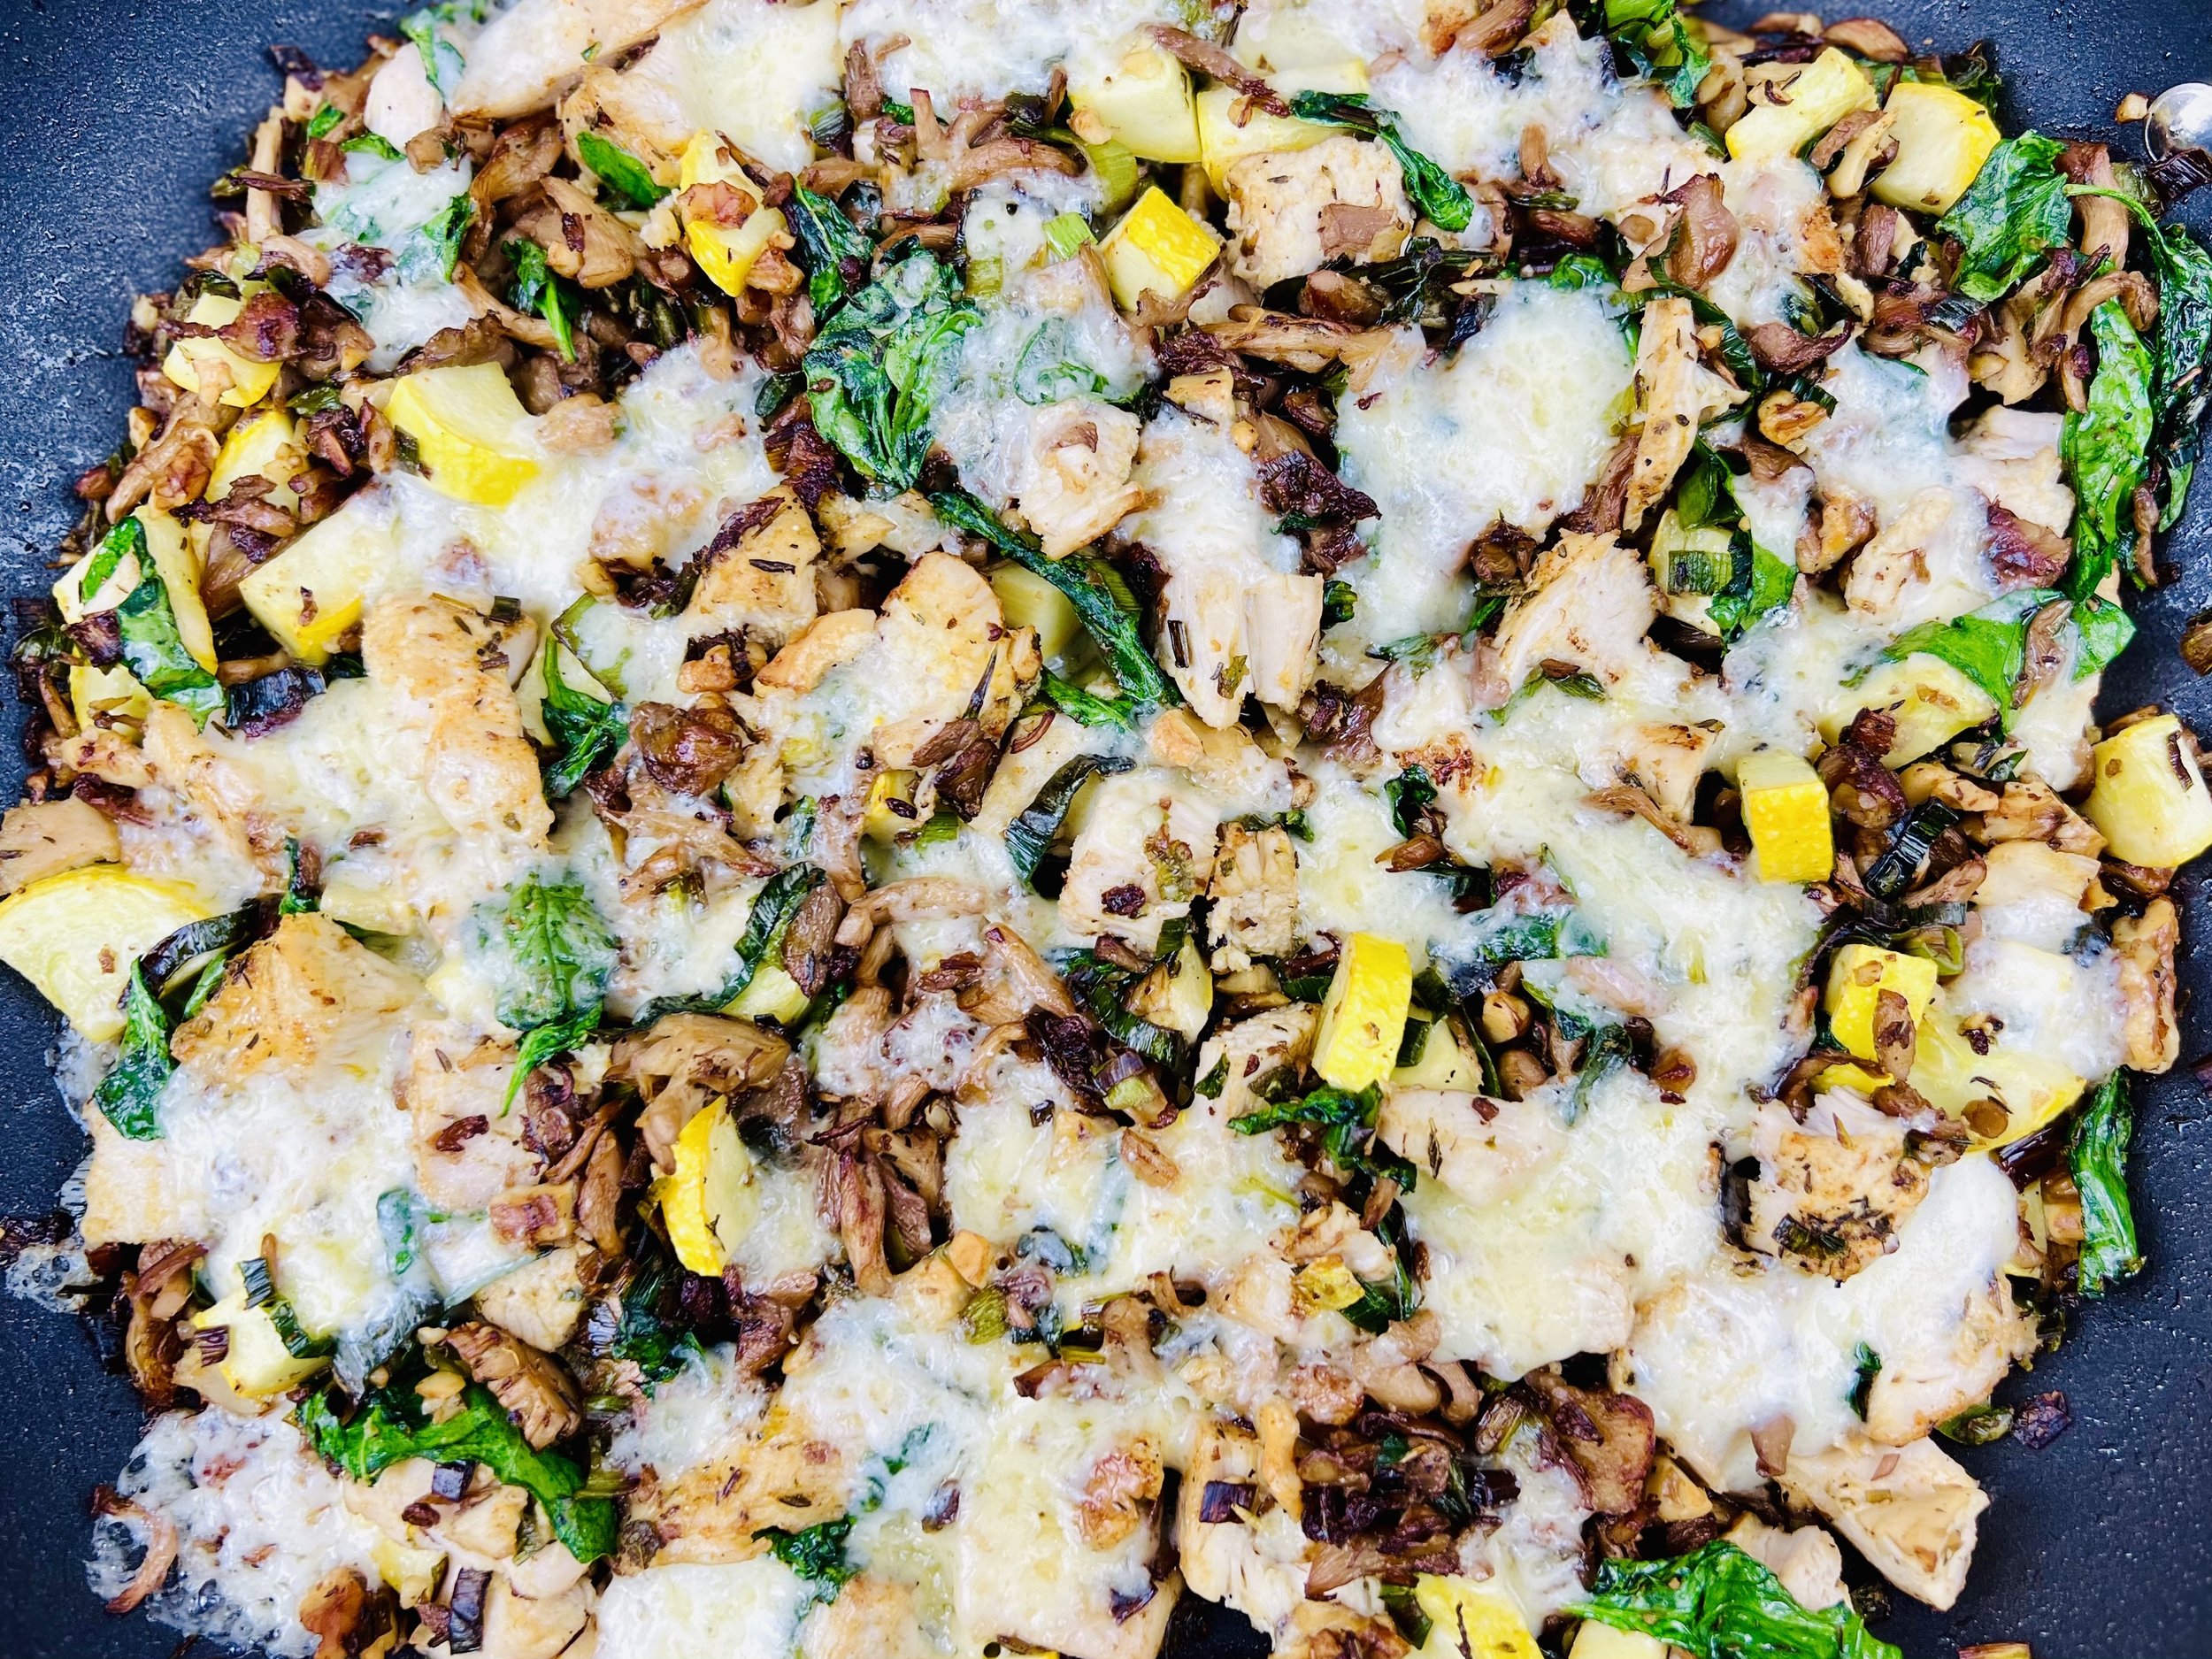
20-Minute Wild Rice and Chicken Hash (low FODMAP)
20 Minutes • Low FODMAP • Gluten-Free • Serves 4 • Ok to make-ahead: Step 1
20 Minutes • Low FODMAP • Gluten-Free • Serves 4 • Ok to make-ahead: Steps 1 - 2
Super good. Super easy. Super fast. Next time you cook blended wild rice for something, make some extra so you can make this hash which comes together in under 20 minutes and makes a perfect quick dinner. It’s hearty, comforting, and full of flavor. The whole family will love it and you’ll love having dinner ready in a snap!
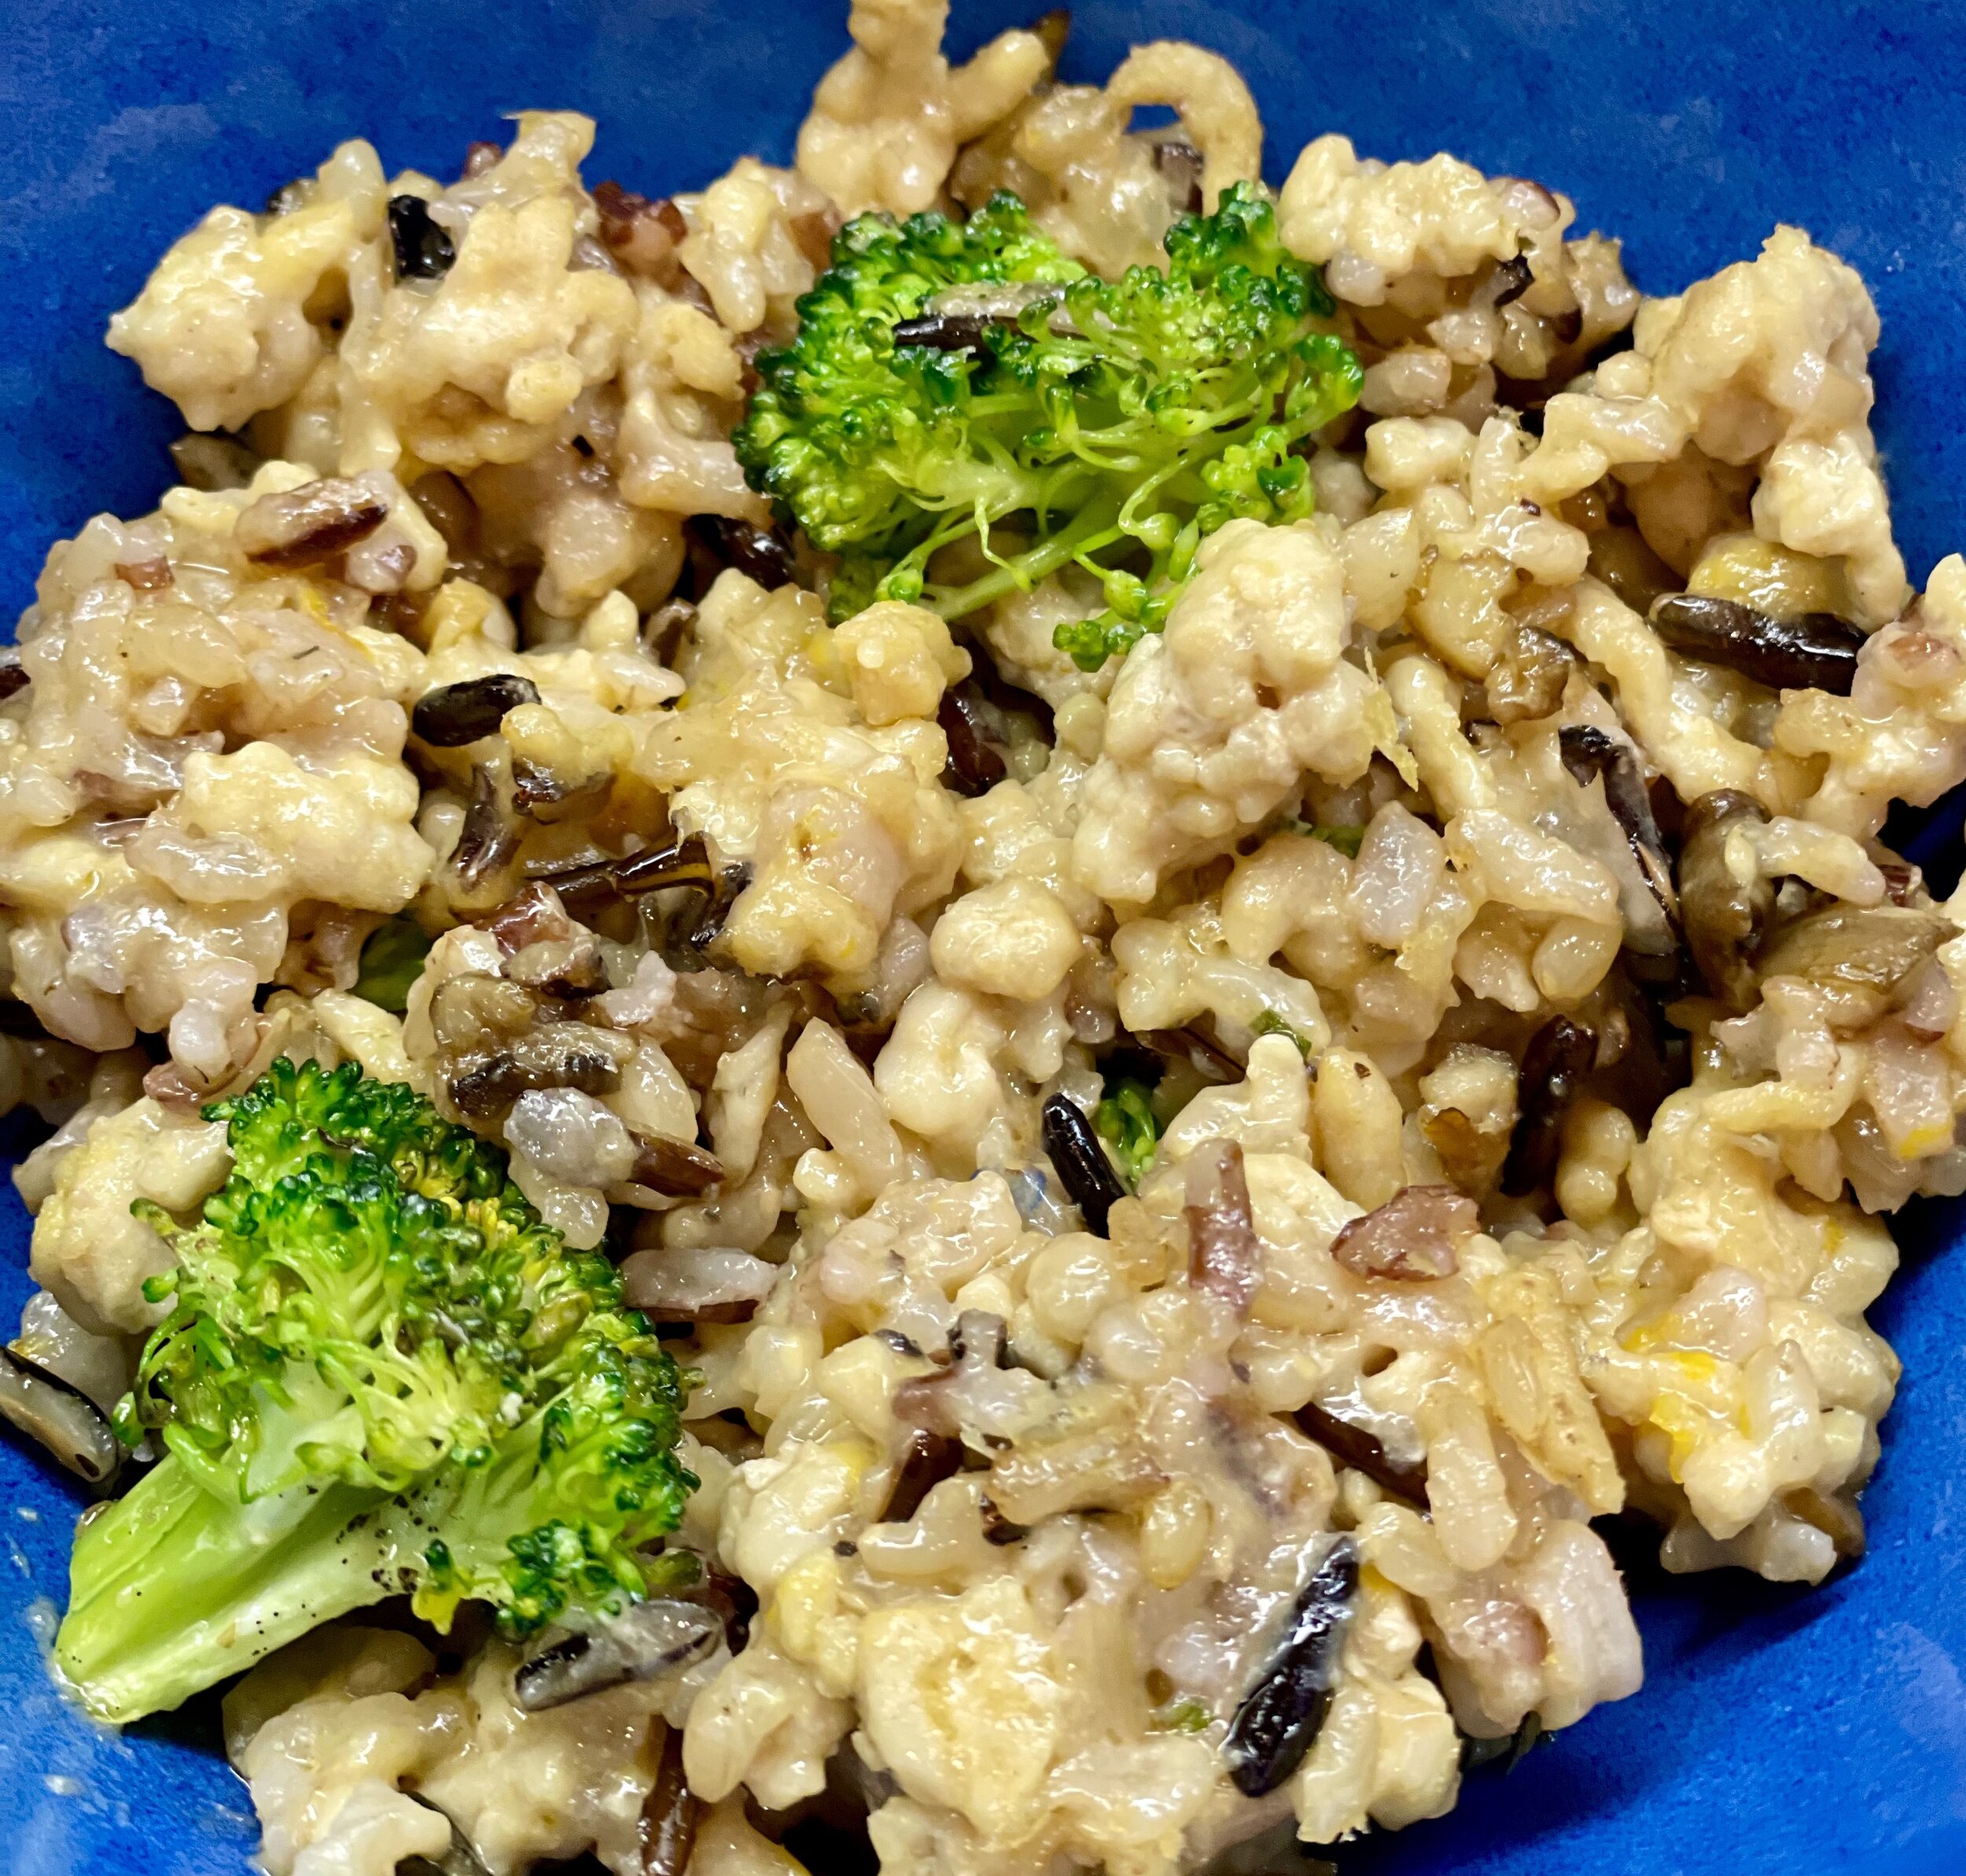
Ingredients
2 cups cooked wild rice blend (preferably cooked in chicken broth)
1 pound ground chicken
2 tablespoons garlic-infused olive oil
1 tablespoon Smoke N Sanity Lemon Pepper (use code IBSGC10 for 10% discount)
Zest of one lemon
1 1/2 cups extra sharp cheddar cheese, grated
1 cup oyster mushrooms, chopped
1 head broccoli, florets only, cut into bite-size pieces
Salt and black pepper to taste
Directions
(1) If you don’t have leftover rice, cook 1 cup (dry) of wild rice blend according to package directions.
(2) Chop the mushrooms and broccoli.
Make-ahead note: At this point, you may put your rice and veggies in the fridge until you’re ready to make the hash.
(3) Heat the olive oil in a large frying pan. When the oil shimmers add the broccoli and sauté for about 5 minutes. Add the mushrooms and continue to cook until the broccoli is tender and the mushrooms start to get a bit crispy.
(4) Once the broccoli is tender (but still bright green), remove the vegetables from the pan.
(5) Add another tablespoon of garlic-infused olive oil to the pan and heat over medium-high heat. When the oil shimmers, add the ground chicken and sauté until the chicken is cooked through.
(6) Add the vegetables and rice to the cooked chicken and heat through. Add the lemon pepper, lemon zest, and grated cheese and stir to combine and melt the cheese. Taste and add additional salt and pepper if needed.
Eat and enjoy every bite because you can!
This post may contain affiliate links so you can easily purchase items listed on the page. In some cases, we have provided a special discount code for IBS Game Changers so be sure to use it when you purchase an item to get the discount that has been arranged just for you!
More Deliciously Low FODMAP™ main courses you might enjoy
45 Minutes • Low FODMAP • Gluten-Free • Serves 4 • Ok to make-ahead: Steps 1 - 4